Connect to Azure AD-secured APIs in SharePoint Framework solutions
When building SharePoint Framework solutions, you might need to connect to an API secured by using Azure Active Directory (Azure AD). SharePoint Framework allows you to specify which Azure AD applications and permissions your solution requires, and a global or SharePoint administrator can grant the necessary permissions if they haven't yet been granted. By using the AadHttpClient, you can easily connect to APIs secured by using Azure AD without having to implement the OAuth flow yourself.
Web API permissions overview
Azure AD secures a number of resources, from Microsoft 365 to custom line-of-business applications built by the organization. To connect to these resources, applications must obtain a valid access token that grants them access to a particular resource. Applications can obtain an access token as part of the OAuth authorization flow.
Client-side applications that are incapable of storing a secret, such as SharePoint Framework solutions, use a specific type of OAuth flow named OAuth implicit flow.
Developers building client-side solutions are responsible for implementing authorization by using the OAuth implicit flow in their application. In SharePoint Framework solutions, that's already done as part of the framework through MSGraphClient and AadHttpClient, both of which are introduced in SharePoint Framework v1.4.1.
Note
If you build solutions on a version of the SharePoint Framework earlier than v1.4.1, you can still connect to resources secured with Azure AD. In this case, you need to implement the OAuth implicit flow by directly using Microsoft identity platform authentication libraries. For more information, see Connect to Azure AD-secured APIs in SharePoint Framework solutions.
As part of the SharePoint Framework, a specific process is defined for how developers can request permissions and administrators can manage permissions to resources secured with Azure AD. The following schema illustrates this process.
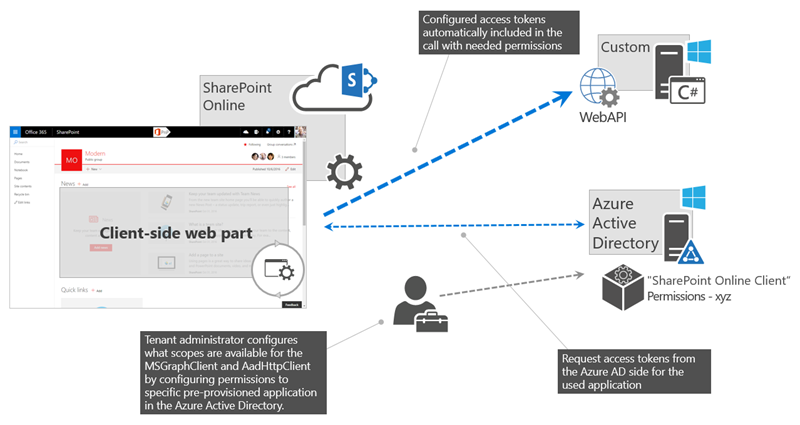
Developers building a SharePoint Framework solution that requires access to specific resources secured with Azure AD list these resources along with the required permission scopes in the solution manifest. When deploying the solution package to the app catalog, SharePoint creates permission requests and prompts the administrator to manage the requested permissions. For each requested permission, a global or SharePoint administrator can decide whether they want to grant or deny the specific permission.
All permissions are granted to the whole tenant and not to a specific application that has requested them. When the administrator grants a specific permission, its added to the SharePoint Online Client Extensibility Azure AD application, which is provisioned by Microsoft in every Azure AD and which is used by the SharePoint Framework in the OAuth flow to provide solutions with valid access tokens.
Discover available applications and permissions
The target Azure AD that secures your Microsoft 365 tenant determines which applications you can request permissions for in your solution. The list of available applications might depend on the Microsoft 365 license that the organization is using and which line-of-business applications they registered in Azure AD. If you have sufficient permissions, there are several ways that you can see which applications and permission scopes are available in your tenant.
Use Azure portal or Azure AD admin center
One way to see the available applications in Azure AD is by navigating to the Azure portal or to the Azure AD admin center.
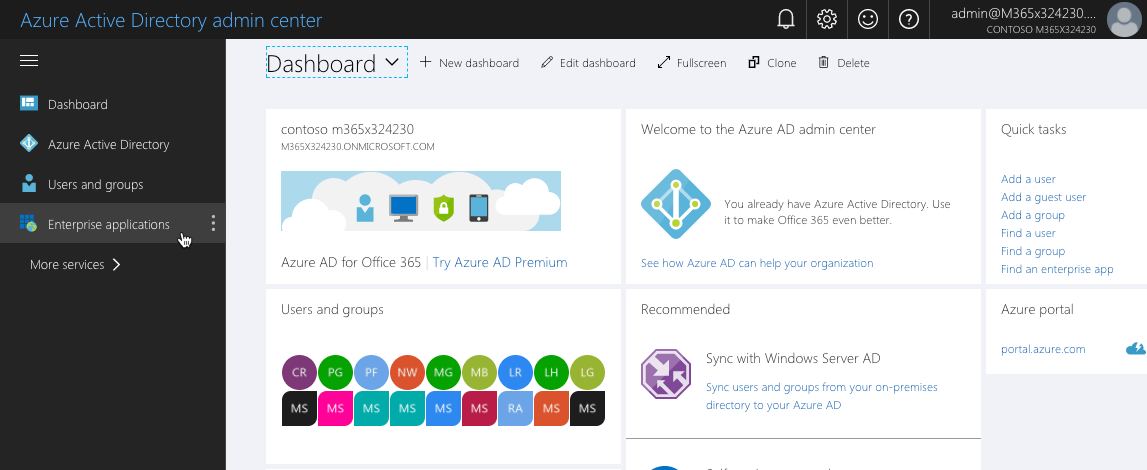
In the Azure AD admin center, in the left navigation, select the Enterprise applications link.
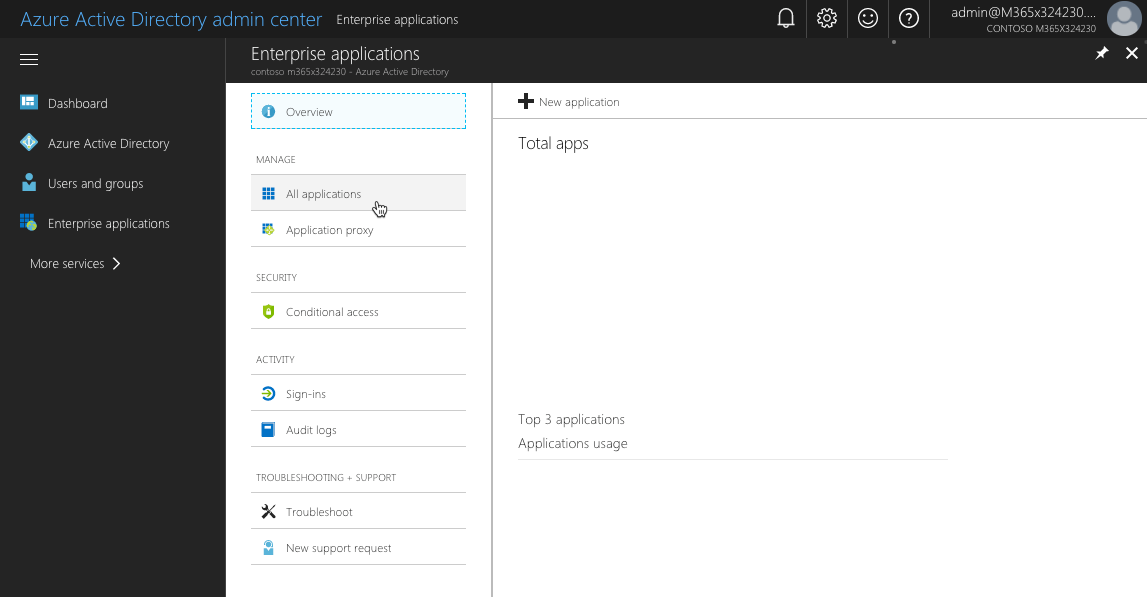
On the Enterprise applications blade, in the Manage group, select the All applications link.
To quickly find the application to which you want to connect, you can filter the overview either by application type (Microsoft Applications or Enterprise Applications), or you can search for it by using its name or ID.
For example, if you want to request additional permissions to the Microsoft Graph, in the search box you would search for
graph.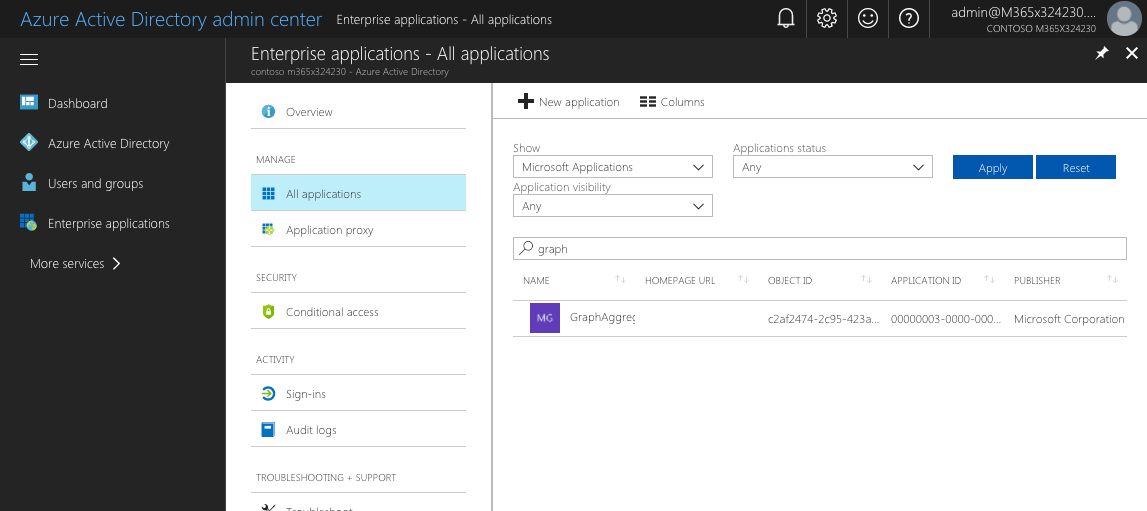
After you find the application, select it to get additional information. On the application's blade, in the Manage group, select Properties to open the application's properties.
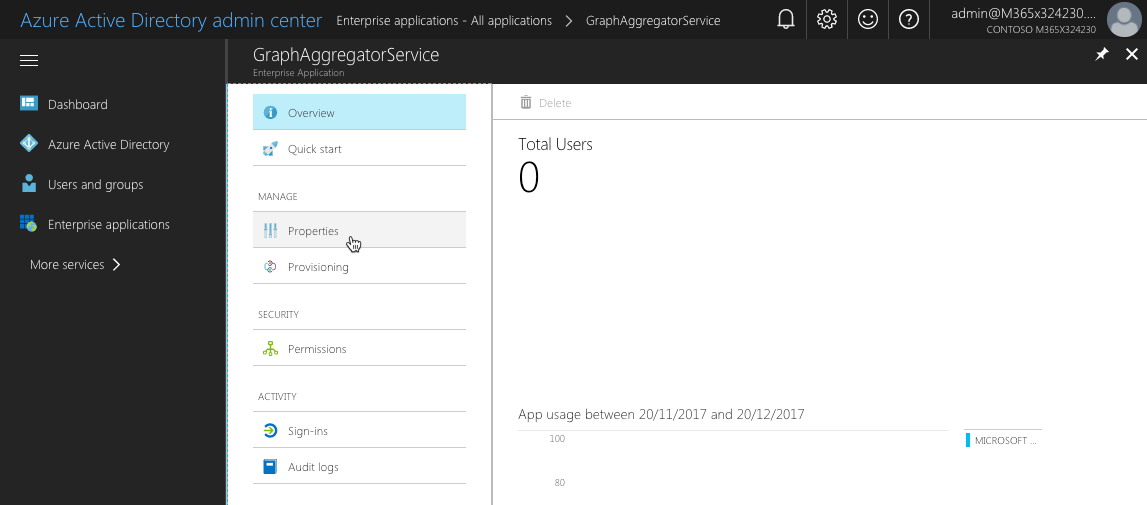
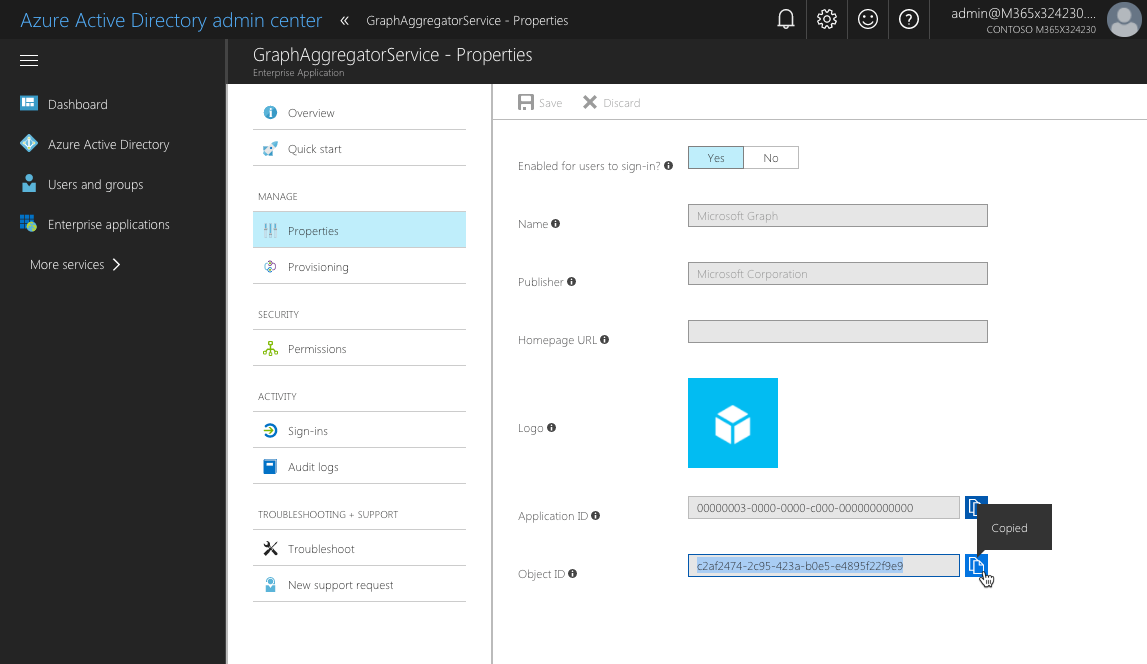
From the list of properties, copy the value of the Object ID property, which you need to request additional permission scopes to the Microsoft Graph. Instead, you can copy the application's Name and use it in the permission request instead.
Note
While the Object ID is unique for each tenant, the application's Name is the same across all tenants. If you want to build your solution once and deploy it to different tenants, you should use the application's Name when requesting additional permissions in your solution.
Use Azure PowerShell
Note
Before you can execute the following steps, you must install Azure PowerShell. Alternatively, you can execute the cmdlets mentioned in this section in the Azure Cloud Shell PowerShell.
Sign in to your Azure subscription by executing in PowerShell (this isn't necessary if you're using the Azure Cloud Shell):
Login-AzureRmAccountEnter the following to list the applications available in your tenant:
Get-AzureRmADServicePrincipal | sort DisplayName | ft DisplayName, IdRunning this cmdlet lists all applications available in your tenant. For each application, its display name and object ID are displayed, which you can use in your SharePoint Framework solution to request application permissions.
Use Azure CLI
Note
Before you can execute the following steps, you must install the Azure CLI. Alternatively, you can run the Azure CLI through the Azure Cloud Shell or as a Docker container.
If you're running the CLI on your machine or in a Docker container, start by connecting to your Azure subscription by executing:
azure loginAfter you're connected, execute the following command to list all available Azure AD applications:
azure ad sp list --query "sort_by([*].{displayName: displayName, objectId: objectId}, &displayName)" -o tableRunning this command lists all Azure AD applications available in your tenant, sorted by displayName. For each application, the command displays its displayName and objectId. Additionally, the output is formatted as a table.
Get the list of permission scopes exposed by the application
Each Azure AD application exposes a number of permission scopes. These permission scopes often relate to specific resources or operations inside the application. To get the list of permissions available for the application you would like to connect to, consult its documentation. For the list of permission scopes available in the Microsoft Graph, see Microsoft Graph permissions reference.
Request permissions to an Azure AD application
If your SharePoint Framework solution requires permissions to specific resources secured with Azure AD, such as Microsoft Graph or enterprise applications, you can specify these resources along with the necessary permissions in the configuration of your solution.
In your SharePoint Framework project, open the config/package-solution.json file.
To the
solutionproperty, add thewebApiPermissionRequestsproperty that lists all the resources and corresponding permissions that your solution needs.Following is an example of a SharePoint Framework solution requesting access to read user calendars by using the Microsoft Graph:
{
  "$schema": "https://developer.microsoft.com/json-schemas/spfx-build/package-solution.schema.json",
  "solution": {
    "name": "spfx-graph-client-side-solution",
    "id": "5d16587c-5e87-44d7-b658-1148988f212a",
    "version": "1.0.0.0",
    "includeClientSideAssets": true,
    "skipFeatureDeployment": true,
    "webApiPermissionRequests": [
      {
        "resource": "Microsoft Graph",
        "scope": "Calendars.Read"
      }
    ]
  },
  "paths": {
    "zippedPackage": "solution/spfx-graph.sppkg"
  }
}
Note
For the value of the
resourceproperty, you need to specify thedisplayNameof the application to which you want to request permissions. If you specify the resource using itsobjectId, you will get an error when trying to approve the permission request.If you want to request multiple permission scopes for the given resource, specify each scope in a separate entry, for example:
{
  "$schema": "https://developer.microsoft.com/json-schemas/spfx-build/package-solution.schema.json",
  "solution": {
    "name": "spfx-graph-client-side-solution",
    "id": "5d16587c-5e87-44d7-b658-1148988f212a",
    "version": "1.0.0.0",
    "includeClientSideAssets": true,
    "skipFeatureDeployment": true,
    "webApiPermissionRequests": [
      {
        "resource": "Microsoft Graph",
        "scope": "Calendars.Read"
      },
      {
        "resource": "Microsoft Graph",
        "scope": "User.ReadBasic.All"
      }
    ]
  },
  "paths": {
    "zippedPackage": "solution/spfx-graph.sppkg"
  }
}
When this solution is deployed to the SharePoint app catalog, it prompts the administrator to verify the requested permissions and either grant or deny them.
Note
No matter if the administrator denies or approves the requested permissions, the solution can be deployed and used on sites. When building solutions that require additional permissions, you should never assume that the requested permissions have been granted.
Requesting permissions to Azure AD applications in another tenant
The previous steps address adding a permission request to an Azure AD application defined in the same Azure AD tenant as your SharePoint Online tenant. However, when you want to grant a permission for an Azure AD application defined in another tenant (a multitenant Azure AD application), you must first add a service principal for that Azure AD application to your tenant.
Note
This capability was added in the SPFx v1.15.2 release.
Important
Azure AD applications have two types of principals. The application object is created when the Azure AD app is created; it is a global representation of the application across all tenants.
Permissions are granted to service principals which are the local representation of the app for use in a specific tenant.
When you create an Azure AD application in a tenant, both the application object & service principal are created in that tenant. But when you want to use the Azure AD application in another tenant, you must create a service principal for that application in your tenant.
To learn more about Azure AD application principals, objects, and service principals, see: Application and service principal objects in Azure Active Directory.
To learn more about single and multitenant Azure AD applications, see: Tenancy in Azure Active Directory.
When you want to grant SharePoint Online permissions to an Azure AD application defined to another tenant, the service principal needs to already exist on the tenant where SharePoint Online operates. Prior to SPFx v1.15.2, , SharePoint expected the service principal already existed. But SPFx v1.15.2 introduced a way to register the service principal during the permission request approval process.
To do this, you must include two additional properties in the SPFx project's package-solution.json file's webApiPermissionRequests entry:
{
  "$schema": "https://developer.microsoft.com/json-schemas/spfx-build/package-solution.schema.json",
  "solution": {
  ..
  "webApiPermissionRequests": [
    {
      "resource": "<API name as it's registered in Azure AD>",
      "scope": "<required permission scope>",
      "appId": "<GUID>",
      "replyUrl": "<URL>"
    }
  ]
  ..
The two additional properties are:
appId: This is the application object's ID for which a service principal will get created in the tenant.replyUrl: This is the URL used by Azure AD during the consent and registration experience of the permission request.
Important
If either appid or replyUrl are included, they are both required. In other words, include both properties (if you're referencing an Azure AD app registered in another tenant from your SharePoint Online tenant) or neither property (if you're referencing an Azure AD app registered in the same tenant as your SharePoint Online tenant).
Manage permission requests
When you deploy SharePoint Framework solutions that request permissions to Azure AD applications, administrators are prompted to manage the permission request provided with the solution. Permission requests can be managed in several ways.
Manage permissions in the new SharePoint admin center
To learn how to use the API access page in the new SharePoint admin center, see Manage access to Azure AD-secured APIs.
Manage permissions with PowerShell
Global and SharePoint administrators can also use the SharePoint Online Management Shell to manage permissions and permission requests in SharePoint Online.
To view all pending permission requests, use the Get-SPOTenantServicePrincipalPermissionRequests cmdlet. For each permission request, the cmdlet lists its ID (required to either approve or deny the request), the resource for which permissions have been requested, and the requested permissions.
Note
SharePoint doesn't verify if the requested permissions have already been granted or not, so before approving or rejecting a permission request, check which permissions have already been granted in your tenant.
To approve the specific permission request, use the Approve-SPOTenantServicePrincipalPermissionRequest -RequestId <Guid> cmdlet, specifying the ID of the permission request that you want to approve.
Note
If you try to approve a request for a permission that has already been granted, you get an error.
To deny a permission request (if the requested permission has already been granted, or the request is against your organizational policies), use the Deny-SPOTenantServicePrincipalPermissionRequest -RequestId <Guid> cmdlet, specifying the ID of the permission request that you want to deny.
Note
Denying a permission request issued by a SharePoint Framework application doesn't prevent that application from being deployed in the app catalog and installed on sites.
To view which permissions have been granted in your tenant, use the Get-SPOTenantServicePrincipalPermissionGrants cmdlet. For each grant, the cmdlet displays the following information:
- ClientId: The objectId of the service principal granted consent to impersonate the user when accessing the resource (represented by the resourceId).
- ConsentType: Whether consent was provided by the administrator for the organization or whether consent was provided by an individual. The possible values are "AllPrincipals" or "Principal".
- ObjectId: The unique identifier for the permission grant.
- Resource: The resource to which access has been granted.
- ResourceId: The objectId of the resource service principal to which access has been granted.
- Scope: The value of the scope claim that the resource application should expect in the OAuth 2.0 access token.
To revoke a previously granted permission, use the Revoke-SPOTenantServicePrincipalPermission -ObjectId <String> cmdlet. In the ObjectId parameter, you should specify the objectId of the grant that you want to revoke, which you can obtain by using the Get-SPOTenantServicePrincipalPermissionGrants cmdlet.
Note
Revoking a permission doesn't trigger any changes to the app catalog or any of the deployed applications. The only consequence of revoking a permission is that any application used in the tenant will not be able to connect to the resources for which the permission has been revoked.
Manage permissions using the CLI for Microsoft 365
Global and SharePoint administrators can use the CLI for Microsoft 365 to manage permissions and permission requests in SharePoint Online.
Note
The CLI for Microsoft 365 is an open-source solution with active community providing support for it. There is no SLA for the open-source tool support from Microsoft.
To view all pending permission requests, use the spo serviceprincipal permissionrequest list command. For each permission request, the command lists its ID (required to either approve or deny the request), the resource for which permissions have been requested, and the requested permissions.
Note
SharePoint doesn't verify if the requested permissions have already been granted or not, so before approving or rejecting a permission request, check which permissions have already been granted in your tenant.
To approve a specific permission request, use the spo serviceprincipal permissionrequest approve command, specifying the ID of the permission request that you want to approve.
Note
If you try to approve a request for a permission that has already been granted, you get an error.
To deny a permission request (if the requested permission has already been granted, or the request is against your organizational policies), use the spo serviceprincipal permissionrequest deny command, specifying the ID of the permission request that you want to deny.
Note
Denying a permission request issued by a SharePoint Framework application doesn't prevent that application from being deployed in the app catalog and installed on sites.
To view which permissions have been granted in your tenant, use the spo serviceprincipal grant list command. For each grant, the command displays the following information:
- ObjectId: The unique identifier for the permission grant.
- Resource: The resource to which access has been granted.
- ResourceId: The objectId of the resource service principal to which access has been granted.
- Scope: The value of the scope claim that the resource application should expect in the OAuth 2.0 access token.
To revoke a previously granted permission, use the spo serviceprincipal grant revoke command. In the grantId parameter, specify the objectId of the grant that you want to revoke, which you can obtain by using the spo serviceprincipal grant list command.
Note
Revoking a permission doesn't trigger any changes to the app catalog or any of the deployed applications. The only consequence of revoking a permission is that any application used in the tenant will not be able to connect to the resources for which the permission has been revoked.
Connect to Azure AD applications using the AadHttpClient
Introduced in v1.4.1, the SharePoint Framework simplifies connecting to APIs secured with Azure AD. Using the new AadHttpClient, you can easily connect to APIs secured with Azure AD without having to implement authentication and authorization yourself.
Internally, the AadHttpClient implements the Azure AD OAuth flow leveraging Microsoft identity platform authentication libraries by using the SharePoint Online Client Extensibility service principal to obtain a valid access token. The SharePoint Online Client Extensibility service principal is provisioned by Microsoft and is available in the Azure AD of all Microsoft 365 tenants.
To use the AadHttpClient in your SharePoint Framework solution, add the following
importclause in your main web part file:import { AadHttpClient, HttpClientResponse } from '@microsoft/sp-http';Get a new instance of the AadHttpClient, passing the resource to which you want to connect as parameters:
export default class HelloWorldWebPart extends BaseClientSideWebPart<IHelloWorldWebPartProps> {
  public render(): void {
    // ...

    this.context.aadHttpClientFactory
      .getClient('https://contoso.azurewebsites.net')
      .then((client: AadHttpClient): void => {
        // connect to the API
      });
  }

  // ...
}
Note
Each instance of the AadHttpClient is linked to the specific resource, which is why you need to create a new instance of the client for each resource that you want to connect to.
After you instantiate the AadHttpClient for your resource, you can issue a web request to communicate with your API; in this example, the API returns a list of orders represented by the custom Order interface defined elsewhere in the project:
export default class HelloWorldWebPart extends BaseClientSideWebPart<IHelloWorldWebPartProps> {
  public render(): void {
    // ...

    this.context.aadHttpClientFactory
      .getClient('https://contoso.azurewebsites.net')
      .then((client: AadHttpClient): void => {
        client
          .get('https://contoso.azurewebsites.net/api/orders', AadHttpClient.configurations.v1)
          .then((response: HttpClientResponse): Promise<Order[]> => {
            return response.json();
          })
          .then((orders: Order[]): void => {
            // process data
          });
      });
  }

  // ...
}
Considerations
Following are some considerations that you should take into account when working with web API permissions.
Request permissions via SharePoint Framework solutions
It's only possible to request additional permissions through a SharePoint Framework solution. The request is started when the solution package (/*.sppkg) containing a permissions request is deployed in the app catalog. After the request is started, it can be approved or denied by a global or SharePoint administrator.
Granted permissions apply to the entire tenant
Although permissions to Azure AD resources are being requested by a SharePoint Framework solution, once granted, they apply to the entire tenant and can be leveraged by any client-side request in that tenant. This includes SPFx solutions and non-SPFx solutions because.
Removing solution doesn't revoke permissions
Removing the solution that initially requested the particular permission doesn't revoke the granted permission. Administrators have to manually revoke permissions granted through SharePoint Framework application requests.
Revoking previously granted permissions doesn't invalidate issued access tokens
Revoking previously granted permissions doesn't invalidate access tokens issued to users. Instead, these access tokens remain valid until they expire.
Permission request doesn't affect solution deployment
No matter if the administrator denies or approves permissions requested by the solution, the solution can be deployed and used on sites. When building solutions that require additional permissions, you should never assume that the requested permissions have been granted.
Control the SharePoint Online Client service principal
All permissions granted through web API requests are stored with the SharePoint Online Client Extensibility Azure AD application. If administrators don't want developers to use the web API request model and the MSGraphClient and AadHttpClient in their solutions, they can disable the SharePoint Online Client Extensibility service principal through PowerShell by using the Disable-SPOTenantServicePrincipal cmdlet.
The service principal can be re-enabled by using the Enable-SPOTenantServicePrincipal cmdlet. Instead, it's also possible to enable and disable the SharePoint Online Client Extensibility service principal through the CLI for Microsoft 365 by using the spo serviceprincipal set command.
Note
The SharePoint Online Client Extensibility principal is fully controlled by SharePoint via the API access page in the SharePoint admin center. Making any changes directly to the principal in the Microsoft Entra admin center can result in unpredictable behaviors and is not supported.