Secure by default with Microsoft Purview and protect against oversharing - Phase 2
This guide is divided into four phases:
- Introduction
- Phase 1: Foundational – Start with default labeling
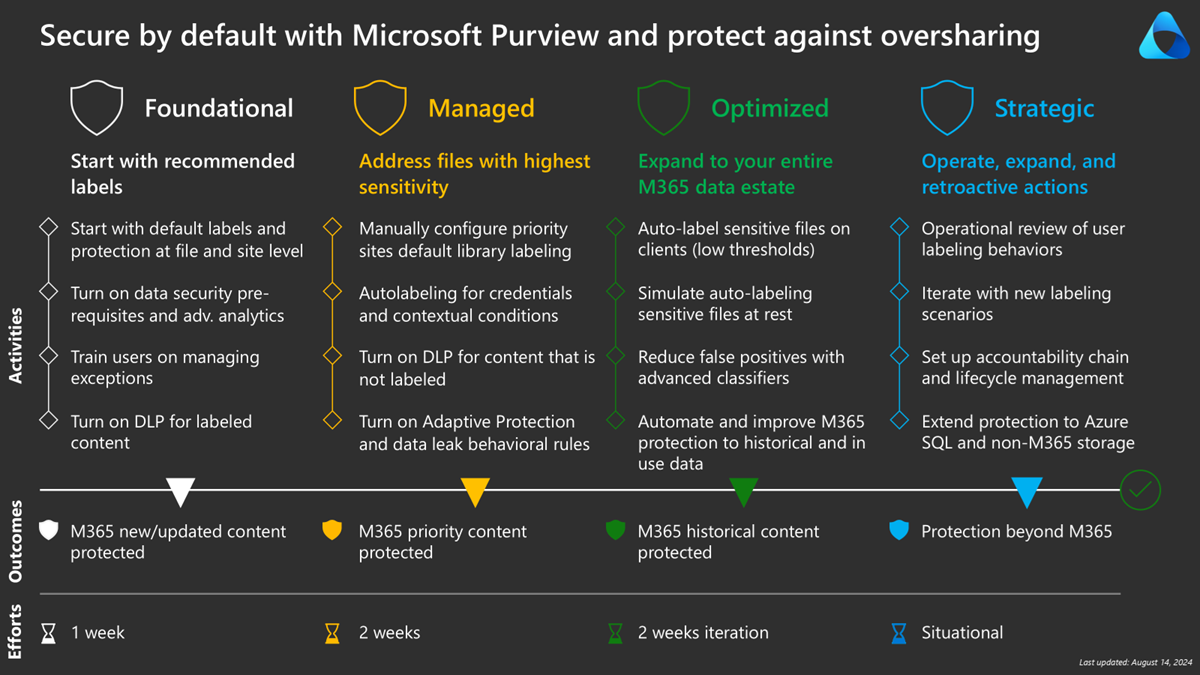
- Phase 2: Managed – Address files with highest sensitivity (this page)
- Phase 3: Optimized – Expand to your entire Microsoft 365 data estate
- Phase 4: Strategic – Operate, expand, and retroactive actions

In the first phase, we explained how to secure new and updated content. In this phase, we explore how to secure your existing data, starting with the most sensitive data.
Phase 2: Managed - Address files with highest sensitivity
Identify your priority sites from:
- Well known sites, including sites from leadership teams
- Content Explorer with high number of sensitive documents
- Reporting
- Graph API for sites with high quantity of sensitive information
Note
If you opted to default files to Confidential\All employees, we recommend focusing on sites with a higher priority label.
Manually configure priority sites default library labeling
Currently, configuration requires two separate steps:
- Add a sensitivity label to the SharePoint Site.
- Define a sensitivity label as the default for files in SharePoint libraries.
Site owners can configure sensitivity labels on SharePoint sites and the default library label in libraries. SharePoint administrators can configure the site sensitivity label in the SharePoint administrator portal. Later we cover how to configure sensitivity labeling on sites and libraries with PowerShell.
Auto-labeling for credentials and contextual conditions
Purview provides both client-side and service-side auto-labeling.
Client-side offers the flexibility of end-user awareness and decision making. In context of securing by default, client-side labeling is most useful to recommend higher sensitivity labeling for recipients with lower thresholds of sensitive information. Users can decide to accept or not accept the recommendation, and report if the label suggestion isn’t appropriate.
Client-side auto-labeling provides end-user awareness and decision-making flexibility. When securing by default, client-side labeling is most useful for recommending higher sensitivity labeling for recipients with lower thresholds of sensitive information. Users can then decide to accept or not accept the recommendation, and report it if the label suggestion isn’t appropriate.
Service-side labels apply to existing files in OneDrive and SharePoint, and in transport for emails, and provide more conditions, such as contextual conditions for:
- File type
- File size
- Document properties
In context of the secure by default guide, we secure first by site context, instead of only by sensitive information type. Therefore, we can use contextual conditions such as Set label to Confidential\All Employees on all Office/.pdf file extensions for these sites and quickly address existing priority sites. We cover more options at scale in Phase 3.
Important
We recommend configuring auto-labeling policies on All credentials to sensitive information because this information is most valued by adversaries. For client-side auto-labeling, set the label to Highly Confidential\Specific People. For service-side auto-labeling, set the label to Highly Confidential\All employees.
Turn on Data Loss Prevention for content that isn't labeled
At this stage, the foundation is well in place, defaults are secure, and we started addressing existing data. Enabling Data Loss Prevention (DLP) rules for unlabeled (use the Content is not labeled condition) on Endpoint and Exchange accelerates the labeling of content by users and prevents the sharing of unlabeled content.
We recommend turning on this DLP rule condition for Endpoint DLP with Office/PDF file types, and for relevant restrictive actions such as upload to cloud. Users must open and label their files before uploading files on websites.
Turn on Adaptive protection and data leak behavioral rules
Insider Risk Management (IRM) provides a layer of analytics and control, based on user behaviors. In the secure by default context using sensitivity labels, IRM can identify and alert when users are downgrading labels or downloading, obfuscating, and/or exfiltrating that content.
Administrators are in control of the triggers and thresholds. In addition, you can now use Adaptive Protection to strengthen your DLP rules based on the user’s risk. For example, a DLP rule can audit by default when sharing files with the label General. A user identified as high risk can be prevented from sharing the same file.
Tip
We recommend that you turn on and test a default policy with Adaptive Protection and iterate where applicable in your existing DLP rules.
IRM provides many more capabilities, configurations, and controls. Review the following references and future Purview Deployment Blueprints that cover Insider Risk Management in more detail.
Phase 2 - Summary
- Use sensitivity labels with Microsoft Teams, Groups, and SharePoint sites
- Add a sensitivity label to SharePoint document library
- Configure a default sensitivity label for a SharePoint document library
- Automatically apply a sensitivity label in Microsoft 365
See also
- All credentials entity definition
- Data Loss Prevention policy reference
- Get started with insider risk management
- Help dynamically mitigate risks with adaptive protection
- Learn about Adaptive Protection in data loss prevention
- Investigate insider risk management activities
- Best practices for managing your alert volume in insider risk management
- Create and manage insider risk management policies
Continue to Phase 3: Optimized – Expand to your entire Microsoft 365 data estate