Quick start guide: Make an authenticated API call
This article helps you construct an authenticated request to the Intelligent Recommendations service, and to see results.
Overview
To make a successful API request, you need to prepare the following information:
- Microsoft Entra ID tenant ID
- Caller's application client ID
- Application's secret value
- The HTTP query using the Intelligent Recommendations account serving endpoint URL composed with valid query path/parameters, as outlined in the Intelligent Recommendations API.
For help with locating this information, continue reading.
If you have this information prepared, you can jump to Construct the API request section of this quick start guide.
Prerequisites
Before you begin, make sure you have:
A provisioned Intelligent Recommendations account. If you haven't yet created an Intelligent Recommendations account, go to Create a new intelligent Recommendations account. You can also follow the instructions in Quick start guide: Set up and run Intelligent Recommendations with sample data.
An application (Microsoft Entra ID identity) for calling the Intelligent Recommendations service.
Note
Once the service has been successfully provisioned, it may take up to one day for the AI-ML model training to process the input data and produce ranked lists. If you just provisioned your first Intelligent Recommendations account, you might want to wait before continuing.
Step 1: Create the endpoint URL
Every Intelligent Recommendations account requires at least one service endpoint to serve requests. A service endpoint provides a unique URL for calling into the service.
To build a proper API request, locate the service endpoint URL using your Azure portal account:
Sign in to Azure portal.
Navigate to Intelligent Recommendations Accounts.
Select the account you want to query.
From the Components section of the menu, select Service Endpoints.
Select the service endpoint you want to use.
Locate the URL in the properties of the endpoint resource, as shown:
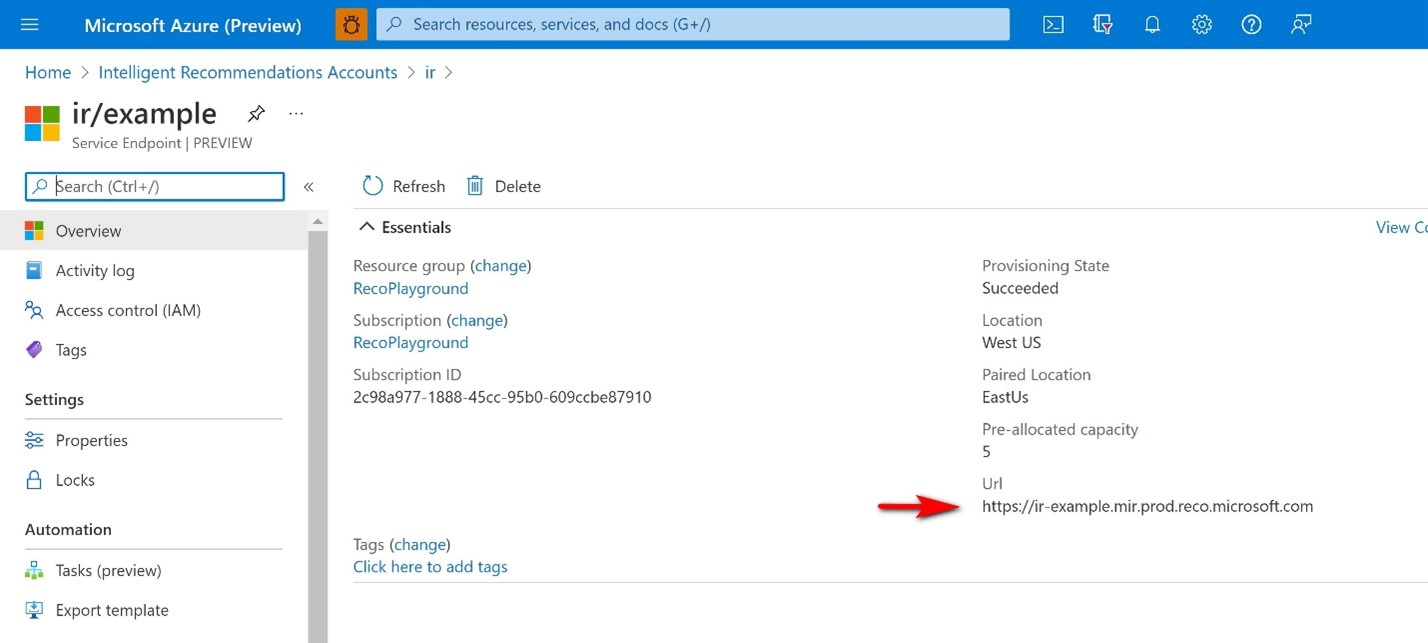
The URL is structured as follows:
https://{ir-account-name}-{service-endpoint-name}.mir.prod.reco.microsoft.com/
Step 2: Set up a client application
Intelligent Recommendations requires an OAuth2 authentication. Determine (or create) the Microsoft Entra ID application from which to call the service endpoint with authentication. Any unauthenticated calls fail with an error.
Sign in to Azure portal.
Go to Microsoft Entra ID.
Go to App Registrations.
Select an existing application or create a new one.
Once the application is ready, locate the client ID and tenant ID in the application properties:
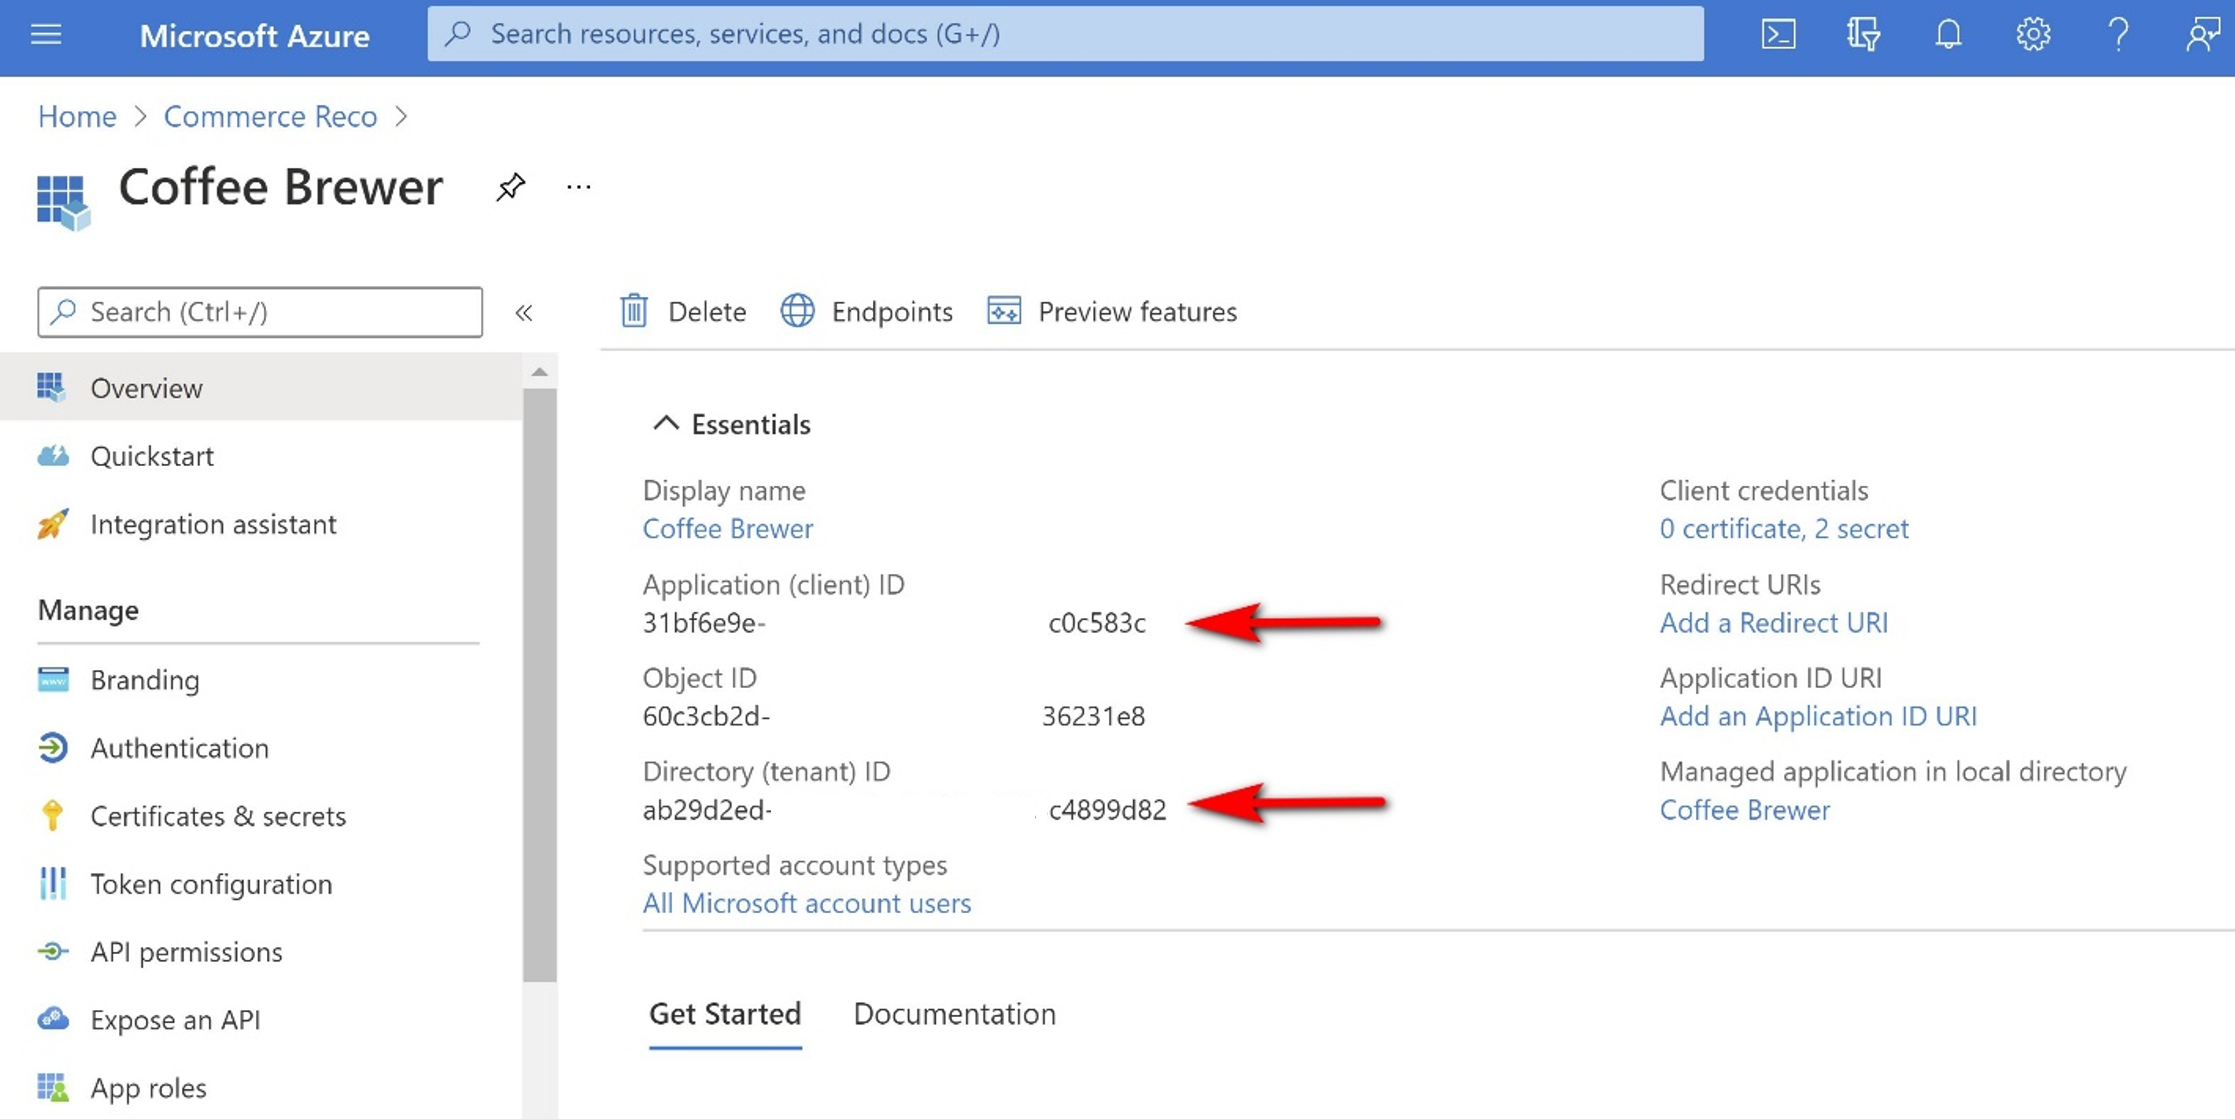
Make note of the client ID and tenant ID. These values are used to create the API request.
Add the allowed identity or identities to the Intelligent Recommendations account
Before continuing, you must add the identity to the authenticated list in your Intelligent Recommendations account.
- Sign in to Azure portal.
- Navigate to Intelligent Recommendations Accounts.
- Select the account you want to query.
- From the menu, select Endpoint Authentications.
- Add the new application principal ID (the principal ID is the same as the client ID, which you found earlier).
- Change the principal type to "Application".
Note
Updating these settings may take up to 15 minutes.
Step 3: Configure authentication
The last step is to configure the authentication mechanism. You can use either a secret or a certificate. In this quick start guide, you see how to create a secret.
- In the left navigation pane, select Certificates & Secrets.
- Select New Client Secret. This secret value is private and must be stored in a secure place, because you'll need it in the next step.
Note
You can only copy the secret value right after creation, as shown:
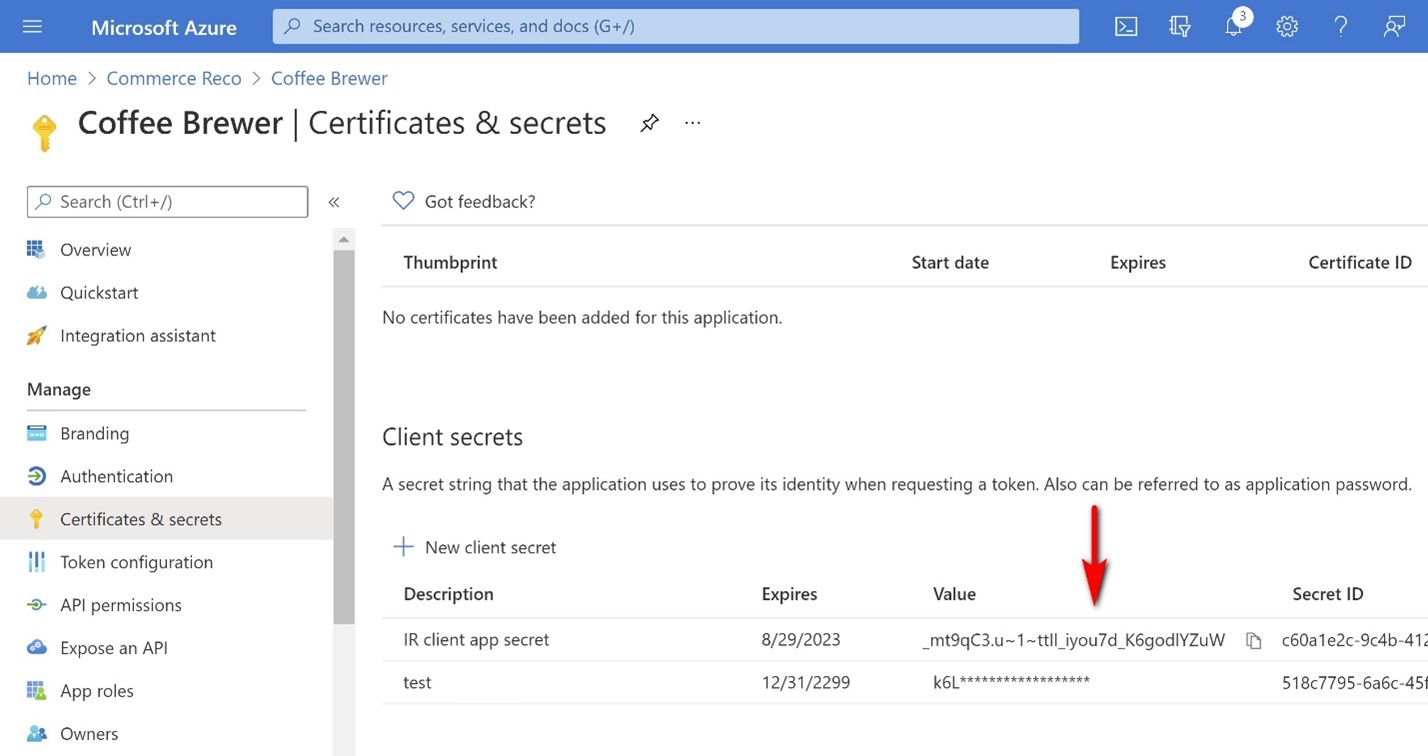
Now that you've prepared the necessary information, you're ready to create an API request and call the Intelligent Recommendations service.
Construct the API request
The next section provides two ways to call the Intelligent Recommendations API with REST API tools. To use a different application to call the Intelligent Recommendations endpoint, ensure that you're using a REST API tool that supports OAuth2 authentication.
In this quick start guide, you walk through how to configure an API request to retrieve a popular list of items both with Insomnia and with C# code.
Before continuing, make sure you have each of the following prerequisites:
- Microsoft Entra ID tenant ID
- Caller application client ID
- Application secret value
- The HTTP query using the Intelligent Recommendations account serving endpoint URL composed with valid query path/parameters, as outlined in the Intelligent Recommendations API
Note
In the following example request, we're using the account name irtest and the service endpoint serving01.
https://irtest-serving01.mir.prod.reco.microsoft.com/Reco/V1.0/Popular
Call the endpoint with Results explorer
IMPORTANT As of April 2023, the IR Portal Website and Results Explorer tool have been deprecated and are no longer in use. To see results, use one of the options in the following sections:
Calling the endpoint with Insomnia
You can use Insomnia or a similar REST API tool that supports OAuth2 authentication to send test requests to an Intelligent Recommendations endpoint.
For more details, see Use Insomnia with Dataverse Web API
Authentication process
Under the Get Started section, select Create a request.
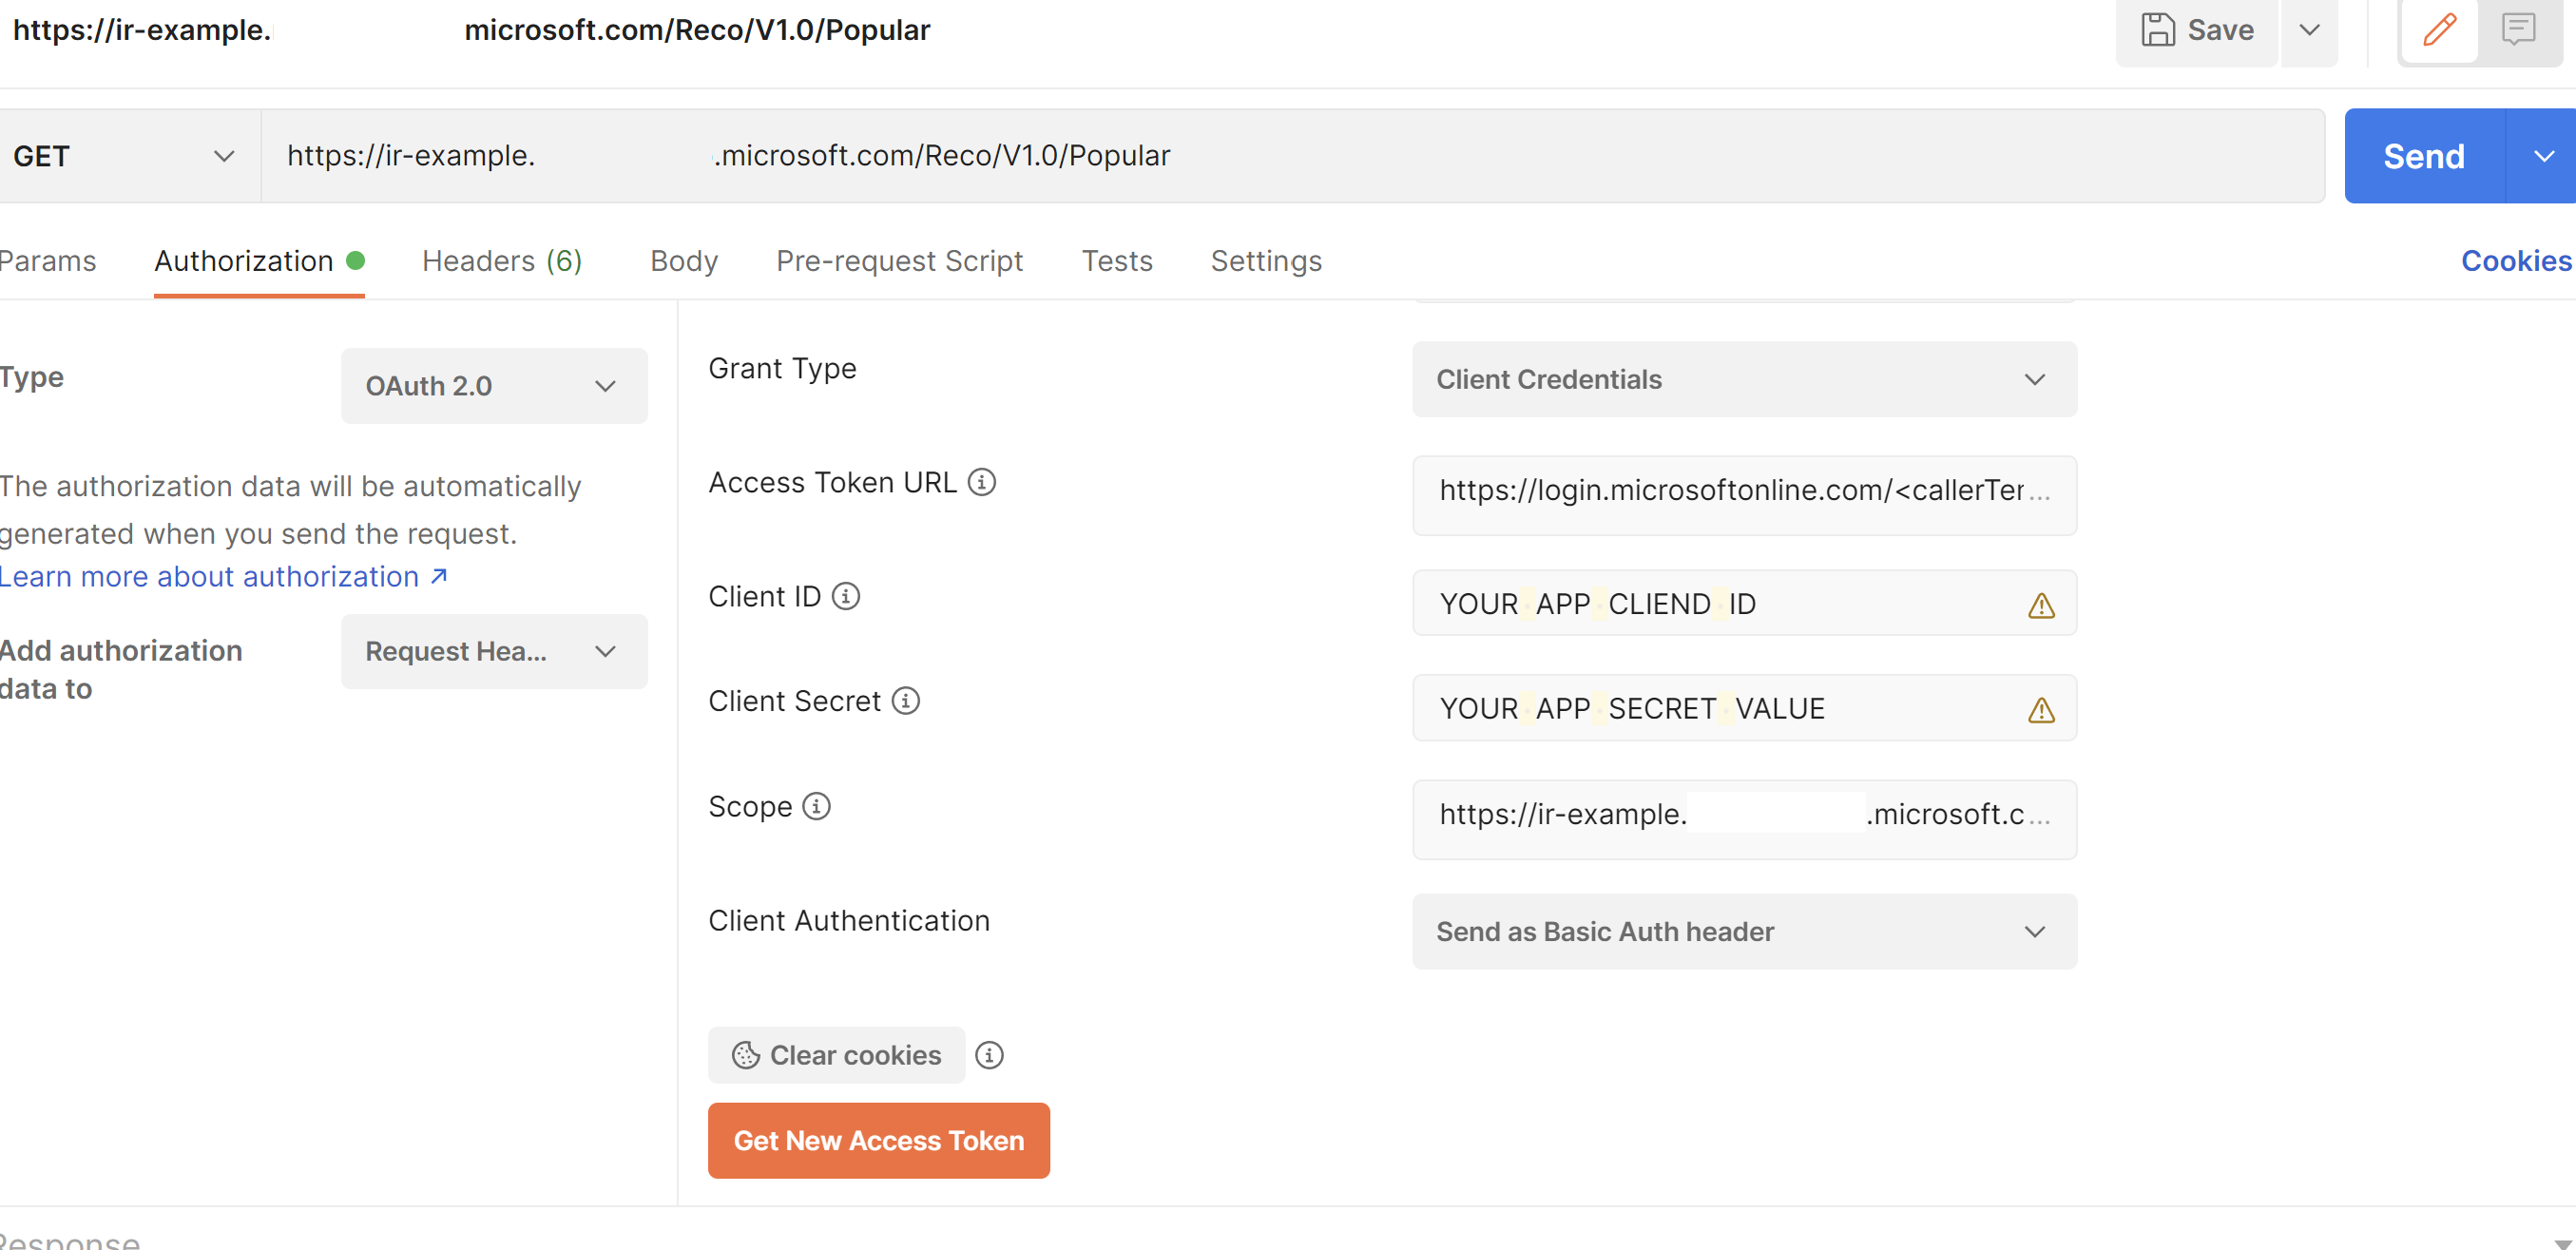
Navigate to the Authorization tab of the request composer and configure it with the following values:
- Set type to OAuth 2.0
- Set Add Authorization Headers to Request Headers
- Create a new token with some token name.
- Grant Type = Client Credentials
- Access Token URL =
https://login.microsoftonline.com/<callerTenantID>/oauth2/v2.0/token - Client ID = <yourAppClientID>
- Client Secret = <yourAppSecretValue>
- Scope = <YOUR ENDPOINT URL>/.default
- Keep Client Authentication set to Send as Basic Auth Header
Here's how it looks before token generation:
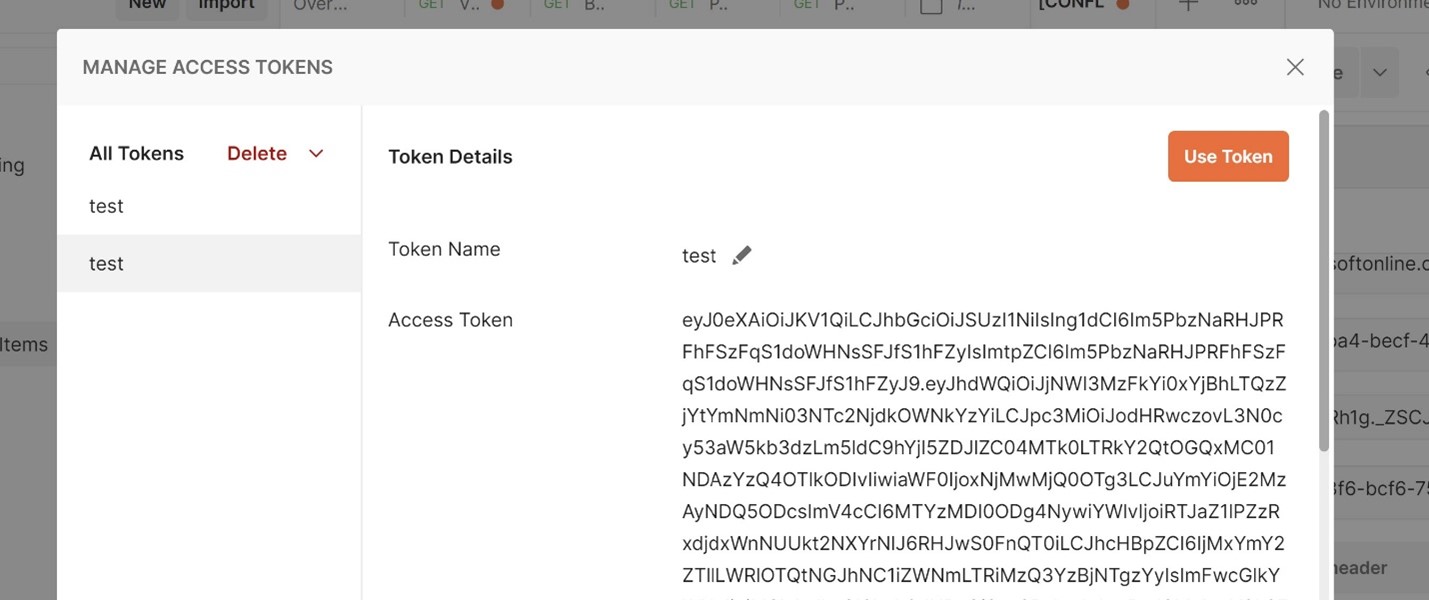
Scroll down the page until you find the Get new access token button. If configured correctly, selecting the button opens a new window with a viable token.
Select Use Token.
Post the request
Now that you're authenticated, you can post the actual request.
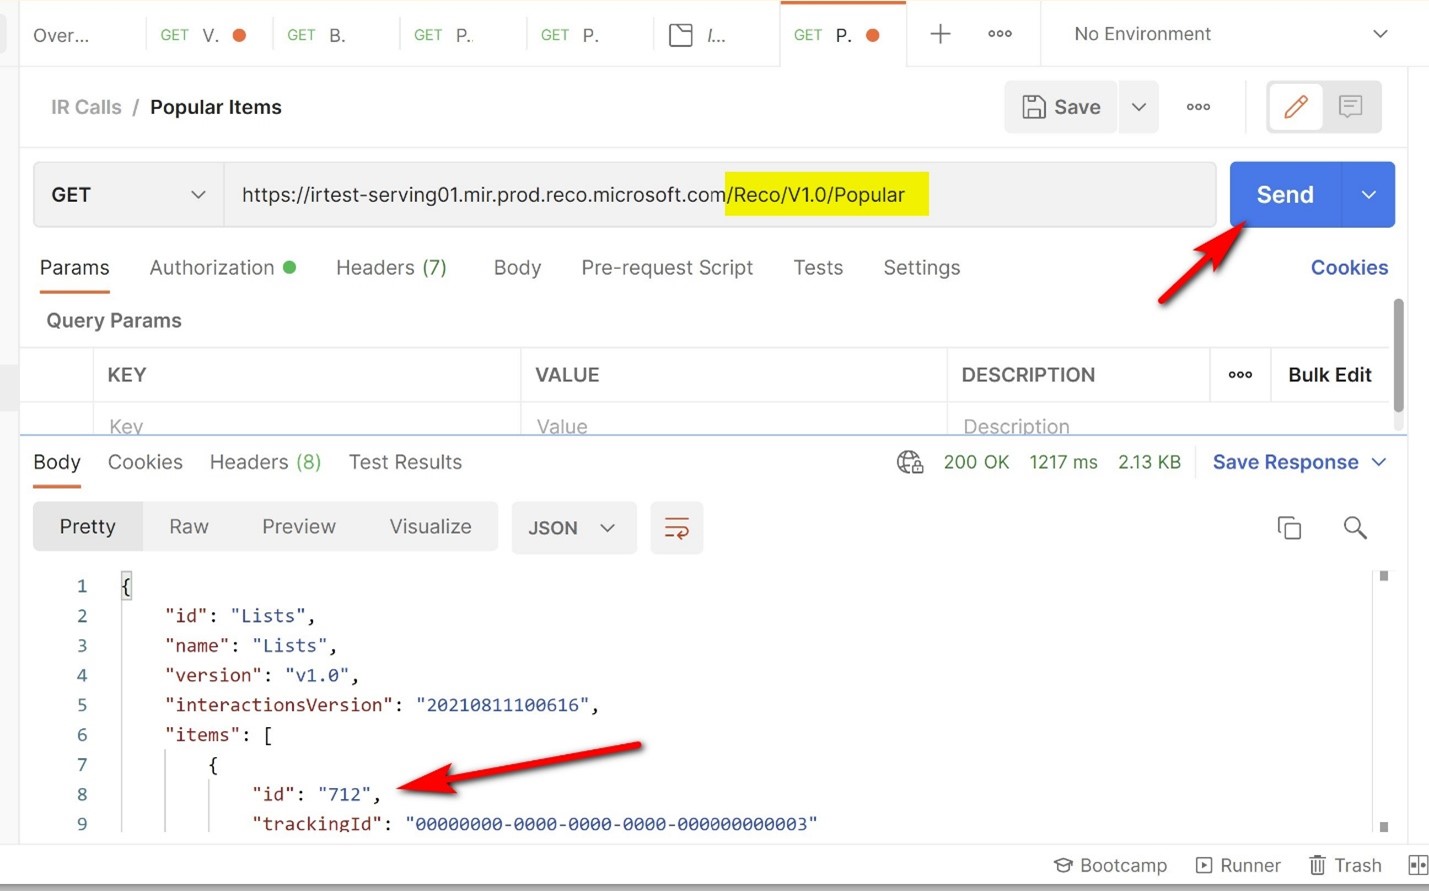
Post your request, and then select Send. See our Sample Requests Guide for a list of additional, preconfigured API requests that you can try out.
The JSON response appears at the bottom of the screen:
Note
A successful response will return a ranked list of items in the Items section of the JSON response. For this scenario, the most popular item ID is 712. You can view the full list of API Status Codes here.
Calling the endpoint with C# code
To make a successful call to the Intelligent Recommendations endpoint using C#, prepare the following information:
- Microsoft Entra ID tenant ID
- Caller application client ID
- Application secret value
- The HTTP query using the Intelligent Recommendations account serving endpoint URL composed with valid query path/parameters, as outlined in the Intelligent Recommendations API specification
Next, copy the sample code given, update the relevant fields, and execute.
public static async Task CallIRApiAsync()
{
    // *************************************************************************
    // The code depends on the Microsoft.Identity.Client library
    // Please note the code sections that have to be modified below
    // *************************************************************************

    // Recommendations AAD app ID
    var scope = "<YOUR ENDPOINT URL>";

    // Your client AAD app ID
    var callerAadAppId = "<YOUR AAD APP ID>";

    // AAD Tenant ID
    var callerAadTenantId = "<YOUR AAD TENANT ID>";

    var token = await AcquireTokenWithSecret(callerAadAppId, callerAadTenantId, scope);
    var httpClient = new HttpClient();
    httpClient.DefaultRequestHeaders.Authorization  = AuthenticationHeaderValue.Parse(token.CreateAuthorizationHeader());

    // **************************************************
    // and now, use httpClient to execute IR requests..
    // **************************************************
}

public static Task<AuthenticationResult> AcquireTokenWithSecret (
               string callerAadAppId, string callerTenantId, string scope )
{
    // The below example uses a secret to authenticate to AAD
    // An alternative certificate-based method can be used instead:
    // replace: "WithClientCert(string secret)" ==> "WithCertificate(X509Certificate certificate)"

    var secret = "<YOUR AAD APP SECRET>";
    var app = ConfidentialClientApplicationBuilder.Create(callerAadAppId).WithAuthority($"https://login.microsoftonline.com/{callerTenantId}").WithClientSecret(secret).Build();
    var scopes = new[] { $"{scope}/.default" };
    return app.AcquireTokenForClient(scopes).ExecuteAsync(CancellationToken.None); }
}
A successful response contains a ranked list of recommended items based on the scenario under the Items section. For this scenario, the most popular item ID is 712. You can view the full list of API Status Codes here.
Calling the endpoint with Azure Machine Learning
To make API requests to the Intelligent Recommendations service using Azure Machine Learning, you can use this Retail Recommender Jupyter notebook. As an added bonus, the notebook also includes steps for combining Intelligent Recommendations with Azure Personalizer! See more: Retail Recommender Jupyter Notebook.
See also
Intelligent Recommendations API reference
API Status Codes
Quick start guide: Set up and run Intelligent Recommendations with sample data
Deployment overview
Use data contracts to share data