Create a Standard logic app workflow in single-tenant Azure Logic Apps using Visual Studio Code
Applies to: Azure Logic Apps (Standard)
This how-to guide shows how to create an example integration workflow that runs in single-tenant Azure Logic Apps by using Visual Studio Code with the Azure Logic Apps (Standard) extension. Before you create this workflow, you'll create a Standard logic app resource, which provides the following capabilities:
Your logic app can include multiple stateful and stateless workflows.
Workflows in the same logic app and tenant run in the same process as the Azure Logic Apps runtime, so they share the same resources and provide better performance.
You can locally create, run, and test workflows using the Visual Studio Code development environment.
When you're ready, you can deploy your logic app to Azure where your workflow can run in the single-tenant Azure Logic Apps environment or in an App Service Environment v3 (Windows-based App Service plans only). You can also deploy and run your workflow anywhere that Kubernetes can run, including Azure, Azure Kubernetes Service, on premises, or even other cloud providers, due to the Azure Logic Apps containerized runtime.
Note
Deploying your logic app to a Kubernetes cluster is currently in public preview.
For more information about single-tenant Azure Logic Apps, review Single-tenant versus multitenant in Azure Logic Apps.
While the example workflow is cloud-based and has only two steps, you can create workflows from hundreds of operations that can connect a wide range of apps, data, services, and systems across cloud, on premises, and hybrid environments. The example workflow starts with the built-in Request trigger and follows with an Office 365 Outlook action. The trigger creates a callable endpoint for the workflow and waits for an inbound HTTPS request from any caller. When the trigger receives a request and fires, the next action runs by sending email to the specified email address along with selected outputs from the trigger.
Tip
If you don't have an Office 365 account, you can use any other available action that can send messages from your email account, for example, Outlook.com.
To create this example workflow using the Azure portal instead, follow the steps in Create integration workflows using single tenant Azure Logic Apps and the Azure portal. Both options provide the capability to develop, run, and deploy logic app workflows in the same kinds of environments. However, with Visual Studio Code, you can locally develop, test, and run workflows in your development environment.
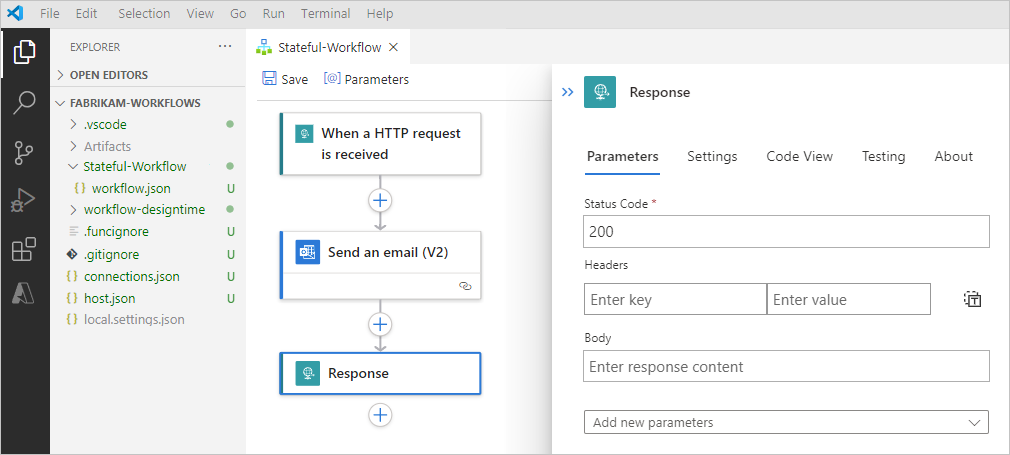
As you progress, you'll complete these high-level tasks:
- Create a project for your logic app and a blank stateful workflow.
- Add a trigger and an action.
- Run, test, debug, and review run history locally.
- Find domain name details for firewall access.
- Deploy to Azure, which includes optionally enabling Application Insights.
- Manage your deployed logic app in Visual Studio Code and the Azure portal.
- Enable run history for stateless workflows.
- Enable or open the Application Insights after deployment.
Prerequisites
Access and connectivity
If you plan to locally build Standard logic app projects and run workflows using only the built-in connectors that run natively on the Azure Logic Apps runtime, you don't need the following requirements. However, make sure that you have the following connectivity and Azure account credentials to publish or deploy your project from Visual Studio Code to Azure, use the managed connectors that run in global Azure, or access Standard logic app resources and workflows already deployed in Azure:
Access to the internet so that you can download the requirements, connect from Visual Studio Code to your Azure account, and publish from Visual Studio Code to Azure.
An Azure account and subscription. If you don't have a subscription, sign up for a free Azure account.
To create the same example workflow in this article, you need an Office 365 Outlook email account that uses a Microsoft work or school account to sign in.
If you choose a different email connector, such as Outlook.com, you can still follow the example, and the general overall steps are the same. However, your options might differ in some ways. For example, if you use the Outlook.com connector, use your personal Microsoft account instead to sign in.
Tools
Download and install Visual Studio Code, which is free.
Download and install the Azure Account extension for Visual Studio Code so that you have a single common experience for Azure sign-in and subscription filtering across all Azure extensions in Visual Studio Code. This how-to guide includes steps that use this experience.
Download and install the following Visual Studio Code dependencies for your specific operating system using either method:
Install all dependencies automatically
Starting with version 2.81.5, the Azure Logic Apps (Standard) extension for Visual Studio Code includes a dependency installer that automatically installs all the required dependencies in a new binary folder and leaves any existing dependencies unchanged. For more information, see Get started more easily with the Azure Logic Apps (Standard) extension for Visual Studio Code.
This extension includes the following dependencies:
Dependency Description C# for Visual Studio Code Enables F5 functionality to run your workflow. Azurite for Visual Studio Code Provides a local data store and emulator to use with Visual Studio Code so that you can work on your logic app project and run your workflows in your local development environment. If you don't want Azurite to automatically start, you can disable this option:
1. On the File menu, select Preferences > Settings.
2. On the User tab, select Extensions > Azure Logic Apps (Standard).
3. Find the setting named Azure Logic Apps Standard: Auto Start Azurite, and clear the selected checkbox..NET SDK 6.x.x Includes the .NET Runtime 6.x.x, a prerequisite for the Azure Logic Apps (Standard) runtime. Azure Functions Core Tools - 4.x version Installs the version based on your operating system (Windows, macOS, or Linux).
These tools include a version of the same runtime that powers the Azure Functions runtime, which the Azure Logic Apps (Standard) extension uses in Visual Studio Code.Node.js version 16.x.x unless a newer version is already installed Required to enable the Inline Code Operations action that runs JavaScript. The installer doesn't perform the following tasks:
- Check whether the required dependencies already exist.
- Install only the missing dependencies.
- Update older versions of existing dependencies.
In Visual Studio Code, on the Activity bar, select Extensions. (Keyboard: Press Ctrl+Shift+X)
On the Extensions pane, open the ellipses (...) menu, and select Install from VSIX.
Find and select the downloaded VSIX file.
After setup completes, the extension automatically activates and runs the Validate and install dependency binaries command. To view the process logs, open the Output window.
When the following prompt appears, select Yes (Recommended) to confirm that you want to automatically install the required dependencies:
Reload Visual Studio Code, if necessary.
Confirm that the dependencies correctly appear in the following folder:
C:\Users\<your-user-name>\.azurelogicapps\dependencies\<dependency-name>
Confirm the following extension settings in Visual Studio Code:
On the File menu, select Preferences > Settings.
On the User tab, select Extensions > Azure Logic Apps (Standard).
Review the following settings:
Extension setting Value Dependencies Path C:\Users\<your-user-name>\.azurelogicapps\dependencies Dependency Timeout 60 seconds Dotnet Binary Path C:\Users\<your-user-name>\.azurelogicapps\dependencies\DotNetSDK\dotnet.exe Func Core Tools Binary Path C:\Users\<your-user-name>\.azurelogicapps\dependencies\FuncCoreTools\func Node JS Binary Path C:\Users\<your-user-name>\.azurelogicapps\dependencies\NodeJs\node Auto Start Azurite Enabled Auto Start Design Time Enabled
If you have an existing logic app project with custom-defined tasks stored in the .vscode/tasks.json file, make sure that you save the tasks.json file elsewhere before you open your project.
When you open your project, you're prompted to update tasks.json file to use the required dependencies. If you choose to continue, the extension overwrites the tasks.json file.
When you open your logic app project, the following notifications appear:
Notification Action Always start the background design-time process at launch? To open the workflow designer faster, select Yes (Recommended). Configure Azurite to autostart on project launch? To have Azurite storage automatically start when the project opens, select Enable AutoStart. At the top of Visual Studio Code, in the command window that appears, press enter to accept the default path:
C\Users\<your-user-name>\.azurelogicapps\.azurite
Known issues with preview
If you opted in to automatically install all dependencies on a computer that doesn't have any version of the .NET Core SDK, the following message appears:
"The .NET Core SDK cannot be located: Error running dotnet -- info: Error: Command failed: dotnet --info 'dotnet is not recognized as an internal or external command, operable program, or batch file. 'dotnet' is not recognized as an internal or external command, operable program, or batch file. . .NET Core debugging will not be enabled. Make sure the .NET Core SDK is installed and is on the path."
You get this message because the .NET Core framework is still installing when the extension activates. You can safely choose to disable this message.
If you have trouble with opening an existing logic app project or starting the debugging task (tasks.json) for func host start, and this message appears, follow these steps to resolve the problem:
Add the dotnet binary path to your environment PATH variable.
On the Windows taskbar, in the search box, enter environment variables, and select Edit the system environment variables.
In the System Properties box, on the Advanced tab, select Environment Variables.
In the Environment Variables box, from the User variables for <your-user-name> list, select PATH, and then select Edit.
If the following value doesn't appear in the list, select New to add the following value:
C:\Users\<your-user-name>\.azurelogicapps\dependencies\DotNetSDK
When you're done, select OK.
Close all Visual Studio Code windows, and reopen your project.
If you have problems installing and validating binary dependencies, for example:
- Linux permissions issues
- You get the following error: <File or path> does not exist
- Validation gets stuck on <dependency-name>.
Follow these steps to run the Validate and install binary dependencies command again:
From the View menu, select Command Palette.
When the command window appears, enter and run the Validate and install binary dependencies command.
If you don't have .NET Core 7 or a later version installed, and you open an Azure Logic Apps workspace that contains an Azure Functions project, you get the following message:
There were problems loading project [function-name].csproj. See log for details.
This missing component doesn't affect the Azure Functions project, so you can safely ignore this message.
Install each dependency separately
Dependency Description .NET SDK 6.x.x Includes the .NET Runtime 6.x.x, a prerequisite for the Azure Logic Apps (Standard) runtime. Azure Functions Core Tools - 4.x version - Windows: Use the Microsoft Installer (MSI) version, which is func-cli-X.X.XXXX-x*.msi.
- macOS
- Linux
These tools include a version of the same runtime that powers the Azure Functions runtime, which the Azure Logic Apps (Standard) extension uses in Visual Studio Code.
If you have an installation that's earlier than these versions, uninstall that version first, or make sure that the PATH environment variable points at the version that you download and install.Node.js version 16.x.x unless a newer version is already installed Required to enable the Inline Code Operations action that runs JavaScript.
Note: For Windows, download the MSI version. If you use the ZIP version instead, you have to manually make Node.js available by using a PATH environment variable for your operating system.If you already installed the version of the Azure Logic Apps (Standard) extension that automatically installs all the dependencies (preview), skip this step. Otherwise, download and install the Azure Logic Apps (Standard) extension for Visual Studio Code.
In Visual Studio Code, on the left toolbar, select Extensions.
In the extensions search box, enter azure logic apps standard. From the results list, select Azure Logic Apps (Standard) > Install.
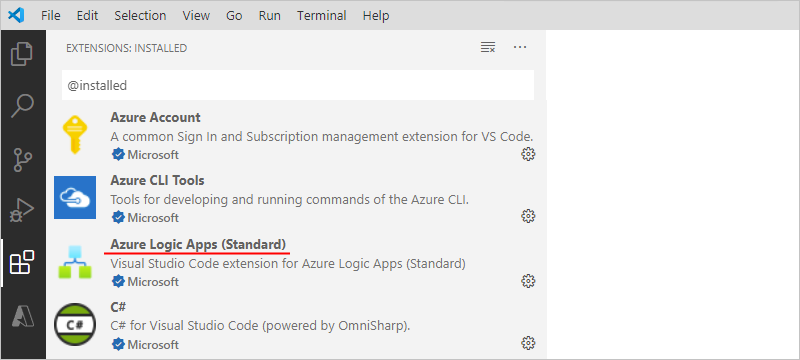
After the installation completes, the extension appears in the Extensions: Installed list.
Tip
If the extension doesn't appear in the installed list, try restarting Visual Studio Code.
Currently, you can have both Consumption (multitenant) and Standard (single-tenant) extensions installed at the same time. The development experiences differ from each other in some ways, but your Azure subscription can include both Standard and Consumption logic app types. In Visual Studio Code, the Azure window shows all the Azure-deployed and hosted logic apps in your Azure subscription, but organizes your apps in the following ways:
Logic Apps (Consumption) section: All the Consumption logic apps in your subscription.
Resources section: All the Standard logic apps in your subscription. Previously, these logic apps appeared in the Logic Apps (Standard) section, which has now moved into the Resources section.
To locally run webhook-based triggers and actions, such as the built-in HTTP Webhook trigger, in Visual Studio Code, you need to set up forwarding for the callback URL.
If you create your logic app resources with settings that support using Application Insights, you can optionally enable diagnostics logging and tracing for your logic app resource. You can do so either when you create your logic app or after deployment. You need to have an Application Insights instance, but you can create this resource either in advance, when you create your logic app, or after deployment.
Install or use a tool that can send HTTP requests to test your solution, for example:
- Visual Studio Code with an extension from Visual Studio Marketplace
- PowerShell Invoke-RestMethod
- Microsoft Edge - Network Console tool
- Bruno
- curl
Caution
For scenarios where you have sensitive data, such as credentials, secrets, access tokens, API keys, and other similar information, make sure to use a tool that protects your data with the necessary security features, works offline or locally, doesn't sync your data to the cloud, and doesn't require that you sign in to an online account. This way, you reduce the risk around exposing sensitive data to the public.
Set up Visual Studio Code
To make sure that all the extensions are correctly installed, reload or restart Visual Studio Code.
Confirm that Visual Studio Code automatically finds and installs extension updates so that all your extensions get the latest updates. Otherwise, you have to manually uninstall the outdated version and install the latest version.
On the File menu, go to Preferences > Settings.
On the User tab, go to Features > Extensions.
Confirm that Auto Check Updates is selected, and that Auto Update is set to All Extensions.
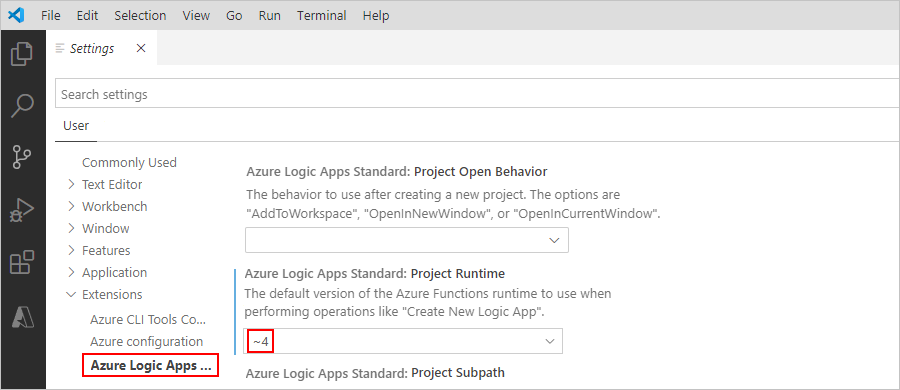
Confirm that the Azure Logic Apps Standard: Project Runtime setting for the Azure Logic Apps (Standard) extension is set to version ~4:
Note
This version is required to use the Inline Code Operations actions.
On the File menu, go to Preferences > Settings.
On the User tab, go to > Extensions > Azure Logic Apps (Standard).
For example, you can find the Azure Logic Apps Standard: Project Runtime setting here or use the search box to find other settings:
Connect to your Azure account
On the Visual Studio Code Activity Bar, select the Azure icon.
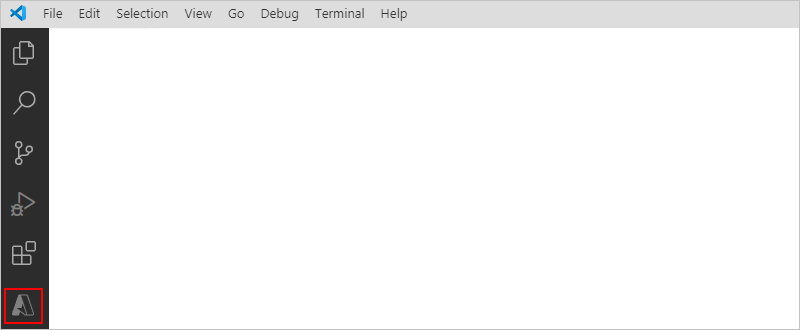
In the Azure window, under Resources, select Sign in to Azure. When the Visual Studio Code authentication page appears, sign in with your Azure account.

After you sign in, the Azure window shows the Azure subscriptions associated with your Azure account. If the expected subscriptions don't appear, or you want the pane to show only specific subscriptions, follow these steps:
In the subscriptions list, move your pointer next to the first subscription until the Select Subscriptions button (filter icon) appears. Select the filter icon.

Or, in the Visual Studio Code status bar, select your Azure account.
When another subscriptions list appears, select the subscriptions that you want, and then make sure that you select OK.
Create a local project
Before you can create your logic app, create a local project so that you can manage, run, and deploy your logic app from Visual Studio Code. The underlying project is similar to an Azure Functions project, also known as a function app project. However, these project types are separate from each other, so logic apps and function apps can't exist in the same project.
On your computer, create an empty local folder to use for the project that you'll later create in Visual Studio Code.
In Visual Studio Code, close all open folders.
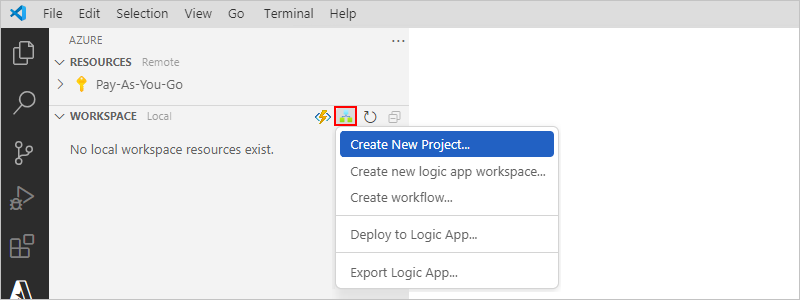
In the Azure window, on the Workspace section toolbar, from the Azure Logic Apps menu, select Create New Project.
If Windows Defender Firewall prompts you to grant network access for
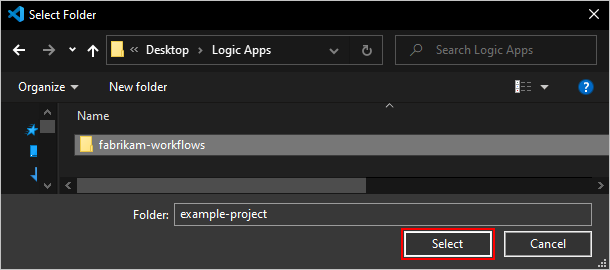
Code.exe, which is Visual Studio Code, and forfunc.exe, which is the Azure Functions Core Tools, select Private networks, such as my home or work network > Allow access.Browse to the location where you created your project folder, select that folder and continue.
From the templates list that appears, select either Stateful Workflow or Stateless Workflow. This example selects Stateful Workflow.

Provide a name for your workflow and press Enter. This example uses Stateful-Workflow as the name.

Note
You might get an error named azureLogicAppsStandard.createNewProject with the error message, Unable to write to Workspace Settings because azureFunctions.suppressProject is not a registered configuration. If you do, try installing the Azure Functions extension for Visual Studio Code, either directly from the Visual Studio Marketplace or from inside Visual Studio Code.
If Visual Studio Code prompts you to open your project in the current Visual Studio Code or in a new Visual Studio Code window, select Open in current window. Otherwise, select Open in new window.
Visual Studio Code finishes creating your project.
From the Visual Studio Activity Bar, open the Explorer pane, if not already open.
The Explorer pane shows your project, which now includes automatically generated project files. For example, the project has a folder that shows your workflow's name. Inside this folder, the workflow.json file contains your workflow's underlying JSON definition.
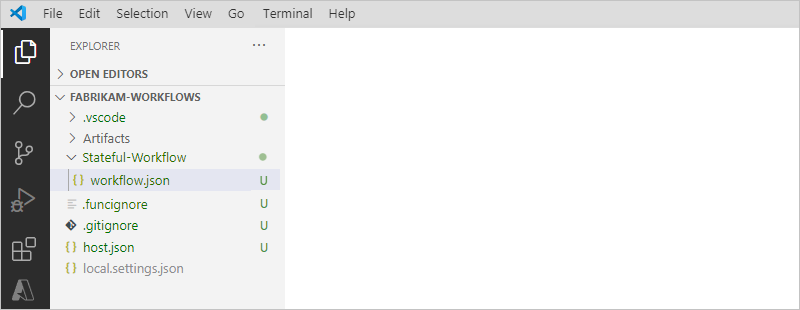
In Visual Studio Code, your logic app project has either of the following types:
- Extension bundle-based (Node.js), which is the default type
- NuGet package-based (.NET), which you can convert from the default type
Based on these types, your project includes slightly different folders and files. A NuGet-based project includes a .bin folder that contains packages and other library files. A bundle-based project doesn't include the .bin folder and other files. Some scenarios require a NuGet-based project for your app to run, for example, when you want to develop and run custom built-in operations. For more information about converting your project to use NuGet, review Enable built-connector authoring.
For the default bundle-based project, your project has a folder and file structure that is similar to the following example:
MyBundleBasedLogicAppProjectName
| .vscode
| Artifacts
  || Maps
     ||| MapName1
     ||| ...
  || Schemas
     ||| SchemaName1
     ||| ...
| WorkflowName1
  || workflow.json
  || ...
| WorkflowName2
  || workflow.json
  || ...
| workflow-designtime
| .funcignore
| connections.json
| host.json
| local.settings.json
At your project's root level, you can find the following files and folders with other items:
Name Folder or file Description .vscode Folder Contains Visual Studio Code-related settings files, such as extensions.json, launch.json, settings.json, and tasks.json files. Artifacts Folder Contains integration account artifacts that you define and use in workflows that support business-to-business (B2B) scenarios. For example, the example structure includes maps and schemas for XML transform and validation operations. <WorkflowName> Folder For each workflow, the <WorkflowName> folder includes a workflow.json file, which contains that workflow's underlying JSON definition. workflow-designtime Folder Contains development environment-related settings files. .funcignore File Contains information related to your installed Azure Functions Core Tools. connections.json File Contains the metadata, endpoints, and keys for any managed connections and Azure functions that your workflows use.
Important: To use different connections and functions for each environment, make sure that you parameterize this connections.json file and update the endpoints.host.json File Contains runtime-specific configuration settings and values, for example, the default limits for the single-tenant Azure Logic Apps platform, logic apps, workflows, triggers, and actions. At your logic app project's root level, the host.json metadata file contains the configuration settings and default values that all workflows in the same logic app use while running, whether locally or in Azure.
Note: When you create your logic app, Visual Studio Code creates a backup host.snapshot.*.json file in your storage container. If you delete your logic app, this backup file isn't deleted. If you create another logic app with the same name, another snapshot file is created. You can have only up to 10 snapshots for the same logic app. If you exceed this limit, you get the following error:Microsoft.Azure.WebJobs.Script.WebHost: Repository has more than 10 non-decryptable secrets backups (host))
To resolve this error, delete the extra snapshot files from your storage container.local.settings.json File Contains app settings, connection strings, and other settings that your workflows use while running locally. In other words, these settings and values apply only when you run your projects in your local development environment. During deployment to Azure, the file and settings are ignored and aren't included with your deployment.
This file stores settings and values as local environment variables that are used by your local development tools as theappSettingsvalues. You can call and reference these environment variables both at runtime and deployment time by using app settings and parameters.
Important: The local.settings.json file can contain secrets, so make sure that you also exclude this file from your project source control.Note
The FUNCTIONS_WORKER_RUNTIME app setting is required for your Standard logic app, and the value was previously set to node. However, the required value is now dotnet for all new and existing deployed Standard logic apps. This change in value shouldn't affect your workflow's runtime, so everything should work the same way as before. For more information, see the FUNCTIONS_WORKER_RUNTIME app setting.
The APP_KIND app setting is required for your Standard logic app, and the value must be workflowApp. However, in some scenarios, this app setting might be missing, for example, due to automation using Azure Resource Manager templates or other scenarios where the setting isn't included. If certain actions don't work, such as the Execute JavaScript Code action, or if the workflow stops working, check that the APP_KIND app setting exists and is set to to workflowApp. For more information, see the APP_KIND app setting.
Convert your project to NuGet package-based (.NET)
By default, Visual Studio Code creates a logic app project that is extension bundle-based (Node.js), not NuGet package-based (.NET). If you require a logic app project that is NuGet package-based (.NET), for example, to enable built-in connector authoring, you must convert your project from extension bundle-based (Node.js) to NuGet package-based (.NET).
Important
This action is a one-way operation that you can't undo.
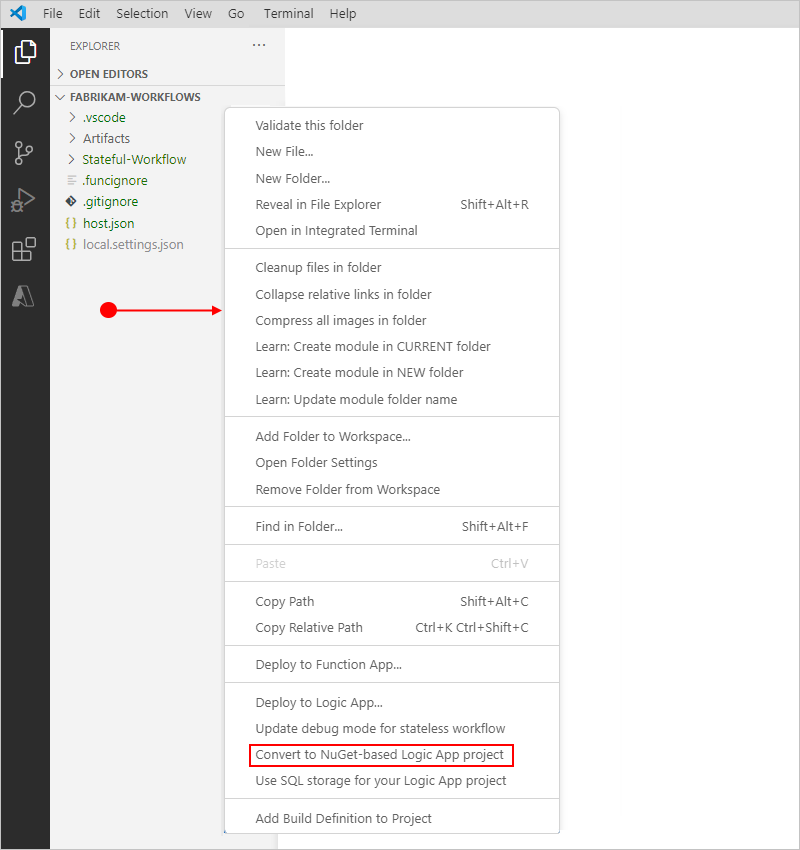
In the Explorer pane, at your project's root, move your mouse pointer over any blank area below all the other files and folders, open the shortcut menu, and select Convert to NuGet-based Logic App project.
When the prompt appears, confirm the project conversion.
Enable built-in connector authoring
You can create your own built-in connectors for any service you need by using the single-tenant Azure Logic Apps extensibility framework. Similar to built-in connectors such as Azure Service Bus and SQL Server, these connectors provide higher throughput, low latency, local connectivity, and run natively in the same process as the single-tenant Azure Logic Apps runtime.
The authoring capability is currently available only in Visual Studio Code, but isn't enabled by default. To create these connectors, follow these steps:
If you haven't already, convert your project from extension bundle-based (Node.js) to NuGet package-based (.NET).
Review and follow the steps in the article, Azure Logic Apps Running Anywhere - Built-in connector extensibility.
Add custom artifacts to your project
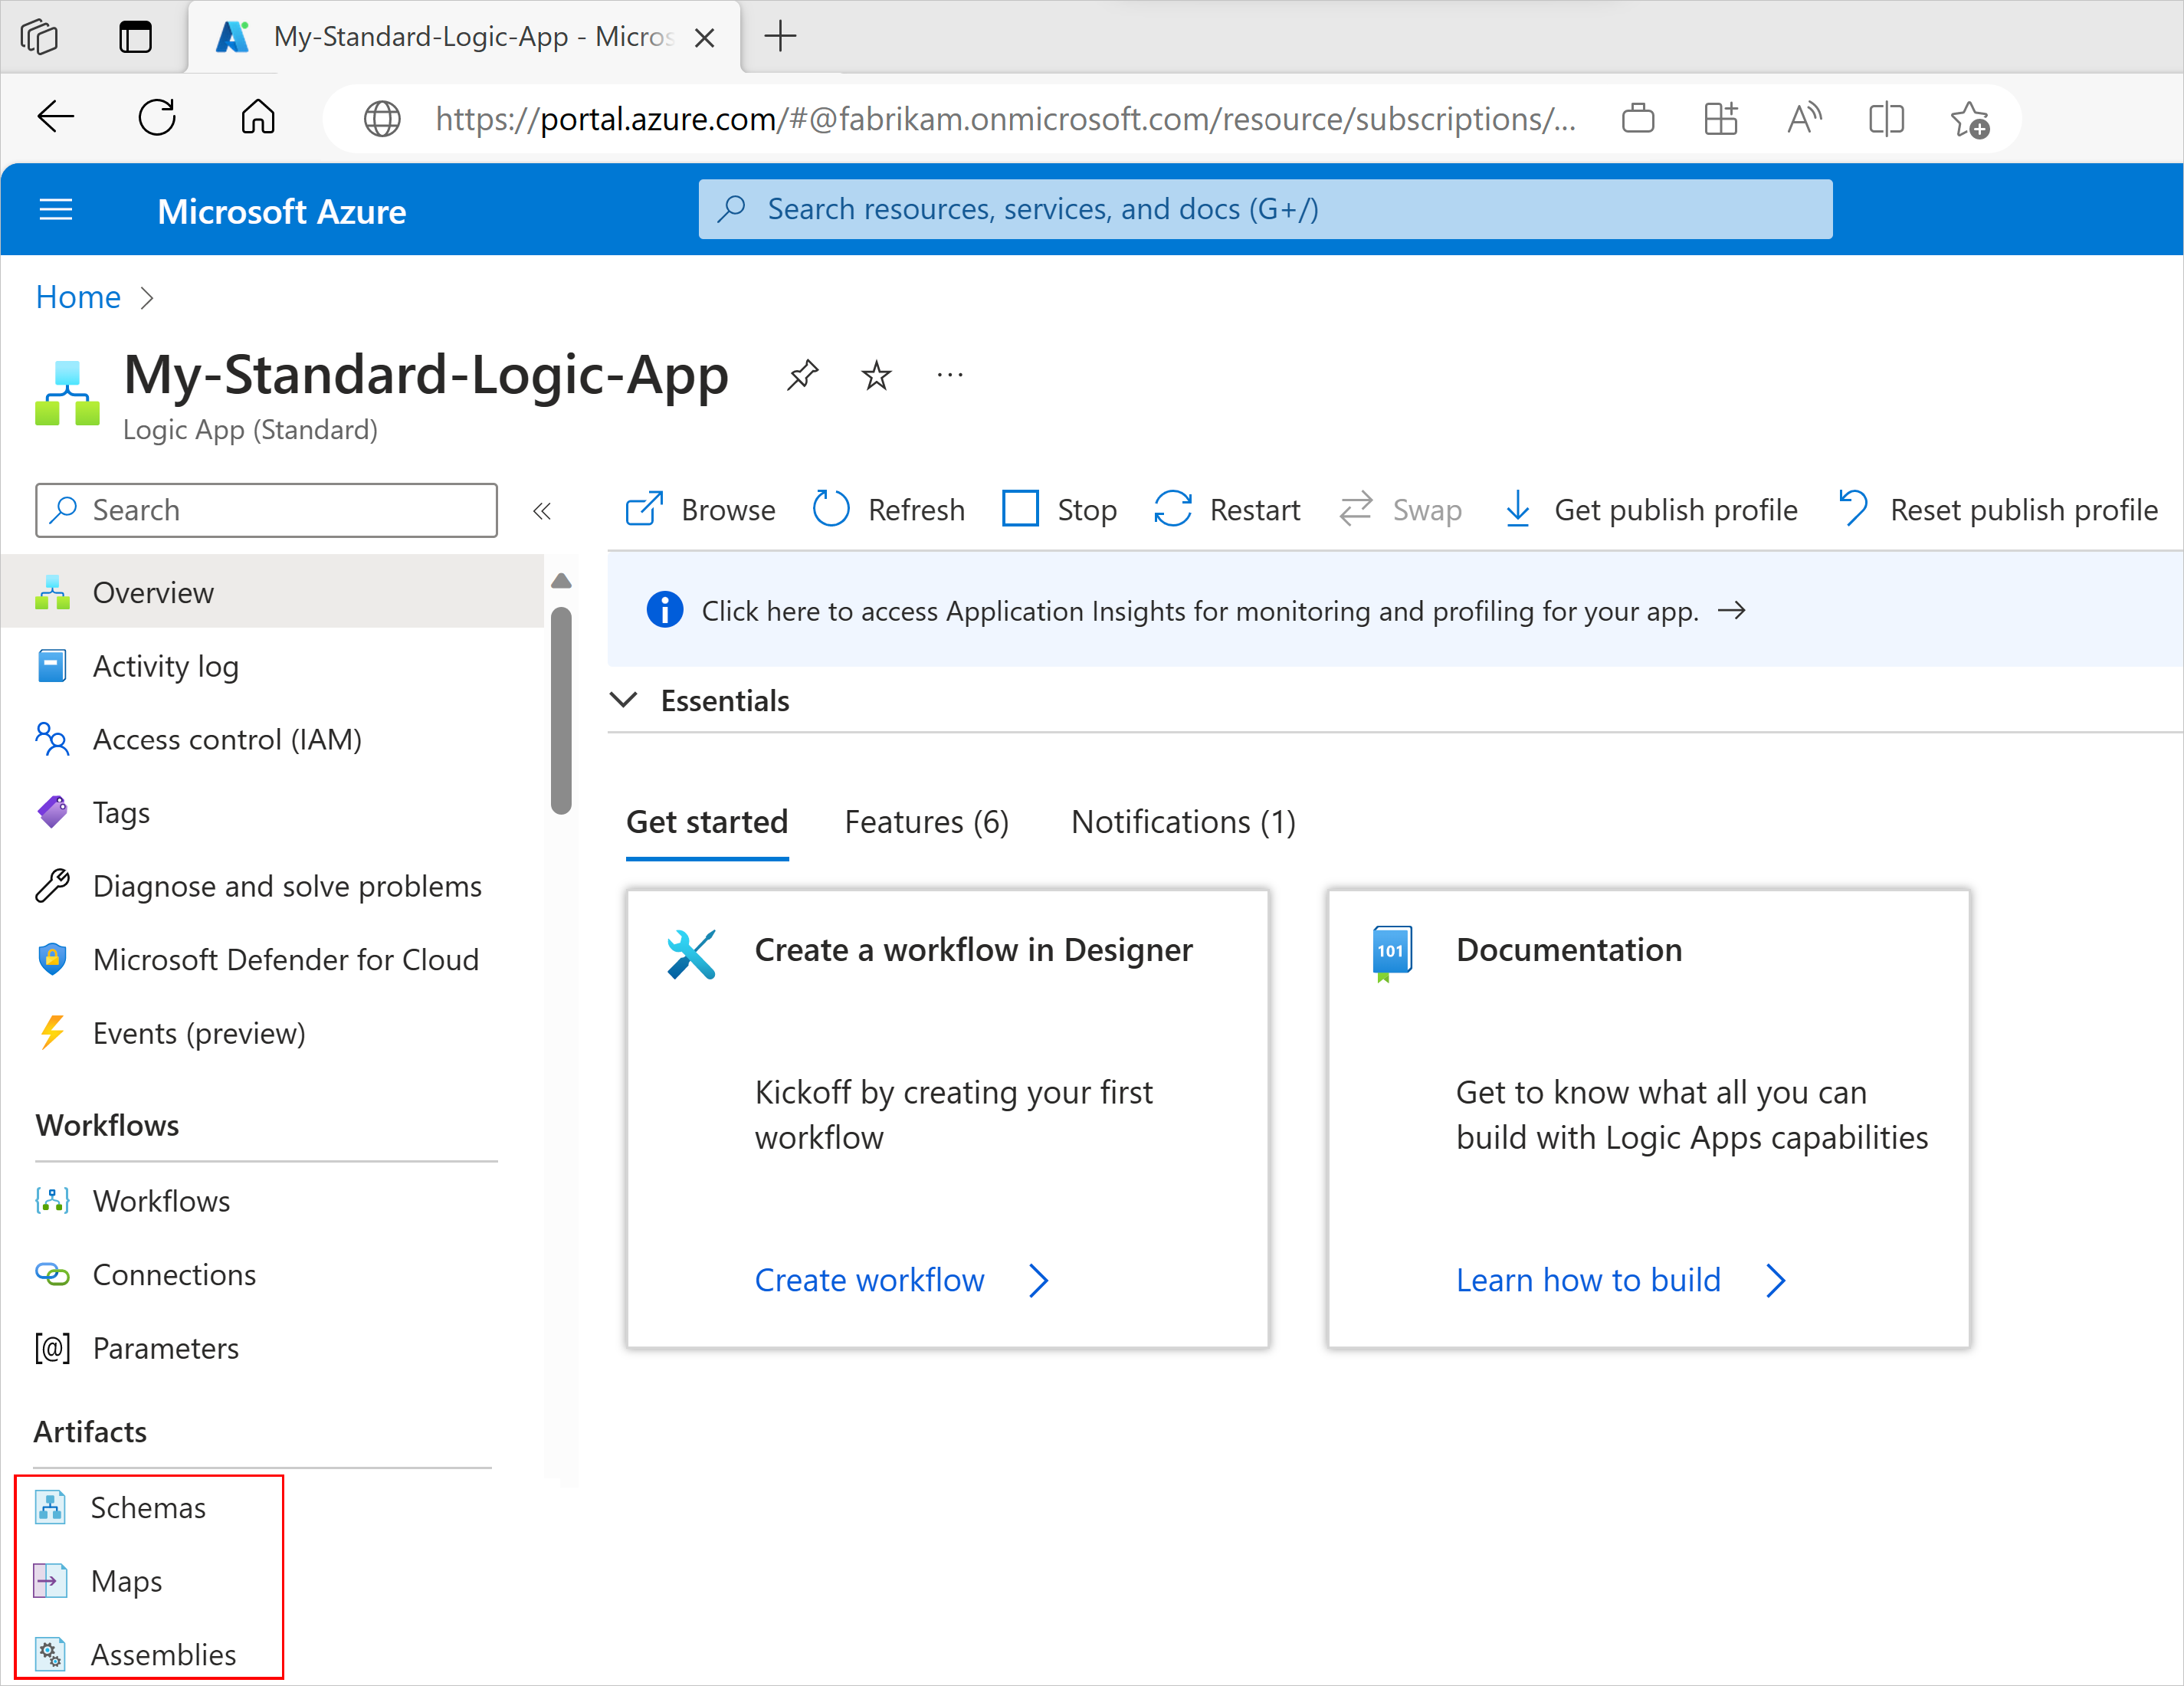
In a logic app workflow, some connectors have dependencies on artifacts such as maps, schemas, or assemblies. In Visual Studio Code, you can upload these artifacts to your logic app project, similar to how you can upload these artifacts in the Azure portal through the logic app resource menu under Artifacts, for example:
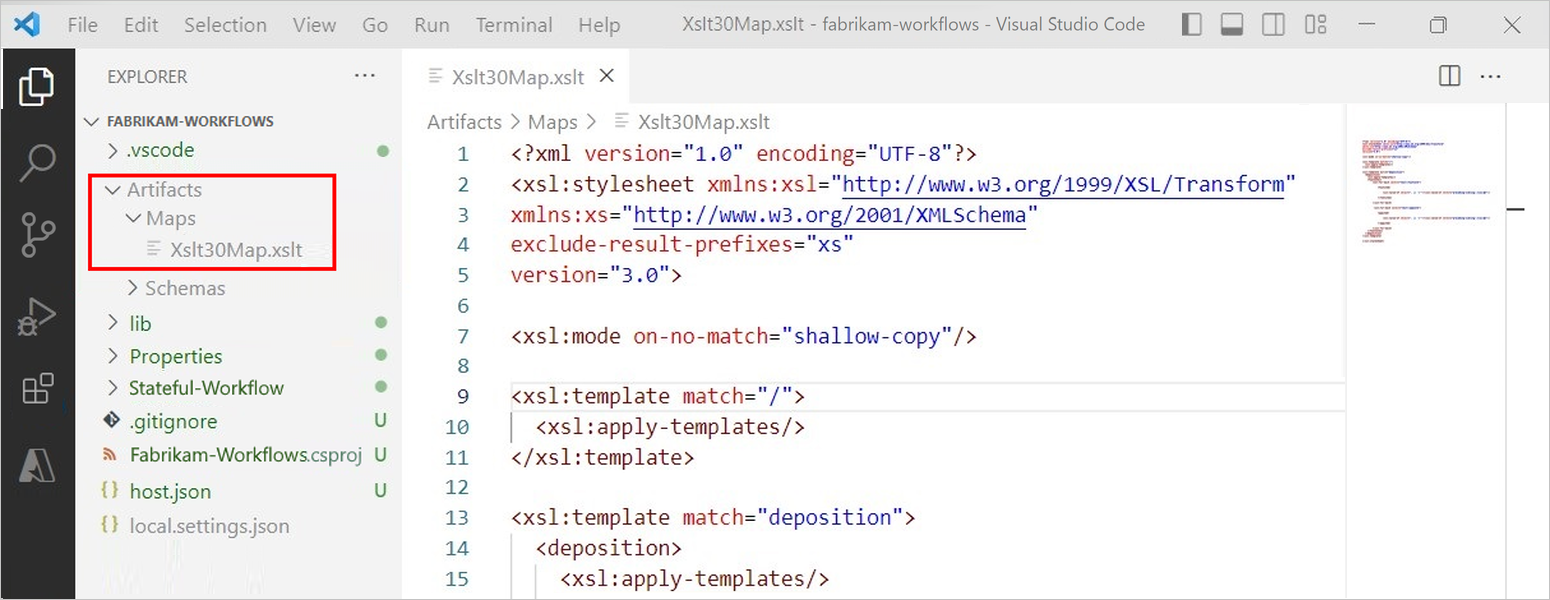
Add maps to your project
To add maps to your project, in your project hierarchy, expand Artifacts > Maps, which is the folder where you can put your maps.
Add schemas to your project
To add schemas to your project, in your project hierarchy, expand Artifacts > Schemas, which is the folder where you can put your schemas.
Add assemblies to your project
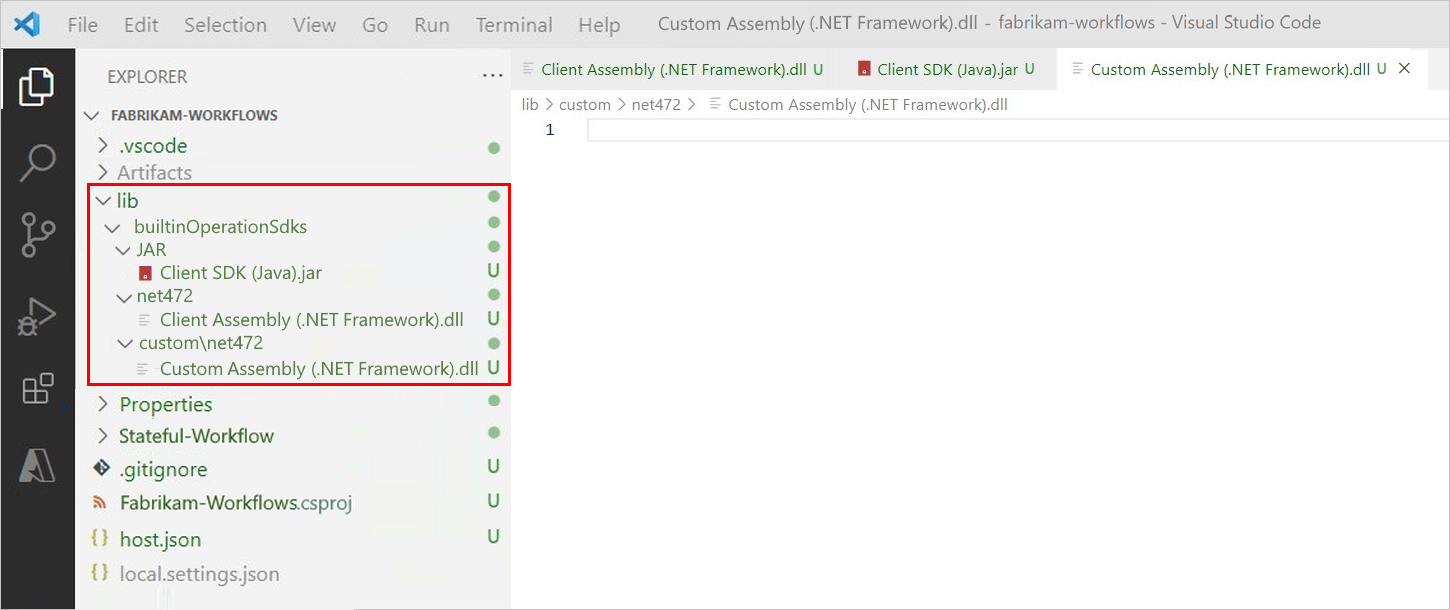
A Standard logic app can use or reference specific kinds of assemblies, which you can upload to your project in Visual Studio Code. However, you must add them to specific folders in your project. The following table provides more information about each assembly type and where exactly to put them in your project.
| Assembly type | Description |
|---|---|
| Client/SDK Assembly (.NET Framework) | This assembly type provides storage and deployment of client and custom SDK for the .NET Framework. For example, the SAP built-in connector uses these assemblies to load the SAP NCo non-redistributable DLL files. Make sure that you add these assemblies to the following folder: \lib\builtinOperationSdks\net472 |
| Client/SDK Assembly (Java) | This assembly type provides storage and deployment of custom SDK for Java. For example, the JDBC built-in connector uses these JAR files to find JDBC drivers for custom relational databases (RDBs). Make sure to add these assemblies to the following folder: \lib\builtinOperationSdks\JAR |
| Custom Assembly (.NET Framework) | This assembly type provides storage and deployment of custom DLLs. For example, the Transform XML operation uses these assemblies for the custom transformation functions that are required during XML transformation. Make sure to add these assemblies to the following folder: \lib\custom\net472 |
The following image shows where to put each assembly type in your project:
For more information about uploading assemblies to your logic app resource in the Azure portal, see Add referenced assemblies.
Migrate NuGet-based projects to use "lib\*" assemblies
Important
This task is required only for NuGet-based logic app projects.
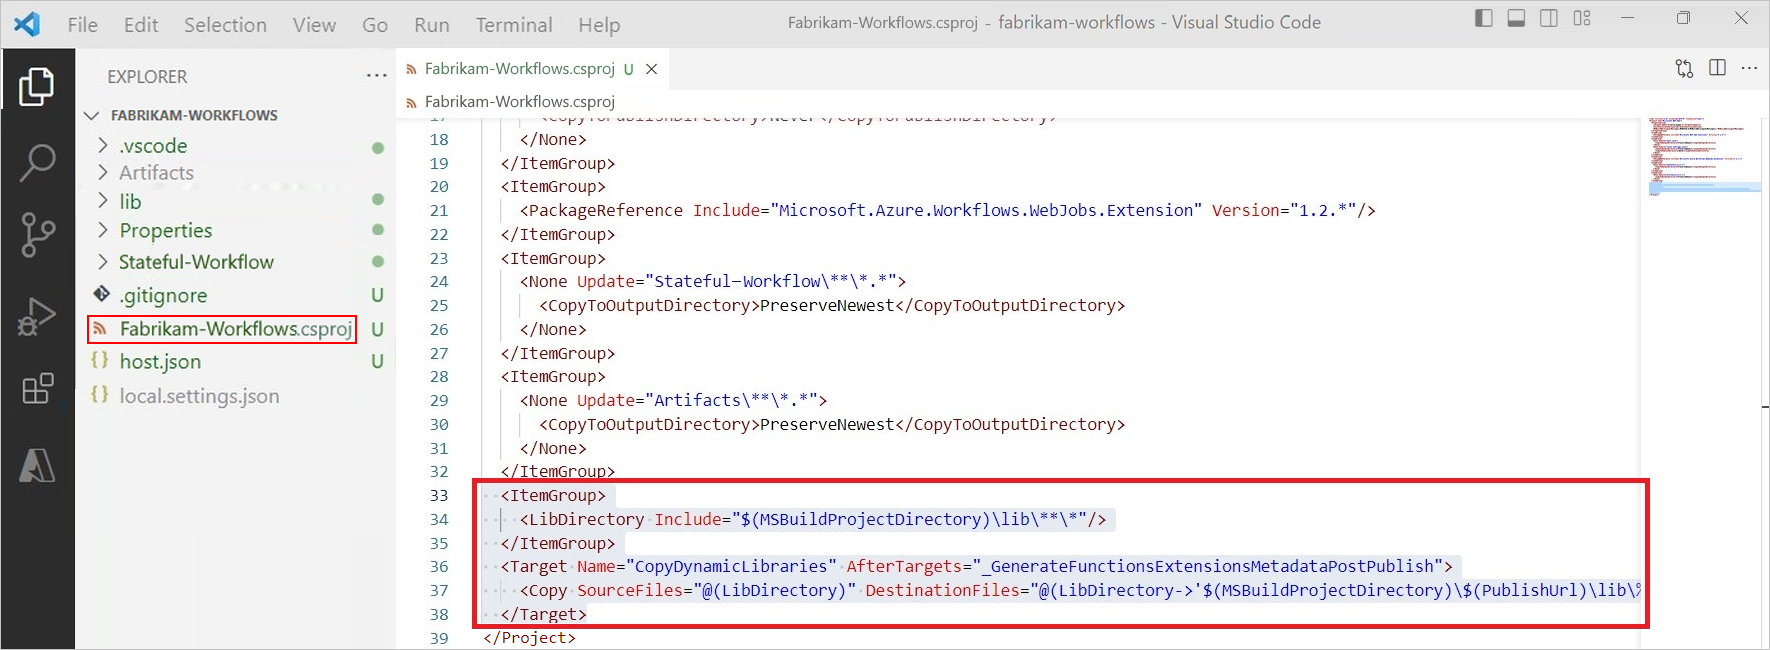
If you created your logic app project when assemblies support wasn't available for Standard logic app workflows, you can add the following lines to your <project-name>.csproj file to work with projects that use assemblies:
  <ItemGroup>
    <LibDirectory Include="$(MSBuildProjectDirectory)\lib\**\*"/>
  </ItemGroup>
  <Target Name="CopyDynamicLibraries" AfterTargets="_GenerateFunctionsExtensionsMetadataPostPublish">
    <Copy SourceFiles="@(LibDirectory)" DestinationFiles="@(LibDirectory->'$(MSBuildProjectDirectory)\$(PublishUrl)\lib\%(RecursiveDir)%(Filename)%(Extension)')"/>
  </Target>
Important
For a project that runs on Linux or MacOS, make sure to update the directory separator. For example, review the following image that shows the previous code added to the <project-name>.csproj file.
Open the workflow definition file in the designer
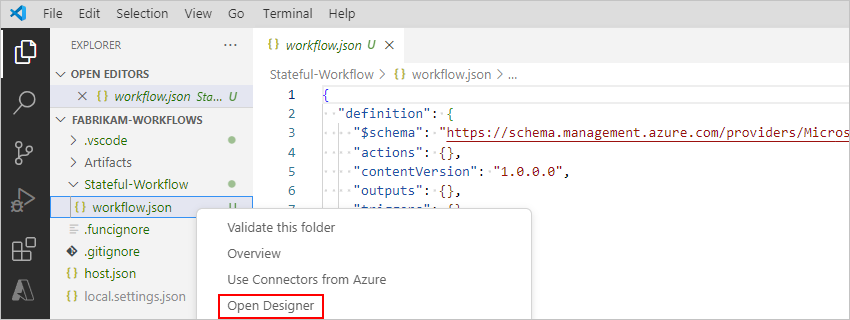
Expand your workflow's project folder, which is named Stateful-Workflow in this example, and open the workflow.json file.
Open the workflow.json file's shortcut menu, and select Open Designer.
After the Enable connectors in Azure list opens, select Use connectors from Azure, which applies to all the managed or "shared" connectors, which are hosted and run in Azure versus the built-in, native, or "in-app" connectors, which run directly with the Azure Logic Apps runtime.

Note
Stateless workflows currently support only actions from managed connectors, not triggers. Although you have the option to enable connectors in Azure for your stateless workflow, the designer doesn't show any managed connector triggers for you to select.
After the Select subscription list opens, select the Azure subscription to use for your logic app project.

After the resource groups list opens, select Create new resource group.

Provide a name for the resource group, and press Enter. This example uses Fabrikam-Workflows-RG.

From the locations list, select the Azure region to use when creating your resource group and resources. This example uses West Central US.

After you perform this step, Visual Studio Code opens the workflow designer.
Note
When Visual Studio Code starts the workflow design-time API, you might get a message that startup might take a few seconds. You can ignore this message or select OK.
If the designer won't open, review the troubleshooting section, Designer fails to open.
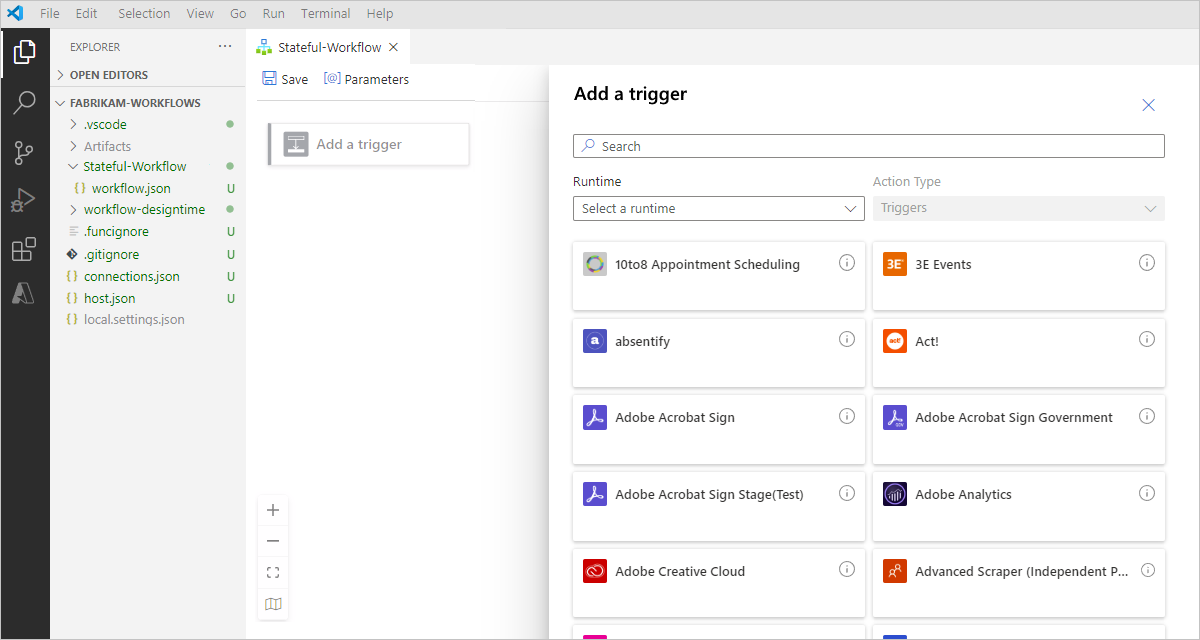
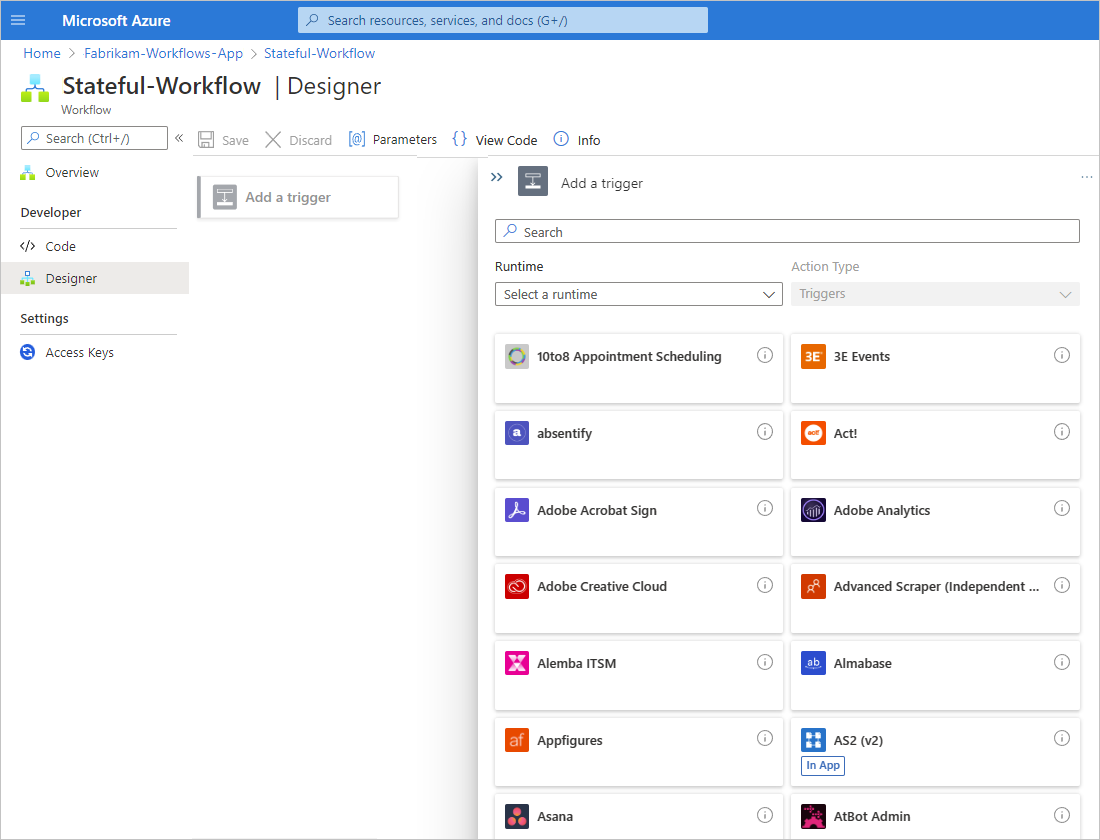
After the designer appears, the Add a trigger prompt appears on the designer.
On the designer, select Add a trigger, which opens the Add a trigger pane and a gallery showing all the connectors that have triggers for you to select.
Next, add a trigger and actions to your workflow.
Add a trigger and actions
After you open a blank workflow in the designer, the Add a trigger prompt appears on the designer. You can now start creating your workflow by adding a trigger and actions.
Important
To locally run a workflow that uses a webhook-based trigger or actions, such as the built-in HTTP Webhook trigger or action, you must enable this capability by setting up forwarding for the webhook's callback URL.
The workflow in this example uses the following trigger and actions:
The Request built-in connector trigger named When an HTTP request is received, which can receive inbound calls or requests and creates an endpoint that other services or logic app workflows can call.
The Office 365 Outlook managed connector action named Send an email. To follow this how-to guide, you need an Office 365 Outlook email account. If you have an email account that's supported by a different connector, you can use that connector, but that connector's user experience will differ from the steps in this example.
The Request built-in connector action named Response, which you use to send a reply and return data back to the caller.
Add the Request trigger
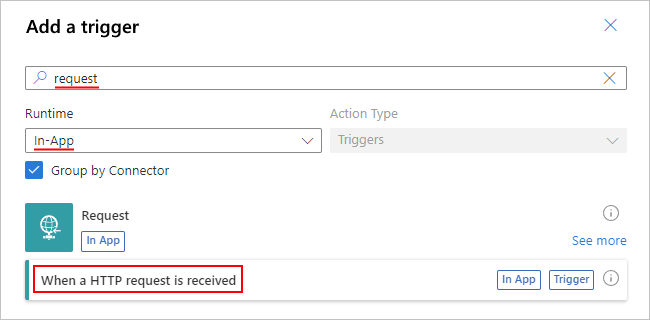
On the workflow designer, in the Add a trigger pane, open the Runtime list, and select In-App so that you view only the available built-in connector triggers.
Find the Request trigger named When an HTTP request is received by using the search box, and add that trigger to your workflow. For more information, see Build a workflow with a trigger and actions.
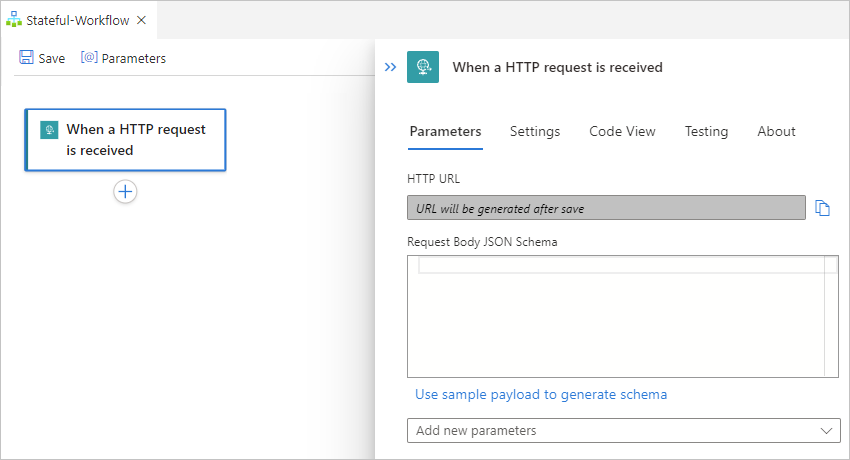
When the trigger appears on the designer, the trigger's information pane opens and shows the trigger's parameters, settings, and other related tasks.
Tip
If the information pane doesn't appear, makes sure that the trigger is selected on the designer.
Save your workflow. On the designer toolbar, select Save.
If you need to delete an item from the designer, follow these steps for deleting items from the designer.
Add the Office 365 Outlook action
On the designer, under the Request trigger, select the plus sign (+) > Add an action.
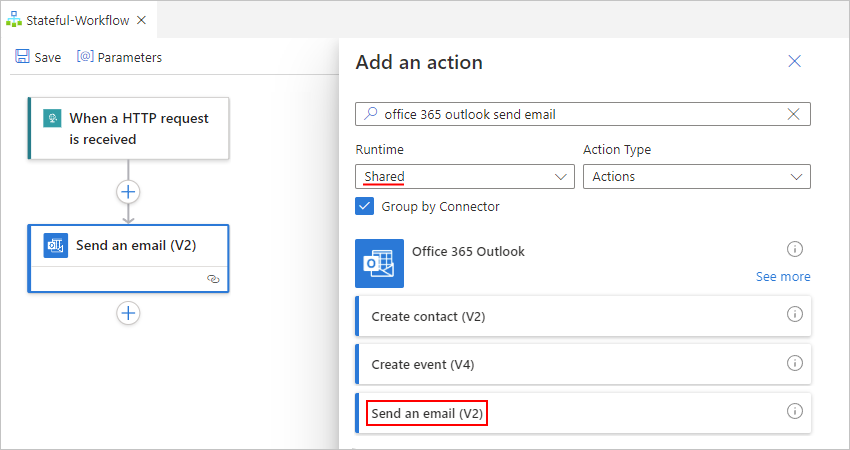
In the Add an action pane that opens, from the Runtime list, select Shared so that you view only the available managed connector actions.
Find the Office 365 Outlook managed connector action named Send an email (V2) by using the search box, and add that action to your workflow. For more information, see Build a workflow with a trigger and actions.
When the action's authentication pane opens, select Sign in to create a connection to your email account.
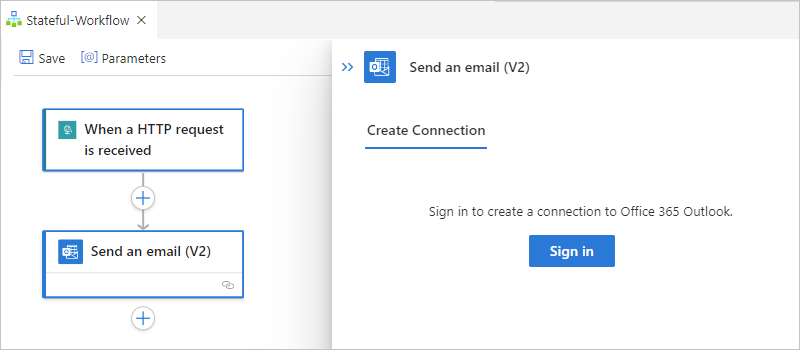
Follow the subsequent prompts to select your account, allow access, and allow returning to Visual Studio Code.
Note
If too much time passes before you complete the prompts, the authentication process times out and fails. In this case, return to the designer and retry signing in to create the connection.
When the Microsoft prompt appears, select the user account for Office 365 Outlook, and then select Allow access.
When Azure Logic Apps prompts to open a Visual Studio Code link, select Open.

When Visual Studio Code prompts to open the Microsoft Azure Tools, select Open.

Tip
To skip such future prompts, select the following options when the associated prompts appear:
Permission to open link for Visual Studio Code: Select Always allow logic-apis-westcentralus.consent.azure-apim.net to open links of this type in the associated app. This domain changes based on the Azure region that you selected for your logic app resource.
Permission to open Microsoft Azure Tools: Select Don't ask again for this extension.
After Visual Studio Code creates your connection, some connectors show the message that The connection will be valid for {n} days only. This time limit applies only to the duration while you author your logic app workflow in Visual Studio Code. After deployment, this limit no longer applies because your workflow can authenticate at runtime by using its automatically enabled system-assigned managed identity. This managed identity differs from the authentication credentials or connection string that you use when you create a connection. If you disable this system-assigned managed identity, connections won't work at runtime.
On the designer, if the Send an email action doesn't appear selected, select that action.
On the action information pane, on the Parameters tab, provide the required information for the action, for example:
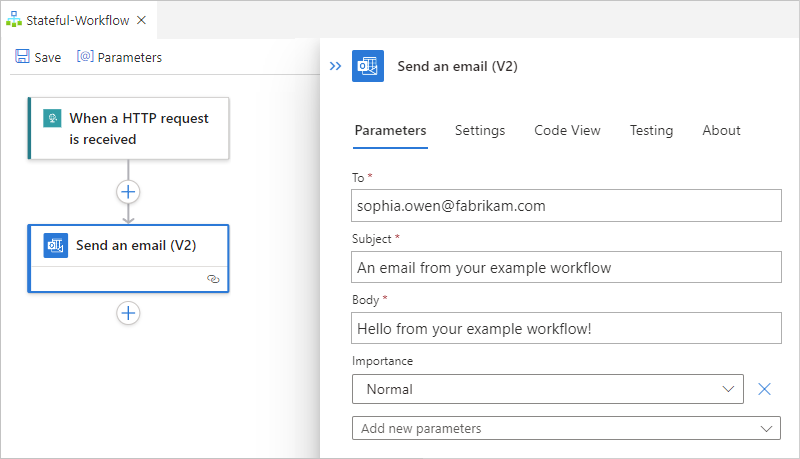
Property Required Value Description To Yes <your-email-address> The email recipient, which can be your email address for test purposes. This example uses the fictitious email, sophia.owen@fabrikam.com. Subject Yes An email from your example workflow The email subject Body Yes Hello from your example workflow! The email body content Note
If you make any changes on the Testing tab, make sure that you select Save to commit those changes before you switch tabs or change focus to the designer. Otherwise, Visual Studio Code won't keep your changes.
Save your workflow. On the designer, select Save.
Enable locally running webhooks
When you use a webhook-based trigger or action, such as HTTP Webhook, with a logic app workflow running in Azure, the Azure Logic Apps runtime subscribes to the service endpoint by generating and registering a callback URL with that endpoint. The trigger or action then waits for the service endpoint to call the URL. However, when you're working in Visual Studio Code, the generated callback URL starts with http://localhost:7071/.... This URL is for your localhost server, which is private so the service endpoint can't call this URL.
To locally run webhook-based triggers and actions in Visual Studio Code, you need to set up a public URL that exposes your localhost server and securely forwards calls from the service endpoint to the webhook callback URL. You can use a forwarding service and tool such as ngrok, which opens an HTTP tunnel to your localhost port, or you can use your own equivalent tool.
Set up call forwarding using ngrok
Go to the ngrok website. Either sign up for a new account or sign in to your account, if you have one already.
Get your personal authentication token, which your ngrok client needs to connect and authenticate access to your account.
To find your authentication token page, on your account dashboard menu, expand Authentication, and select Your Authtoken.
From the Your Authtoken box, copy the token to a safe location.
From the ngrok download page or your account dashboard, download the ngrok version that you want, and extract the .zip file. For more information, see Step 1: Unzip to install.
On your computer, open your command prompt tool. Browse to the location where you have the ngrok.exe file.
Connect the ngrok client to your ngrok account by running the following command. For more information, see Step 2: Connect your account.
ngrok authtoken <your_auth_token>Open the HTTP tunnel to localhost port 7071 by running the following command. For more information, see Step 3: Fire it up.
ngrok http 7071From the output, find the following line:
http://<domain>.ngrok.io -> http://localhost:7071Copy and save the URL that has this format:
http://<domain>.ngrok.io
Set up the forwarding URL in your app settings
In Visual Studio Code, on the designer, add the webhook-based trigger or action that you want to use.
This example continues with the HTTP + Webhook trigger.
When the prompt appears for the host endpoint location, enter the forwarding (redirection) URL that you previously created.
Note
Ignoring the prompt causes a warning to appear that you must provide the forwarding URL, so select Configure, and enter the URL. After you finish this step, the prompt won't appear for subsequent webhook triggers or actions that you might add.
To make the prompt appear, at your project's root level, open the local.settings.json file's shortcut menu, and select Configure Webhook Redirect Endpoint. The prompt now appears so you can provide the forwarding URL.
Visual Studio Code adds the forwarding URL to the local.settings.json file in your project's root folder. In the
Valuesobject, the property that's namedWorkflows.WebhookRedirectHostUrinow appears and is set to the forwarding URL, for example:{ "IsEncrypted": false, "Values": { "AzureWebJobsStorage": "UseDevelopmentStorage=true", "FUNCTIONS_WORKER_RUNTIME": "dotnet", "FUNCTIONS_V2_COMPATIBILITY_MODE": "true", <...> "Workflows.WebhookRedirectHostUri": "http://xxxXXXXxxxXXX.ngrok.io", <...> } }Note
Previously, the FUNCTIONS_WORKER_RUNTIME setting's default value was
node. Now,dotnetis the default value for all new and existing deployed Standard logic apps, even for apps that had a different value. This change shouldn't affect your workflow's runtime, and everything should work the same way as before. For more information, see the FUNCTIONS_WORKER_RUNTIME app setting.
The first time when you start a local debugging session or run the workflow without debugging, the Azure Logic Apps runtime registers the workflow with the service endpoint and subscribes to that endpoint for notifying the webhook operations. The next time that your workflow runs, the runtime won't register or resubscribe because the subscription registration already exists in local storage.
When you stop the debugging session for a workflow run that uses locally run webhook-based triggers or actions, the existing subscription registrations aren't deleted. To unregister, you have to manually remove or delete the subscription registrations.
Note
After your workflow starts running, the terminal window might show errors like this example:
message='Http request failed with unhandled exception of type 'InvalidOperationException' and message: 'System.InvalidOperationException: Synchronous operations are disallowed. Call ReadAsync or set AllowSynchronousIO to true instead.'
In this case, open the local.settings.json file in your project's root folder, and make sure that the property is set to true:
"FUNCTIONS_V2_COMPATIBILITY_MODE": "true"
Manage breakpoints for debugging
Before you run and test your logic app workflow by starting a debugging session, you can set breakpoints inside the workflow.json file for each workflow. No other setup is required.
At this time, breakpoints are supported only for actions, not triggers. Each action definition has these breakpoint locations:
Set the starting breakpoint on the line that shows the action's name. When this breakpoint hits during the debugging session, you can review the action's inputs before they're evaluated.
Set the ending breakpoint on the line that shows the action's closing curly brace (}). When this breakpoint hits during the debugging session, you can review the action's results before the action finishes running.
To add a breakpoint, follow these steps:
Open the workflow.json file for the workflow that you want to debug.
On the line where you want to set the breakpoint, in the left column, select inside that column. To remove the breakpoint, select that breakpoint.
When you start your debugging session, the Run view appears on the left side of the code window, while the Debug toolbar appears near the top.
Note
If the Run view doesn't automatically appear, press Ctrl+Shift+D.
To review the available information when a breakpoint hits, in the Run view, examine the Variables pane.
To continue workflow execution, on the Debug toolbar, select Continue (play button).
You can add and remove breakpoints at any time during the workflow run. However, if you update the workflow.json file after the run starts, breakpoints don't automatically update. To update the breakpoints, restart the logic app.
For general information, see Breakpoints - Visual Studio Code.
Run, test, and debug locally
To test your logic app workflow, follow these steps to start a debugging session, and find the URL for the endpoint that's created by the Request trigger. You need this URL so that you can later send a request to that endpoint.
To debug a stateless workflow more easily, you can enable the run history for that workflow.
If your Azurite emulator is already running, continue to the next step. Otherwise, make sure to start the emulator before you run your workflow:
In Visual Studio Code, from the View menu, select Command Palette.
After the command palette appears, enter Azurite: Start.
For more information about Azurite commands, see the documentation for the Azurite extension in Visual Studio Code.
On the Visual Studio Code Activity Bar, open the Run menu, and select Start Debugging (F5).
The Terminal window opens so that you can review the debugging session.
Note
If you get the error, "Error exists after running preLaunchTask 'generateDebugSymbols'", see the troubleshooting section, Debugging session fails to start.
Now, find the callback URL for the endpoint on the Request trigger.
Reopen the Explorer pane so that you can view your project.
From the workflow.json file's shortcut menu, select Overview.
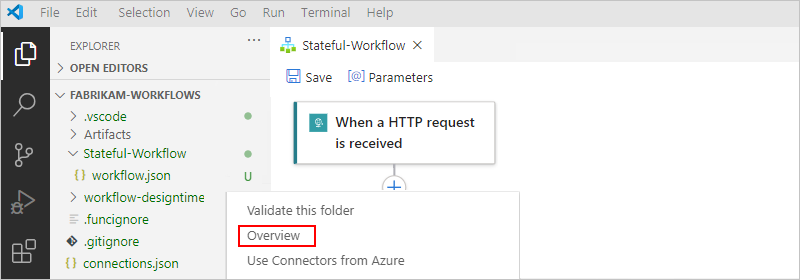
Find the Callback URL value, which looks similar to this URL for the example Request trigger:
http://localhost:7071/api/<workflow-name>/triggers/manual/invoke?api-version=2020-05-01&sp=%2Ftriggers%2Fmanual%2Frun&sv=1.0&sig=<shared-access-signature>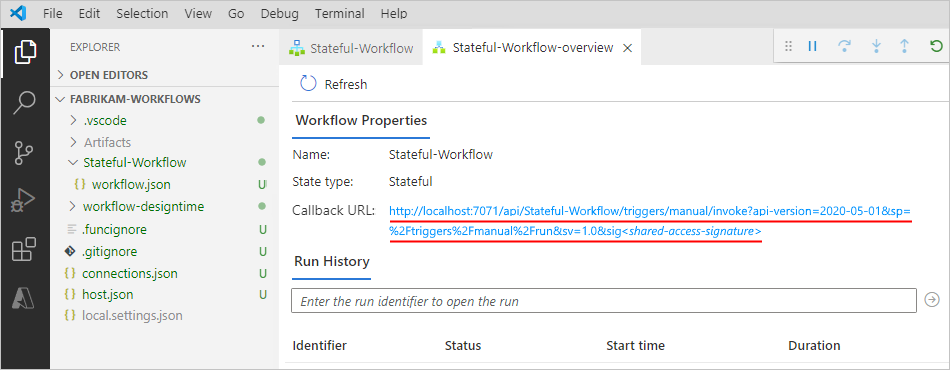
Copy and save the Callback URL property value.
To test the callback URL and trigger the workflow, send an HTTP request to the URL, including the method that the Request trigger expects, by using your HTTP request tool and its instructions.
This example uses the GET method with the copied URL, which looks like the following sample:
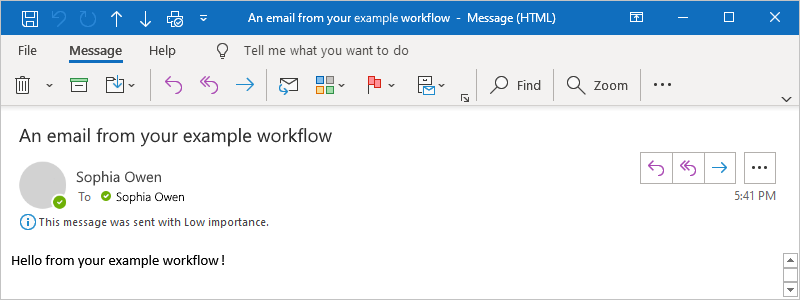
GET http://localhost:7071/api/Stateful-Workflow/triggers/manual/invoke?api-version=2020-05-01&sp=%2Ftriggers%2Fmanual%2Frun&sv=1.0&sig=<shared-access-signature>When the trigger fires, the example workflow runs and sends an email that appears similar to this example:
In Visual Studio Code, return to your workflow's overview page.
If you created a stateful workflow, after the request that you sent triggers the workflow, the overview page shows the workflow's run status and history.
Tip
If the run status doesn't appear, try refreshing the overview page by selecting Refresh. No run happens for a trigger that's skipped due to unmet criteria or finding no data.
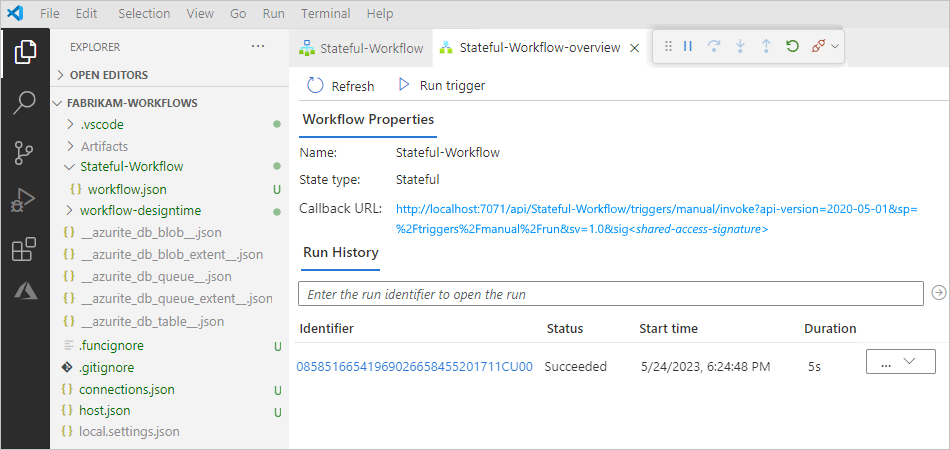
The following table shows the possible final statuses that each workflow run can have and show in Visual Studio Code:
Run status Description Aborted The run stopped or didn't finish due to external problems, for example, a system outage or lapsed Azure subscription. Cancelled The run was triggered and started but received a cancellation request. Failed At least one action in the run failed. No subsequent actions in the workflow were set up to handle the failure. Running The run was triggered and is in progress, but this status can also appear for a run that is throttled due to action limits or the current pricing plan. Tip: If you set up diagnostics logging, you can get information about any throttle events that happen.
Succeeded The run succeeded. If any action failed, a subsequent action in the workflow handled that failure. Timed out The run timed out because the current duration exceeded the run duration limit, which is controlled by the Run history retention in days setting. A run's duration is calculated by using the run's start time and run duration limit at that start time. Note: If the run's duration also exceeds the current run history retention limit, which is also controlled by the Run history retention in days setting, the run is cleared from the runs history by a daily cleanup job. Whether the run times out or completes, the retention period is always calculated by using the run's start time and current retention limit. So, if you reduce the duration limit for an in-flight run, the run times out. However, the run either stays or is cleared from the runs history based on whether the run's duration exceeded the retention limit.
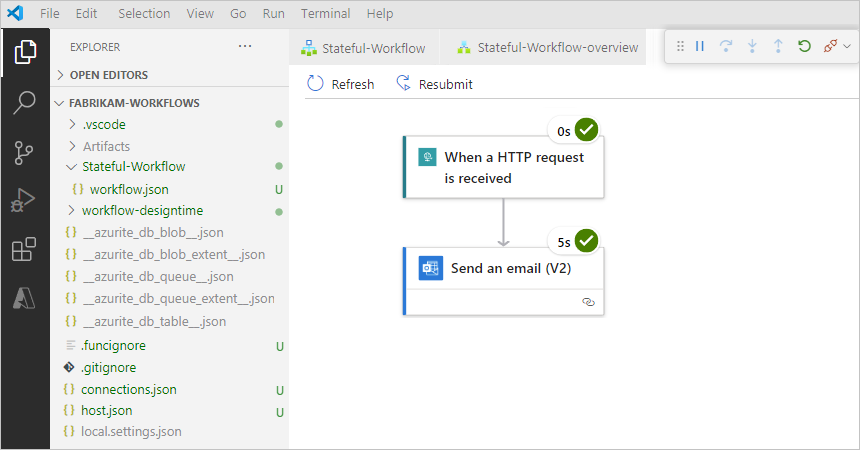
Waiting The run hasn't started or is paused, for example, due to an earlier workflow instance that's still running. To review the statuses for each step in a specific run and the step's inputs and outputs, select the ellipses (...) button for that run, and select Show run.
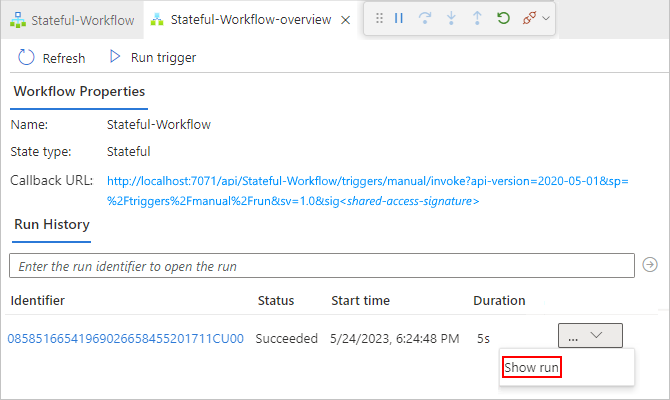
Visual Studio Code opens the monitoring view and shows the status for each step in the run.
Note
If a run failed and a step in monitoring view shows the 400 Bad Request error, this problem might result from a longer trigger name or action name that causes the underlying Uniform Resource Identifier (URI) to exceed the default character limit. For more information, see "400 Bad Request".
The following table shows the possible statuses that each workflow action can have and show in Visual Studio Code:
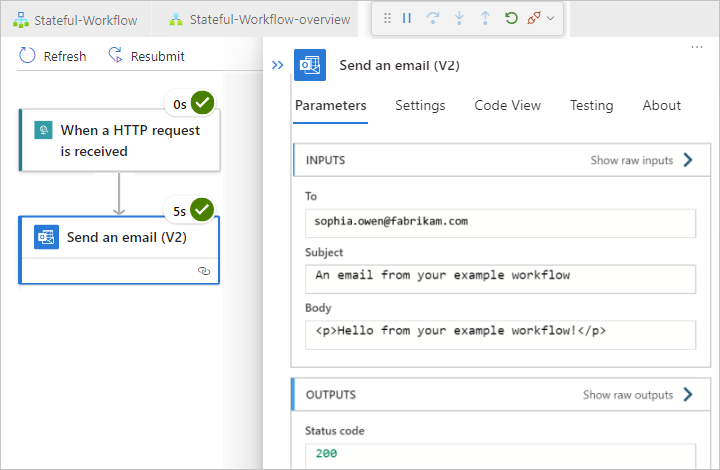
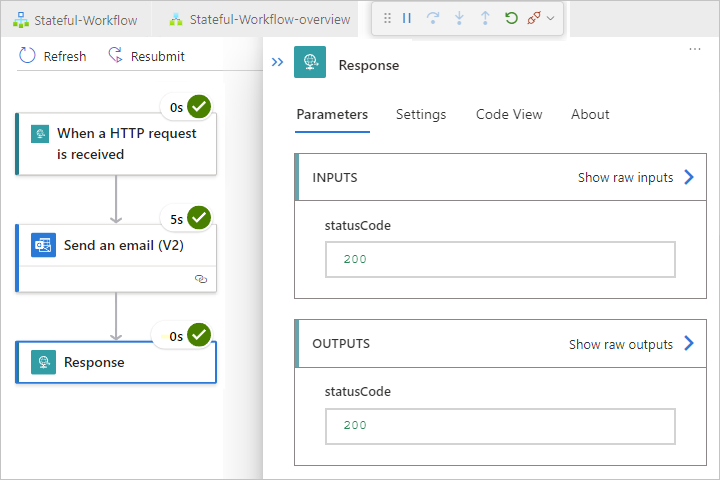
Action status Description Aborted The action stopped or didn't finish due to external problems, for example, a system outage or lapsed Azure subscription. Cancelled The action was running but received a request to cancel. Failed The action failed. Running The action is currently running. Skipped The action was skipped because the immediately preceding action failed. An action has a runAftercondition that requires that the preceding action finishes successfully before the current action can run.Succeeded The action succeeded. Succeeded with retries The action succeeded but only after one or more retries. To review the retry history, in the run history details view, select that action so that you can view the inputs and outputs. Timed out The action stopped due to the timeout limit specified by that action's settings. Waiting Applies to a webhook action that's waiting for an inbound request from a caller. To review the inputs and outputs for each step, select the step that you want to inspect. To further review the raw inputs and outputs for that step, select Show raw inputs or Show raw outputs.
To stop the debugging session, on the Run menu, select Stop Debugging (Shift + F5).
Return a response
When you have a workflow that starts with the Request trigger, you can return a response to the caller that sent a request to your workflow by using the Request built-in action named Response.
In the workflow designer, under the Send an email action, select the plus sign (+) > Add an action.
The Add an action pane opens so that you can select the next action.
In the Add an action pane, from the Runtime list, select In-App. Find and add the Response action.
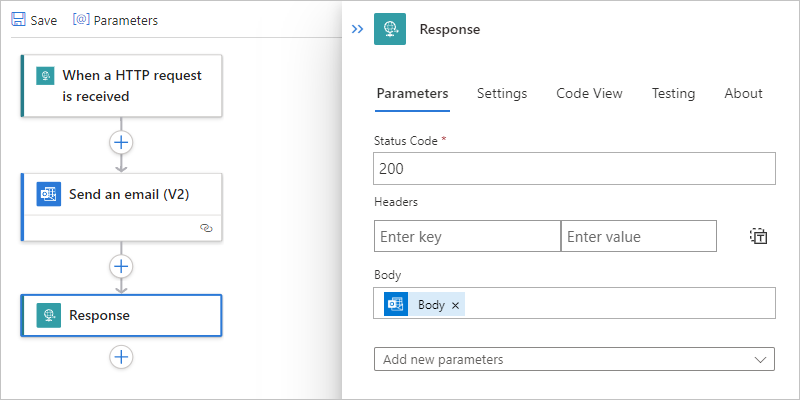
After the Response action appears on the designer, the action's details pane automatically opens.
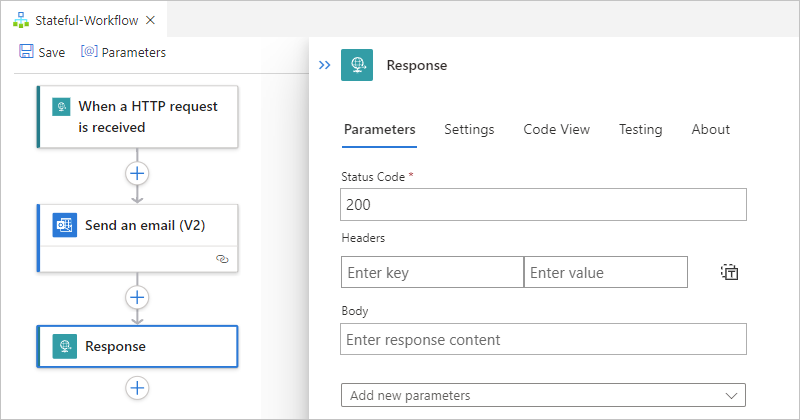
On the Parameters tab, provide the required information for the function that you want to call.
This example returns the Body parameter value, which is the output from the Send an email action.
For the Body parameter, select inside the edit box, and select the lightning icon, which opens the dynamic content list. This list shows the available output values from the preceding trigger and actions in the workflow.
In the dynamic content list, under Send an email, select Body.
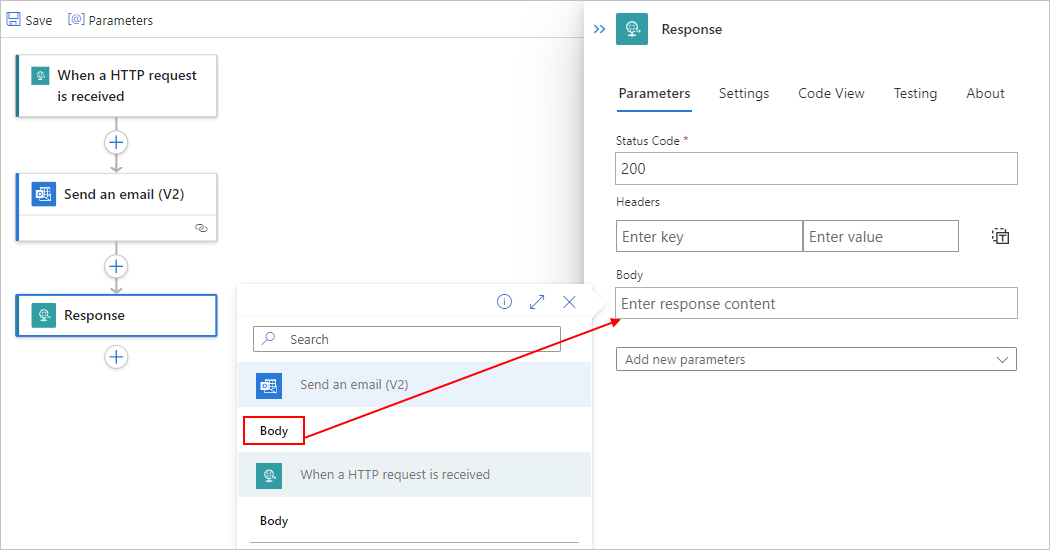
When you're done, the Response action's Body property is now set to the Send an email action's Body output value.
On the designer, select Save.
Retest your logic app
After you make updates to your logic app, you can run another test by rerunning the debugger in Visual Studio Code and sending another request to trigger your updated logic app, similar to the steps in Run, test, and debug locally.
On the Visual Studio Code Activity Bar, open the Run menu, and select Start Debugging (F5).
In your tool for creating and sending requests, send another request to trigger your workflow.
If you created a stateful workflow, on the workflow's overview page, check the status for the most recent run. To view the status, inputs, and outputs for each step in that run, select the ellipses (...) button for that run, and select Show run.
For example, here's the step-by-step status for a run after the sample workflow was updated with the Response action.
To stop the debugging session, on the Run menu, select Stop Debugging (Shift + F5).
Find domain names for firewall access
Before you deploy and run your logic app workflow in the Azure portal, if your environment has strict network requirements or firewalls that limit traffic, you have to set up permissions for any trigger or action connections that exist in your workflow.
To find the fully qualified domain names (FQDNs) for these connections, follow these steps:
In your logic app project, open the connections.json file, which is created after you add the first connection-based trigger or action to your workflow, and find the
managedApiConnectionsobject.For each connection that you created, copy and save the
connectionRuntimeUrlproperty value somewhere safe so that you can set up your firewall with this information.This example connections.json file contains two connections, an AS2 connection and an Office 365 connection with these
connectionRuntimeUrlvalues:AS2:
"connectionRuntimeUrl": https://9d51d1ffc9f77572.00.common.logic-{Azure-region}.azure-apihub.net/apim/as2/11d3fec26c87435a80737460c85f42baOffice 365:
"connectionRuntimeUrl": https://9d51d1ffc9f77572.00.common.logic-{Azure-region}.azure-apihub.net/apim/office365/668073340efe481192096ac27e7d467f
{
   "managedApiConnections": {
      "as2": {
         "api": {
            "id": "/subscriptions/{Azure-subscription-ID}/providers/Microsoft.Web/locations/{Azure-region}/managedApis/as2"
         },
         "connection": {
            "id": "/subscriptions/{Azure-subscription-ID}/resourceGroups/{Azure-resource-group}/providers/Microsoft.Web/connections/{connection-resource-name}"
         },
         "connectionRuntimeUrl": https://9d51d1ffc9f77572.00.common.logic-{Azure-region}.azure-apihub.net/apim/as2/11d3fec26c87435a80737460c85f42ba,
         "authentication": {
            "type":"ManagedServiceIdentity"
         }
      },
      "office365": {
         "api": {
            "id": "/subscriptions/{Azure-subscription-ID}/providers/Microsoft.Web/locations/{Azure-region}/managedApis/office365"
         },
         "connection": {
            "id": "/subscriptions/{Azure-subscription-ID}/resourceGroups/{Azure-resource-group}/providers/Microsoft.Web/connections/{connection-resource-name}"
         },
         "connectionRuntimeUrl": https://9d51d1ffc9f77572.00.common.logic-{Azure-region}.azure-apihub.net/apim/office365/668073340efe481192096ac27e7d467f,
         "authentication": {
            "type":"ManagedServiceIdentity"
         }
      }
   }
}
Deploy to Azure
From Visual Studio Code, you can directly publish your project to Azure to deploy your Standard logic app resource. You can publish your logic app as a new resource, which automatically creates any necessary resources, such as an Azure Storage account, similar to function app requirements. Or, you can publish your logic app to a previously deployed Standard logic app resource, which overwrites that logic app.
Deployment for the Standard logic app resource requires a hosting plan and pricing tier, which you select during deployment. For more information, review Hosting plans and pricing tiers.
Publish to a new Standard logic app resource
On the Visual Studio Code Activity Bar, select the Azure icon to open the Azure window.
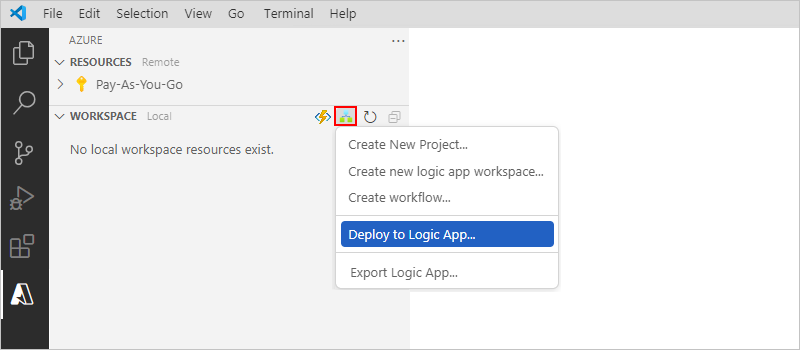
In the Azure window, on the Workspace section toolbar, from the Azure Logic Apps menu, select Deploy to Logic App.
If prompted, select the Azure subscription to use for your logic app deployment.
From the list that Visual Studio Code opens, select from these options:
- Create new Logic App (Standard) in Azure (quick)
- Create new Logic App (Standard) in Azure Advanced
- A previously deployed Logic App (Standard) resource, if any exist
This example continues with Create new Logic App (Standard) in Azure Advanced.

To create your new Standard logic app resource, follow these steps:
Provide a globally unique name for your new logic app, which is the name to use for the Logic App (Standard) resource. This example uses Fabrikam-Workflows-App.

Select a hosting plan for your new logic app. Either create a name for your plan, or select an existing plan (Windows-based App Service plans only). This example selects Create new App Service Plan.

Provide a name for your hosting plan, and then select a pricing tier for your selected plan.
For more information, review Hosting plans and pricing tiers.
For optimal performance, select the same resource group as your project for the deployment.
Note
Although you can create or use a different resource group, doing so might affect performance. If you create or choose a different resource group, but cancel after the confirmation prompt appears, your deployment is also canceled.
For stateful workflows, select Create new storage account or an existing storage account.

If your logic app's creation and deployment settings support using Application Insights, you can optionally enable diagnostics logging and tracing for your logic app. You can do so either when you deploy your logic app from Visual Studio Code or after deployment. You need to have an Application Insights instance, but you can create this resource either in advance, when you deploy your logic app, or after deployment.
To enable logging and tracing now, follow these steps:
Select either an existing Application Insights resource or Create new Application Insights resource.
In the Azure portal, go to your Application Insights resource.
On the resource menu, select Overview. Find and copy the Instrumentation Key value.
In Visual Studio Code, in your project's root folder, open the local.settings.json file.
In the
Valuesobject, add theAPPINSIGHTS_INSTRUMENTATIONKEYproperty, and set the value to the instrumentation key, for example:{ "IsEncrypted": false, "Values": { "AzureWebJobsStorage": "UseDevelopmentStorage=true", "FUNCTIONS_WORKER_RUNTIME": "dotnet", "APPINSIGHTS_INSTRUMENTATIONKEY": <instrumentation-key> } }Tip
You can check whether the trigger and action names correctly appear in your Application Insights instance.
In the Azure portal, go to your Application Insights resource.
On the resource menu, under Investigate, select Application map.
Review the operation names that appear in the map.
Some inbound requests from built-in triggers might appear as duplicates in the Application Map. Rather than use the
WorkflowName.ActionNameformat, these duplicates use the workflow name as the operation name and originate from the Azure Functions host.Next, you can optionally adjust the severity level for the tracing data that your logic app collects and sends to your Application Insights instance.
Each time that a workflow-related event happens, such as when a workflow is triggered or when an action runs, the runtime emits various traces. These traces cover the workflow's lifetime and include, but aren't limited to, the following event types:
- Service activity, such as start, stop, and errors.
- Jobs and dispatcher activity.
- Workflow activity, such as trigger, action, and run.
- Storage request activity, such as success or failure.
- HTTP request activity, such as inbound, outbound, success, and failure.
- Any development traces, such as debug messages.
Each event type is assigned to a severity level. For example, the
Tracelevel captures the most detailed messages, while theInformationlevel captures general activity in your workflow, such as when your logic app, workflow, trigger, and actions start and stop. This table describes the severity levels and their trace types:Severity level Trace type Critical Logs that describe an unrecoverable failure in your logic app. Debug Logs that you can use for investigation during development, for example, inbound and outbound HTTP calls. Error Logs that indicate a failure in workflow execution, but not a general failure in your logic app. Information Logs that track the general activity in your logic app or workflow, for example: - When a trigger, action, or run starts and ends.
- When your logic app starts or ends.Trace Logs that contain the most detailed messages, for example, storage requests or dispatcher activity, plus all the messages that are related to workflow execution activity. Warning Logs that highlight an abnormal state in your logic app but doesn't prevent its running. To set the severity level, at your project's root level, open the host.json file, and find the
loggingobject. This object controls the log filtering for all the workflows in your logic app and follows the ASP.NET Core layout for log type filtering.{ "version": "2.0", "logging": { "applicationInsights": { "samplingExcludedTypes": "Request", "samplingSettings": { "isEnabled": true } } } }If the
loggingobject doesn't contain alogLevelobject that includes theHost.Triggers.Workflowproperty, add those items. Set the property to the severity level for the trace type that you want, for example:{ "version": "2.0", "logging": { "applicationInsights": { "samplingExcludedTypes": "Request", "samplingSettings": { "isEnabled": true } }, "logLevel": { "Host.Triggers.Workflow": "Information" } } }
When you're done with the deployment steps, Visual Studio Code starts creating and deploying the resources necessary for publishing your logic app.
To review and monitor the deployment process, on the View menu, select Output. From the Output window toolbar list, select Azure Logic Apps.

When Visual Studio Code finishes deploying your logic app to Azure, the following message appears:

Congratulations, your logic app is now live in Azure and enabled by default.
Next, you can learn how to perform these tasks:
Manage deployed logic apps in Visual Studio Code or by using the Azure portal.
Enable monitoring view in the Azure portal for a deployed logic app.
Add blank workflow to project
You can have multiple workflows in your logic app project. To add a blank workflow to your project, follow these steps:
On the Visual Studio Code Activity Bar, select the Azure icon.
In the Azure window, on the Workspace section toolbar, from the Azure Logic Apps menu, select Create workflow.
Select the workflow type that you want to add: Stateful or Stateless
Provide a name for your workflow.
When you're done, a new workflow folder appears in your project along with a workflow.json file for the workflow definition.
Manage deployed logic apps in Visual Studio Code
In Visual Studio Code, you can view all the deployed logic apps in your Azure subscription, whether they're Consumption or Standard logic app resources, and select tasks that help you manage those logic apps. However, to access both resource types, you need both the Azure Logic Apps (Consumption) and the Azure Logic Apps (Standard) extensions for Visual Studio Code.
On the Visual Studio Code Activity Bar, select the Azure icon. In the Resources, expand your subscription, and then expand Logic App, which shows all the logic apps deployed in Azure for that subscription.
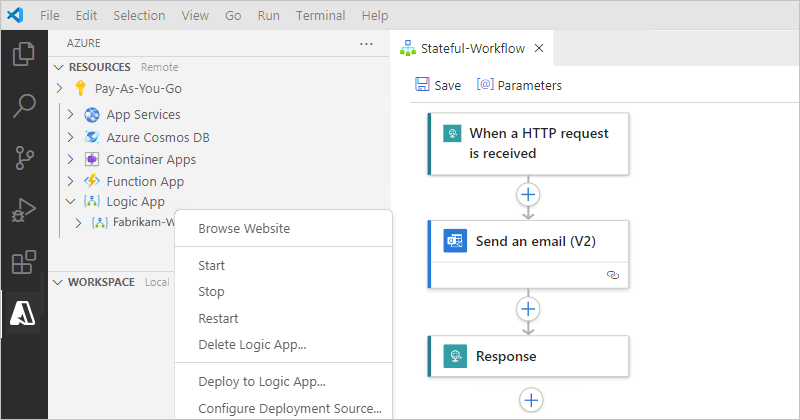
Open the logic app that you want to manage. From the logic app's shortcut menu, select the task that you want to perform.
For example, you can select tasks such as stopping, starting, restarting, or deleting your deployed logic app. You can disable or enable a workflow by using the Azure portal.
Note
The stop logic app and delete logic app operations affect workflow instances in different ways. For more information, review Considerations for stopping logic apps and Considerations for deleting logic apps.
To view all the workflows in the logic app, expand your logic app, and then expand the Workflows node.
To view a specific workflow, open the workflow's shortcut menu, and select Open in Designer, which opens the workflow in read-only mode.
To edit the workflow, you have these options:
In Visual Studio Code, open your project's workflow.json file in the workflow designer, make your edits, and redeploy your logic app to Azure.
In the Azure portal, open your logic app. You can then open, edit, and save your workflow.
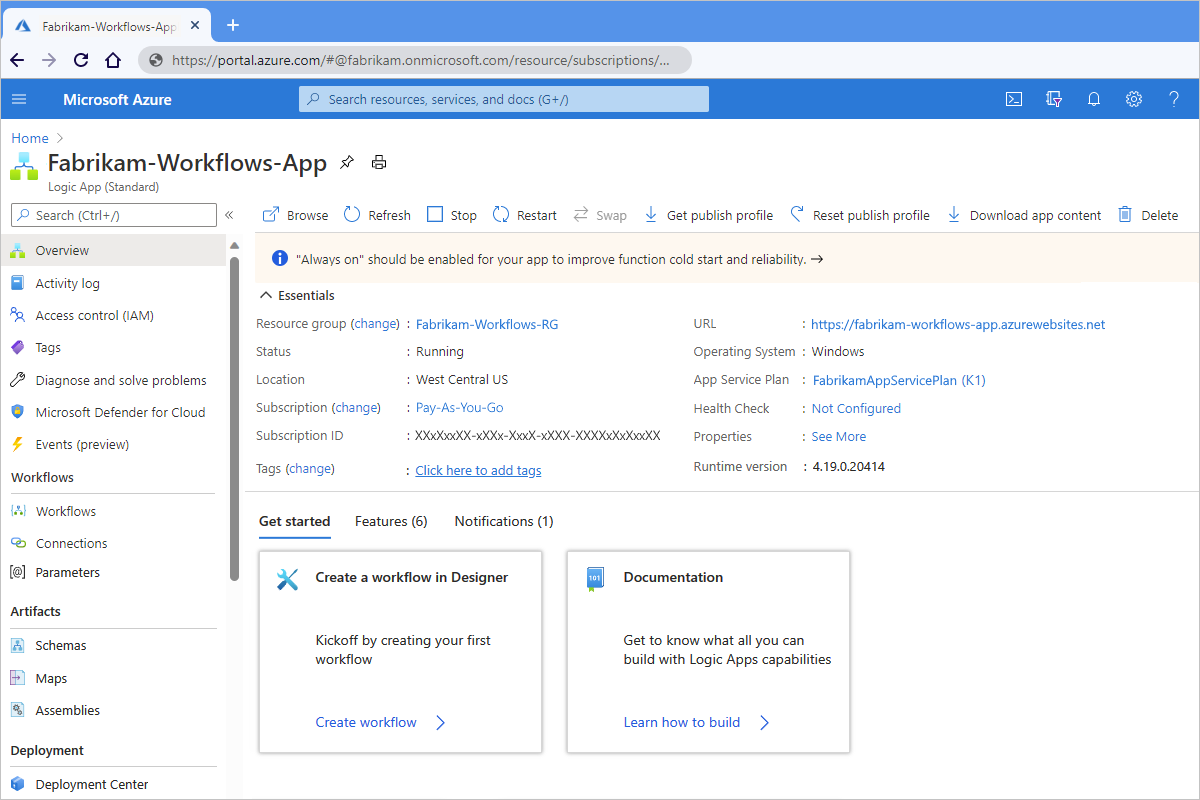
To open the deployed logic app in the Azure portal, open the logic app's shortcut menu, and select Open in Portal.
The Azure portal opens in your browser, signs you in to the portal automatically if you're signed in to Visual Studio Code, and shows your logic app.
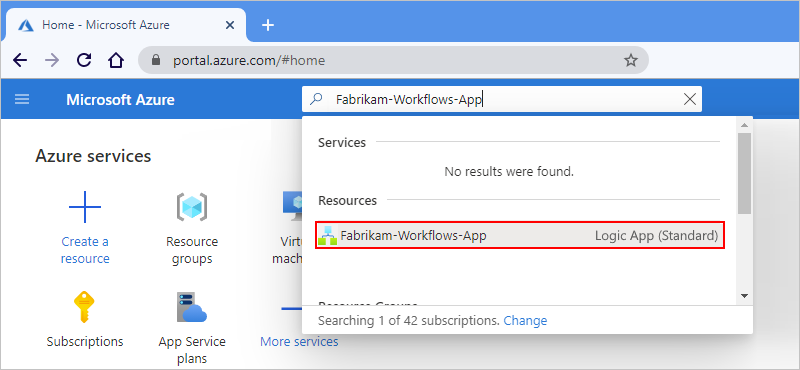
You can also sign in separately to the Azure portal, use the portal search box to find your logic app, and then select your logic app from the results list.
Considerations for stopping logic apps
Stopping a logic app affects workflow instances in the following ways:
Azure Logic Apps cancels all in-progress and pending runs immediately.
Azure Logic Apps doesn't create or run new workflow instances.
Triggers won't fire the next time that their conditions are met. However, trigger states remember the points where the logic app was stopped. So, if you restart the logic app, the triggers fire for all unprocessed items since the last run.
To stop a trigger from firing on unprocessed items since the last run, clear the trigger state before you restart the logic app:
On the Visual Studio Code Activity Bar, select the Azure icon to open the Azure window.
In the Resources section, expand your subscription, which shows all the deployed logic apps for that subscription.
Expand your logic app, and then expand the node that's named Workflows.
Open a workflow, and edit any part of that workflow's trigger.
Save your changes. This step resets the trigger's current state.
Repeat for each workflow.
When you're done, restart your logic app.
Considerations for deleting logic apps
Deleting a logic app affects workflow instances in the following ways:
Azure Logic Apps cancels in-progress and pending runs immediately, but doesn't run cleanup tasks on the storage used by the app.
Azure Logic Apps doesn't create or run new workflow instances.
If you delete a workflow and then recreate the same workflow, the recreated workflow won't have the same metadata as the deleted workflow. To refresh the metadata, you have to resave any workflow that called the deleted workflow. That way, the caller gets the correct information for the recreated workflow. Otherwise, calls to the recreated workflow fail with an
Unauthorizederror. This behavior also applies to workflows that use artifacts in integration accounts and workflows that call Azure functions.
Manage deployed logic apps in the portal
After you deploy a logic app to the Azure portal from Visual Studio Code, you can view all the deployed logic apps that are in your Azure subscription, whether they're Consumption or Standard logic app resources. Currently, each resource type is organized and managed as separate categories in Azure. To find Standard logic apps, follow these steps:
In the Azure portal search box, enter logic apps. When the results list appears, under Services, select Logic apps.

On the Logic apps pane, select the logic app that you deployed from Visual Studio Code.
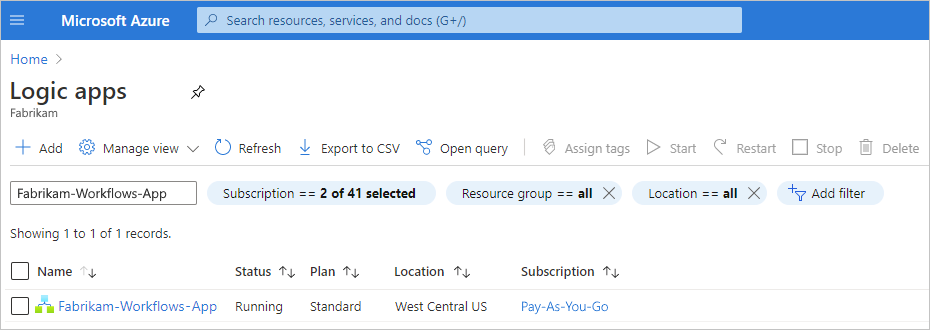
The Azure portal opens the individual resource page for the selected logic app.

To view the workflows in this logic app, on the logic app's menu, select Workflows.
The Workflows pane shows all the workflows in the current logic app. This example shows the workflow that you created in Visual Studio Code.
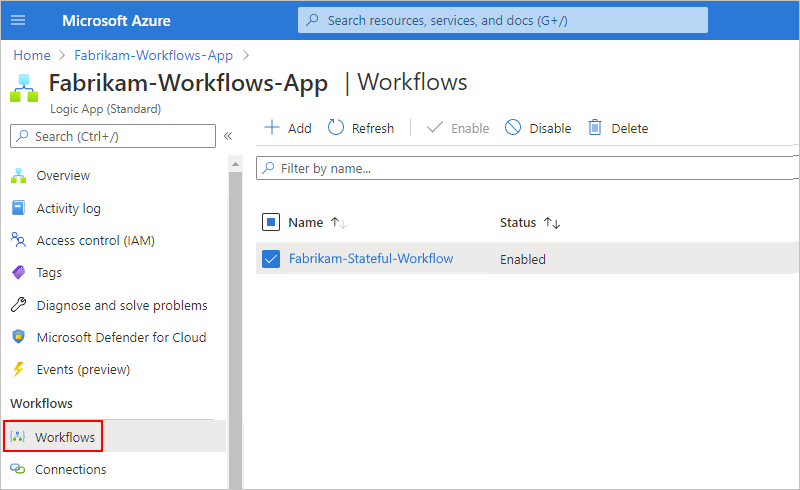
To view a workflow, on the Workflows pane, select that workflow.
The workflow pane opens and shows more information and tasks that you can perform on that workflow.
For example, to view the steps in the workflow, select Designer.
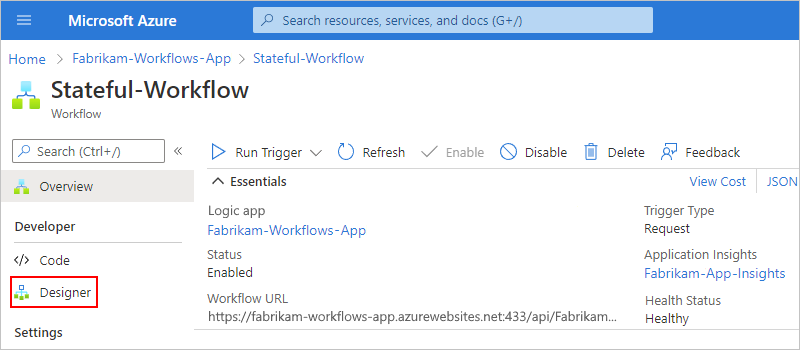
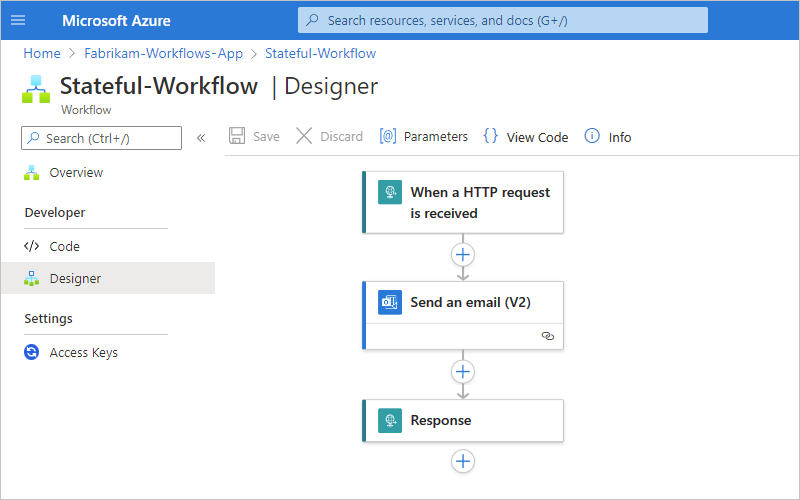
The workflow designer opens and shows the workflow that you built in Visual Studio Code. You can now make changes to this workflow in the Azure portal.
Add another workflow in the portal
Through the Azure portal, you can add blank workflows to a Standard logic app resource that you deployed from Visual Studio Code and build those workflows in the Azure portal.
In the Azure portal, select your deployed Standard logic app resource.
On the logic app resource menu, select Workflows. On the Workflows pane, select Add.
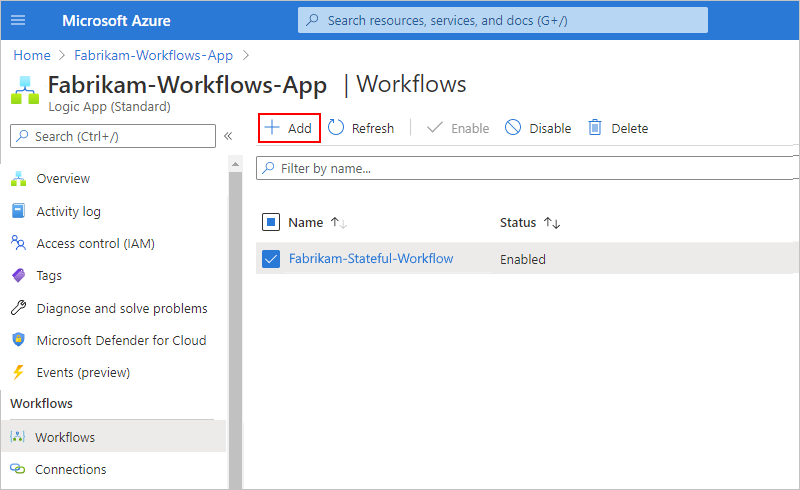
In the New workflow pane, provide name for the workflow. Select either Stateful or Stateless > Create.
After Azure deploys your new workflow, which appears on the Workflows pane, select that workflow so that you can manage and perform other tasks, such as opening the designer or code view.
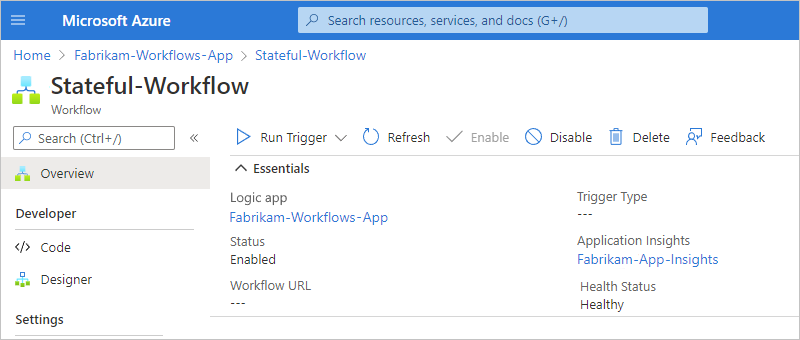
For example, opening the designer for a new workflow shows a blank canvas. You can now build this workflow in the Azure portal.
Enable run history for stateless workflows
To debug a stateless workflow more easily, you can enable the run history for that workflow, and then disable the run history when you're done. Follow these steps for Visual Studio Code, or if you're working in the Azure portal, see Create single-tenant based workflows in the Azure portal.
In your Visual Studio Code project, at the root folder level, open the local.settings.json file.
Add the
Workflows.{yourWorkflowName}.operationOptionsproperty, and set the value toWithStatelessRunHistory, for example:Windows
{
   "IsEncrypted": false,
   "Values": {
      "AzureWebJobsStorage": "UseDevelopmentStorage=true",
      "FUNCTIONS_WORKER_RUNTIME": "dotnet",
      "Workflows.{yourWorkflowName}.OperationOptions": "WithStatelessRunHistory"
   }
}
macOS or Linux
{
   "IsEncrypted": false,
   "Values": {
      "AzureWebJobsStorage": "DefaultEndpointsProtocol=https;AccountName=fabrikamstorageacct; \
          AccountKey=<access-key>;EndpointSuffix=core.windows.net",
      "FUNCTIONS_WORKER_RUNTIME": "dotnet",
      "Workflows.{yourWorkflowName}.OperationOptions": "WithStatelessRunHistory"
   }
}
In the project folder named workflow-designtime, open the local.settings.json file, and make the same change.
To disable the run history when you're done, either set the
Workflows.{yourWorkflowName}.OperationOptionsproperty toNone, or delete the property and its value.
Enable monitoring view in the Azure portal
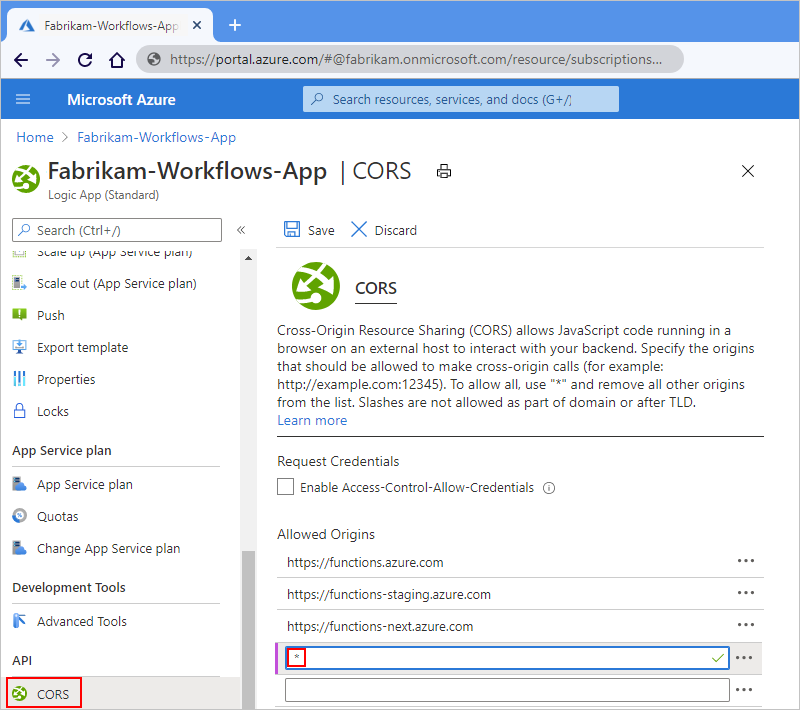
After you deploy a Logic App (Standard) resource from Visual Studio Code to Azure, you can review any available run history and details for a workflow in that resource by using the Azure portal and the Monitor experience for that workflow. However, you first have to enable the Monitor view capability on that logic app resource.
In the Azure portal, open the Standard logic app resource.
On the logic app resource menu, under API, select CORS.
On the CORS pane, under Allowed Origins, add the wildcard character (*).
When you're done, on the CORS toolbar, select Save.
Enable or open Application Insights after deployment
During workflow execution, your logic app emits telemetry along with other events. You can use this telemetry to get better visibility into how well your workflow runs and how the Logic Apps runtime works in various ways. You can monitor your workflow by using Application Insights, which provides near real-time telemetry (live metrics). This capability can help you investigate failures and performance problems more easily when you use this data to diagnose issues, set up alerts, and build charts.
If your logic app's creation and deployment settings support using Application Insights, you can optionally enable diagnostics logging and tracing for your logic app. You can do so either when you deploy your logic app from Visual Studio Code or after deployment. You need to have an Application Insights instance, but you can create this resource either in advance, when you deploy your logic app, or after deployment.
To enable Application Insights on a deployed logic app or to review Application Insights data when already enabled, follow these steps:
In the Azure portal, find your deployed logic app.
On the logic app menu, under Settings, select Application Insights.
If Application Insights isn't enabled, on the Application Insights pane, select Turn on Application Insights. After the pane updates, at the bottom, select Apply.
If Application Insights is enabled, on the Application Insights pane, select View Application Insights data.
After Application Insights opens, you can review various metrics for your logic app. For more information, review these topics:
- Azure Logic Apps Running Anywhere - Monitor with Application Insights - part 1
- Azure Logic Apps Running Anywhere - Monitor with Application Insights - part 2
Delete items from the designer
To delete an item in your workflow from the designer, follow any of these steps:
Select the item, open the item's shortcut menu (Shift+F10), and select Delete. To confirm, select OK.
Select the item, and press the delete key. To confirm, select OK.
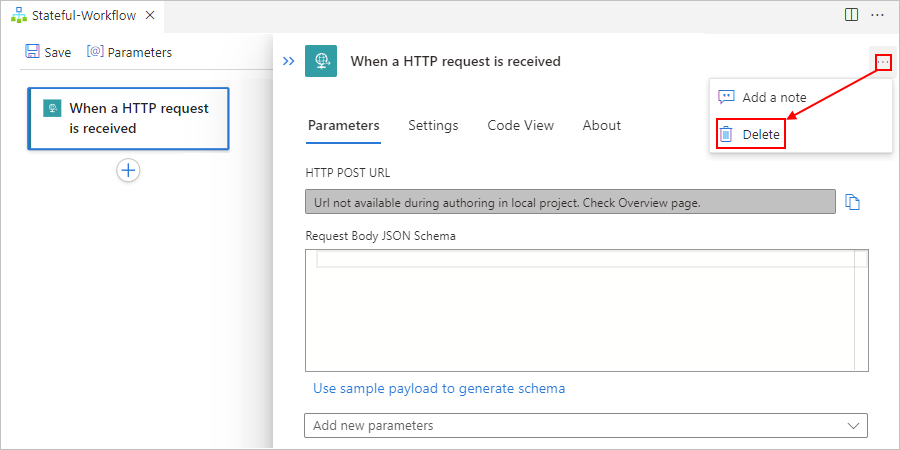
Select the item so that details pane opens for that item. In the pane's upper right corner, open the ellipses (...) menu, and select Delete. To confirm, select OK.
Tip
If the ellipses menu isn't visible, expand Visual Studio Code window wide enough so that the details pane shows the ellipses (...) button in the upper right corner.
Troubleshoot errors and problems
Designer fails to open
When you try to open the designer, you get this error, "Workflow design time could not be started". If you previously tried to open the designer, and then discontinued or deleted your project, the extension bundle might not be downloading correctly. To check whether this cause is the problem, follow these steps:
In Visual Studio Code, open the Output window. From the View menu, select Output.
From the list in the Output window's title bar, select Azure Logic Apps (Standard) so that you can review output from the extension, for example:

Review the output and check whether this error message appears:
A host error has occurred during startup operation '{operationID}'.
System.Private.CoreLib: The file 'C:\Users\{userName}\AppData\Local\Temp\Functions\
ExtensionBundles\Microsoft.Azure.Functions.ExtensionBundle.Workflows\1.1.7\bin\
DurableTask.AzureStorage.dll' already exists.
Value cannot be null. (Parameter 'provider')
Application is shutting down...
Initialization cancellation requested by runtime.
Stopping host...
Host shutdown completed.
To resolve this error, delete the ExtensionBundles folder at this location ...\Users{your-username}\AppData\Local\Temp\Functions\ExtensionBundles, and retry opening the workflow.json file in the designer.
New triggers and actions are missing from the designer picker for previously created workflows
Single-tenant Azure Logic Apps supports built-in actions for Azure Function Operations, Liquid Operations, and XML Operations, such as XML Validation and Transform XML. However, for previously created logic apps, these actions might not appear in the designer picker for you to select if Visual Studio Code uses an outdated version of the extension bundle, Microsoft.Azure.Functions.ExtensionBundle.Workflows.
Also, the Azure Function Operations connector and actions don't appear in the designer picker unless you enabled or selected Use connectors from Azure when you created your logic app. If you didn't enable the Azure-deployed connectors at app creation time, you can enable them from your project in Visual Studio Code. Open the workflow.json shortcut menu, and select Use Connectors from Azure.
To fix the outdated bundle, follow these steps to delete the outdated bundle, which makes Visual Studio Code automatically update the extension bundle to the latest version.
Note
This solution applies only to logic apps that you create and deploy using Visual Studio Code with the Azure Logic Apps (Standard) extension, not the logic apps that you created using the Azure portal. See Supported triggers and actions are missing from the designer in the Azure portal.
Save any work that you don't want to lose, and close Visual Studio Code.
On your computer, browse to the following folder, which contains versioned folders for the existing bundle:
...\Users\{your-username}\.azure-functions-core-tools\Functions\ExtensionBundles\Microsoft.Azure.Functions.ExtensionBundle.WorkflowsDelete the version folder for the earlier bundle, for example, if you have a folder for version 1.1.3, delete that folder.
Now, browse to the following folder, which contains versioned folders for required NuGet package:
...\Users\{your-username}\.nuget\packages\microsoft.azure.workflows.webjobs.extensionDelete the version folder for the earlier package.
Reopen Visual Studio Code, your project, and the workflow.json file in the designer.
The missing triggers and actions now appear in the designer.
"400 Bad Request" appears on a trigger or action
When a run fails, and you inspect the run in monitoring view, this error might appear on a trigger or action that has a longer name, which causes the underlying Uniform Resource Identifier (URI) to exceed the default character limit.
To resolve this problem and adjust for the longer URI, edit the UrlSegmentMaxCount and UrlSegmentMaxLength registry keys on your computer by following the steps below. These key's default values are described in this topic, Http.sys registry settings for Windows.
Important
Before you start, make sure that you save your work. This solution requires you to restart your computer after you're done so that the changes can take effect.
On your computer, open the Run window, and run the
regeditcommand, which opens the registry editor.In the User Account Control box, select Yes to permit your changes to your computer.
In the left pane, under Computer, expand the nodes along the path, HKEY_LOCAL_MACHINE\SYSTEM\CurrentControlSet\Services\HTTP\Parameters, and then select Parameters.
In the right pane, find the
UrlSegmentMaxCountandUrlSegmentMaxLengthregistry keys.Increase these key values enough so that the URIs can accommodate the names that you want to use. If these keys don't exist, add them to the Parameters folder by following these steps:
From the Parameters shortcut menu, select New > DWORD (32-bit) Value.
In the edit box that appears, enter
UrlSegmentMaxCountas the new key name.Open the new key's shortcut menu, and select Modify.
In the Edit String box that appears, enter the Value data key value that you want in hexadecimal or decimal format. For example,
400in hexadecimal is equivalent to1024in decimal.To add the
UrlSegmentMaxLengthkey value, repeat these steps.
After you increase or add these key values, the registry editor looks like this example:

When you're ready, restart your computer so that the changes can take effect.
Debugging session fails to start
When you try to start a debugging session, you get the error, "Error exists after running preLaunchTask 'generateDebugSymbols'". To resolve this problem, edit the tasks.json file in your project to skip symbol generation.
In your project, expand the folder that's named .vscode, and open the tasks.json file.
In the following task, delete the line,
"dependsOn: "generateDebugSymbols", along with the comma that ends the preceding line, for example:Before:
 {
   "type": "func",
   "command": "host start",
   "problemMatcher": "$func-watch",
   "isBackground": true,
   "dependsOn": "generateDebugSymbols"
 }
After:
 {
   "type": "func",
   "command": "host start",
   "problemMatcher": "$func-watch",
   "isBackground": true
 }
Next steps
We'd like to hear from you about your experiences with the Azure Logic Apps (Standard) extension!
- For bugs or problems, create your issues in GitHub.
- For questions, requests, comments, and other feedback, use this feedback form.

