Tutorial: Create and manage policies to enforce compliance
Understanding how to create and manage policies in Azure is important for staying compliant with your corporate standards and service-level agreements. In this tutorial, you learn to use Azure Policy to do some of the more common tasks related to creating, assigning, and managing policies across your organization, such as:
- Assign a policy to enforce a condition for resources you create in the future
- Create and assign an initiative definition to track compliance for multiple resources
- Resolve a non-compliant or denied resource
- Implement a new policy across an organization
If you would like to assign a policy to identify the current compliance state of your existing resources, the quickstart articles go over how to do so.
Prerequisites
If you don't have an Azure subscription, create a free account before you begin.
Assign a policy
The first step in enforcing compliance with Azure Policy is to assign a policy definition. A policy definition defines under what condition a policy is enforced and what effect to take. In this example, assign the built-in policy definition called Inherit a tag from the resource group if missing to add the specified tag with its value from the parent resource group to new or updated resources missing the tag.
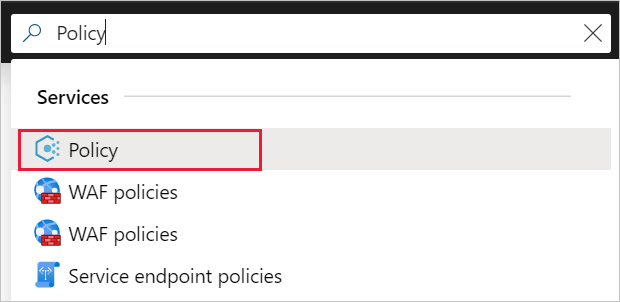
Go to the Azure portal to assign policies. Search for and select Policy.
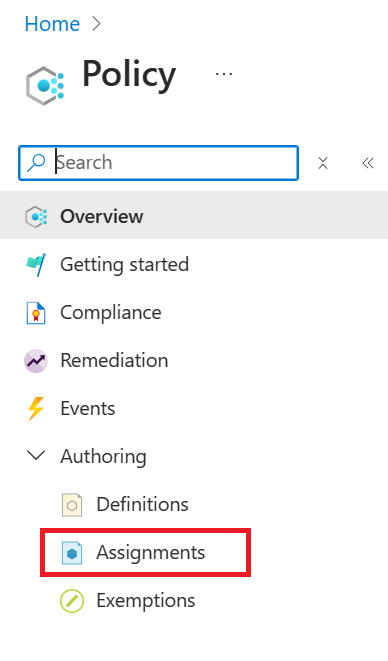
Select Assignments on the left side of the Azure Policy page. An assignment is a policy that has been assigned to take place within a specific scope.
Select Assign Policy from the top of the Policy | Assignments page.

On the Assign Policy page and Basics tab, select the Scope by selecting the ellipsis and selecting either a management group or subscription. Optionally, select a resource group. A scope determines what resources or grouping of resources the policy assignment gets enforced on. Then select Select at the bottom of the Scope page.
Resources can be excluded based on the Scope. Exclusions start at one level lower than the level of the Scope. Exclusions are optional, so leave it blank for now.
Select the Policy definition ellipsis to open the list of available definitions. You can filter the policy definition Type to Built-in to view all and read their descriptions.
Select Inherit a tag from the resource group if missing. If you can't find it right away, type inherit a tag into the search box and then press ENTER or select out of the search box. Select Select at the bottom of the Available Definitions page once you have found and selected the policy definition.
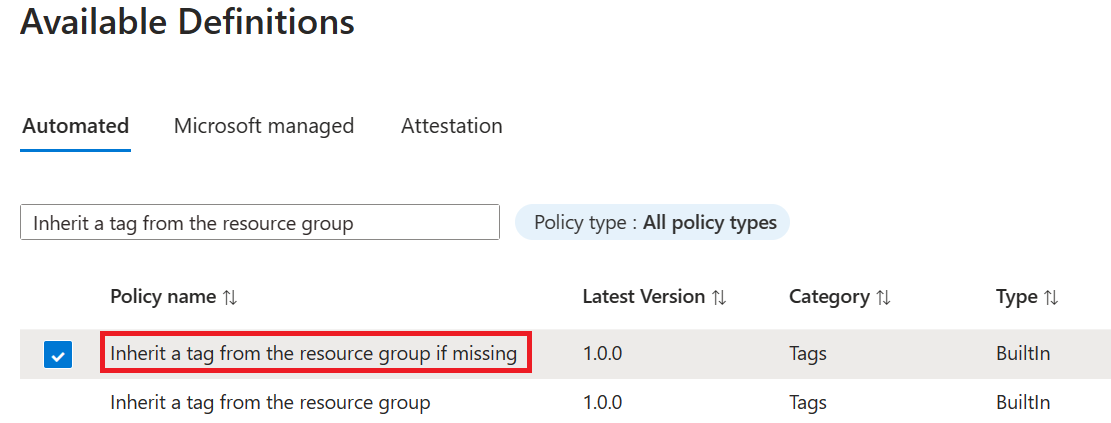
The Version is automatically populated to the latest major version of the definition and set to autoinjest any non-breaking changes. You may change the version to others, if available or adjust your ingesting settings, but no change is required. Overrides are optional, so leave it blank for now.
The Assignment name is automatically populated with the policy name you selected, but you can change it. For this example, leave Inherit a tag from the resource group if missing. You can also add an optional Description. The description provides details about this policy assignment.
Leave Policy enforcement as Enabled. When Disabled, this setting allows testing the outcome of the policy without triggering the effect. For more information, see enforcement mode.
Select the Parameters tab at the top of the wizard.
For Tag Name, enter Environment.
Select the Remediation tab at the top of the wizard.
Leave Create a remediation task unchecked. This box allows you to create a task to alter existing resources in addition to new or updated resources. For more information, see remediate resources.
Create a Managed Identity is automatically checked since this policy definition uses the modify effect. Type of Managed Identity is set to System Assigned. Permissions is set to Contributor automatically based on the policy definition. For more information, see managed identities and how remediation access control works.
Select the Non-compliance messages tab at the top of the wizard.
Set the Non-compliance message to This resource doesn't have the required tag. This custom message is displayed when a resource is denied or for non-compliant resources during regular evaluation.
Select the Review + create tab at the top of the wizard.
Review your selections, then select Create at the bottom of the page.
Implement a new custom policy
Now that you've assigned a built-in policy definition, you can do more with Azure Policy. Next, create a new custom policy to save costs by validating that virtual machines created in your environment can't be in the G series. This way, every time a user in your organization tries to create a virtual machine in the G series, the request is denied.
Select Definitions under Authoring in the left side of the Azure Policy page.
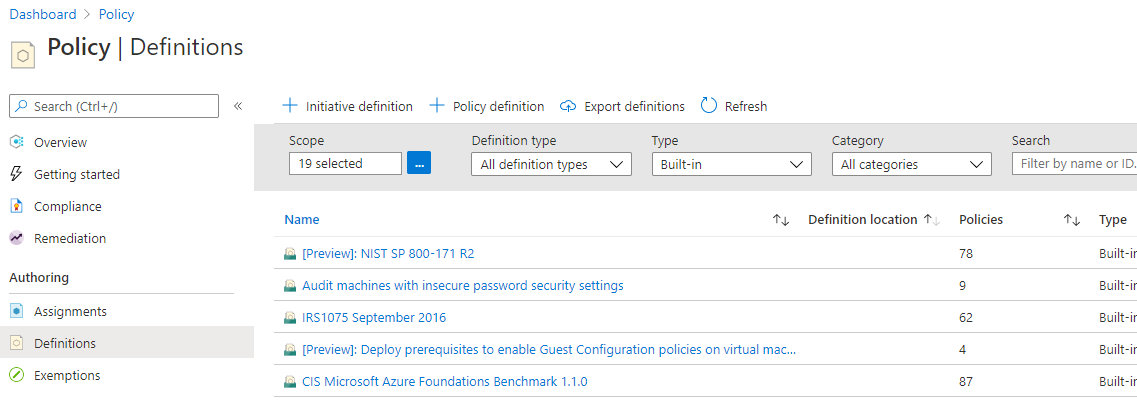
Select + Policy definition at the top of the page. This button opens to the Policy definition page.
Enter the following information:
The management group or subscription in which the policy definition is saved. Select by using the ellipsis on Definition location.
Note
If you plan to apply this policy definition to multiple subscriptions, the location must be a management group that contains the subscriptions you assign the policy to. The same is true for an initiative definition.
The name of the policy definition - Require VM SKUs not in the G series
The description of what the policy definition is intended to do - This policy definition enforces that all virtual machines created in this scope have SKUs other than the G series to reduce cost.
Choose from existing options (such as Compute), or create a new category for this policy definition.
Copy the following JSON code and then update it for your needs with:
- The policy parameters.
- The policy rules/conditions, in this case - VM SKU size equal to G series
- The policy effect, in this case - Deny.
Here's what the JSON should look like. Paste your revised code into the Azure portal.
{
    "policyRule": {
        "if": {
            "allOf": [{
                    "field": "type",
                    "equals": "Microsoft.Compute/virtualMachines"
                },
                {
                    "field": "Microsoft.Compute/virtualMachines/sku.name",
                    "like": "Standard_G*"
                }
            ]
        },
        "then": {
            "effect": "deny"
        }
    }
}
The field property in the policy rule must be a supported value. A full list of values is found on policy definition structure fields. An example of an alias might be
"Microsoft.Compute/VirtualMachines/Size".To view more Azure Policy samples, see Azure Policy samples.
Select Save.
Create a policy definition with REST API
You can create a policy with the REST API for Azure Policy Definitions. The REST API enables you to create and delete policy definitions, and get information about existing definitions. To create a policy definition, use the following example:
PUT https://management.azure.com/subscriptions/{subscriptionId}/providers/Microsoft.authorization/policydefinitions/{policyDefinitionName}?api-version={api-version}
Include a request body similar to the following example:
{
    "properties": {
        "parameters": {
            "allowedLocations": {
                "type": "array",
                "metadata": {
                    "description": "The list of locations that can be specified when deploying resources",
                    "strongType": "location",
                    "displayName": "Allowed locations"
                }
            }
        },
        "displayName": "Allowed locations",
        "description": "This policy enables you to restrict the locations your organization can specify when deploying resources.",
        "policyRule": {
            "if": {
                "not": {
                    "field": "location",
                    "in": "[parameters('allowedLocations')]"
                }
            },
            "then": {
                "effect": "deny"
            }
        }
    }
}
Create a policy definition with PowerShell
Before proceeding with the PowerShell example, make sure you've installed the latest version of the Azure PowerShell Az module.
You can create a policy definition using the New-AzPolicyDefinition cmdlet.
To create a policy definition from a file, pass the path to the file. For an external file, use the following example:
$definition = New-AzPolicyDefinition `
    -Name 'denyCoolTiering' `
    -DisplayName 'Deny cool access tiering for storage' `
    -Policy 'https://raw.githubusercontent.com/Azure/azure-policy-samples/master/samples/Storage/storage-account-access-tier/azurepolicy.rules.json'
For a local file use, use the following example:
$definition = New-AzPolicyDefinition `
    -Name 'denyCoolTiering' `
    -Description 'Deny cool access tiering for storage' `
    -Policy 'c:\policies\coolAccessTier.json'
To create a policy definition with an inline rule, use the following example:
$definition = New-AzPolicyDefinition -Name 'denyCoolTiering' -Description 'Deny cool access tiering for storage' -Policy '{
    "if": {
        "allOf": [{
                "field": "type",
                "equals": "Microsoft.Storage/storageAccounts"
            },
            {
                "field": "kind",
                "equals": "BlobStorage"
            },
            {
                "field": "Microsoft.Storage/storageAccounts/accessTier",
                "equals": "cool"
            }
        ]
    },
    "then": {
        "effect": "deny"
    }
}'
The output is stored in a $definition object, which is used during policy assignment. The
following example creates a policy definition that includes parameters:
$policy = '{
    "if": {
        "allOf": [{
                "field": "type",
                "equals": "Microsoft.Storage/storageAccounts"
            },
            {
                "not": {
                    "field": "location",
                    "in": "[parameters(''allowedLocations'')]"
                }
            }
        ]
    },
    "then": {
        "effect": "Deny"
    }
}'

$parameters = '{
    "allowedLocations": {
        "type": "array",
        "metadata": {
            "description": "The list of locations that can be specified when deploying storage accounts.",
            "strongType": "location",
            "displayName": "Allowed locations"
        }
    }
}'

$definition = New-AzPolicyDefinition -Name 'storageLocations' -Description 'Policy to specify locations for storage accounts.' -Policy $policy -Parameter $parameters
View policy definitions with PowerShell
To see all policy definitions in your subscription, use the following command:
Get-AzPolicyDefinition
It returns all available policy definitions, including built-in policies. Each policy is returned in the following format:
Name               : e56962a6-4747-49cd-b67b-bf8b01975c4c
ResourceId         : /providers/Microsoft.Authorization/policyDefinitions/e56962a6-4747-49cd-b67b-bf8b01975c4c
ResourceName       : e56962a6-4747-49cd-b67b-bf8b01975c4c
ResourceType       : Microsoft.Authorization/policyDefinitions
Properties         : @{displayName=Allowed locations; policyType=BuiltIn; description=This policy enables you to
                     restrict the locations your organization can specify when deploying resources. Use to enforce
                     your geo-compliance requirements.; parameters=; policyRule=}
PolicyDefinitionId : /providers/Microsoft.Authorization/policyDefinitions/e56962a6-4747-49cd-b67b-bf8b01975c4c
Create a policy definition with Azure CLI
You can create a policy definition using Azure CLI with the az policy definition command. To
create a policy definition with an inline rule, use the following example:
az policy definition create --name 'denyCoolTiering' --description 'Deny cool access tiering for storage' --rules '{
    "if": {
        "allOf": [{
                "field": "type",
                "equals": "Microsoft.Storage/storageAccounts"
            },
            {
                "field": "kind",
                "equals": "BlobStorage"
            },
            {
                "field": "Microsoft.Storage/storageAccounts/accessTier",
                "equals": "cool"
            }
        ]
    },
    "then": {
        "effect": "deny"
    }
}'
View policy definitions with Azure CLI
To see all policy definitions in your subscription, use the following command:
az policy definition list
It returns all available policy definitions, including built-in policies. Each policy is returned in the following format:
{
    "description": "This policy enables you to restrict the locations your organization can specify when deploying resources. Use to enforce your geo-compliance requirements.",
    "displayName": "Allowed locations",
    "version": "1.0.0"
    "id": "/providers/Microsoft.Authorization/policyDefinitions/e56962a6-4747-49cd-b67b-bf8b01975c4c",
    "name": "e56962a6-4747-49cd-b67b-bf8b01975c4c",
    "policyRule": {
        "if": {
            "not": {
                "field": "location",
                "in": "[parameters('listOfAllowedLocations')]"
            }
        },
        "then": {
            "effect": "Deny"
        }
    },
    "policyType": "BuiltIn"
}
Create and assign an initiative definition
With an initiative definition, you can group several policy definitions to achieve one overarching goal. An initiative evaluates resources within scope of the assignment for compliance to the included policies. For more information about initiative definitions, see Azure Policy overview.
Create an initiative definition
Select Definitions under Authoring in the left side of the Azure Policy page.

Select + Initiative Definition at the top of the page to open the Initiative definition wizard.
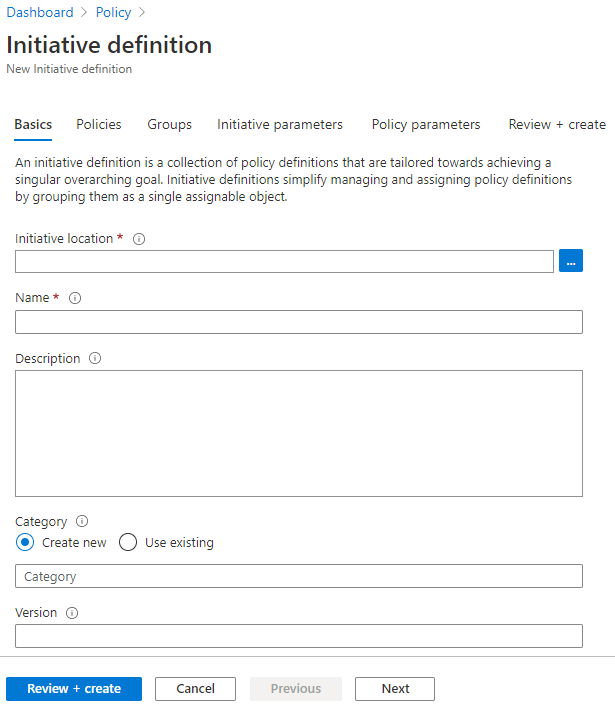
Use the Initiative location ellipsis to select a management group or subscription to store the definition. If the previous page was scoped to a single management group or subscription, Initiative location is automatically populated.
Enter the Name and Description of the initiative.
This example validates that resources are in compliance with policy definitions about getting secure. Name the initiative Get Secure and set the description as: This initiative has been created to handle all policy definitions associated with securing resources.
For Category, choose from existing options or create a new category.
Set a Version for the initiative, such as 1.0.
Note
The version value is strictly metadata and isn't used for updates or any process by the Azure Policy service.
Select Next at the bottom of the page or the Policies tab at the top of the wizard.
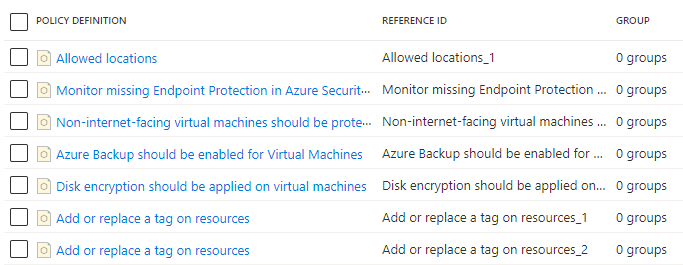
Select Add policy definition(s) button and browse through the list. Select the policy definition(s) you want added to this initiative. For the Get Secure initiative, add the following built-in policy definitions by selecting the checkbox next to the policy definition:
- Allowed locations
- Endpoint protection should be installed on machines
- Non-internet-facing virtual machines should be protected with network security groups
- Azure Backup should be enabled for Virtual Machines
- Disk encryption should be applied on virtual machines
- Add or replace a tag on resources (add this policy definition twice)
After selecting each policy definition from the list, select Add at the bottom of the list. Since it's added twice, the Add or replace a tag on resources policy definitions each get a different reference ID.
Note
The selected policy definitions can be added to groups by selecting one or more added definitions and selecting Add selected policies to a group. The group must exist first and can be created on the Groups tab of the wizard.
Select Next at the bottom of the page or the Groups tab at the top of the wizard. New groups can be added from this tab. For this tutorial, we aren't adding any groups.
Select Next at the bottom of the page or the Initiative parameters tab at the top of the wizard. If we wanted a parameter to exist at the initiative for passing to one or more included policy definitions, the parameter is defined here and then used on the Policy parameters tab. For this tutorial, we aren't adding any initiative parameters.
Note
Once saved to an initiative definition, initiative parameters can't be deleted from the initiative. If an initiative parameter is no longer needed, remove it from use by any policy definition parameters.
Select Next at the bottom of the page or the Policy parameters tab at the top of the wizard.
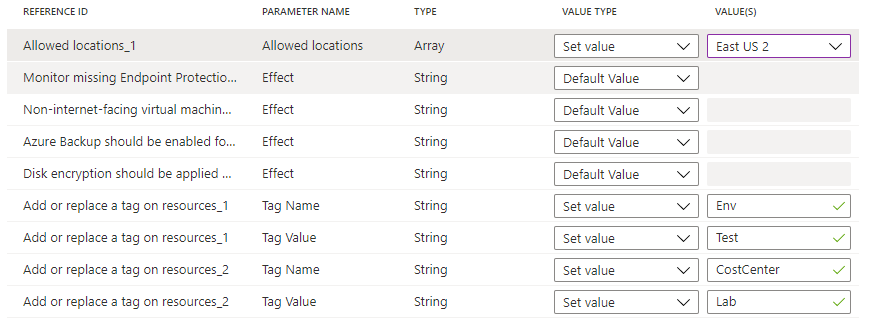
Policy definitions added to the initiative that have parameters are displayed in a grid. The value type can be 'Default value', 'Set value', or 'Use Initiative Parameter'. If 'Set value' is selected, the related value is entered under Value(s). If the parameter on the policy definition has a list of allowed values, the entry box is a dropdown list selector. If 'Use Initiative Parameter' is selected, a dropdown list select is provided with the names of initiative parameters created on the Initiative parameters tab.

Note
In the case of some
strongTypeparameters, the list of values cannot be automatically determined. In these cases, an ellipsis appears to the right of the parameter row. Selecting it opens the 'Parameter scope (<parameter name>)' page. On this page, select the subscription to use for providing the value options. This parameter scope is only used during creation of the initiative definition and has no impact on policy evaluation or the scope of the initiative when assigned.Set the 'Allowed locations' value type to 'Set value' and select 'East US 2' from the dropdown list. For the two instances of the Add or replace a tag on resources policy definitions, set the Tag Name parameters to 'Env' and 'CostCenter and the Tag Value parameters to 'Test' and 'Lab' as shown below. Leave the others as 'Default value'. Using the same definition twice in the initiative but with different parameters, this configuration adds or replaces an 'Env' tag with the value 'Test' and a 'CostCenter' tag with the value of 'Lab' on resources in scope of the assignment.
Select Review + create at the bottom of the page or at the top of the wizard.
Review the settings and select Create.
Create a policy initiative definition with Azure CLI
You can create a policy initiative definition using Azure CLI with the az policy set-definition
command. To create a policy initiative definition with an existing policy definition, use the
following example:
az policy set-definition create -n readOnlyStorage --definitions '[
        {
            "policyDefinitionId": "/subscriptions/mySubId/providers/Microsoft.Authorization/policyDefinitions/storagePolicy",
            "parameters": { "storageSku": { "value": "[parameters(\"requiredSku\")]" } }
        }
    ]' \
    --params '{ "requiredSku": { "type": "String" } }'
Create a policy initiative definition with Azure PowerShell
You can create a policy initiative definition using Azure PowerShell with the
New-AzPolicySetDefinition cmdlet. To create a policy initiative definition with an existing policy
definition, use the following policy initiative definition file as VMPolicySet.json:
[
    {
        "policyDefinitionId": "/providers/Microsoft.Authorization/policyDefinitions/2a0e14a6-b0a6-4fab-991a-187a4f81c498",
        "parameters": {
            "tagName": {
                "value": "Business Unit"
            },
            "tagValue": {
                "value": "Finance"
            }
        }
    },
    {
        "policyDefinitionId": "/providers/Microsoft.Authorization/policyDefinitions/464dbb85-3d5f-4a1d-bb09-95a9b5dd19cf"
    }
]
New-AzPolicySetDefinition -Name 'VMPolicySetDefinition' -Metadata '{"category":"Virtual Machine"}' -PolicyDefinition C:\VMPolicySet.json
Assign an initiative definition
Select Definitions under Authoring in the left side of the Azure Policy page.
Locate the Get Secure initiative definition you previously created and select it. Select Assign at the top of the page to open to the Get Secure: Assign initiative page.

You can also select and hold (or right-click) on the selected row or select the ellipsis at the end of the row for a contextual menu. Then select Assign.

Fill out the Get Secure: Assign Initiative page by entering the following example information. You can use your own information.
- Scope: The management group or subscription you saved the initiative to become the default. You can change scope to assign the initiative to a subscription or resource group within the saved location.
- Exclusions: Configure any resources within the scope to prevent the initiative assignment from being applied to them.
- Initiative definition and Assignment name: Get Secure (pre-populated as name of initiative being assigned).
- Description: This initiative assignment is tailored to enforce this group of policy definitions.
- Policy enforcement: Leave as the default Enabled.
- Assigned by: Automatically filled based on who is logged in. This field is optional, so custom values can be entered.
Select the Parameters tab at the top of the wizard. If you configured an initiative parameter in previous steps, set a value here.
Select the Remediation tab at the top of the wizard. Leave Create a Managed Identity unchecked. This box must be checked when the policy or initiative being assigned includes a policy with the deployIfNotExists or modify effects. As the policy used for this tutorial doesn't, leave it blank. For more information, see managed identities and how remediation access control works.
Select the Review + create tab at the top of the wizard.
Review your selections, then select Create at the bottom of the page.
Check initial compliance
Select Compliance in the left side of the Azure Policy page.
Locate the Get Secure initiative. It's likely still in Compliance state of Not started. Select the initiative to get full details of the assignment.
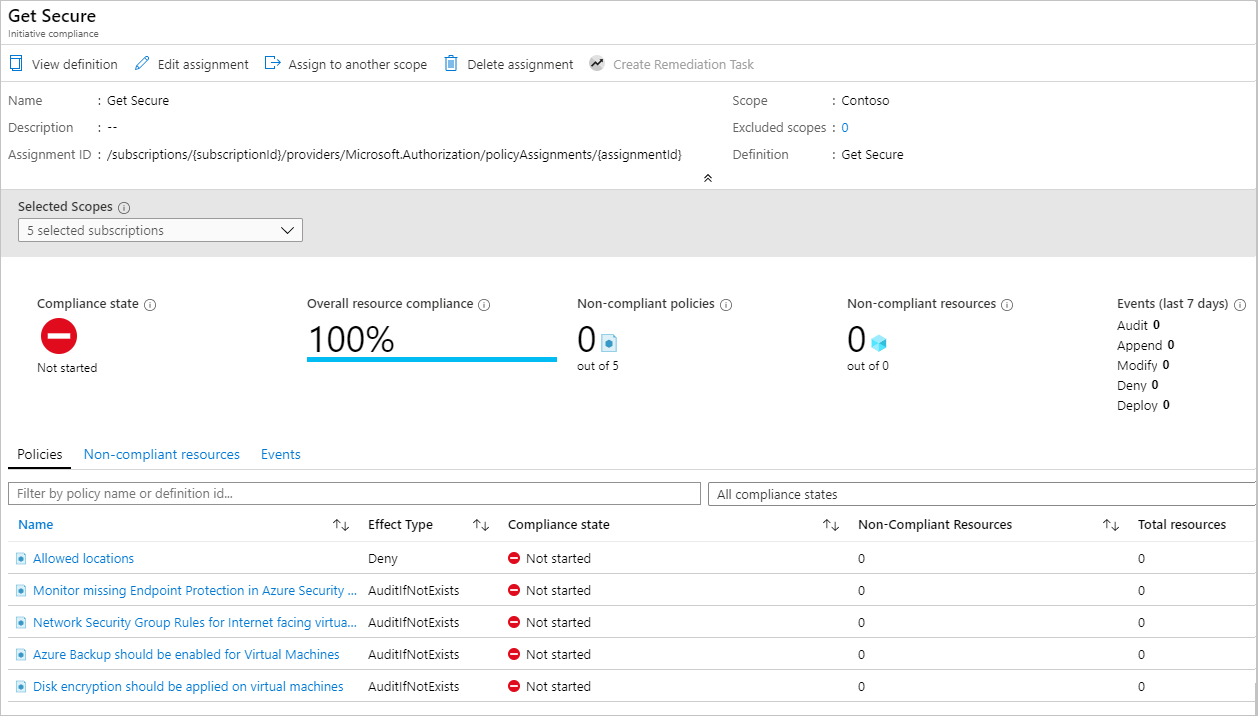
Once the initiative assignment has been completed, the compliance page is updated with the Compliance state of Compliant.
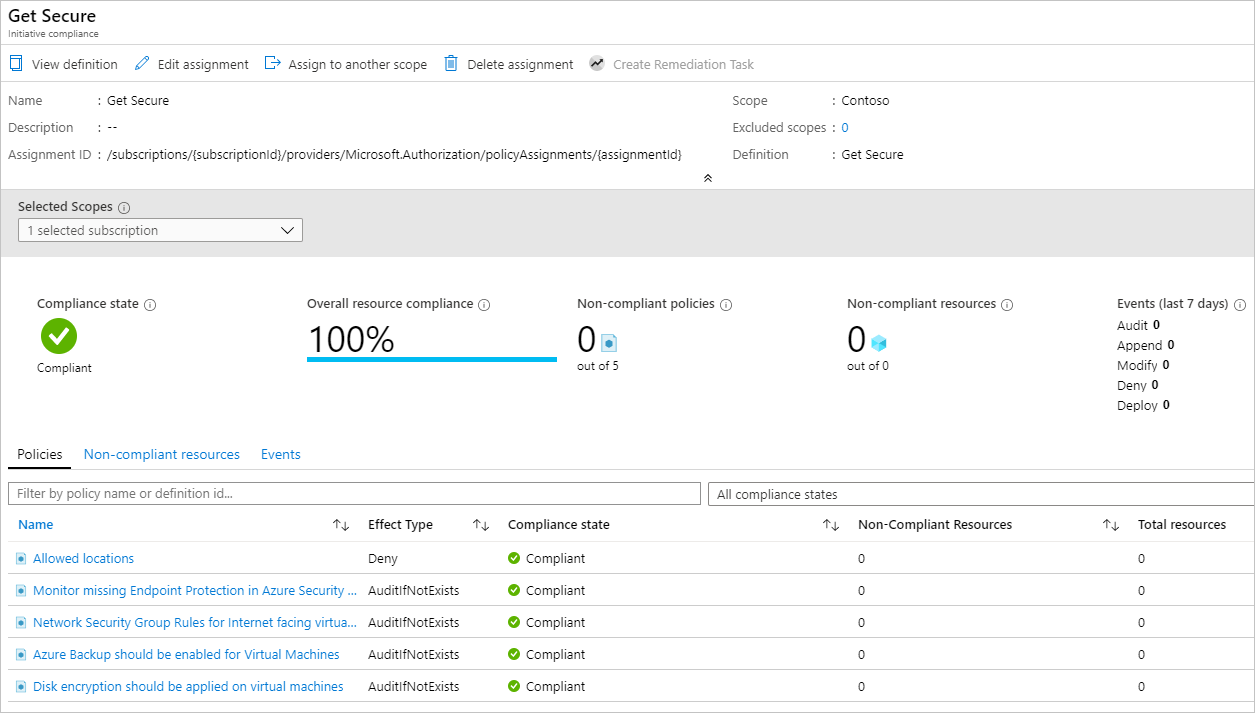
Selecting any policy on the initiative compliance page opens the compliance details page for that policy. This page provides details at the resource level for compliance.
Remove a non-compliant or denied resource from the scope with an exclusion
After assigning a policy initiative to require a specific location, any resource created in a different location is denied. In this section, you walk through resolving a denied request to create a resource by creating an exclusion on a single resource group. The exclusion prevents enforcement of the policy (or initiative) on that resource group. In the following example, any location is allowed in the excluded resource group. An exclusion can apply to a subscription, a resource group, or an individual resource.
Note
A policy exemption can also be used skip the evaluation of a resource. For more information, see Scope in Azure Policy.
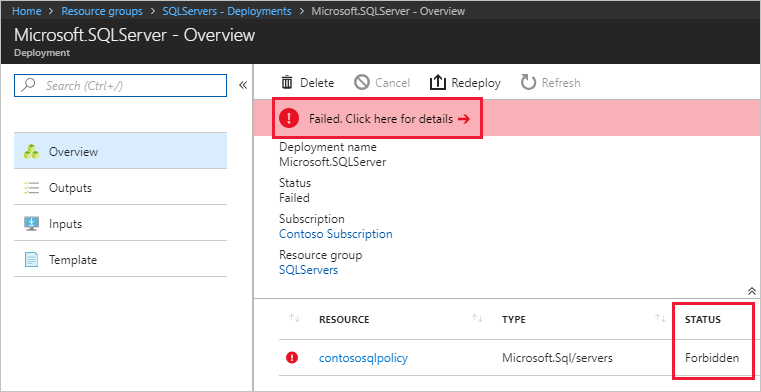
Deployments prevented by an assigned policy or initiative can be viewed on the resource group targeted by the deployment: Select Deployments in the left side of the page, then select the Deployment Name of the failed deployment. The resource that was denied is listed with a status of Forbidden. To determine the policy or initiative and assignment that denied the resource, select Failed. Click here for details -> on the Deployment Overview page. A window opens on the right side of the page with the error information. Under Error Details are the GUIDs of the related policy objects.
On the Azure Policy page: Select Compliance in the left side of the page and select the Get Secure policy initiative. On this page, there's an increase in the Deny count for blocked resources. Under the Events tab are details about who tried to create or deploy the resource that was denied by the policy definition.
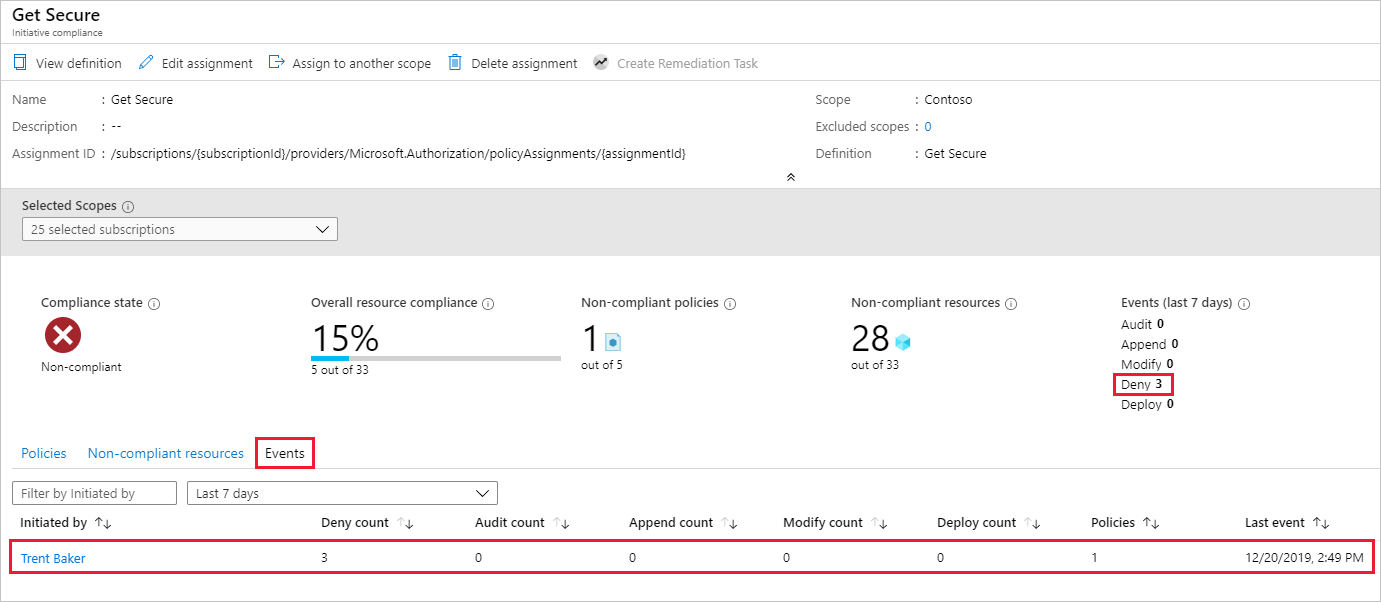
In this example, Trent Baker, one of Contoso's Sr. Virtualization specialists, was doing required work. We need to grant Trent a space for an exception. Create a new resource group, LocationsExcluded, and next grant it an exception to this policy assignment.
Update assignment with exclusion
Select Assignments under Authoring in the left side of the Azure Policy page.
Browse through all policy assignments and open the Get Secure policy assignment.
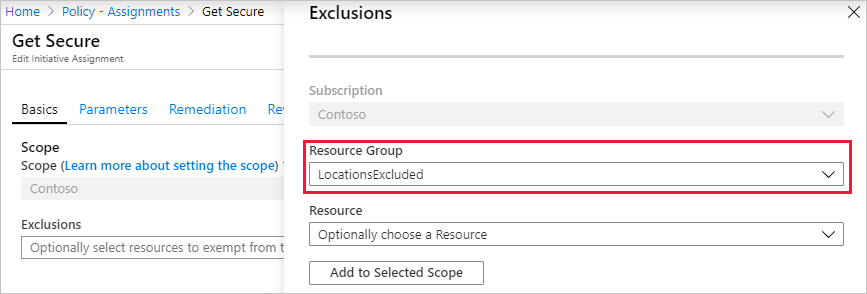
Set the Exclusion by selecting the ellipsis and selecting the resource group to exclude, LocationsExcluded in this example. Select Add to Selected Scope and then select Save.
Note
Depending on the policy definition and its effect, the exclusion could also be granted to specific resources within a resource group inside the scope of the assignment. As a Deny effect was used in this tutorial, it wouldn't make sense to set the exclusion on a specific resource that already exists.
Select Review + save and then select Save.
In this section, you resolved the denied request by creating an exclusion on a single resource group.
Clean up resources
If you're done working with resources from this tutorial, use the following steps to delete any of the policy assignments or definitions created above:
Select Definitions (or Assignments if you're trying to delete an assignment) under Authoring in the left side of the Azure Policy page.
Search for the new initiative or policy definition (or assignment) you want to remove.
Right-click the row or select the ellipses at the end of the definition (or assignment), and select Delete definition (or Delete assignment).
Review
In this tutorial, you successfully accomplished the following tasks:
- Assigned a policy to enforce a condition for resources you create in the future
- Created and assign an initiative definition to track compliance for multiple resources
- Resolved a non-compliant or denied resource
- Implemented a new policy across an organization
Next steps
To learn more about the structures of policy definitions, look at this article: