Remediate non-compliant resources with Azure Policy
Resources that are non-compliant to policies with deployIfNotExists or modify effects can be put into a compliant state through Remediation. Remediation is accomplished through remediation tasks that deploy the deployIfNotExists template or the modify operations of the assigned policy on your existing resources and subscriptions, whether that assignment is on a management group, subscription, resource group, or individual resource. This article shows the steps needed to understand and accomplish remediation with Azure Policy.
How remediation access control works
When Azure Policy starts a template deployment when evaluating deployIfNotExists policies or modifies a resource when evaluating modify policies, it does so using a managed identity associated with the policy assignment. Policy assignments use managed identities for Azure resource authorization. You can use either a system-assigned managed identity created by the policy service or a user-assigned identity provided by the user. The managed identity needs to be assigned the minimum Azure role-based access control (Azure RBAC) role required to remediate resources. If the managed identity is missing roles, an error is displayed in the portal during the assignment of the policy or an initiative. When you use the portal, Azure Policy automatically grants the managed identity the listed roles once assignment starts. When you use an Azure software development kit (SDK), the roles must manually be granted to the managed identity. The location of the managed identity doesn't affect its operation with Azure Policy.
Note
Changing a policy definition does not automatically update the assignment or the associated managed identity.
Remediation security can be configured through the following steps:
- Configure the policy definition
- Configure the managed identity
- Grant permissions to the managed identity through defined roles
- Create a remediation task
Configure the policy definition
As a prerequisite, the policy definition must define the roles that deployIfNotExists and modify need to successfully deploy the content of the included template. No action is required for a built-in policy definition because these roles are prepopulated. For a custom policy definition, under the details property, add a roleDefinitionIds property. This property is an array of strings that match roles in your environment. For a full example, see deployIfNotExists or modify.
"details": {
    ...
    "roleDefinitionIds": [
    "/subscriptions/{subscriptionId}/providers/Microsoft.Authorization/roleDefinitions/{roleGUID}",
    "/providers/Microsoft.Authorization/roleDefinitions/{builtinroleGUID}"
  ]
}
The roleDefinitionIds property uses the full resource identifier and doesn't take the short roleName of the role. To get the ID for the Contributor role in your environment, use the following Azure CLI code:
az role definition list --name "Contributor"
Important
Permissions should be restricted to the smallest possible set when defining roleDefinitionIds
within a policy definition or assigning permissions to a managed identity manually. See
managed identity best practice recommendations
for more best practices.
Configure the managed identity
Each Azure Policy assignment can be associated with only one managed identity. However, the managed identity can be assigned multiple roles. Configuration occurs in two steps: first create either a system-assigned or user-assigned managed identity, then grant it the necessary roles.
Note
When creating a managed identity through the portal, roles will be granted automatically to the managed identity. If roleDefinitionIds are later edited in the policy definition, the new permissions must be manually granted, even in the portal.
Create the managed identity
When you create an assignment using the portal, Azure Policy can generate a system-assigned managed identity and grant it the roles defined in the policy definition's roleDefinitionIds. Alternatively, you can specify a user-assigned managed identity that receives the same role assignment.

To set a system-assigned managed identity in the portal:
On the Remediation tab of the create/edit assignment view, under Types of Managed Identity, ensure that System assigned managed identity is selected.
Specify the location at which the managed identity is to be located.
Don't assign a scope for system-assigned managed identity because the scope is inherited from the assignment scope.
To set a user-assigned managed identity in the portal:
On the Remediation tab of the create/edit assignment view, under Types of Managed Identity, ensure that User assigned managed identity is selected.
Specify the scope where the managed identity is hosted. The scope of the managed identity doesn't have to equate to the scope of the assignment, but it must be in the same tenant.
Under Existing user assigned identities, select the managed identity.
Grant permissions to the managed identity through defined roles
Important
If the managed identity does not have the permissions needed to execute the required remediation task, it will be granted permissions automatically only through the portal. You may skip this step if creating a managed identity through the portal.
For all other methods, the assignment's managed identity must be manually granted access through the addition of roles, or else the remediation deployment will fail.
Example scenarios that require manual permissions:
- If the assignment is created through an Azure software development kit (SDK)
- If a resource modified by
deployIfNotExistsormodifyis outside the scope of the policy assignment - If the template accesses properties on resources outside the scope of the policy assignment
There are two ways to grant an assignment's managed identity the defined roles using the portal: by using Access control (IAM) or by editing the policy or initiative assignment and selecting Save.
To add a role to the assignment's managed identity, follow these steps:
Launch the Azure Policy service in the Azure portal by selecting All services, then searching for and selecting Policy.
Select Assignments on the left side of the Azure Policy page.
Locate the assignment that has a managed identity and select the name.
Find the Assignment ID property on the edit page. The assignment ID look like the following example:
/subscriptions/{subscriptionId}/resourceGroups/{resourceGroupName}/providers/Microsoft.Authorization/policyAssignments/2802056bfc094dfb95d4d7a5The name of the managed identity is the last portion of the assignment resource ID, which is
2802056bfc094dfb95d4d7a5in this example. Copy this portion of the assignment resource ID.Navigate to the resource or the resources parent container (resource group, subscription, management group) that needs the role definition manually added.
Select the Access control (IAM) link in the resources page and then select + Add role assignment at the top of the access control page.
Select the appropriate role that matches a
roleDefinitionIdsfrom the policy definition. Leave Assign access to set to the default of 'user, group, or application'. In the Select box, paste or type the portion of the assignment resource ID located earlier. Once the search completes, select the object with the same name to select ID and select Save.
Create a remediation task
Launch the Azure Policy service in the Azure portal by selecting All services, then searching for and selecting Policy.

Step 1: Initiate remediation task creation
There are three ways to create a remediation task through the portal.
Option 1: Create a remediation task from the Remediation page
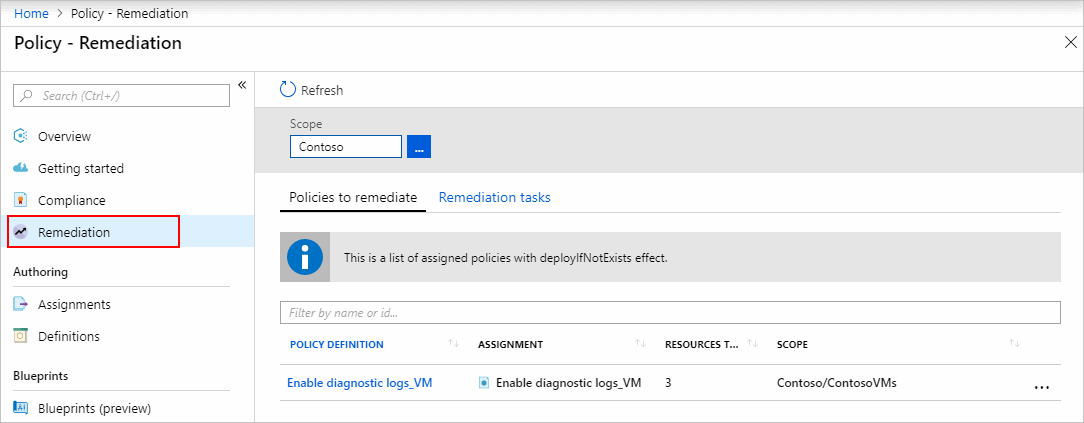
Select Remediation on the left side of the Azure Policy page.

All
deployIfNotExistsandmodifypolicy assignments are shown on the Policies to remediate tab. Select one with resources that are non-compliant to open the New remediation task page.Follow steps to specify remediation task details.
Option 2: Create a remediation task from a non-compliant policy assignment
Select Compliance on the left side of the Azure Policy page.
Select a non-compliant policy or initiative assignment containing
deployIfNotExistsormodifyeffects.Select the Create Remediation Task button at the top of the page to open the New remediation task page.
Follow steps to specify remediation task details.
Option 3: Create a remediation task during policy assignment
If the policy or initiative definition to assign has a deployIfNotExists or a modify effect, the Remediation tab of the wizard offers a Create a remediation task option, which creates a remediation task at the same time as the policy assignment.
Note
This is the most streamlined approach for creating a remediation task and is supported for policies assigned on a subscription. For policies assigned on a management group, remediation tasks should be created using Option 1 or Option 2 after evaluation has determined resource compliance.
From the assignment wizard in the portal, navigate to the Remediation tab. Select the check box for Create a remediation task.
If the remediation task is initiated from an initiative assignment, select the policy to remediate from the drop-down.
Configure the managed identity and fill out the rest of the wizard. The remediation task is created when the assignment is created.
Step 2: Specify remediation task details
This step is only applicable when using Option 1 or Option 2 to initiate remediation task creation.
If the remediation task is initiated from an initiative assignment, select the policy to remediate from the drop-down. One
deployIfNotExistsormodifypolicy can be remediated through a single Remediation task at a time.Optionally modify remediation settings on the page. For information on what each setting controls, see remediation task structure.
On the same page, filter the resources to remediate by using the Scope ellipses to pick child resources from where the policy is assigned (including down to the individual resource objects). Additionally, use the Locations dropdown list to further filter the resources.

Begin the remediation task after the resources are filtered by selecting Remediate. The policy compliance page opens to the Remediation tasks tab to show the state of the tasks progress. Deployments created by the remediation task begin right away.

Step 3: Track remediation task progress
Navigate to the Remediation tasks tab on the Remediation page. Select a remediation task to view details about the filtering used, the current status, and a list of resources being remediated.
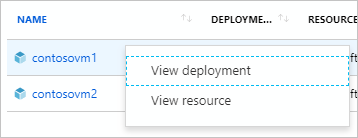
From the Remediation task details page, right-click on a resource to view either the remediation task's deployment or the resource. At the end of the row, select Related events to see details such as an error message.

Resources deployed through a remediation task are added to the Deployed Resources tab on the policy assignment details page.
Next steps
- Review examples at Azure Policy samples.
- Review the Azure Policy definition structure.
- Review Understanding policy effects.
- Understand how to programmatically create policies.
- Learn how to get compliance data.
- Review what a management group is with Organize your resources with Azure management groups.