Create an iOS app (Preview)
This article shows you how to add the Azure Maps to an iOS app. It walks you through these basic steps:
- Set up your development environment.
- Create your own Azure Maps account.
- Get your primary Azure Maps key to use in the app.
- Reference the Azure Maps libraries from the project.
- Add an Azure Maps control to the app.
Note
Azure Maps iOS SDK retirement
The Azure Maps Native SDK for iOS is now deprecated and will be retired on 3/31/25. To avoid service disruptions, migrate to the Azure Maps Web SDK by 3/31/25. For more information, see The Azure Maps iOS SDK migration guide.
Prerequisites
If you don't have an Azure subscription, create a free account before you begin.
Note
For more information on authentication in Azure Maps, see manage authentication in Azure Maps.
Create an Azure Maps account
Create a new Azure Maps account with the following steps:
In the upper left-hand corner of the Azure portal, select Create a resource.
In the Search the Marketplace box, type Azure Maps.
From the Results, select Azure Maps, then select the Create button that appears below the map.
On the Create Maps Account page, enter the following values:
- The Subscription that you want to use for this account.
- The Resource group name for this account. You may choose to Create new or Use existing resource group.
- The Name of your new account.
- The Pricing tier for this account.
- Read the License and Privacy Statement, and check the checkbox to accept the terms.
- Select the Create button.

Get the subscription key for your account
Once your Maps account is successfully created, retrieve the primary key that enables you to query the Maps APIs.
Open your Maps account in the portal.
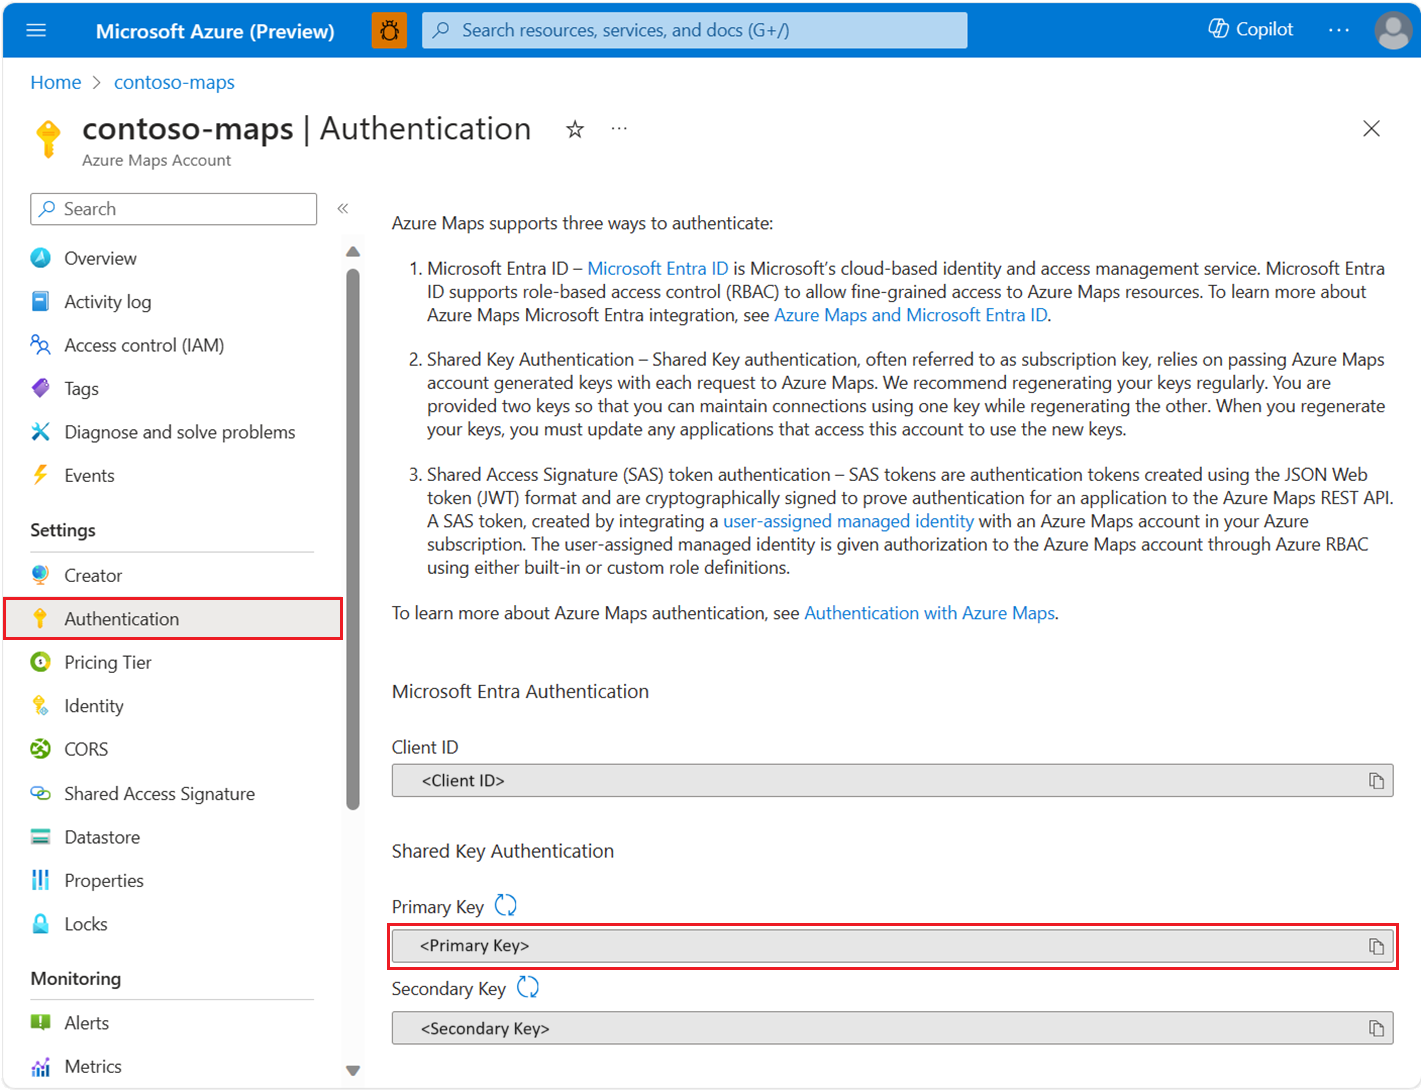
In the settings section, select Authentication.
Copy the Primary Key to your clipboard. Save it locally to use later in this tutorial.
Note
This quickstart uses Shared Key authentication for demonstration purposes, but the preferred approach for any production environment is to use Microsoft Entra authentication.
Create a project in Xcode
First, create a new iOS App project. Complete these steps to create an Xcode project:
Under File, select New -> Project.
On the iOS tab, select App, and then Next.
Enter app name, bundle ID then select Next.
See the Creating an Xcode Project for an App for more help with creating a new project.

Install the Azure Maps iOS SDK
The next step in building your application is to install the Azure Maps iOS SDK. Complete these steps to install the SDK:
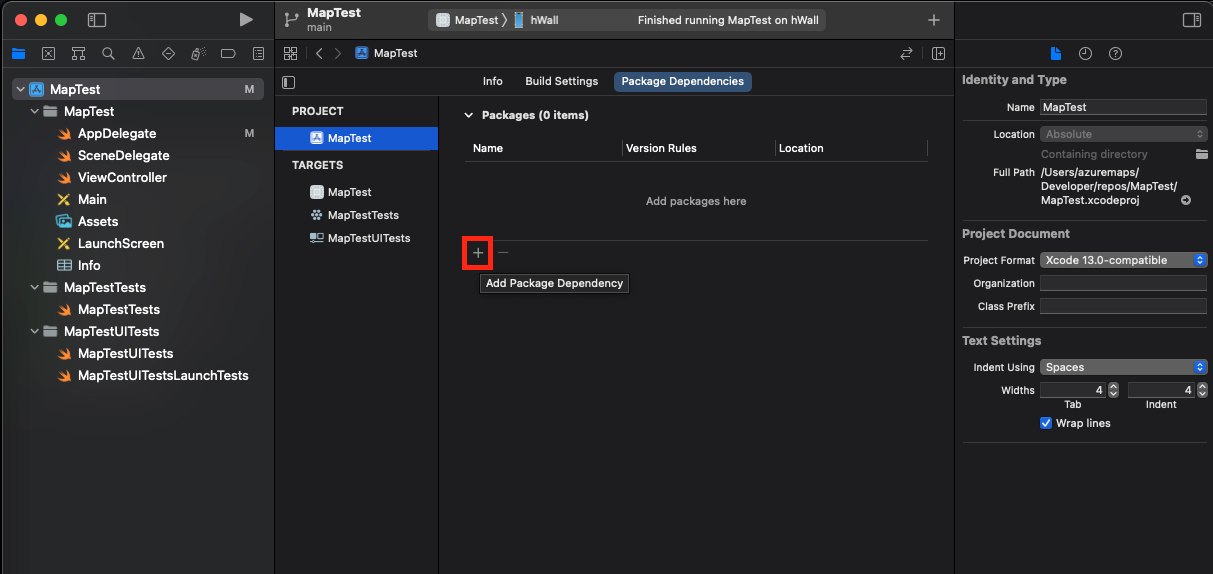
With the desired Xcode iOS project selected in the Project navigator, select the + button to Add package dependency.
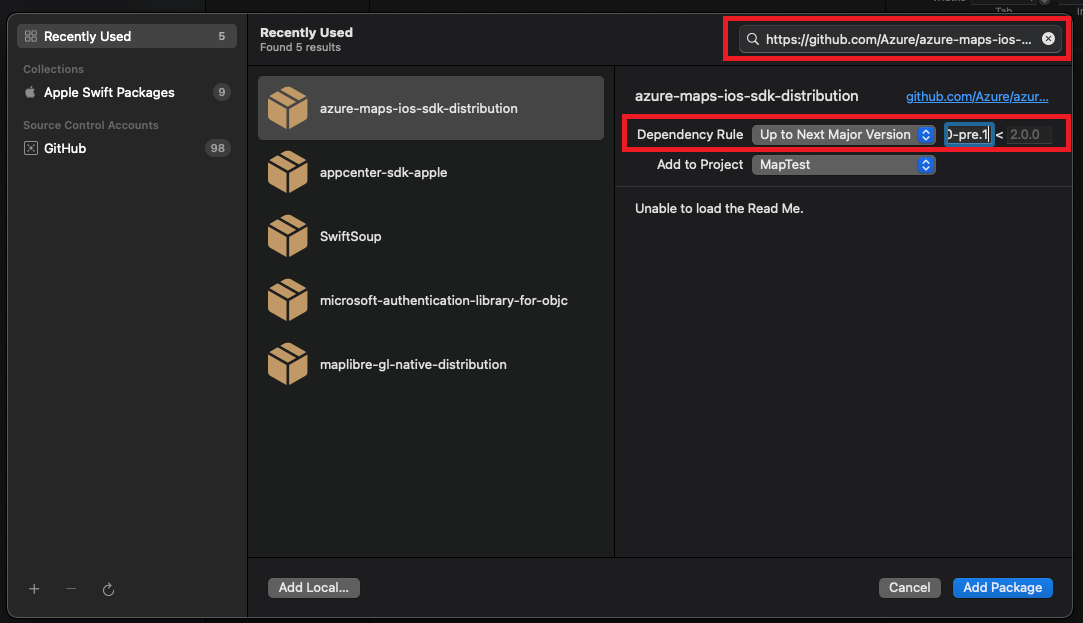
Enter the following values in the resulting dialog:
- Enter
https://github.com/Azure/azure-maps-ios-sdk-distribution.gitin the search bar that appears in the top right corner. - Select
Up to Next Major Versionin the Dependency Rule field. - Enter
1.0.0-pre.3into the Dependency Rule version field.
- Enter
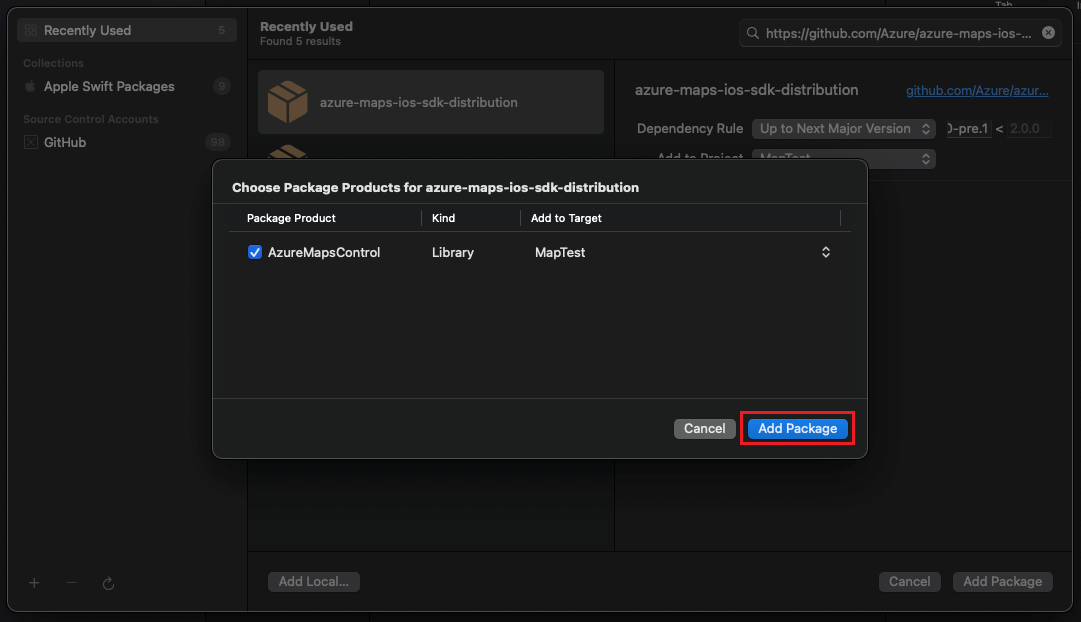
Once the package alongside its dependencies is resolved, select the Add Package button to complete the dependency setup.
Add MapControl view
Add custom
UIViewto view controllerSelect
MapControlclass fromAzureMapsControlmodule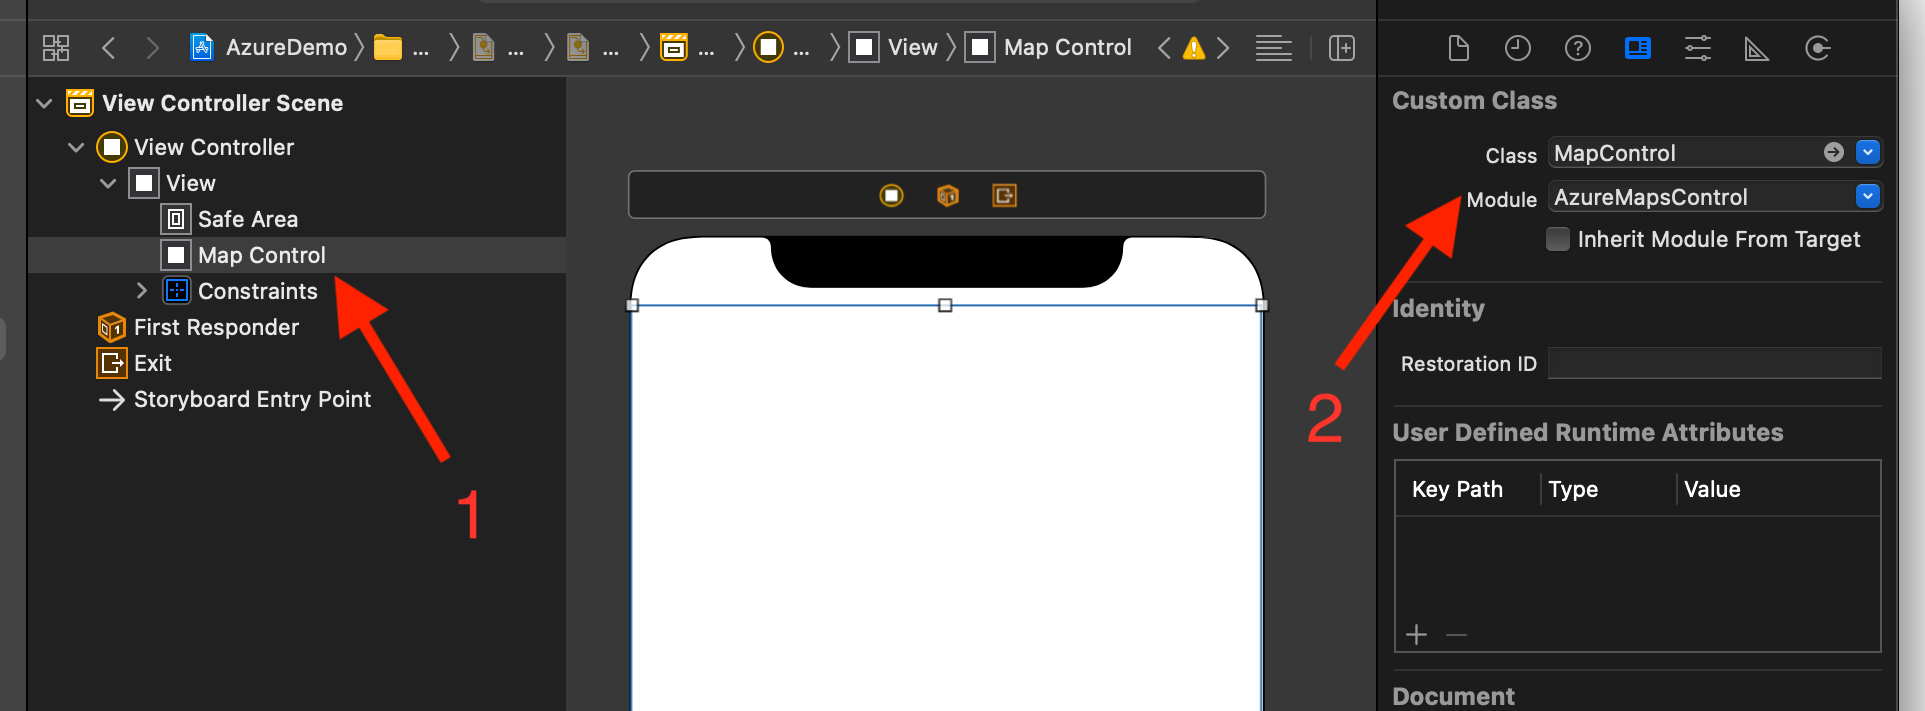
In the AppDelegate.swift file:
- add import for the Azure Maps SDK
- set your Azure Maps authentication information
By setting the authentication information on the AzureMaps class globally using the AzureMaps.configure(subscriptionKey:) or AzureMaps.configure(aadClient:aadAppId:aadTenant:), you don't need to add your authentication information on every view.
Select the run button, as shown in the following graphic (or press
CMD+R), to build your application.
Xcode takes a few seconds to build the application. After the build is complete, you can test your application in the simulated iOS device. You should see a map like this one:

Access map functionality
You can start customizing map functionality by getting hold to AzureMap instance in a mapView.onReady handler. Once the MapControl view is added, your sample ViewController should look similar to the following code:
class ViewController: UIViewController {

    override func viewDidLoad() {
        super.viewDidLoad()
        let mapView = self.view.subviews.first as? MapControl;
        mapView?.onReady({ map in
            // customize your map here
            // map.sources.add()
            // map.layers.insertLayer()
        })
    }
}
Proceed to Add a polygon layer to the map in the iOS SDK for one such example.
Clean up resources
Take these steps to clean up the resources created in this quickstart:
Close Xcode and delete the project you created.
If you tested the application on an external device, uninstall the application from that device.
If you don't plan on continuing to develop with the Azure Maps iOS SDK:
Navigate to the Azure portal page. Select All resources from the main portal page. Or, select the menu icon in the upper left-hand corner, then All resources.
Select your Azure Maps account. At the top of the page, select Delete.
Optionally, if you don't plan to continue developing iOS apps, uninstall Xcode.
Additional information
See the following articles for more code examples:
