How (I) to setup Azure Active Directory with a Web App
This article has been moved to its new location here: https://benperk.github.io/waws/2015/2015-04-how-i-to-setup-azure-active-directory-with-a-web-app.html
Controlling access to a website is cool. I have mostly used Forms Authentication in the past, hashed the credentials, then stored and retrieved them from a custom database during the login. However, starting now, I think I will use Azure Active Directory (AAD) from now on, as it has so many options, it is very secure, it provides both SSO and Multi-Factor Authentication providers; what more can you ask for these days? Check out the details here.
Before I start, I wanted to share that AAD is for controlling access to a Web App or other resources. It is not intended to control access to Web Apps within the Azure Management console. For this there is a concept called Role-Based Access Control (RBAC) described here. This took me a moment to clarify in my mind when I first started working with ADD…but something needing stated only once. So there you go.
The steps I took to control access to my Web App were:
- Create a new Azure Active Directory (AAD)
- Add and verify custom domain
- Add a user to the custom domain
- Add custom domain to Web App
- Add SSL to Web App that matches the custom domain
- Configure Authentication / Authorization for the Web App
- Confirm / grant user access to application
- Modify application to accept security token, if required
The following sections describe the steps in more detail.
Create a new Azure Active Directory
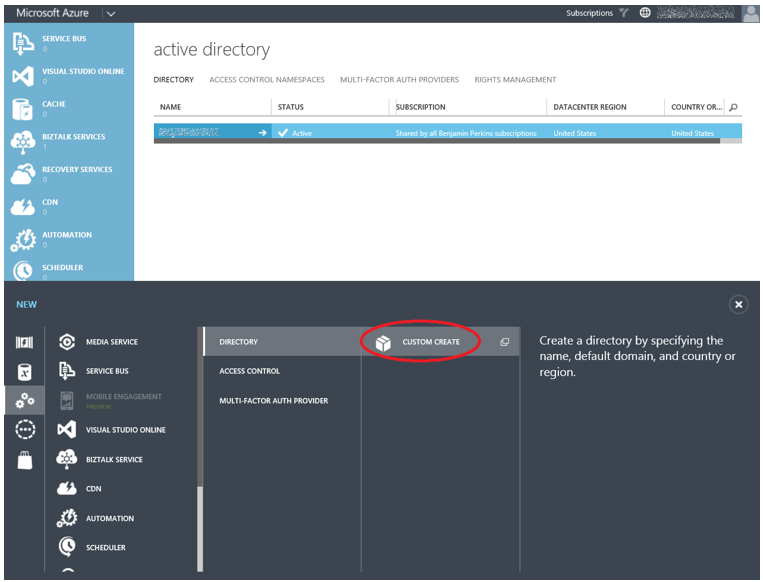
There is a default Active Directory created for your subscription, and this one can be used. However, I decided to create a new one for my project instead. To do this I clicked on +NEW -> App Services -> Active Directory -> Directory -> Custom Create, as shown in Figure 1.
Figure 1, Create an Azure Active Directory for an Azure Web App
Once selected, I provided the requested details in the pop-up received, similar to that shown in Figure 2. The details provided in Figure 2 are for my project only. The text in the boxes would be specific to your AAD.
Figure 2, Creating the Azure Active Directory for an Azure Web App
Click on the check to complete the creation of the AAD.
Add and Verify Custom Domain
Once the AAD is successfully created, click on it from the Active Directory page and the page shown in Figure 3 is rendered. To add a custom domain, click on the Add Domain button circled in red.
Figure 3, Add an Azure Web App custom domain to an Azure Active Directory
Clicking the Add domain button starts a wizard that requests the custom domain name, followed by a request that you add a TXT DNS record for the custom domain for verification.
As shown in Figure 4, I am adding my ‘test’ domain https://www.benjamin.cool which is already bound to a Web App named https://standard.azurewebsites.net.
Figure 4, adding the custom domain to ADD for controlling access
Click the add button and once successfully added, click the arrow, which progresses the wizard to Step 2. In Step 2 you are provided with instructions to add either a TXT or MX record to your DNS configuration. This action should be taken via your domain hosting company’s website and can take up to 48 hours to propagate. I received this popup, Figure 5, when I committed my zone file that contained my TXT record.
Figure 5, zone file DNS propagation for Azure Web App and Azure Active Directory
Once the change is propagated, click on the Verify button, and when successful, you would see that illustrated in Figure 6.
Figure 6, validated custom domain for AAD
Click the check and that’s it.
NOTE: I had already configured the custom domain to my Azure Web App prior to trying the actions in this section. If you need some instructions on how to configure a custom domain to an Web App, here are some instructions.
Add a User to the Custom Domain
Now you need to add the user or users who should have access to the Web App. The example here is only a simple one to show how to do this. I would suggest some design and thought about user and group management. In most cases you would want to create some groups, then add some users to the group and grant application access to the group instead of the individual user. However, keeping it simple for explanation purposes here.
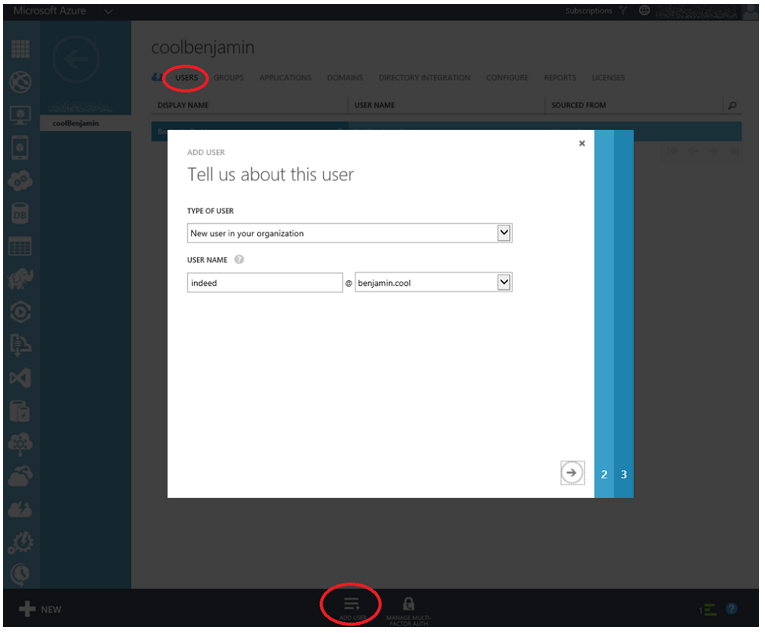
As shown in Figure 7, I clicked on the USERS page and then Add User which kicked off a wizard. I want to add a user with an id = indeed.
Figure 7, add a user to an Azure Active Directory to access an Azure Web App
The remainder of the wizard is outside the scope of this article, as it requires an AAD design and strategy, but in summary, it asks for additional details about the user account I am creating. The last step is the generation of the temporary password for the created user account (indeed@benjamin.cool).
Add Custom Domain to Web App
Add the custom domain to the Web App that you want to control the access, if not already done. Here are some instructions to complete this.
Add SSL to Web App that Matches the Custom Domain
You will need an SSL certificate to configure Authentication and Authorization for the Web App described in the next section. I wrote this article which is an overview of how I created a test SSL certificate and then uploaded and configured it. Read the sections titled ‘Create a Self-Signed Certificate’ and ‘Upload and Configure the self-signed certificate’. Here is another article with more details about creating the test SSL certificate. Once you get this part configured and working, move on to the next section.
Configure Authentication / Authorization for the Web App
Enabling Authentication and Authorization is completed with 2 clicks. First, navigate to the Web App which has the custom domain bound to it and which you configured in the Azure Active Directory, and click on the CONFIGURE link. Once there, scroll down until you see the Authentication / Authorization section as shown in Figure 8.
Figure 8, enable authentication and authorization for an Azure Web App
Notice in Figure 8 that I have both the custom domain and SSL certificate configured. Click on the Configure button (click #1) and a pop-up is rendered, as shown in Figure 9.
Figure 9, configuring authentication and authorization for an Azure Web App
Once you click the check button (click #2), the configuration happens. Review the results in the updated authentication and authorization section. You should see something similar to that shown in Figure 10.
Figure 10, creating an application link between the Azure Web App and Azure Active Directory
Now when I access the site at https://www.benjamin.cool, I am prompted to login as shown in Figure 11. I use the account I created earlier, shown in Figure 7, with the temporary password and am then prompted to change the password.
Figure 11, logging into an Azure Web App protected by Azure Active Directory (AAD)
If you get an error stating “Sorry, but we’re having trouble signing you in. We received a bad request”, similar to that shown in Figure 12, delete your cookies and/or close the browser and try again and/or reboot and try again. If none of these help, continue to the next section to make sure everything is setup correctly.
Figure 12, Sorry, but we’re having trouble signing you in. We received a bad request.
Grant user access to Application
There may be a slight delay between the time you configure the Web App to use Azure Active Directory, done in Figure 8, and its presence within the Azure Active Directory Applications list. If you do receive the message shown in Figure 12, “Sorry, but we’re having trouble signing you in. We received a bad request”, check the APPLICATION page within the Azure Active Directory feature to see what is present. If you see something like that shown in Figure 13 (I.e. no application listed) then wait some moments until you see what is shown in Figure 14. You can also try clicking on the check link to refresh the result list.
Figure 13, checking Applications for new Azure Web App
Figure 14, listing Applications bound to a Azure Active Directory domain
Additionally, if you get the error shown in Figure 12, reconfirm that the application has not been deleted, manually added or corrupted in some way on the CONFIGURE page for the bound Web App. If you see something like illustrated in Figure 15, then you should consider removing and re-configuring the Authentication / Authorization feature for the given Web App.
Figure 15, missing authentication / authorization configuration
Lastly, make sure the user exists and is assigned to the application. By clicking on the application name, shown in Figure 14, then on the USERS link, you are directed to the page shown in Figure 16. Assign the user to the application by clicking the Assign button.
Figure 16, user list for an Azure Active Directory controlled Azure Web App application
Now when I access https://www.benjamin.cool and provide the credentials, I have access to the site as expected. I created a simple ASP.NET MVC application which is illustrated in Figure 17.
Figure 17, an Azure Active Directory access controlled ASP.NET MVC Azure Web App
Modify Application to accept security token
When I configured Azure Active Directory for my ASP.NET MVC project hosted using the Web App, I initially received the error shown in Figure 18. “A claim of type 'https://schemas.xmlsoap.org/ws/2005/05/identity/claims/nameidentifier' or 'https://schemas.microsoft.com/accesscontrolservice/2010/07/claims/identityprovider' was not present on the provided ClaimsIdentity. To enable anti-forgery token support with claims-based authentication, please verify that the configured claims provider is providing both of these claims on the ClaimsIdentity instances it generates. If the configured claims provider instead uses a different claim type as a unique identifier, it can be configured by setting the static property AntiForgeryConfig.UniqueClaimTypeIdentifier.” However, when I created a simple static Web App, I received no error and it worked out of the box without any issue or error.
I corrected this by adding the following code snippet in Listing 1 to my project’s Global.asax.cs file.
Listing 1, adding a ClaimType to the Application_Start() method of an ASP.NET MVC application
protected void Application_Start()
{
AntiForgeryConfig.UniqueClaimTypeIdentifier = ClaimTypes.NameIdentifier;
}
To get the ASP.NET MVC completely compliant here, there are likely more actions required. Adding this code in Listing 1 resulted in getting the main page to render using the credentials created in this article.
Comments
- Anonymous
June 17, 2015
That is a very nice tutorial. I have a question about AAD not authorizing specific users but works like a charm for other users. Can you please guide me on the right path? Can any http://bit.ly/1Ca1vww Authorization has been denied for this request


