Make your own SSL Certificate for testing and learning
This article has been moved to its new home here: https://benperk.github.io/msdn/2014/2014-05-make-your-own-ssl-certificate-for-testing-and-learning.html
Like many technologies, they seem very complicated when you begin to work with it, but once you get into it you start to hit the boundaries of its capabilities and features. Once you use a tool for some time you learn what it can and cannot do, and therefore when there is a problem you can quickly rule out or rule in that it is related or not to the given technology.
I have had some time now to learn about certificates on IIS and wanted to share some information about how you can create, export and import SSL certificates for use with testing how SSL certificates are installed and configured on IIS. One the barriers I had was getting a certificate to play with, as they usually cost money, so I avoided getting one and asking management to pay for one for training me. Nonetheless, with what I am about to explain here will help you learn some about SSL Certificates.
I initially found this article, which was the basis for my learning. I like to find articles, learn from them and build on them, adding my experiences and understandings.
One of the initially challenging task I has was finding the MAKECERT and CERTMGR executables required to make and import the certificate. It is part of the Windows SDK but am not about to tell you which version you need, I installed a few and ultimately found the EXEs that I was after.
The steps required to create and import an SSL certificate to IIS for testing are:
- Create a self-signed root authority certificate and export the private key
- Install the root certificate into the Trusted Root Certificate Store
- Make the Server Certificate for IIS
- Export the certificate as a .PFX file, include all properties and private key
- Import the certificate on IIS
Create a self-signed root authority certificate and export the private key
Certificate Authorities, companies that create real SSL certificates create paths to certificates that can have 1 or more intermediate certificates. This is done to reduce the possibility of private keys being compromised and making all certificates generated using that
private key no long trusted. By having intermediates, they can have multiple private keys and reduce the impact of this possible loss of integrity. There are certificates that do not have a CA not intermediate CAs, which carry different restrictions and technicalities.
To create the certificate and export the private key, enter the following from a Command prompt running with administrative privileges, also shown in Figure 1.
makecert -n "CN=benjamin-perkins.me" -r -sv benperkmeCA.pvk benperkmeCA.cer
Figure 1, create CA certificate and export the private key using MAKECERT
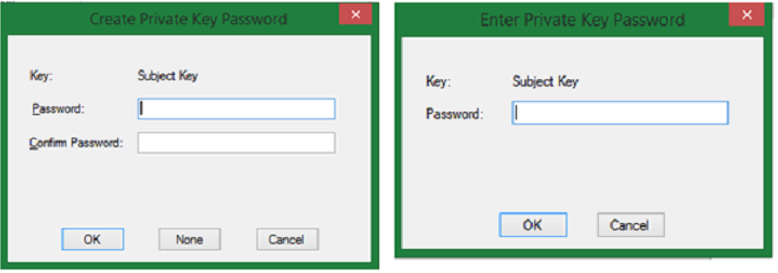
When you execute the command, you will be asked to create and enter a password for the private key. You do get the option to not have one, but don’t recommend this even for testing. With real SSL certificates, I.e. not self-signed or test ones, you would always want to have a password, so let’s try to mimic how it would work when we really do it. Figure 2 illustrates the password requests pop-ups.
Figure 2, MAKECERT password request dialog
Install the root certificate into the Trusted Root Certificate Store
You can do this using MMC and the Certificate Management console, but let’s use the command prompt first. To add the CA to the Trusted Root Certificate Store, execute the following from a Command prompt running as an Administrator and as shown in Figure 3.
certmgr.exe -add -all -c "benperkmeCA.cer" -s -r localMachine Root
Figure 3, install the CA into the Trusted Root Certificate Store using CERTMGR
Enter CERTMGR from the command or open the Certificate manager using MMC and look at the Trusted Root Certificate Authorities tab or folder. You will find the certificate present in the list and shown in Figure 4 and Figure 5.
Figure 4, view certificates from CERTMGR.exe
Figure 5, view certificates from the Certificate Manager within MMC
Make the Server Certificate for IIS
This article will focus on creating a server certificate used for HTTPS on an IIS server. You can also create client certificates using similar MAKECERT commands, but this article won’t cover that. I do plan to write another about that soon. To create the test server certificate for use with IIS, execute the following command and as shown in Figure 6. See here for instructions on how to make a SHA256 certificate.
makecert -pe -iv benperkmeCA.pvk -n "CN=benjamin-perkins.me" -eku 1.3.6.1.5.5.7.3.1 -ss my -sr localmachine -sky exchange -ic BenperkmeCA.cer IIS-ServerCert-Benperk.cer
Figure 6, create a test IIS SSL Server Certificate using MAKECERT
You will be prompted to enter the password you created in step 1, Figure 2. Once entered the IIS Server Certificate is created. Once created you can then see it in the Certificate Management Console with MMC as shown in Figure 7.
Figure 7, view the IIS SSL certificate in MMC certificate manager
I will quickly jump to IIS and show you the window you get when you want to import an SSL certificate for use. Notice in Figure 8, which is rendered from the IIS management console that it is looking for a .PFX file. However, if you look at the command run in Figure 6, a .CER file was created. To get the .PFX file for import into IIS, we need to export the certificate from the certificate management console shown in Figure 7.
Export the certificate as a .PFX file, include all properties and private key
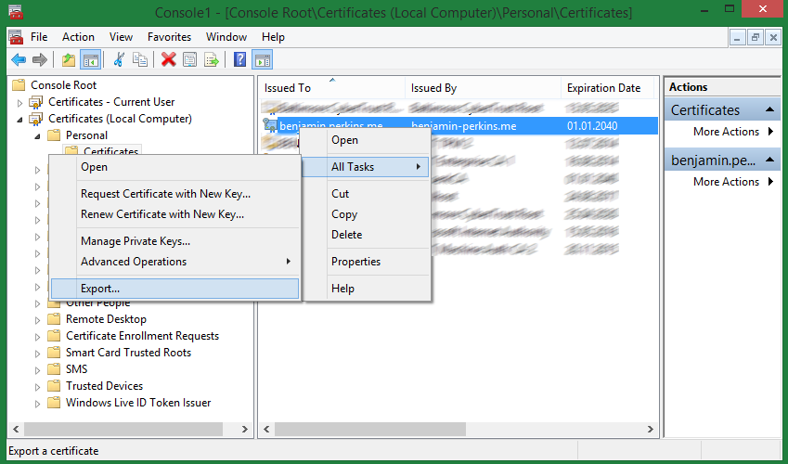
To export the .CER file you just created as a .PFX file, right click on the certificate, All Tasks -> Export… as shown in Figure 8.
Figure 8, export the certificate from the MMC certificate manager
When the Export menu item is selected, an export wizard is run, on the first window read through the information and click the next button, the window shown in Figure 9 is rendered. Select the radio button “Yes, export the private key” and then click the next button.
Figure 9, export certificate wizard, export the private key
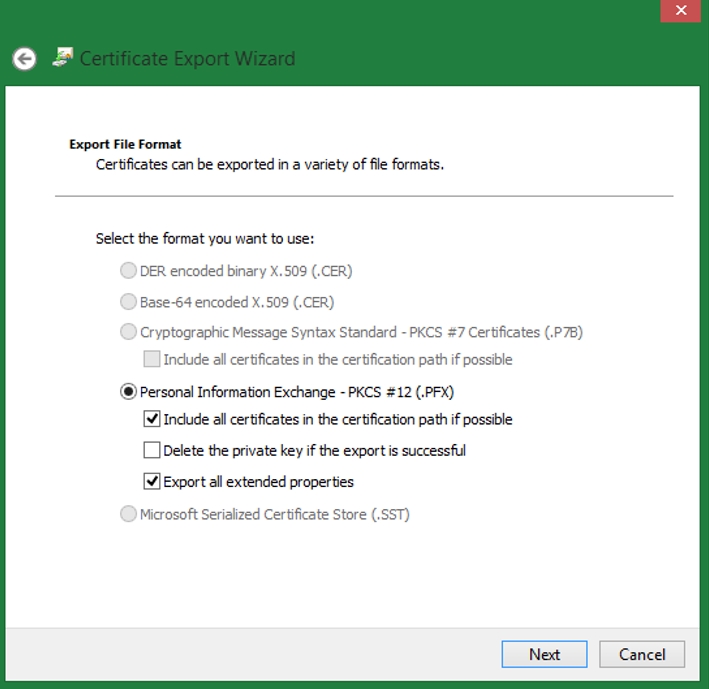
In the next windows, as illustrated by Figure 10, click the “Export all extended properties” check box, leave all other settings as default and click the next button. I didn’t test this one but by doing this the export likely includes the CA which will be needed when we
import the certificate into IIS. Check it out and let me know what happens, if anything when you do not check this one. Thanks in advance. If this is not the case, you might see something like that shown in Figure 14, after the certificate is imported on IIS.
Figure 10, export certificate wizard, export all extended properties
Add a password, as shown in Figure 11 and click the next button.
Figure 11, export certificate wizard, set password
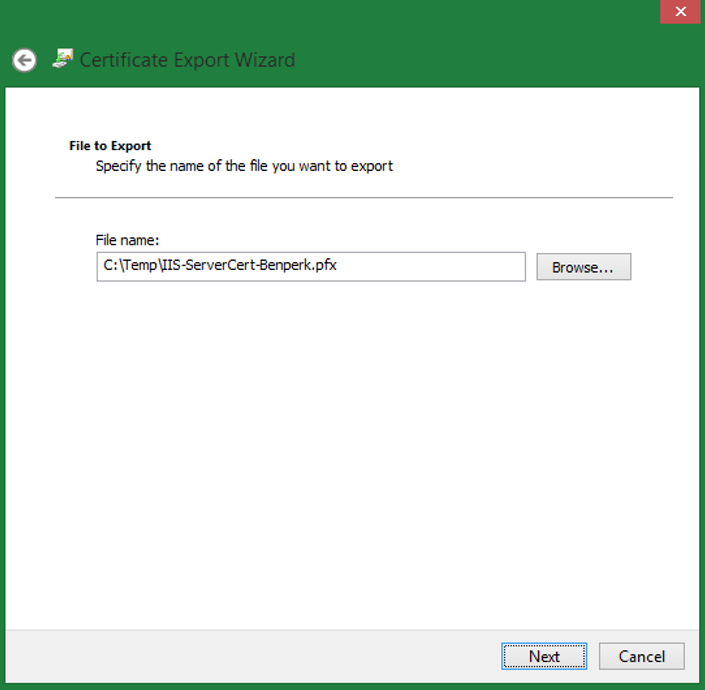
Define the name and location of your .PFX file and click the next button, as shown in Figure 12.
Figure 11, export certificate wizard, save the PFX file
Complete the wizard. A message box is rendered stating that the export was successful.
Import the certificate on IIS
To install the certificate on IIS, copy the .PFX file and place it in a secure location which is accessible from the server. Then copy the .PFX file onto the server and open the IIS management console. At the server level, click on the Serve Certificates feature as shown on Figure 12.
Figure 12, the Server Certificate feature in the IIS Management console
Once in the Server Certificates feature, click on the Import… link on the Action pane, as illustrated on Figure 13, fill in the certificate details and press OK to import the certificate.
Figure 13, import the SSL certificate into IIS for binding requests to HTTPS
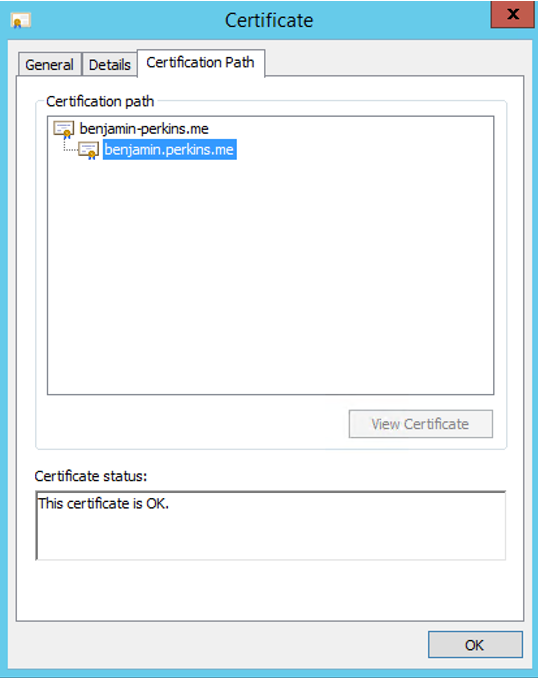
Once imported, you will see the certificate in the feature. You can double-click on the certificate and view the details. Click on the Certificate path and make sure the path and status show as OK. If you see something like that shown in Figure 14, you need to install the CA certificate or any intermediate certificate required for the chain or path to be valid. Recall from step 1, Figure 1 where we created the CA. To get this to work you need to export the .CER file (DER) and import it onto the IIS server using the MMC Certificate Management console.
Figure 14, Checking out the certificate status and path
Once you get the CA certificate created in step 1 of this article, open the certificate details and view the path and status, all is OK as shown in Figure 15.
Figure 15, OK path and status certificate properties
After doing this exercise, I feel comfortable with certificate and understand how to make and install them. There is lots more to learn before I start hitting the boundaries of the technology, but I know they are there and it is only a matter of time………….and effort.
Comments
Anonymous
March 24, 2015
Nice guide!Anonymous
May 08, 2015
Thanks for detailed post.Anonymous
July 29, 2015
Thanks, glad you liked it.Anonymous
August 03, 2015
How do I set the friendly name of the imported SSL certificate?Anonymous
August 04, 2015
Nice article. Liked it.Anonymous
September 08, 2015
Informative ideas , I was fascinated by the info , Does anyone know if my assistant could get ahold of a blank 2009 SBA 2404 version to complete ?Anonymous
October 19, 2015
I wanted to mention that by default MAKECERT creates an SHA1 certificate. You might consider using the -a parameter and create an SHA256 based certificate.Anonymous
February 01, 2016
The comment has been removedAnonymous
March 13, 2017
Hello.This is a nice postAnonymous
May 04, 2017
>>It is part of the Windows SDK but am not about to tell you which version you needVery Helpful- Anonymous
May 04, 2017
@Lee, point taken. I wanted to recommend using the PowerShell method instead of the MAKECERT one which I why I did not provide the link. I looked and seems like it can still be downloaded from here, at least for now. "Windows Server 2003 Administration Tools Pack""
- Anonymous
Anonymous
August 21, 2017
C:\Program Files (x86)\Microsoft Visual Studio\2017\Community>makecert -n "CN=benjamin-perkins.me" -r -sv benperkmeCA.pvk benperkmeCA.cerError: Unable to create file for the subject ('benperkmeCA.pvk')Error: Can't create the key of the subject ('benperkmeCA.pvk')FailedHi Ben, stumbling at the first hurdle...i was forced to try though the vs 2K17 console to make the certificate but got this unhelpful error, having installed the windows10 SDK with all the right bits im at a loss as to how to proceed any ideas?- Anonymous
August 21, 2017
@Tom, if possible I'd recommend that you use the PowerShell method to create self signed certificates from now. New-SelfSignedCertificate
- Anonymous

