Donor commitments in Fundraising and Engagement
Important
Fundraising and Engagement is being retired. Support for Fundraising and Engagement will end at 11:59 PM Pacific Time on December 31, 2026. For more information, go to What’s new in Fundraising and Engagement.
Donor commitments (often called pledges) are agreements by donors to make gifts to your organization. Each pledge has a donor commitment record to store the details, such as donor information, pledge amount, and transactions that fulfill the pledge.
Note
Donor promises to make multiple donations on a schedule are stored in Payment Schedules.
To work with donor commitment records, follow these steps:
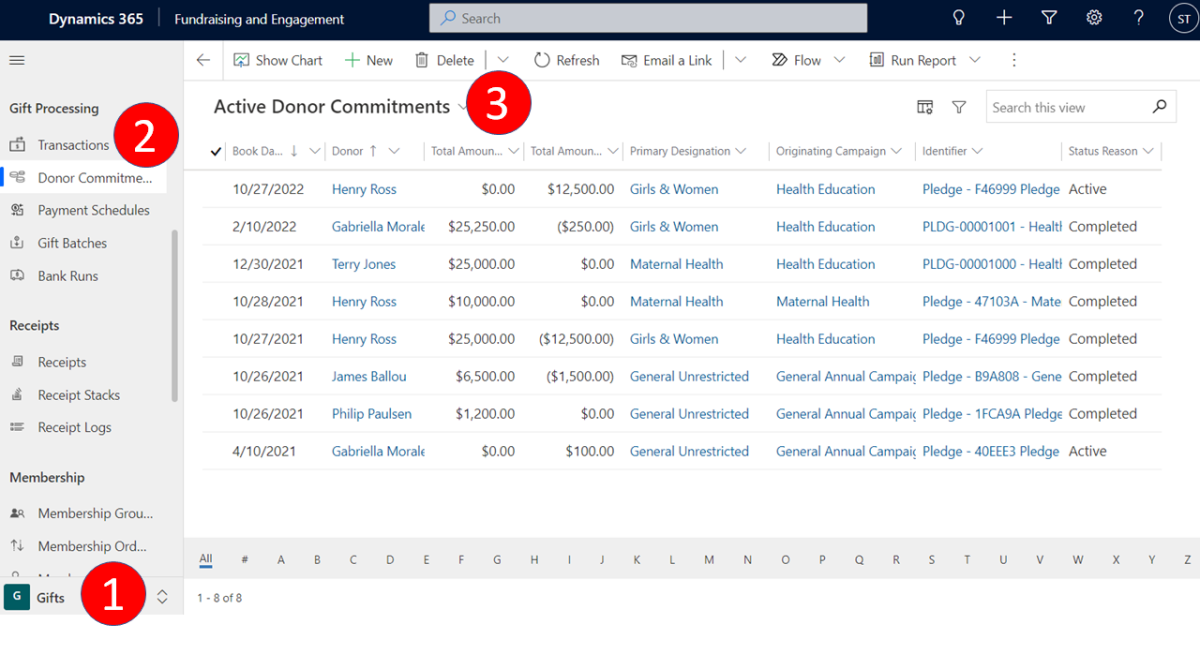
In the navigation pane, select Gifts from the Change area menu.
Under Gift Processing, select Donor Commitments.
The default view opens and displays existing records. If needed, switch to a different view.

Add a new donor commitment
To record a new pledge from a donor to make a single donation, create a new donor commitment record as follows:
In the navigation pane, select Gifts from the Change area menu.
Under Gift Processing, select Donor Commitments.
On the action pane, select New.
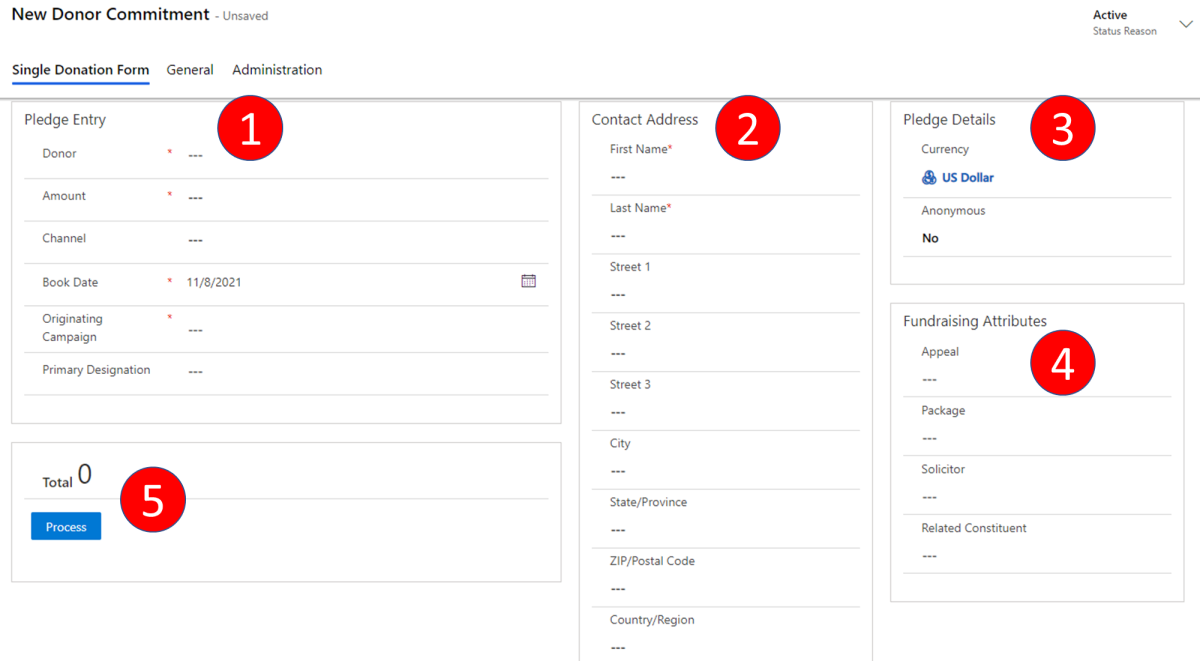
A new record opens and displays the Single Donation Form tab. Complete the following sections:

# Area 1 Pledge Entry 2 Contact Address 3 Pledge Details 4 Fundraising Attributes 5 Process
Pledge Entry
| Field | Description |
|---|---|
| Donor | The related contact or organization giving the gift. |
| Amount | The total amount committed. |
| Channel | The channel the gift was received in: Phone: Gift received by phone. Mail: Gift received by mail. In Person: Gift received in person. Online: Gift received online (for example, third-party website or e-transfer). Social: Gift received via social media campaigns. |
| Book Date | The date defaults to today’s date, however, it can be changed to either a post-dated donation (a donation yet to occur) or a previous date. |
| Originating Campaign | The campaign or event that the gift is related to. |
| Primary Designation | The designation contains the information needed to track both expected and received revenue. |
Contact Address
This section fills in automatically when you select a Donor in the Pledge Entry section.
Pledge Details
| Field | Description |
|---|---|
| Currency | The currency of the donation. |
| Anonymous | Indicates whether the contact wants to be listed in any marketing materials for this particular donation. |
Fundraising Attributes
| Field | Description |
|---|---|
| Appeal | The appeal this gift record is related to. |
| Package | The package this gift record is related to. |
| Solicitor | A lookup field to identify the individual credited with obtaining the gift. |
| Related Constituent | A lookup field to identify the contact/constituent related to the gift. For example, an organization might be the donor and the related constituent is the individual associated with the organization’s gift. |
Process
Select Process to begin accepting payments from the donor. The Linked Transactions section appears.
Note
If you save the new record, Linked Transactions also appears.
To accept a partial payment, select New Transaction in the Linked Transactions section.
Note
Before you can process a transaction, a configuration record must be completed to activate various processes necessary to complete credit card transactions, donations and integrations. The details of the configuration record may make some of these features unavailable. For more information, go to Configurations: Primary Configuration Record.
Accept a payment for an existing donor commitment
You can accept a partial payment or full payment for an active donor commitment.
In the navigation pane, select Gifts from the Change area menu.
Under Gift Processing, select Donor Commitments.
The default view opens and displays existing records. If needed, switch to a different view.

In the view, find the donor commitment record, and then select the link in the Identifier column.
When the record opens, in the Linked Transactions section, do one of the following:
- To accept a partial payment, select New Transaction.
- To accept payment for the full Remaining Balance, select Convert to Donation.

In the transaction record that opens, under Gift Entry, select the correct Gift Type. If you're accepting a partial payment, adjust the value of Amount accordingly.
Change any other fields as needed, then select Process.
When the transaction completes, you can save and close the transaction record. Or, to return to the donor commitment record, select the link just above Linked Pledge at the top right.
Print a thank-you letter
Note
Before you can print a Thank You letter, you need an activated Word template. For information about how to build and activate templates, see Generate receipts and thank you letters.
In the navigation pane, select Gifts from the Change area menu.
Under Gift Processing, select Donor Commitments.
The default view opens and displays existing records. If needed, switch to a different view.

In the view, find the donor commitment record, and then select the link in the Identifier column.
When the record opens, select Print Thank You on the action pane.
Note
Depending on your role and the configuration record you're using, the Print Thank You command might not be available.
Write off a donor commitment
When a donor is unable to fulfill a donor commitment, you can write it off rather than deactivating or deleting the record. If you write it off, you can track the donor’s activity more accurately and balance the account.
In the navigation pane, select Gifts from the Change area menu.
Under Gift Processing, select Donor Commitments.
The default view opens and displays existing records. If needed, switch to a different view.
In the view, find active donor commitment record, and then select the link in the Identifier column.
When the record opens, select Write Off on the action pane.
The dialog shows the maximum available amount. Set the amount of the write-off, then select Submit.
The donor commitment's Remaining Balance changes according to the write-off amount, and the status reason changes to Write Off.
See also
Gifts overview
Contacts in Fundraising and Engagement
Transactions in Fundraising and Engagement
Payment schedules in Fundraising and Engagement