Commerce Chat with Power Virtual Agents module
This article describes the Commerce Chat with Power Virtual Agents module that integrates Microsoft Power Virtual Agents with Dynamics 365 Commerce websites.
The Commerce Chat with Power Virtual Agents feature empowers Dynamics 365 e-commerce customers to use Power Virtual Agents chatbot capabilities to handle their queries. As of the Dynamics 365 Commerce 10.0.30 release, this feature can be incorporated into e-commerce websites by using the Commerce Chat with Power Virtual Agents module that is part of the Commerce module library.
The Commerce Chat with Power Virtual Agents feature helps businesses achieve the following goals:
- Increase personalized engagement with their consumers, and improve retention.
- Increase customer service through integration of self-service chatbots.
- Increase overall customer satisfaction, and therefore increase sales.
Note
To learn about the differences between the Dynamics 365 Omnichannel for Customer Service and Power Virtual Agents applications, see Commerce chat features overview.
Prerequisites for using Power Virtual Agents
To use the Commerce Chat with Power Virtual Agents feature, you must first create a Power Virtual Agents chatbot for your e-commerce website. For instructions, see Create and delete Power Virtual Agents bots.
After you configure the chatbot, follow the procedures below to obtain the bot ID, and tenant ID chatbot parameter values you'll use to configure the Commerce chat experience.
Find the bot ID of a Power Virtual Agent
To find the bot ID of a Power Virtual Agent in the Power Virtual Agents web app, follow these steps.
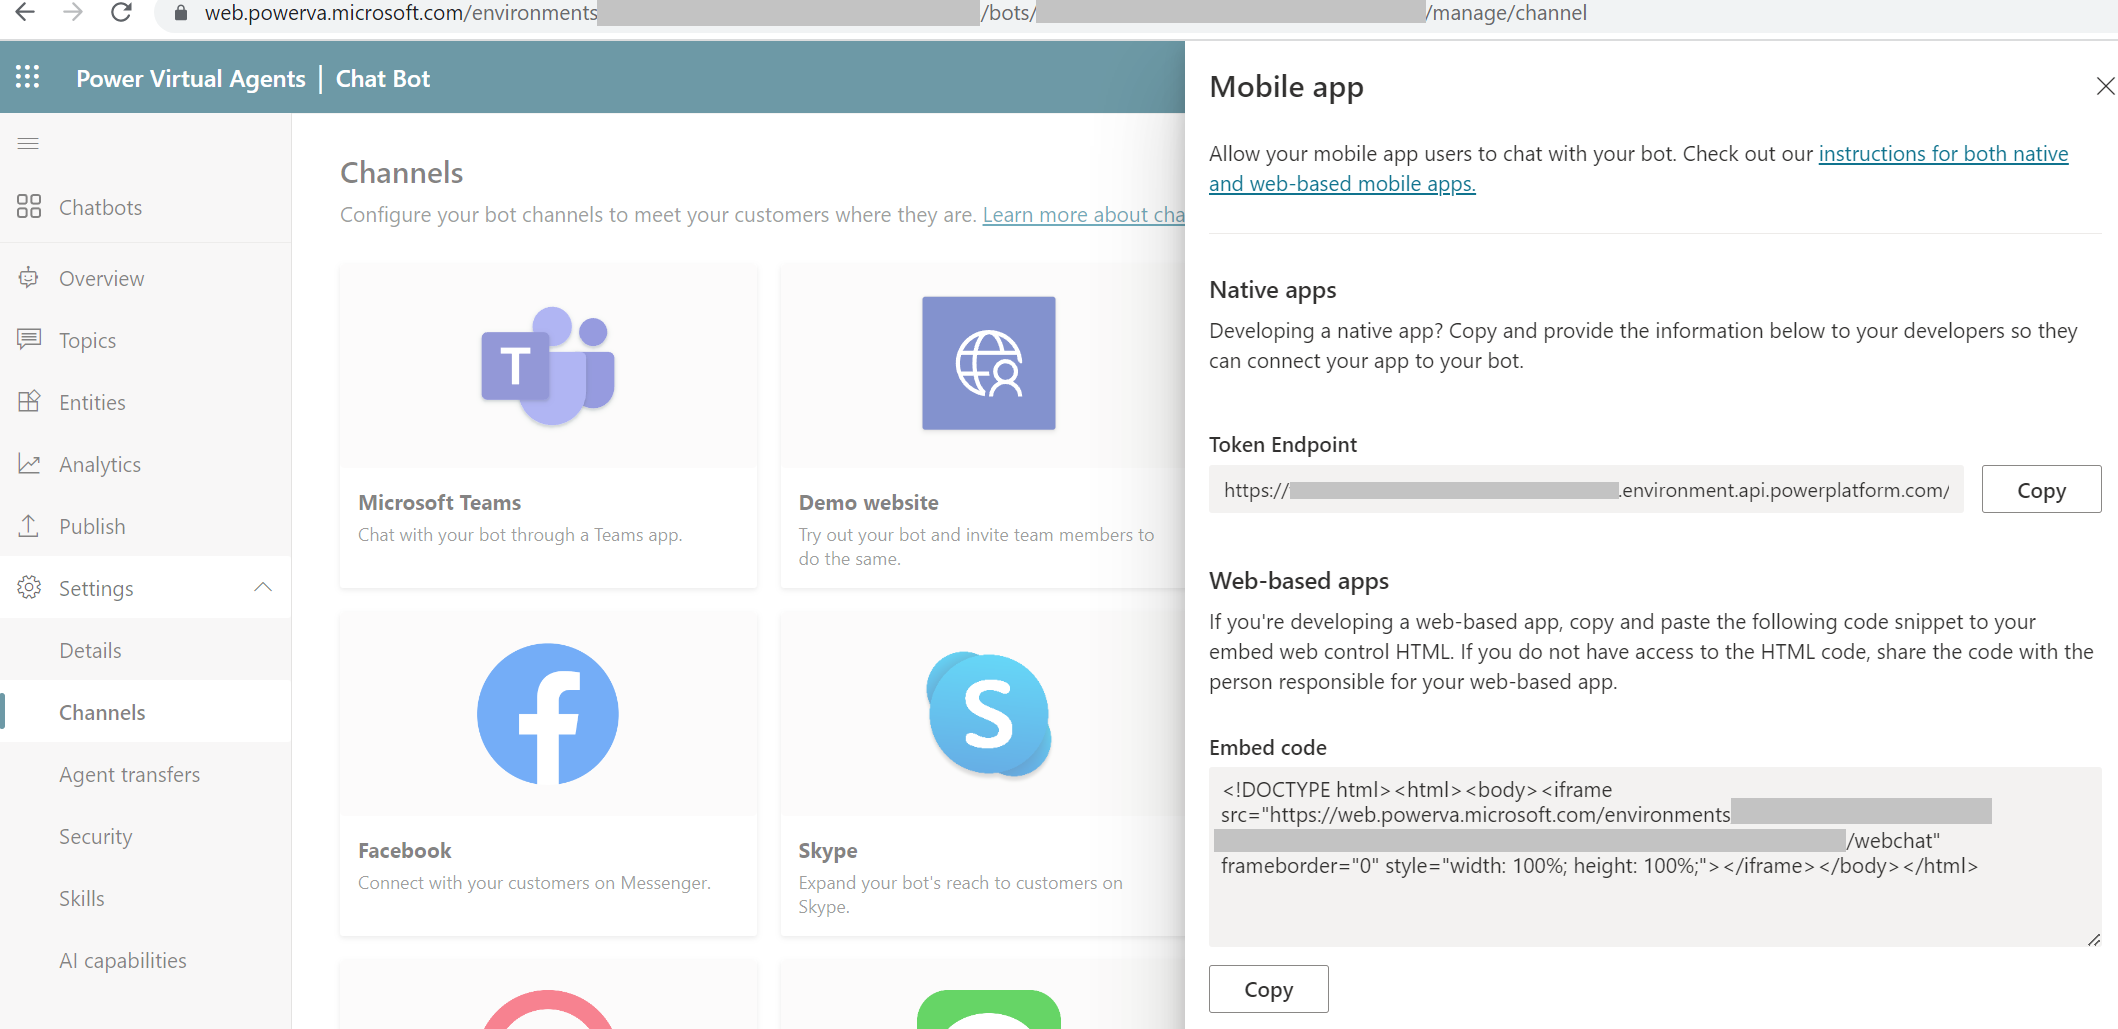
- In the left navigation menu, select Settings > Channels.
- Select Mobile app.
- In the Mobile app flyout menu, under Token Endpoint, select Copy to copy the token endpoint URL.
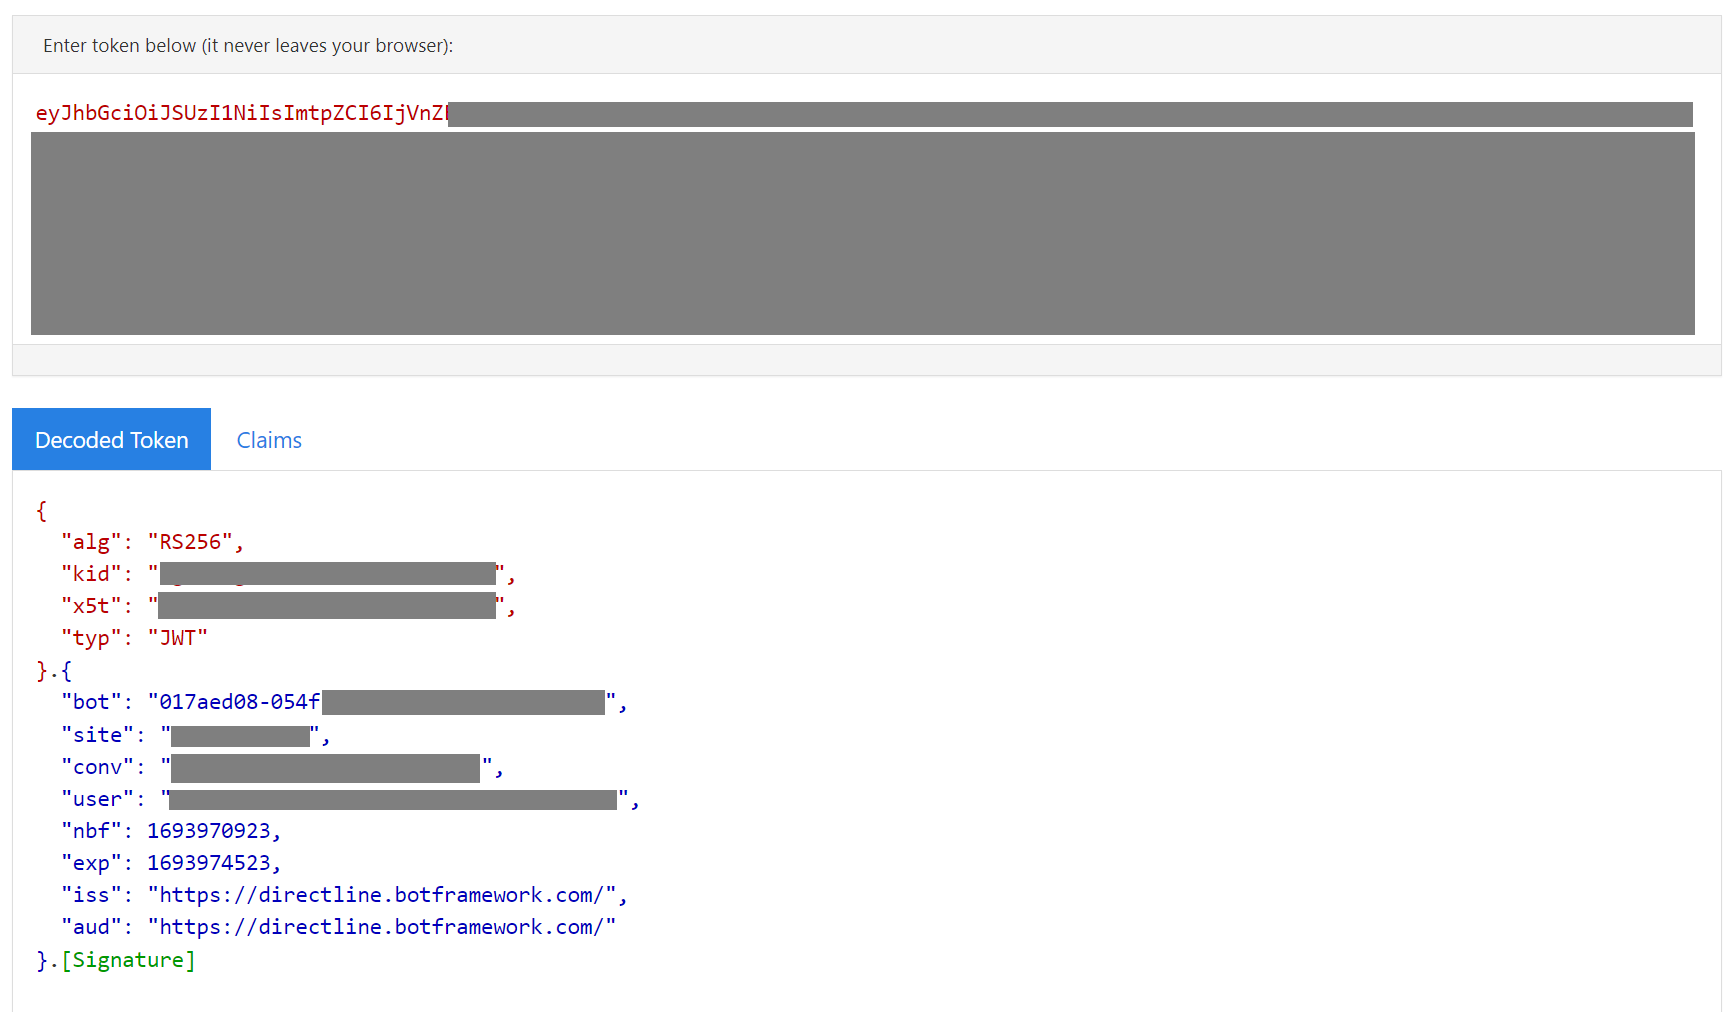
- Open a new browser tab and navigate to the Token Endpoint. A JSON result displays. Copy the value of the token property. The value is a JWT token.
- Decode the JWT token. In the decoded result, the bot ID is found in the bot field.


Note
The bot ID differs from the bot app ID.
For more information on how to copy the bot ID parameter values, see Retrieve your Power Virtual Agents bot parameters.
Find the tenant ID of a Power Virtual Agent
To find the tenant ID of a Power Virtual Agent in the Power Virtual Agents web app, follow these steps.
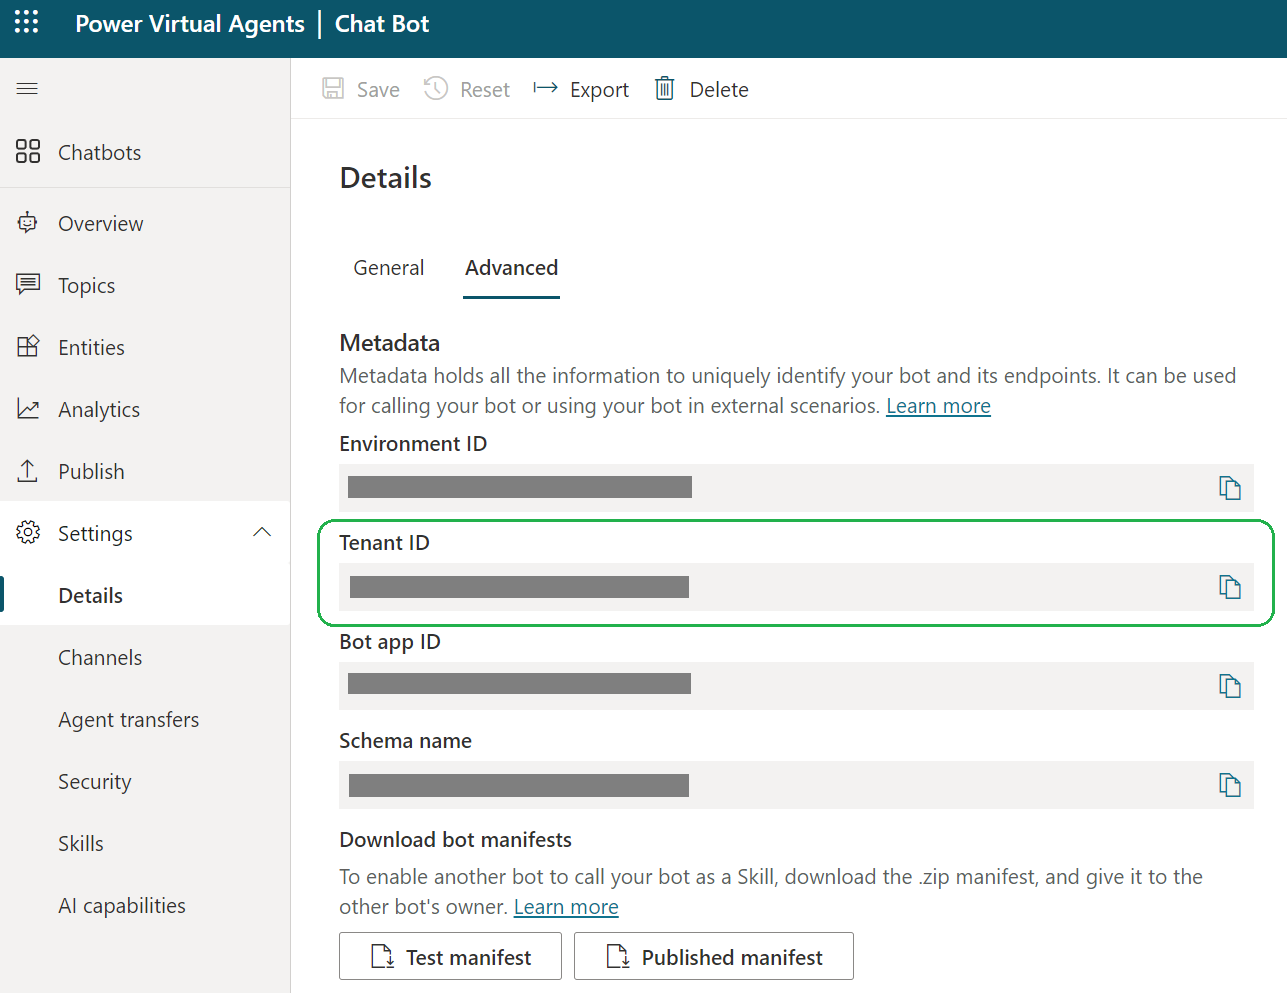
- In the left navigation menu, select Settings > Details.
- Select Advanced.
- Select the copy symbol to copy the Tenant ID value.

Configure your e-commerce site
One recommended way to implement the chat experience for your e-commerce site is to add the Commerce Chat with Power Virtual Agents module to the shared header fragment that is used on your site pages.
To add the chat module to your site's header fragment in Commerce site builder, follow these steps.
In Commerce site builder for your site, go to Fragments.
Select New.
In the Select a fragment dialog box, select the Commerce Chat with Power Virtual Agents module, enter a name for the fragment, and then select OK.
In the outline view, select the Msdyn365 pva chat connector slot.
In the properties pane on the right, follow these steps:
- Under Bot Parameters, in the Bot Framework Webchat Chat CDN URL field, leave the default value (for example,
https://cdn.botframework.com/botframework-webchat/latest/webchat.js). - In the Bot Framework Direct Line Authentication URL field, leave the default value (for example,
https://powerva.microsoft.com/api/botmanagement/v1/directline/directlinetoken). - In the Bot ID field, enter the Power Virtual Agents Bot ID value that you copied in the Prerequisites for using Power Virtual Agents section.
- In the Tenant ID field, enter the Tenant ID value that you copied.
- Under Bot Parameters, in the Bot Framework Webchat Chat CDN URL field, leave the default value (for example,
Select Save, select Finish editing to check in the fragment, and then select Publish to publish it.
Go to Fragments, and open the header fragment for your site.
In the Default container slot, select the ellipsis (...), and then select Add fragment.
In the Select modules dialog box, select the chat fragment that you created earlier, and then select OK.
Select Save, select Finish editing to check in the fragment, and then select Publish to publish it.
Proactive chat parameters
For a complete list of proactive chat configuration parameters, see Commerce chat module proactive chat parameters.
Note
Currently, Power Virtual Agents doesn't support Microsoft Entra ID B2C (Microsoft Entra B2C) authentication. It supports only anonymous Retail Cloud Scale Unit (RCSU) calls to get product availability or interact with other anonymous APIs. Calls to authenticated APIs via Power Virtual Agents chatbots require an explicit customer sign-in.
Additional resources
Commerce chat features overview