Exercise - Use FHIRlink actions and operations to retrieve data
In this exercise, you use the FHIRlink connection in a canvas app to retrieve data from your Azure Health Data Services FHIR service that you created and validated in Exercise - Connect to Azure Health Data Services by using FHIRlink.
You create a simple canvas app that connects to Azure Health Data Services and calls on two FHIRlink operations: ListResources and GetResource. This app demonstrates how the connector simplifies the task of querying resources from a FHIR endpoint.
Connect to Azure Health Data Services by using a new FHIRlink connection
In this first task, you connect to Azure Health Data Services by using a new FHIRlink connection. You create a new canvas app and then query data by using the ListResources FHIRlink connection.
Create a new canvas app
In this task, you set up a new canvas app that uses the saved FHIRlink connection as a data source. You add controls to the screen that allow you to begin using the FHIRlink connection object.
Go to Power Apps.
On the left navigation pane, select Create > Blank app.

From the available options, select Create under Blank canvas app.
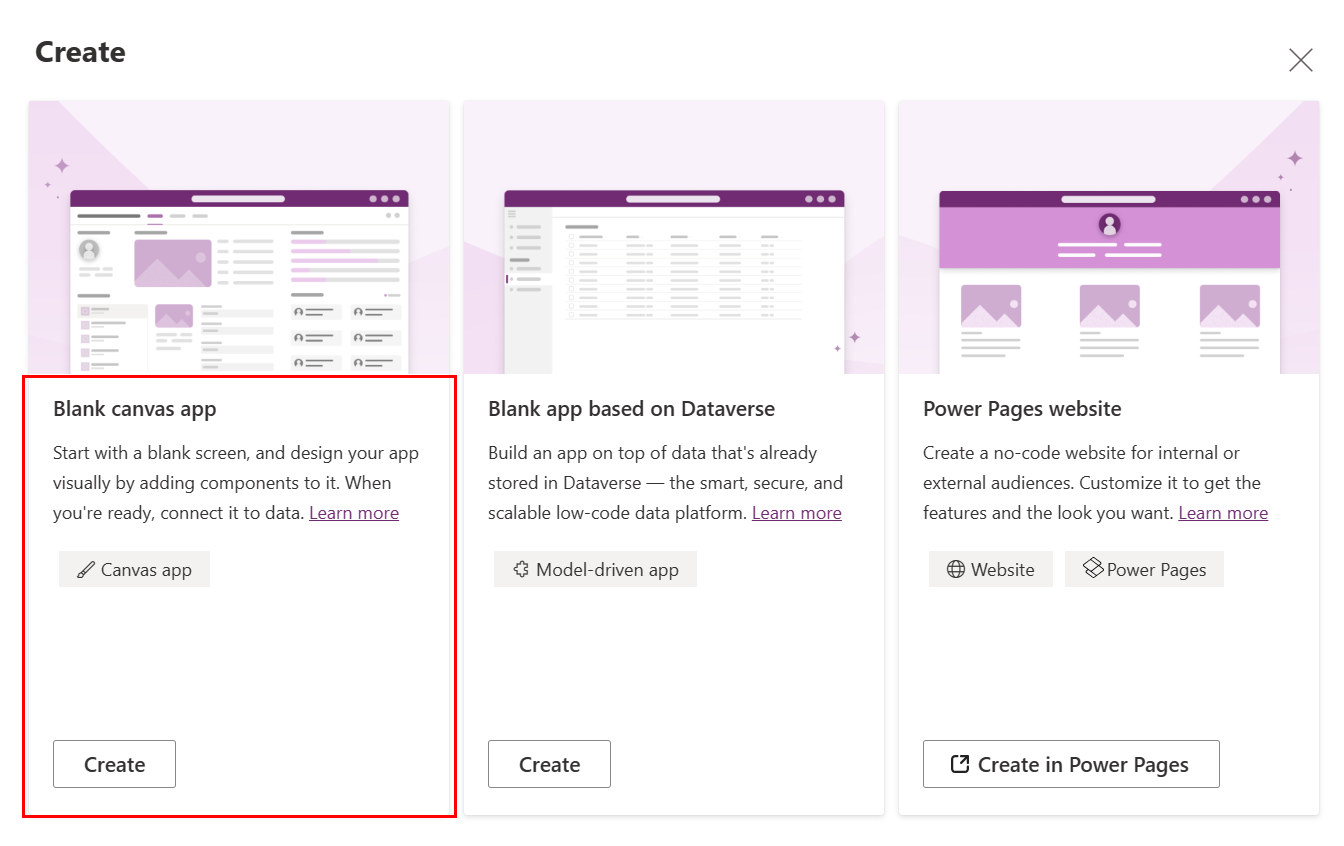
Enter the app name, such as Patient Finder.

Select Create to create the blank canvas app.
Note
If you're familiar with developing canvas apps, you may start with a different template and modify it to suit your requirements.
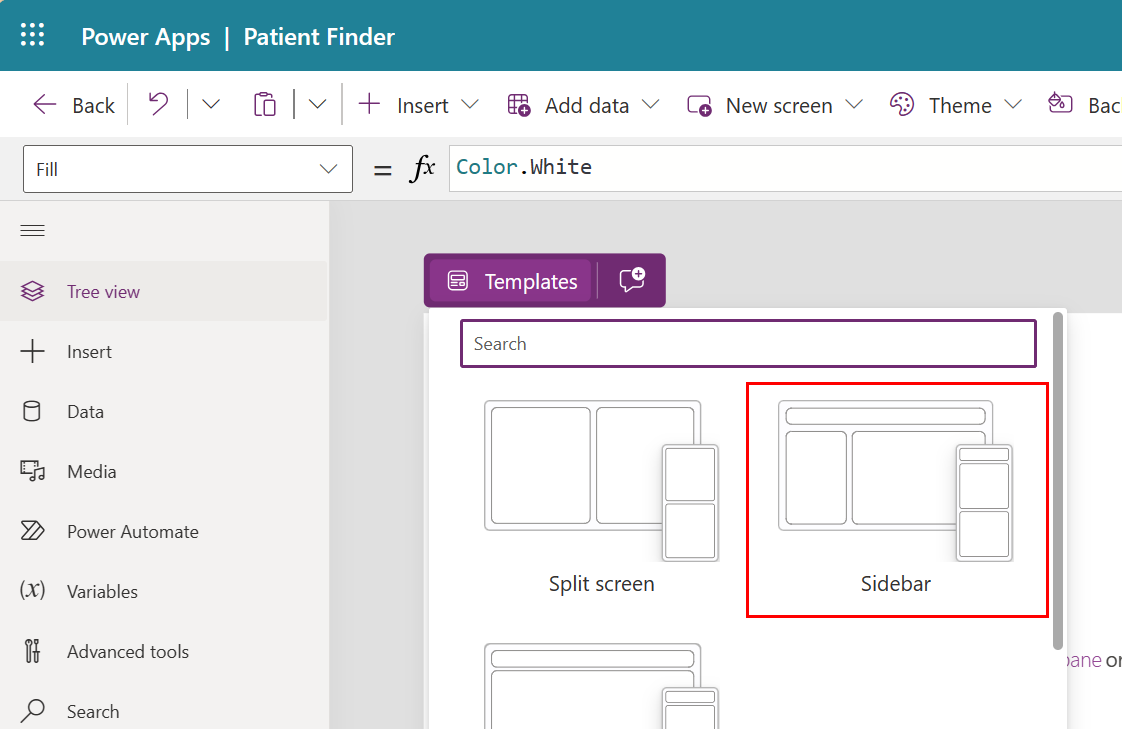
After you create the application, it opens in Microsoft Power Apps Studio so that you can start building the app.
In the canvas app designer, select the Templates option to view a list of available templates to accelerate development.
Select the Sidebar template that provides a three-pane layout, including containers named HeaderContainer1, SidebarContainer1, and MainContainer1. This simple layout helps you in later tasks.
You can customize the appearance to your personal preferences. These containers are referenced in later sections.
Select FHIRlink as a Data source for this canvas app. From the left navigation pane, select Data > Add data and then expand the Connectors section.
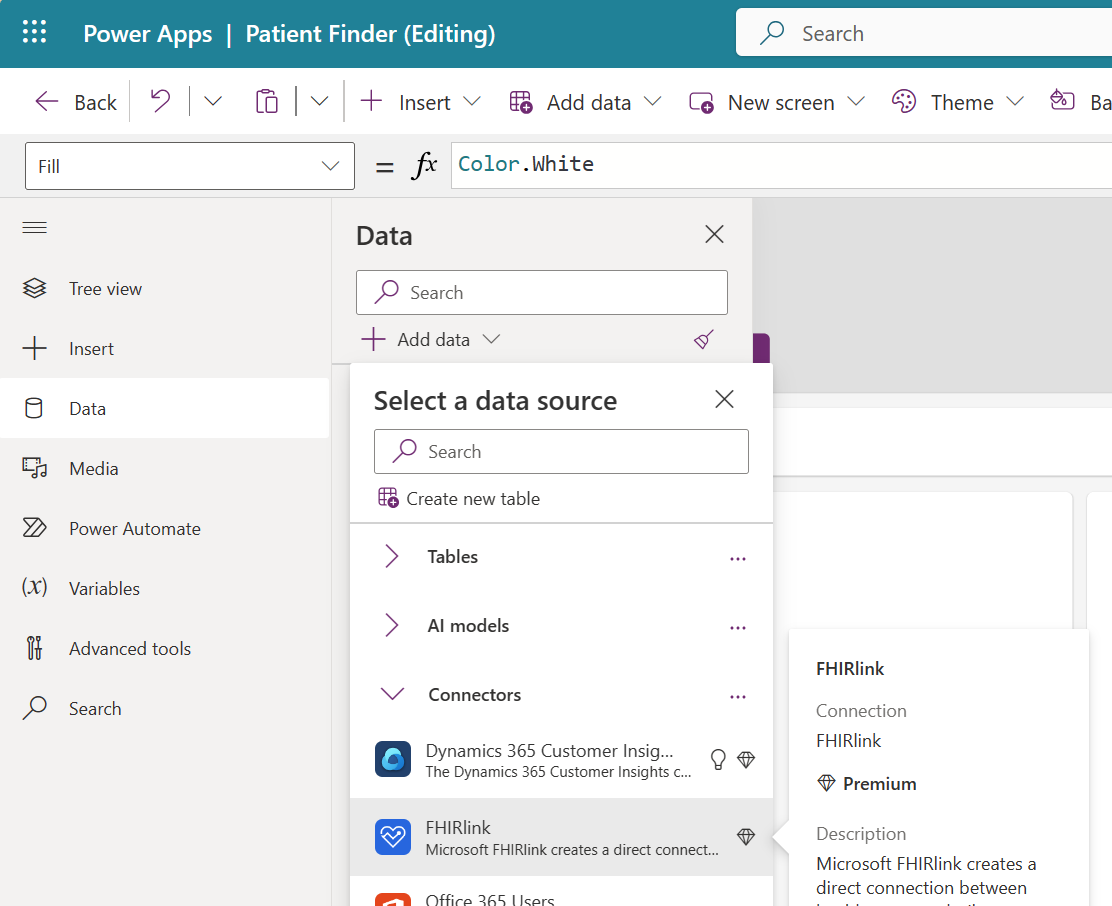
Select FHIRlink and then select your saved connection from the list.
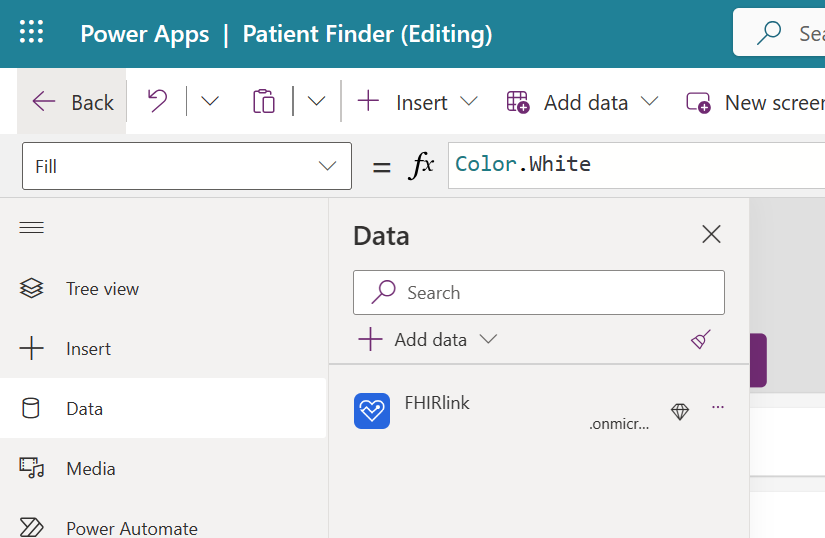
You have a new object added to your canvas app named FHIRlink that provides access to the FHIRlink connector operations, like actions in a Power Automate flow.
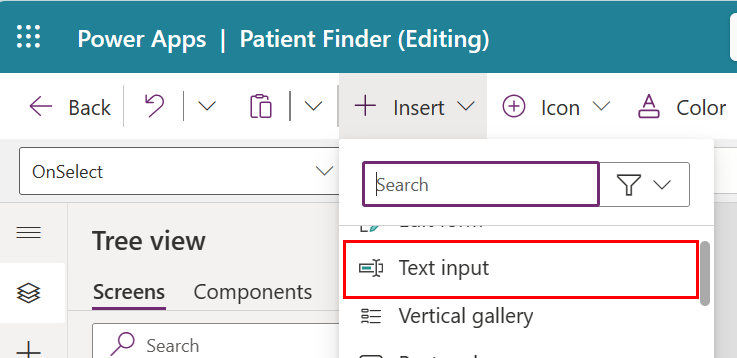
In HeaderContainer1, insert the following controls:
Search Icon control - Name it IconSearch
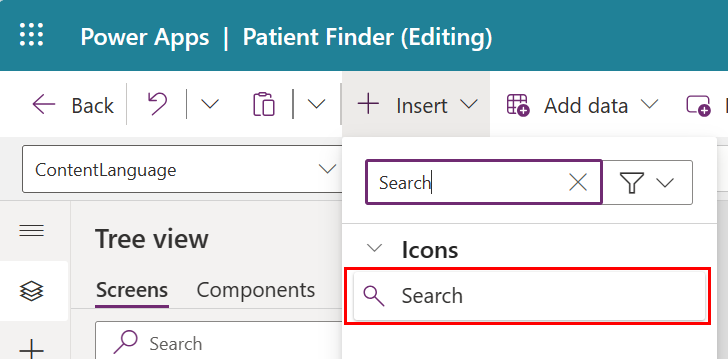
Text input control - Name it TextInputSearch
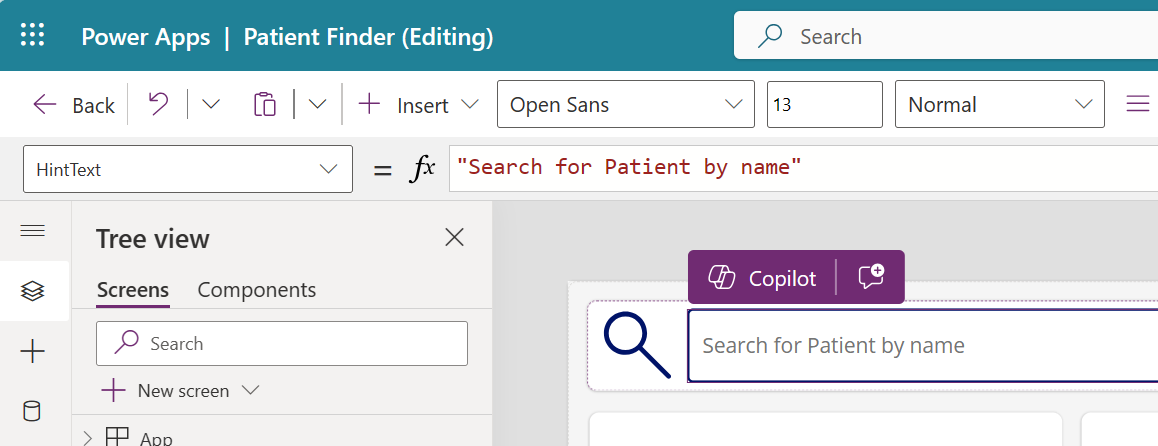
Set the following basic properties for each control by using the formula bar:
IconSearch
AlignInContainer - AlignInContainer.Center
FillPortions - 1
TextInputSearch
AlignInContainer - AlignInContainer.Center
FillPortions - 2
Height - 60
LayoutMinWidth - 1250
HintText - "Search for Patient by name"


Query data by using the FHIRlink connection ListResources
Next, you use the FHIRlink connection operation named ListResources to query data from your Azure Health Data Services FHIR service. You focus on the IconSearch control and its OnSelect event to work with the FHIRlink connection object.
Select the IconSearch control and then select OnSelect in the formula bar.
In the formula editor, enter FHIRlink. A list of available operations display on the FHIRlink connection object.
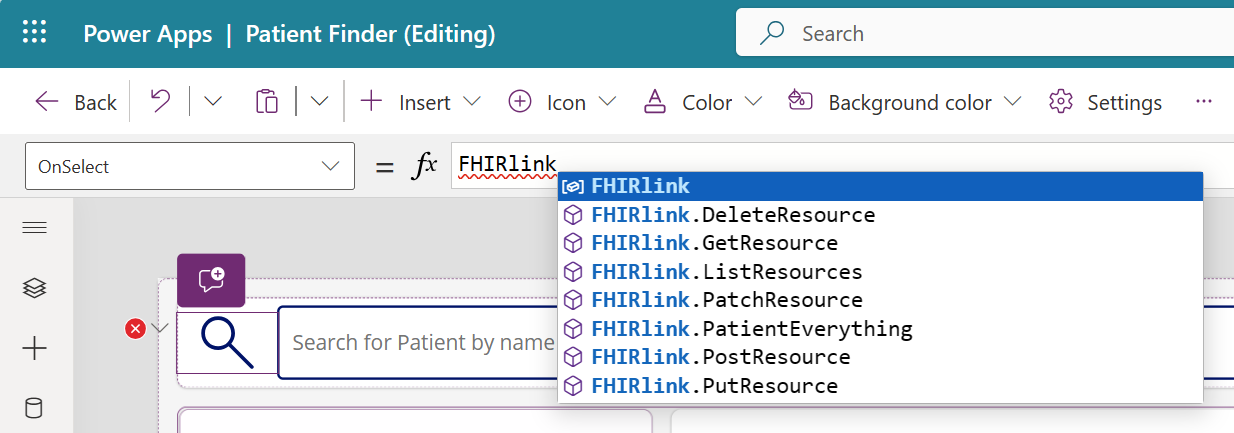
Select ListResources from the list. The formula should now show FHIRlink.ListResources.
Enter an open parenthesis at the end of the statement and then view the IntelliSense details for this operation. This operation signature is the list of available parameters and their descriptions that the Power Apps maker portal designer provides.
In the lower left of the IntelliSense pop-up window, select the down arrow to view the parameters.
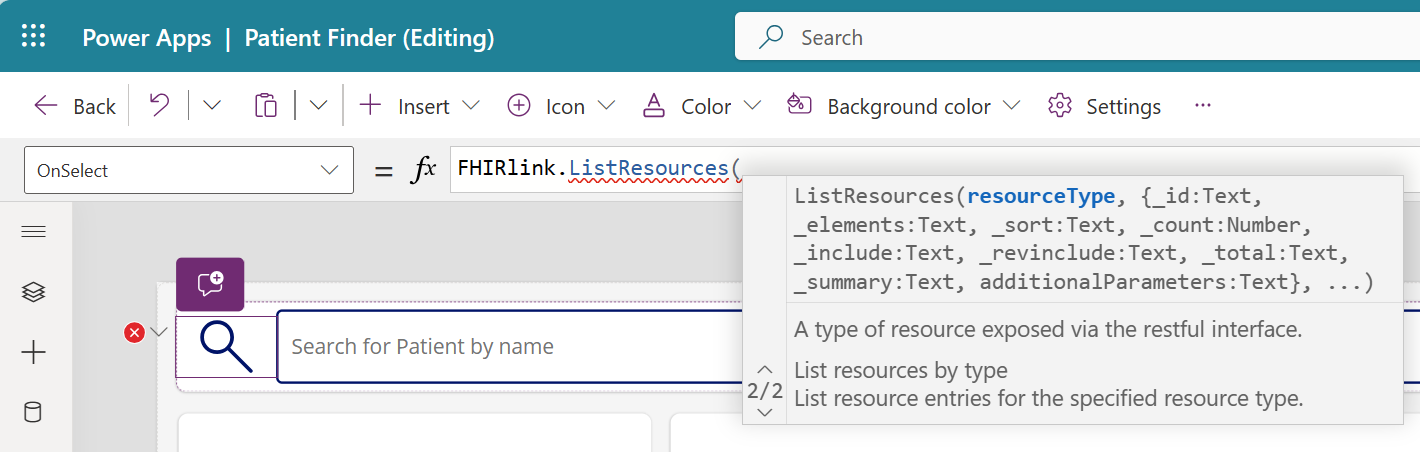
For the first resourceType parameter, enter "Patient" with parentheses. The formula bar reads:
FHIRlink.ListResources("Patient").When you select the IconSearch control, the FHIRlink object requests a list of resources from the connected FHIR server of type Patient.
Update the formula bar to include assigning the results of this call to a variable. Update the formula to read:
Set (_patientList, FHIRlink.ListResources("Patient")).This step assigns the results of the ListResources call to a variable named
__patientList. You must test the connection by selecting the button and viewing the value of the__patientListvariable.You can view the value of the variable and check the formula update as follows:
Press the F5 key and preview the application. After the application runs, select the IconSearch control.
Press the escape (Esc) key to leave the preview mode.
In the left navigation pane, select Variables > Global variables.
Select the ellipsis (...) to the right of the
__patientListvariable in the list and then select View Variable.
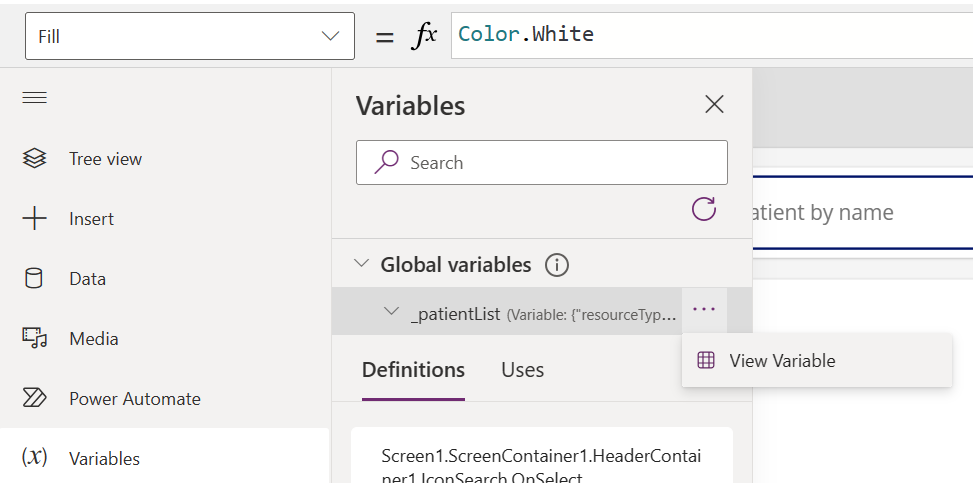
On the Variables view, you can view the contents of the
_patientListvariable. TheFHIRlink.ListResourcesoperation returns a JSON FHIR resource of type Bundle.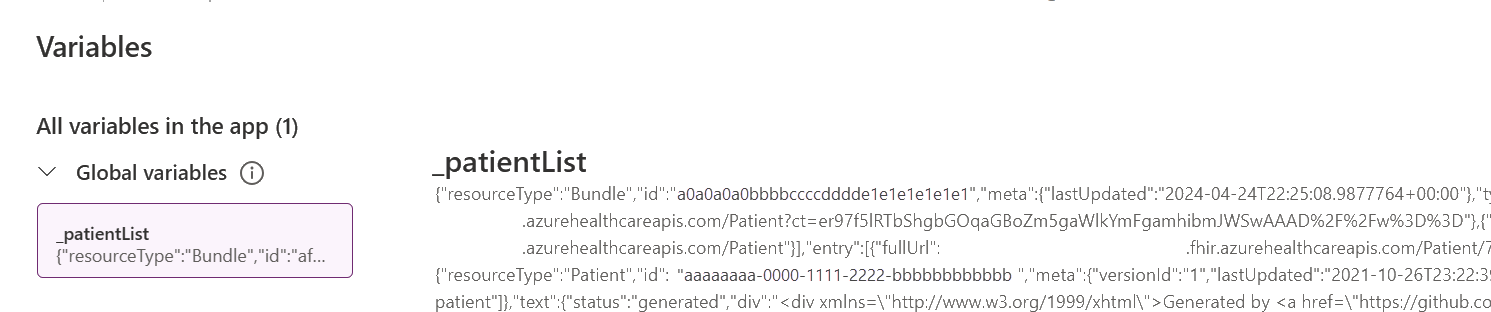
This step verifies that the saved connection works for the new canvas app.
To further refine this query to reduce the amount of data that the ListResources operation returns, you can use more parameters. For example, the _elements parameter allows you to specify the exact fields to return from the Patient resource.
Update the formula bar to include filtering the fields by adding the _elements parameter and the following Patient field names: id, name, birthDate, and telecom. The new formula reads as follows:


Set (_patientList, FHIRlink.ListResources("Patient", {_elements:"id,name,birthDate,telecom"}))
When the FHIR bundle returns, only the elements of the Patient FHIR resource are in their respective formats.
Work with Azure Health Data Services data from FHIRlink
Now that you have a FHIR bundle with Patient resource records, you can access them in Microsoft Power Fx code.
The FHIRlink ListResources operation returns a JSON FHIR Bundle as an Untyped object data type, which the system saves to the __patientList variable. The FHIR specification indicates that the FHIR bundle that's included in the entries element is an array of child FHIR Patient resource type elements.
Essentially, the _patientList.entry variable provides a list of Patient resources. To use these records in the rest of the canvas app, you need to convert them to an accessible format, such as a table.
Access the FHIR bundle patient entries
To access the FHIR bundle patient entries, follow these steps:
Select the IconSearch control and then select OnSelect in the formula bar.
Update the formula to include converting the
_patientList.entryobject into a table by using the ClearCollect and Table Power Fx functions. You can add this formula as a new line of code following theFHIRlink.ListResourcescall.Table - Converts
_patientList.entryinto a Table object.ClearCollect - Clears an existing collection and populates it with a new list of items.
The new formula should read as follows:
Set (_patientList, FHIRlink.ListResources("Patient", {_elements:"id,name,birthDate,telecom"}));ClearCollect(_patientListTable, Table(_patientList.entry));View the value of the variable to check the formula update.
Press the F5 key to preview the application. When the application is running, select the IconSearch control.
Press the Esc key to leave the preview mode.
In the left navigation pane, select the Variables menu item and then expand the section named Collections.
Select the ellipsis (...) to the right of the _patientListTable variable in the list and then select View Variable.
The _patientListTable variable now contains several items. These items represent the Patient entry items that are returned in the FHIR bundle.
Retrieve a record by using the GetResource FHIRlink connection
You need to use FHIRlink to retrieve a single Patient resource record. You must review the individual entry elements from the FHIR bundle and then evaluate one item and retrieve its details.
An example of a FHIR bundle resource entry for a Patient resource is as follows:
"entry": [
    {
        "fullUrl": "urn:uuid:df8ed3a9-4f20-4de9-a3cf-25614f5d28cf",
        "resource": {
            "resourceType": "Patient",
            "id": "df8ed3a9-4f20-4de9-a3cf-25614f5d28cf",
            "meta": {
                "versionId": "2",
                "lastUpdated": "2023-04-06T13:22:06.042-04:00",
                "profile": [
                    "http://hl7.org/fhir/us/core/StructureDefinition/us-core-patient"
                ]
            },
            ...
  }
  ]
The FHIRlink.GetResource operation requires the ID of the FHIR resource that you're requesting. Therefore, you need to retrieve the FHIR resource ID from the first patient resource in the bundle. Based on the format of the entry, you want the id field under the resource node, or in code resource.id.
You can add another step to the existing formula for the IconSearch OnSelect event to first retrieve this ID value and then call FHIRlink.GetResource.
Select the IconSearch control and then select OnSelect in the formula bar.
Update the formula to retrieve the first item in the table. This item is the first Patient FHIR resource that's returned in the bundle.
Add the following line to the current formula:
Set (_selectedPatientId, First(_patientListTable).Value.resource.id);This update uses a combination of Power Fx statements to retrieve the ID:
First retrieves the first item by position in the _patientListTable Table variable.
The .Value statement returns the object that's contained in the Table row.
This untyped object is your entry value, so you can access the ID value by appending
.resource.id.The Set statement assigns a variable named
_selectedPatientId.
View the value of the variable as follows and then check the formula update.
Press the F5 key and preview the application. After the application runs, select the IconSearch control.
Press the Esc key to leave the preview mode.
In the left navigation pane, select the Variables menu item and expand the section named Global variables.
Select the ellipsis (...) to the right of the
_selectedPatientIdvariable in the list and then select View Variable.
The
_selectedPatientIdvariable contains the GUID value for the first Patient resource in the bundle.After you have the Patient ID value, call
FHIRlink.GetResource.Add the following line to the current formula:
Set (_selectedPatient, FHIRlink.GetResource("Patient", _selectedPatientId));You can use the Set statement to assign the results of
FHIRlink.GetResourceinto the_selectedPatientvariable.View the value of the variable as follows to check the formula update.
Press the F5 key and preview the application. After the application runs, select the IconSearch control.
Press the Esc key to leave the preview mode.
In the left navigation pane, select the Variables menu item and expand the section named Global variables.
Select the ellipsis (...) to the right of the
_selectedPatientIdvariable in the list and then select View Variable.
The
_selectedPatientIdvariable contains the GUID value for the first Patient resource in the bundle.The final version of the formula bar should appear as follows:
Set (_patientList, FHIRlink.ListResources("Patient", {_elements:"id,name,birthDate,telecom"}));ClearCollect(_patientListTable, Table(_patientList.entry));Set (_selectedPatientId, First(_patientListTable).Value.resource.id);Set (_selectedPatient, FHIRlink.GetResource("Patient", _selectedPatientId));
Each statement in the IconSearch OnSelect event runs in the order listed, and the two calls use the FHIRlink object and the saved connection information to access the Azure Health Data Services FHIR service.
In this exercise, you learned how to:
Use the FHIRlink connector to retrieve a list of FHIR resource records.
Evaluate the returned JSON bundle.
Extract the details of a single Patient resource from the bundle.
Use the information to retrieve a single Patient resource by using the FHIRlink connector.
You use these operations in the next lab to display Patient details to the user.
Important references
For more information, see the following links:
For Power Fx operations:
FHIR®, Google, and EPIC® are registered trademarks that are owned by Health Level Seven International and Epic Systems Corporation, respectively. Use of these trademarks on this page doesn't constitute endorsement by Health Level Seven International or Epic Systems.