Deploying Project for the web
 Microsoft Project for the web will soon become Microsoft Planner, which is currently rolling out to customers. To learn more about setting up the new Planner for your organization, see Microsoft Planner for admins.
Project for the web is available for use in the Default environment and in Sandbox and Production Dataverse environments.
Project for the web in the Default environment enables customers to quickly get started creating projects, managing schedules, and sharing them with other users in the organization. Because everyone is a member of this environment by default, enabling users to create and manage Projects only requires that you assign a Project license to them.
For some situations, you should consider deploying Project to additional environments. These are:
Customizing Project to behave differently for different business units
Application Lifecycle management (Development/Test/Production)
If you’re looking to deploy to additional environments, you’ll need to create the environments, deploy Project, and configure access for users.
Learn more about Dataverse environments.
Deploying to the Default environment
Deployment of Project to the Default environment is done for you automatically. When Project for the web or Roadmap is first used in an Office 365 tenant, a Default Dataverse instance is provisioned for the tenant and the solutions are deployed.
Provisioning a new environment
Note
This section only applies to Admins interested in deploying Project to a non-Default environment.
Project is supported in the following types of environments:
- Default
- Production
- Sandbox
To be able to deploy to Sandbox and Production environments, the environment needs to be created with a database and the "Enable Dynamics 365 Apps" toggle must be disabled.
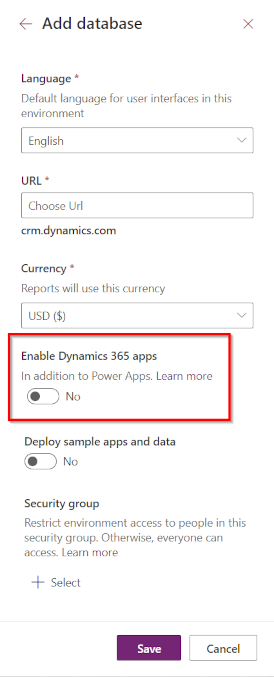
Note
If you set a security group for the environment, only the users in that group will be able to view those projects and other information of the environment. Additionally, tasks can only be assigned to users in that group.
Learn more about creating and managing environments.
Deploying Project to the environment
Once the environment is created, you can deploy Project to the environment from within the Power Platform Admin Center (PPAC).
Open the Resources > Dynamics 365 apps page from the left-hand navigation menu. Then, install the Project Service Core package into your environment.

Note
If the installation package isn't appearing in the list of available packages, either the tenant doesn't have a Project license, or the environment was created with the "Enable Dynamics 365 Apps toggle" enabled.
Learn more about using the PPAC to deploy applications.
Configuring Roles and Security
Sandbox and Production environments require additional configuration. Assign the Project Common and Project User roles to anyone who will be creating Projects in the environment. Also, ensure these users have the appropriate Project license.
There’s no additional configuration needed to enable users to manage Projects in the Default environment. Users in the Default environment only need a Project license to be able to create and manage Projects.
Learn more about Project’s security roles.
Note
Project-related roles are only available after the Project Service Core package has been deployed to the environment.
Creating and managing projects in non-Default environments
In non-Default environments, projects are created and managed via the Project Power App. Users with the Project User and Project Common roles will see the Project app tile appears in Office.com – All Apps section.
Deploying an environment to a different Geography
All environments will be created in the geography where the tenant was initially created. To create an environment in a different geography, you’ll need to contact your Microsoft Sales Representative or Reseller to get this enabled.
Learn more about managing multiple environments.
Troubleshooting
System requirements
To provision and use Project for the web, there are system prerequisites that are expected to be on. These pre-requisites are enabled by default. The details of these system prerequisites are provided in the following table.
Enterprise applications
The following enterprise applications should be enabled:
| Application Name | Application ID |
|---|---|
| Dynamics Provision | 39e6ea5b-4aa4-4df2-808b-b6b5fb8ada6f |
| Common Data Service | 00000007-0000-0000-c000-000000000000 |
| Microsoft Flow | 7df0a125-d3be-4c96-aa54-591f83ff541c |
| Microsoft PowerApps | 475226c6-020e-4fb2-8a90-7a972cbfc1d4 |
| Dynamics CRM Online Administration | 637fcc9f-4a9b-4aaa-8713-a2a3cfda1505 |
| Project Online | f53895d3-095d-408f-8e93-8f94b391404e |
Verifying status of Enterprise applications
To verify whether the required Enterprise applications are enabled, perform the following steps:
Sign in to as the tenant admin using https://aad.portal.azure.com/
Select Enterprise Applications. The Enterprise applications screen appears.
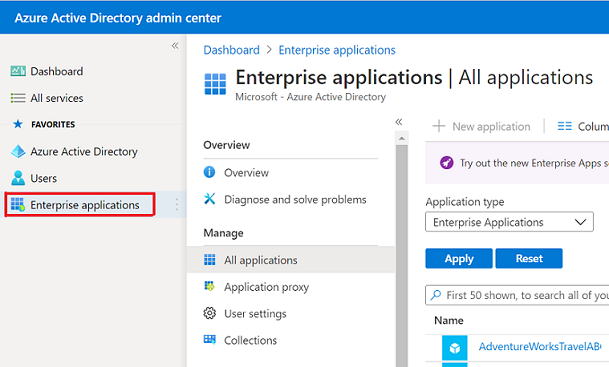
From the Application Type dropdown, choose All Applications and select Apply.

Use the textbox shown here and search for the application ID listed in the table. For example, 39e6ea5b-4aa4-4df2-808b-b6b5fb8ada6f. The application Dynamics Provision is displayed in the result pane.
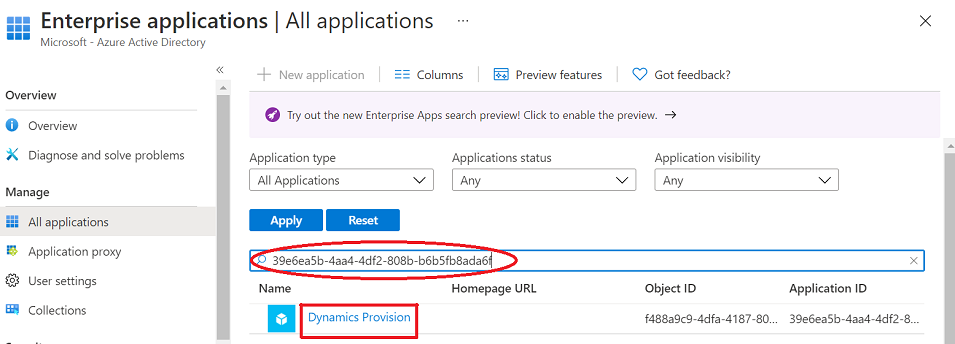
Select Dynamics Provision. The Dynamics Provision screen appears.
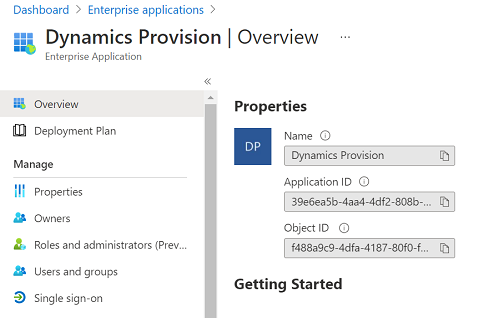
Select Properties on the left pane.
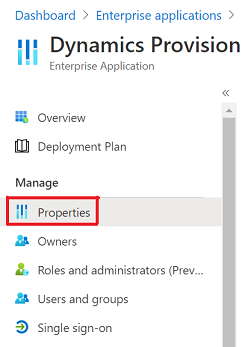
Ensure that Enabled for users to sign-in is set to Yes.

Repeat Steps 1-7 for each of the Enterprise applications listed earlier.
Verifying status of required Enterprise applications using Azure Active Directory PowerShell for Graph
For administrators who prefer using Azure Active Directory PowerShell for Graph instead of the above manual steps, they can use the following script to check if the above list of Applications is enabled. In addition, it also checks to ensure that the required Enterprise Apps exist and the AppRoleAssignmentRequired property is correctly set:
Connect-AzureAd

$ProjectRequiredApps = Get-AzureADServicePrincipal -Filter "
		                    AppId    eq '00000007-0000-0000-c000-000000000000'
		                    or AppId eq '475226c6-020e-4fb2-8a90-7a972cbfc1d4'
		                    or AppId eq '637fcc9f-4a9b-4aaa-8713-a2a3cfda1505'
		                    or AppId eq '7df0a125-d3be-4c96-aa54-591f83ff541c'
		                    or AppId eq '39e6ea5b-4aa4-4df2-808b-b6b5fb8ada6f'
		                    or AppId eq 'f53895d3-095d-408f-8e93-8f94b391404e'
		                    "

$ProjectRequiredApps | Select DisplayName, AppID, ObjectID, AccountEnabled, AppRoleAssignmentRequired, ReplyURLs | ft

#Check that all required Enterprise Apps are present. Create hashtable to check that app exists and if so remove from list. Entries left behind means it's missing.
[hashtable]$EntApps = [ordered]@{"Dataverse"                          = "00000007-0000-0000-c000-000000000000"
                                 "Microsoft Flow Service"             = "7df0a125-d3be-4c96-aa54-591f83ff541c"
                                 "Dynamics Provision"                 = "39e6ea5b-4aa4-4df2-808b-b6b5fb8ada6f"
                                 "Dynamics CRM Online Administration" = "637fcc9f-4a9b-4aaa-8713-a2a3cfda1505"
                                 "PowerApps Service"                  = "475226c6-020e-4fb2-8a90-7a972cbfc1d4"
                                 "Portfolios"                         = "f53895d3-095d-408f-8e93-8f94b391404e"
                                 }

Foreach ($App in $ProjectRequiredApps) #Remove from hashtable if app exist.
{
    If ($EntApps.Item($App.DisplayName))
    {
        $EntApps.Remove($App.DisplayName)
    }
}

If ($EntApps.Count -gt 0)
{
   Write-Host "Check#1: One or more required Enterprise Apps are missing." -ForegroundColor Red
   Write-Host "Please check that you have 1 or more of the following subscriptions: Planner Plan 1, Planner and Project Plan 3, or Planner and Project Plan 5." -ForegroundColor Red
   $EntApps | ft -a
}
else
{
    Write-Host "Check#1: All required Enterprise Apps are present." -ForegroundColor Yellow
}


#Check that required apps are enabled (AccountEnabled=True) if not display message to enable the required Enterprise Apps.
If ($ProjectRequiredApps | ? {$_.AccountEnabled -eq $false})
{
	Write-Host "Check#2: The following required AAD Enterprise App is disabled."
	Write-Host "Instructions on how to enable the required app via Azure Active Directory Admin Center are at: https://learn.microsoft.com/project-for-the-web/deploying-project" -ForegroundColor Red
	Write-Host "If you prefer using Powershell, for each App in the list use the Powershell cmdlet ""Set-AzureADServicePrincipal"" to enable the app." -ForegroundColor Red
	Write-Host "Example:`n" -ForegroundColor Red
	Write-Host "    Set-AzureADServicePrincipal -ObjectId "“ObjectId GUID from below output."”-AccountEnabled `$true" -ForegroundColor Red
	Write-Host "`nMore info on the cmdlet ""Set-AzureADServicePrincipal can be found"" at: https://learn.microsoft.com/powershell/module/azuread/set-azureadserviceprincipal" -ForegroundColor Red
    $ProjectRequiredApps | Select DisplayName, AppID, ObjectID, AccountEnabled | ? {$_.AccountEnabled -eq $false} | ft
}
Else
{
	Write-Host "Check#2: All required Enterprise Apps are enabled." -ForegroundColor Yellow
}


#Check that AppRoleAssignmentRequired for all required apps is set to False (AppRoleAssignmentRequired=False).
If ($ProjectRequiredApps | ? {$_.AppRoleAssignmentRequired -eq $true})
{
	Write-Host "Check#3: The AppRoleAssignmentRequired property for the specified Enterprise App is set to True." -ForegroundColor Red
	Write-Host "Out of box this setting should be set to False. If set to True, it can prevent Project for the Web from working correctly." -ForegroundColor Red
	Write-Host "This setting can only be modified via Powershell, for each App in the list use the Powershell cmdlet ""Set-AzureADServicePrincipal"" to change the AppRoleAssignmentRequired to False." -ForegroundColor Red
	Write-Host "Example:`n" -ForegroundColor Red
	Write-Host "    Set-AzureADServicePrincipal -ObjectId "“ObjectId GUID from below output."”-AppRoleAssignmentRequired `$false" -ForegroundColor Red
	Write-Host "`nMore info on the cmdlet ""Set-AzureADServicePrincipal can be found"" at: https://learn.microsoft.com/powershell/module/azuread/set-azureadserviceprincipal" -ForegroundColor Red
	$ProjectRequiredApps | Select DisplayName, AppID, ObjectID, AccountEnabled, AppRoleAssignmentRequired | ? {$_.AppRoleAssignmentRequired -eq $true} | ft -a
}
Else
{
	Write-Host "Check#3: The AppRoleAssignmentRequired property for all required Enterprise Applications are set correctly." -ForegroundColor Yellow
}