Tutorial: Learn how to upgrade a Service Fabric application using Visual Studio
Important
The preview of Azure Service Fabric Mesh has been retired. New deployments will no longer be permitted through the Service Fabric Mesh API. Support for existing deployments will continue through April 28, 2021.
For details, see Azure Service Fabric Mesh Preview Retirement.
This tutorial is part four of a series and shows you how to upgrade an Azure Service Fabric Mesh application directly from Visual Studio. The upgrade will include both a code update and a config update. You'll see that the steps for upgrading and publishing from within Visual Studio are the same.
In this tutorial you learn how to:
- Upgrade a Service Fabric Mesh service by using Visual Studio
In this tutorial series you learn how to:
Service Fabric Mesh is currently in preview. Previews are made available to you on the condition that you agree to the supplemental terms of use. Some aspects of this feature may change prior to general availability (GA).
Prerequisites
Before you begin this tutorial:
- If you haven't deployed the to-do app, follow the instructions in Publish a Service Fabric Mesh web application.
Upgrade a Service Fabric Mesh service by using Visual Studio
This article shows how to upgrade a microservice within an application. In this example, we'll modify the WebFrontEnd service to display a task category and increase the amount of CPU it's given. Then we'll upgrade the deployed service.
Modify the config
When you create a Service Fabric Mesh app, Visual studio adds a parameters.yaml file for each deployment environment (cloud and local). In these files, you can define parameters and their values that can then be referenced from your Mesh *.yaml files such as service.yaml or network.yaml. Visual Studio provides some variables for you, such as how much CPU the service can use.
We'll update the WebFrontEnd_cpu parameter to update the cpu resources to 1.5 in anticipation that the WebFrontEnd service will be more heavily used.
In the todolistapp project, under Environments > Cloud, open the parameters.yaml file. Modify the
WebFrontEnd_cpu, value to1.5. The parameter name is prefaced with the service nameWebFrontEnd_as a best practice to distinguish it from parameters of the same name that apply to different services.WebFrontEnd_cpu: 1.5Open the WebFrontEnd project's service.yaml file under WebFrontEnd > Service Resources.
Note that the in
resources:section,cpu:is set to"[parameters('WebFrontEnd_cpu')]". If the project is being built for the cloud, the value for'WebFrontEnd_cpuwill be taken from the Environments > Cloud > parameters.yaml file, and will be1.5. If the project is being built to run locally, the value will be taken from the Environments > Local > parameters.yaml file, and will be '0.5'.
Tip
By default, the parameter file that is a peer of the profile.yaml file will be used to supply the values for that profile.yaml file. For example, Environments > Cloud > parameters.yaml provides the parameter values for Environments > Cloud > profile.yaml.
You can override this by adding the following to the profile.yaml file:parametersFilePath=”relative or full path to the parameters file”
For example, parametersFilePath=”C:\MeshParms\CustomParameters.yaml” or parametersFilePath=”..\CommonParameters.yaml”
Modify the model
To introduce a code change, add a Category property to the ToDoItem class in the ToDoItem.cs file.
public class ToDoItem
{
    public string Category { get; set; }
    ...
}
Then update the Load() method, in the same file, to set the category to a default string:
public static ToDoItem Load(string description, int index, bool completed)
{
    ToDoItem newItem = new ToDoItem(description)
    {
        Index = index,
        Completed = completed,
        Category = "none"    // <-- add this line
    };

    return newItem;
}
Modify the service
The WebFrontEnd project is an ASP.NET Core application with a web page that shows to-do list items. In the WebFrontEnd project, open Index.cshtml and add the following two lines, indicated below, to display the task's category:
<div>
    <table class="table-bordered">
        <thead>
            <tr>
                <th>Description</th>
                <th>Category</th>           @*add this line*@
                <th>Done?</th>
            </tr>
        </thead>
        <tbody>
            @foreach (var item in Model.Items)
            {
                <tr>
                    <td>@item.Description</td>
                    <td>@item.Category</td>           @*add this line*@
                    <td>@item.Completed</td>
                </tr>
            }
        </tbody>
    </table>
</div>
Build and run the app to verify that you see a new category column in the web page that lists the tasks.
Upgrade the app from Visual Studio
Whether you're making a code upgrade, or a config upgrade (in this case we're doing both), upgrade your Service Fabric Mesh app on Azure by right-clicking on todolistapp in Visual Studio and then select Publish...
Next, you'll see a Publish Service Fabric Application dialog.
Use the Target profile dropdown to select the profile.yaml file to use for this deployment. We are upgrading the app in the cloud so we select the cloud.yaml in the dropdown, which will use the WebFrontEnd_cpu value of 1.0 defined in that file.
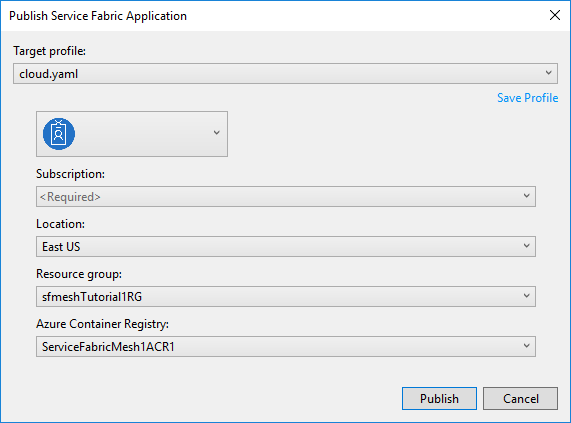
Select your Azure account and subscription. Set the Location to the location that you used when you originally published the to-do app to Azure. This article used East US.
Set Resource group to the resource group that you used when you originally published the to-do app to Azure.
Set Azure Container Registry to the azure container registry name that you created when you originally published the to-do app to Azure.
In the publish dialog, press the Publish button to upgrade the to-do app on Azure.
Monitor the progress of the upgrade by selecting the Service Fabric Tools pane in the Visual Studio Output window.
After the image is built and pushed to the Azure Container Registry, a For status link will appear in the output that you can click to monitor the deployment in the Azure portal.
Once the upgrade has finished, the Service Fabric Tools output will display the IP address and port of your application in the form of a URL.
The application was deployed successfully and it can be accessed at http://10.000.38.000:20000.
Open a web browser and navigate to the URL to see the website running in Azure. You should now see a web page that contains a category column.
Next steps
In this part of the tutorial, you learned:
- How to upgrade a Service Fabric Mesh app by using Visual Studio
Advance to the next tutorial: