Tutorial: Deploy a Service Fabric Mesh application
Important
The preview of Azure Service Fabric Mesh has been retired. New deployments will no longer be permitted through the Service Fabric Mesh API. Support for existing deployments will continue through April 28, 2021.
For details, see Azure Service Fabric Mesh Preview Retirement.
This tutorial is part three of a series and shows you how to publish an Azure Service Fabric Mesh web application directly from Visual Studio.
In this tutorial you learn how to:
- Publish the app to Azure using Visual Studio.
- Check application deployment status
- See all applications currently deployed to your subscription
In this tutorial series you learn how to:
Service Fabric Mesh is currently in preview. Previews are made available to you on the condition that you agree to the supplemental terms of use. Some aspects of this feature may change prior to general availability (GA).
Prerequisites
Before you begin this tutorial:
If you don't have an Azure subscription, you can create a free account before you begin.
Make sure that you've set up your development environment which includes installing the Service Fabric runtime, SDK, Docker, and Visual Studio 2017.
Download the to-do sample application
If you did not build the to-do sample application in part two of this tutorial series, you can download it. In a command window, run the following command to clone the sample app repository to your local machine.
git clone https://github.com/azure-samples/service-fabric-mesh
The application is under the src\todolistapp directory.
Publish to Azure
To publish your Service Fabric Mesh project to Azure, right-click on todolistapp in Visual Studio and select Publish...
Next, you'll see a Publish Service Fabric Application dialog.
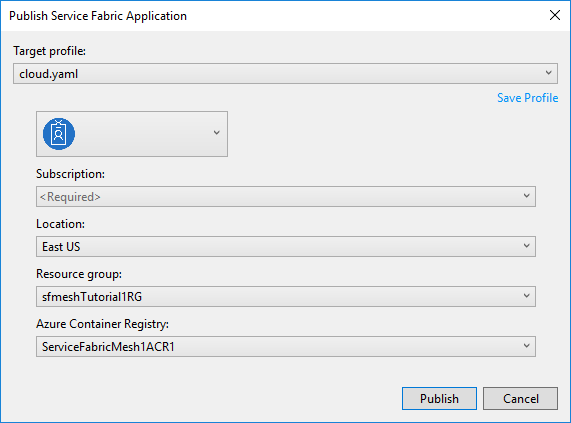
Select your Azure account and subscription. Choose a Location. This article uses East US.
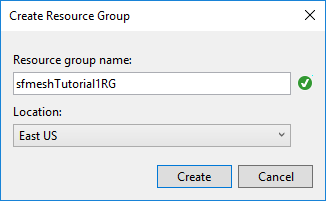
Under Resource group, select <Create New Resource Group...>. A dialog appears where you will create a new resource group. This article uses the East US location and names the group sfmeshTutorial1RG (if your organization has multiple people using the same subscription, choose a unique group name). Press Create to create the resource group and return to the publish dialog.
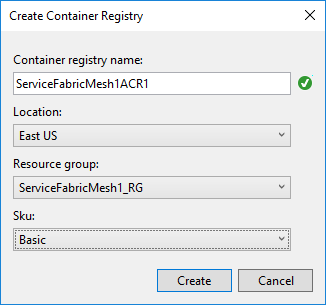
Back in the Publish Service Fabric Application dialog, under Azure Container Registry, select <Create New Container Registry...>. In the Create Container Registry dialog, use a unique name for the Container registry name. Specify a Location (this tutorial uses East US). Select the Resource group that you created in the previous step in the drop-down, for example, sfmeshTutorial1RG. Set the SKU to Basic and then press Create to create the private Azure container registry and return to the publish dialog.
If you get an error that a resource provider has not been registered for your subscription, you can register it. First see if the resource provider is available for your subscription:
Get-AzureRmResourceProvider -ListAvailable
If the container registry provider (Microsoft.ContainerRegistry) is available, register it from Powershell:
Connect-AzureRmAccount
Register-AzureRmResourceProvider -ProviderNamespace Microsoft.ContainerRegistry
In the publish dialog, press the Publish button to deploy your Service Fabric application to Azure.
When you publish to Azure for the first time, the docker image is pushed to the Azure Container Registry (ACR) which takes time depending on the size of the image. Subsequent publishes of the same project will be faster. You can monitor the progress of the deployment by selecting the Service Fabric Tools pane in the Visual Studio Output window. Once the deployment has finished, the Service Fabric Tools output will display the IP address and port of your application in the form of a URL.
Packaging Application...
Building Images...
Web1 -> C:\Code\ServiceFabricMeshApp\ToDoService\bin\Any CPU\Release\netcoreapp2.0\ToDoService.dll
Uploading the images to Azure Container Registry...
Deploying application to remote endpoint...
The application was deployed successfully and it can be accessed at http://10.000.38.000:20000.
Open a web browser and navigate to the URL to see the website running in Azure.
Set up Service Fabric Mesh CLI
You can use the Azure Cloud Shell or a local installation of the Azure CLI for the remaining steps. Install Azure Service Fabric Mesh CLI extension module by following these instructions.
Check application deployment status
At this point, your application has been deployed. You can check to see its status by using the app show command.
The application name for the tutorial app is todolistapp. Gather the details on the application with the following command:
az mesh app show --resource-group $rg --name todolistapp
Get the IP address of your deployment
If you want to get the IP address for your application, use the following command:
az mesh gateway show --resource-group myResourceGroup --name todolistappGateway
See all applications currently deployed to your subscription
You can use the "app list" command to get a list of applications you have deployed to your subscription.
az mesh app list --output table
Next steps
In this part of the tutorial, you learned how to:
- Publish the app to Azure.
- Check application deployment status
- See all the application you have currently deployed to your subscription
Advance to the next tutorial: