Set up customer engagement apps to use SharePoint Online
Note
The new and improved Power Platform admin center is now in public preview! We designed the new admin center to be easier to use, with task-oriented navigation that helps you achieve specific outcomes faster. We'll be publishing new and updated documentation as the new Power Platform admin center moves to general availability.
When you use SharePoint Online with customer engagement apps (Dynamics 365 Sales, Dynamics 365 Customer Service, Dynamics 365 Field Service, Dynamics 365 Marketing, and Dynamics 365 Project Service Automation), you can:
Create, upload, view, and delete documents stored in SharePoint from within customer engagement apps.
Use the SharePoint document management abilities within customer engagement apps, such as checking the document in and out and changing document properties.
Enable non-customer engagement apps users, such as customers who want to review a bid, to directly access the SharePoint documents, provided they have the appropriate permissions.
Important
This topic is for organizations who wish to deploy for the first time or upgrade to server-based SharePoint integration. After you enable server-based SharePoint integration, you can't revert to the previous client-based authentication method.
To set up customer engagement apps to use SharePoint Online, complete the following steps.
Assign user permissions to the Team SharePoint site
Your customer engagement apps and Microsoft 365 users are not automatically allowed access to your SharePoint sites. You must work within the SharePoint site to assign specific permission levels to individual users or groups.
Assign users to the Team site
Browse to the Microsoft 365 admin center and sign in using Microsoft 365 Global administrator credentials.
Open the Microsoft 365 app launcher, and then select SharePoint.
On the left-side menu, select Team Site.
On the Home page, select SHARE (upper-right corner).

To view the default permissions for your team site, select lots of people.
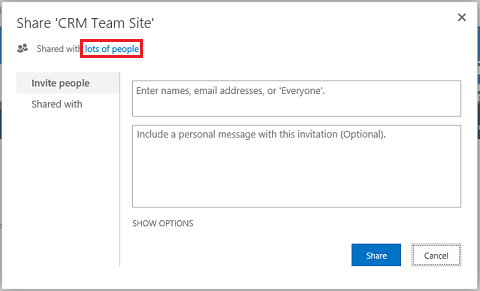
By default, all users in your Microsoft 365 organization are able to add and edit documents on the Team SharePoint site. To invite others, choose Invite people and add people external to your organization to share documents.
For more information about SharePoint permissions, see Introduction: Control user access with permissions
Configure customer engagement apps for SharePoint document management
If you are a new organization and have not yet deployed document management, see Configure a new organization.
If your organization is already using document management with Microsoft Dynamics CRM List Component, you must switch to server-based SharePoint integration. More information: Switching from the list component or changing the deployment
Important
Server-based SharePoint integration uses the entity display name to build the SharePoint library. When you upgrade to server-based SharePoint integration, be sure to check that the display names in your document library on SharePoint match the entity display names. More information: "Validation Error" when you try to configure server-based SharePoint integration for Microsoft Dynamics CRM Online and SharePoint Online.
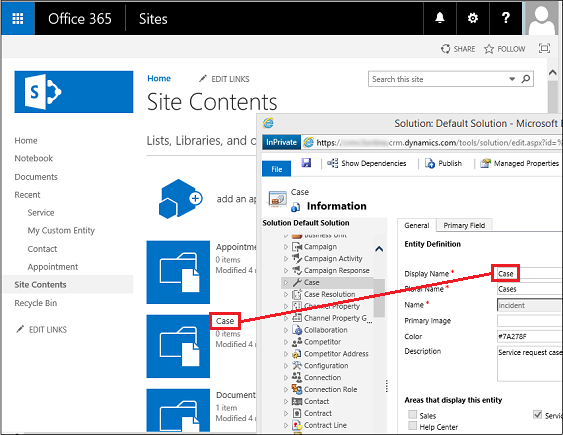
These names should match.
Configure a new organization
If your organization has not deployed document management, when a System Administrator logs in an alert message will be displayed to enable server-based SharePoint integration.

Note
If you don't see the alert and have not previously enabled server-based SharePoint integration, clear your browser cache or open customer engagement apps using Internet Explorer with InPrivate browsing to have the alert display again. Once you configure server-based integration, the alert will no longer appear.
In the Power Platform admin center, select an environment.
Select Settings > Integration > Document management settings, and then select Enable server-based SharePoint integration.
In the Enable Server-based SharePoint Integration alert select Next.
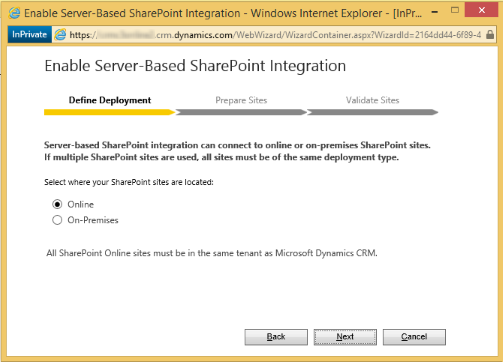
Choose Online for where your SharePoint sites are located, and then choose Next.
If your customer engagement apps are not connected to a SharePoint online site, enter the URL (for example https://contoso.sharepoint.com) of your SharePoint site that you will use for auto folder creation, and then choose Next.
Tip
To see your SharePoint site collections, in the Microsoft 365 admin center, select Admin centers > SharePoint, and then select site collections.
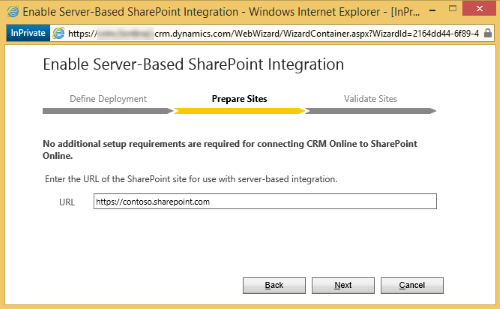
The URL will be checked for being a valid SharePoint online site and for existing in the same Microsoft 365 tenant as your organization. After enabling server-based SharePoint integration you can't go back to the previous client-side integration. Choose Enable.
Next steps
Once server-based SharePoint integration is enabled you will need to enable the entities you want available for document management integration. More information: Enable document management on entities
Once server-based SharePoint integration is enabled you can also enable integration with OneNote and OneDrive. More information: Set up OneNote integration and Enable OneDrive for Business (online)
Using Document Management
You are now ready to add document storage locations to the entities you enabled above and start managing documents. Begin by opening a document management-enabled record (for example, Contact).
Browse to your web application.
Choose an account, such as the Adventure Works sample account.
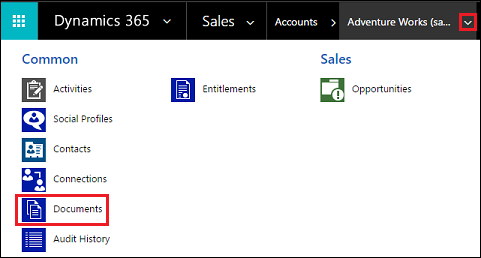
On the nav bar, select the down arrow next to the account name, and then select Documents.
Select Upload, and then browse to a document to upload to the new folder in your Microsoft 365SharePoint Online Team site.

Select a folder location, and then select Ok.
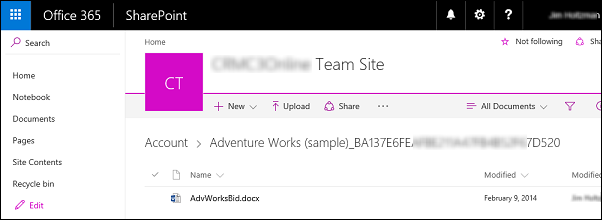
To see the document in your Microsoft 365SharePoint Online Team site, select to the left of the document name (you'll see a check mark), and then select Open Location.
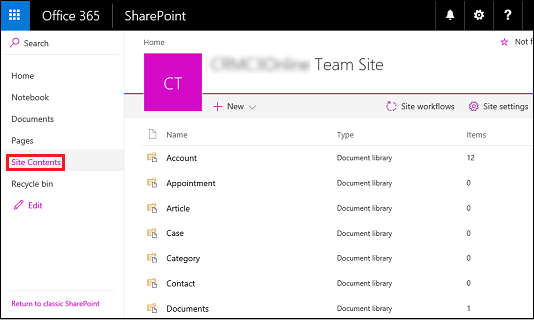
Select Site Contents to see all the document libraries created for the managed entities you selected.
The entities you selected to be managed by Document Management appear as document libraries (for example: Account, Article, Case, Lead, Opportunity, Product, Quote, and Sales Literature).
Known issue
SharePoint Online has introduced a new feature that enables a SharePoint or global administrator in Microsoft 365 to block or limit access to SharePoint and OneDrive content from unmanaged devices. For more information, see Control access from unmanaged devices.
You can set access at three levels:
- Allow full access from desktop apps, mobile apps and the web
- Allow limited, web-only access
- Block access
For "Block Access" level, only devices that satisfy the AD trust policy defined by the SharePoint or global admin can open SharePoint site and perform operations.
Impact on customer engagement apps and SharePoint Online integration
When SharePoint Online is configured for "Block Access", customer engagement apps receives a 401 UnAuthorized response from SharePoint Online for all operations triggered using server-to-server integration. This is because SharePoint Online rejects the AppAssertedUser token (the claims-based token which is used for server-to-server authentication between customer engagement apps and SharePoint Online).
Work around
As a workaround, you can set the unmanaged devices policy to "Allow full access from desktop apps, mobile apps, and the web" on SharePoint Online.
Sign in to https://admin.microsoft.com as a global or SharePoint admin. If you see a message that you don't have permission to access the page, you don't have Microsoft 365 administrator permissions in your organization.
In the left pane, select Admin centers > SharePoint.
In the SharePoint admin center, select access control in the left pane.
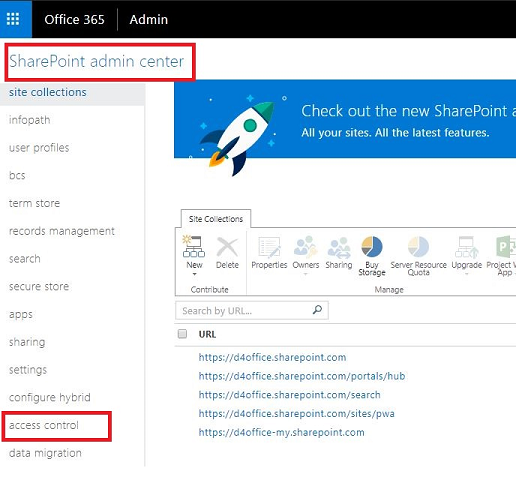
Under Unmanaged devices, select Allow full access from desktop apps, mobile apps, and the web.
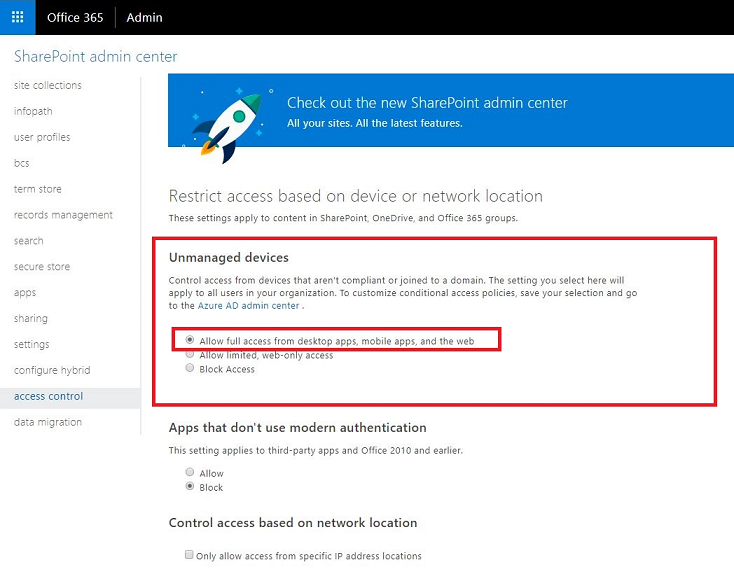
Select Ok.
Information transmitted between customer engagement apps and SharePoint when you use server-based SharePoint integration
When you use the document management feature in customer engagement apps by using server-based SharePoint integration, the following information is transmitted between customer engagement apps and SharePoint:
- Entity name for the entity that is used to create folders in SharePoint, such as Account, Article, or Lead. To configure the entities that are integrated, go to Settings > Document Management > Document Management Settings.