Add an event trigger
Event triggers allow your agent to react automatically when an event occurs in other systems. You can then define a specific flow of actions for the agent to take in response, or give your agent instructions for how to determine the best actions to take.
Important
Enabling event triggers can impact how billing is calculated. Learn more about billing for generative mode.
For in depth guidance on how event triggers work and relate to other components of an agent, go to Event trigger overview.
Note
This feature is only available for agents with generative orchestration enabled.
To add an event trigger to your agent:
On the Overview page for your agent, go to the Triggers section.
Select Add trigger.

Select the desired trigger.
Provide your authentication details, if necessary.
Select Next.
Note
You can only authenticate trigger connectors using the agent maker's account (agent author authentication). The agent maker can only set a trigger for your agent based on events in systems you have permission to access as agent author. For more information, see the event trigger limitations.
Configure your trigger as needed and define the event parameters that activate your trigger and the trigger payload. Triggers provide default payload content, but you can add your own content and instructions. For more information, go to Define the trigger payload.
In order for an agent to react to an event trigger, the agent needs actions or topics to call in its response, and instructions for which ones to call. For more information, see Call an action or topic.
Test a trigger
Always test a trigger and its reaction before publishing. You can test how your agent reacts to your defined trigger using the test agent chat.
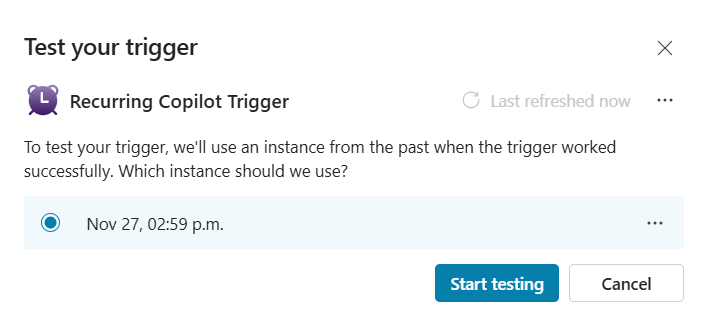
Until you publish your agent with a new trigger, the agent doesn't react automatically to the trigger. Instead, you must manually activate your agent by selecting a trigger payload to send to your agent.
- Run the triggering event once to generate a payload. For example, if using the Microsoft Planner trigger When a new task is assigned to me for Microsoft Planner, assign a test task to yourself in Microsoft Planner to activate your trigger.
- Select Test trigger icon
 beside the trigger in the agent's Overview page. The list includes all recent instances of the event.
 - Choose the instance you want to test and select Start testing.

You can use the activity map to see how your agent reacts to the trigger payload during your tests. To open the activity map, select the map icon ![]() at the top of the test pane.
at the top of the test pane.
Modify a trigger
After you create a trigger, you can change the event parameters and payload through Power Automate. To open the trigger from Copilot Studio:
- In the Overview page, locate the trigger.
- Select the more icon (…), then Open in Power Automate.

- Select the trigger, then go to the Parameters and Code tabs to make your changes. For information on what variables and string operators you can add, go to the About tab.
- Make and save your changes. For more information on making changes in Power Automate, go to Get started with triggers in Power Automate.
Publish an agent with a trigger
Before you publish an agent with event triggers, you receive a warning about the agent using the author's credentials. Event triggers can only use the agent author's credentials for authentication (that is, the credentials you used to authorize the connections). This might allow users of an agent without their own authorization the ability to access data and systems they shouldn't. For more information, go to data protection best practices for triggers.

After you publish an agent with event triggers, it reacts automatically each time the agent's triggers are activated. You can see a step-by-step record of your agent's triggers and reactions in the Activity page.