Academic year transition - Microsoft Teams (Microsoft 365 groups)
The academic year transition for Microsoft Teams consists of the following steps:
Recent changes to Teams
Policy changes
New policies are released regularly. To help you stay up-to-date, these changes are communicated through the message center in the Microsoft Admin Center. A few new policies of note include (but are not limited to):
- Limit presenter role permissions for your org
- Webinars and town halls - Normally students aren't allowed to schedule meetings, but as events (webinars and town halls) are now controlled by a separate policy, they need to be disabled for students as well. For more information:
Because new features are being released regularly, make sure all your policies for student safety are up to date by visiting Keeping students safe while using Teams for distance learning.
Learn more about Managing Microsoft Teams policies and policy packages for education.
New Teams for Education
In March 2024, Microsoft updated the classic Teams client to the new Teams clients. To keep up with the latest changes, read about what is changing in the new Microsoft Teams.
Note
The end of support for the classic Teams client starts July 1, 2024. The end of availability for the classic Teams client starts July 1, 2025. For details and the most up-to-date information on these dates, see End of availability for classic Teams client.
- If you have clients that aren't able to upgrade, run the Teams desktop client usage report. Then, use the troubleshooting guide to resolve the issues to prevent students from being blocked from using Teams.
- If you encounter other issues with the new Teams client installation, refer to this troubleshooting guide and Known issues in the new Microsoft Teams desktop client.
Teams Premium for Education
Microsoft Teams Premium for Education is now available. The following Teams features moved from Teams to Teams Premium as of June 30, 2023:
- Live Translated Captions
- Virtual Appointments: SMS notifications
- Virtual Appointments: Organized analytics in Admin Center
- Virtual Appointments: Scheduled Queue View
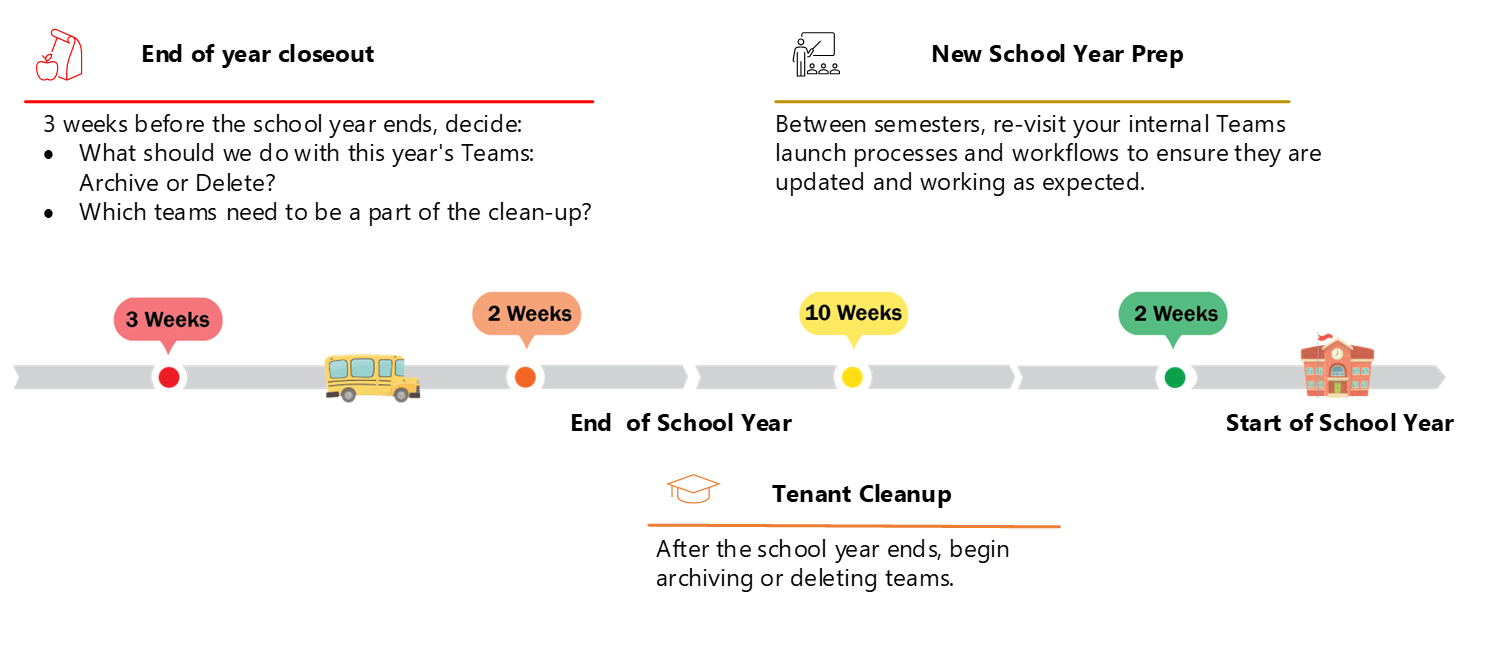
End of Year Closeout
Regardless of how the teams were created (manually, using PowerShell, or using custom code), there are two key decisions to make in order to close out the school year:
- What should we do with this year's Teams: Archive or Delete?
- Which teams need to be a part of the clean-up?
While each situation is different, a guiding principle should be to follow your internal business practices on Class continuity. In general:
- Classes should be archived when they run through their completion time frame. For example, semester classes should be archived at the end of a semester, while annual classes should be archived at the end of the school year. Obtain this information from your SIS and note for when cleanup begins after the end of the school year
- We recommend archiving until you're certain you no longer need the Class content, usually after some number of months or years depending on your compliance requirements. You can use Azure Blob Storage if you want to delete information from an end-user perspective but retain it on the backend for compliance
- Classes should be deleted when it has been determined that the information is no longer needed based on internal and legal data retention periods
- The classes being deleted should be noted for when cleanup begins after the end of the school year
As each situation is different, always check with your internal compliance and legal departments for data retention policies before you delete a Team, as a deleted team can only be restored for 30 days.
For any Team that is archived or deleted, notify the Team owner so that they can back up any files they may want to reuse for future teams.
End User Impact Note: Some Team items, such as assignments, can't be reused if the team is deleted and needs to be recreated.
Clean-Up
Referencing the list of Teams created during the "Closeout" Period, you're now ready to begin archiving teams in Microsoft Teams. You can use PowerShell or any previously used methods.
Archiving teams using PowerShell command
- For instructions, see Set-TeamArchivedState (MicrosoftTeamsPowerShell)
- We recommended using -SetSpoSiteReadOnlyForMembers:$true to make sure the students can't edit any of the files associated with the class
Deleting teams using PowerShell command
- For instructions, see Remove-Team (MicrosoftTeamsPowerShell)
- A deleted team can be restored up to 30 days after deletion
New School Year Prep
As organizations are so varied, we recommend repeating the workflow that you used previously when setting up Teams.
In between semesters, revisit your internal Teams launch processes and workflows to ensure they're updated and working as expected. For example, make sure that no teams have been added that have the same name.
Make sure to set up Teams cloud meeting recording options for users within your organization. Through UI or PowerShell commands, you can set various controls. For example:
- Block or allow download of channel meeting recordings
- Turn on or turn off recording transcription
- Turn on or turn off cloud recording
When a meeting is recorded, it's automatically:
- Uploaded to OneDrive or SharePoint
- Permitted to the people invited to the meeting
- Linked in the chat for the meeting
- Displayed in the Recordings and Transcripts tab for the meeting in Teams calendar
- Added to various file lists across Microsoft 365: Shared with me, office.com, Recommended, Recent, etc.
- Indexed for Microsoft 365 Search
For more information
The following resources provide additional information about Microsoft Teams:
- Chat, teams, channels, & apps in Microsoft Teams
- Use Advisor for Teams to help you roll out Microsoft Teams
- Assign team owners and members in Microsoft Teams
- Best practices for organizing teams
Next steps
Next, let's take a look at user identities and Microsoft Entra ID.