Extend the Microsoft Fabric frontend
You can use the Microsoft Fabric Workload Development Kit to build workloads and create custom capabilities that extend the Fabric experience. The Fabric platform is designed to be interoperable with independent software vendor (ISV) capabilities. For example, you can use the item editor to create a native, consistent user experience by embedding an ISV's frontend in the context of a Fabric workspace item.
In this article, you use the Microsoft Fabric workload development sample repository as a guide to integrate a custom UX workload web app with Microsoft Fabric. The project and detailed examples help you seamlessly integrate your own UI components and actions into the Fabric runtime environment for efficient experimentation and customization.
The sample UX workload project frontend is a standard React web app that incorporates the workload client SDK, as a standard npm package, to provide functionality.
The ISV hosts and runs the project inside a sandboxed <iframe> element in the Fabric portal. It presents ISV-specific UI experiences, including an item editor.
The SDK provides all the necessary interfaces, APIs, and bootstrap functions that are required to transform a regular web app into a micro frontend web app that operates seamlessly in the Fabric portal.
The SDK provides a sample UX workload project. The sample:
- Showcases how to use most of the available SDK calls.
- Demonstrates an example of the Fluent UI-based extensible ribbon that matches the look and feel of Fabric.
- Allows easy customization.
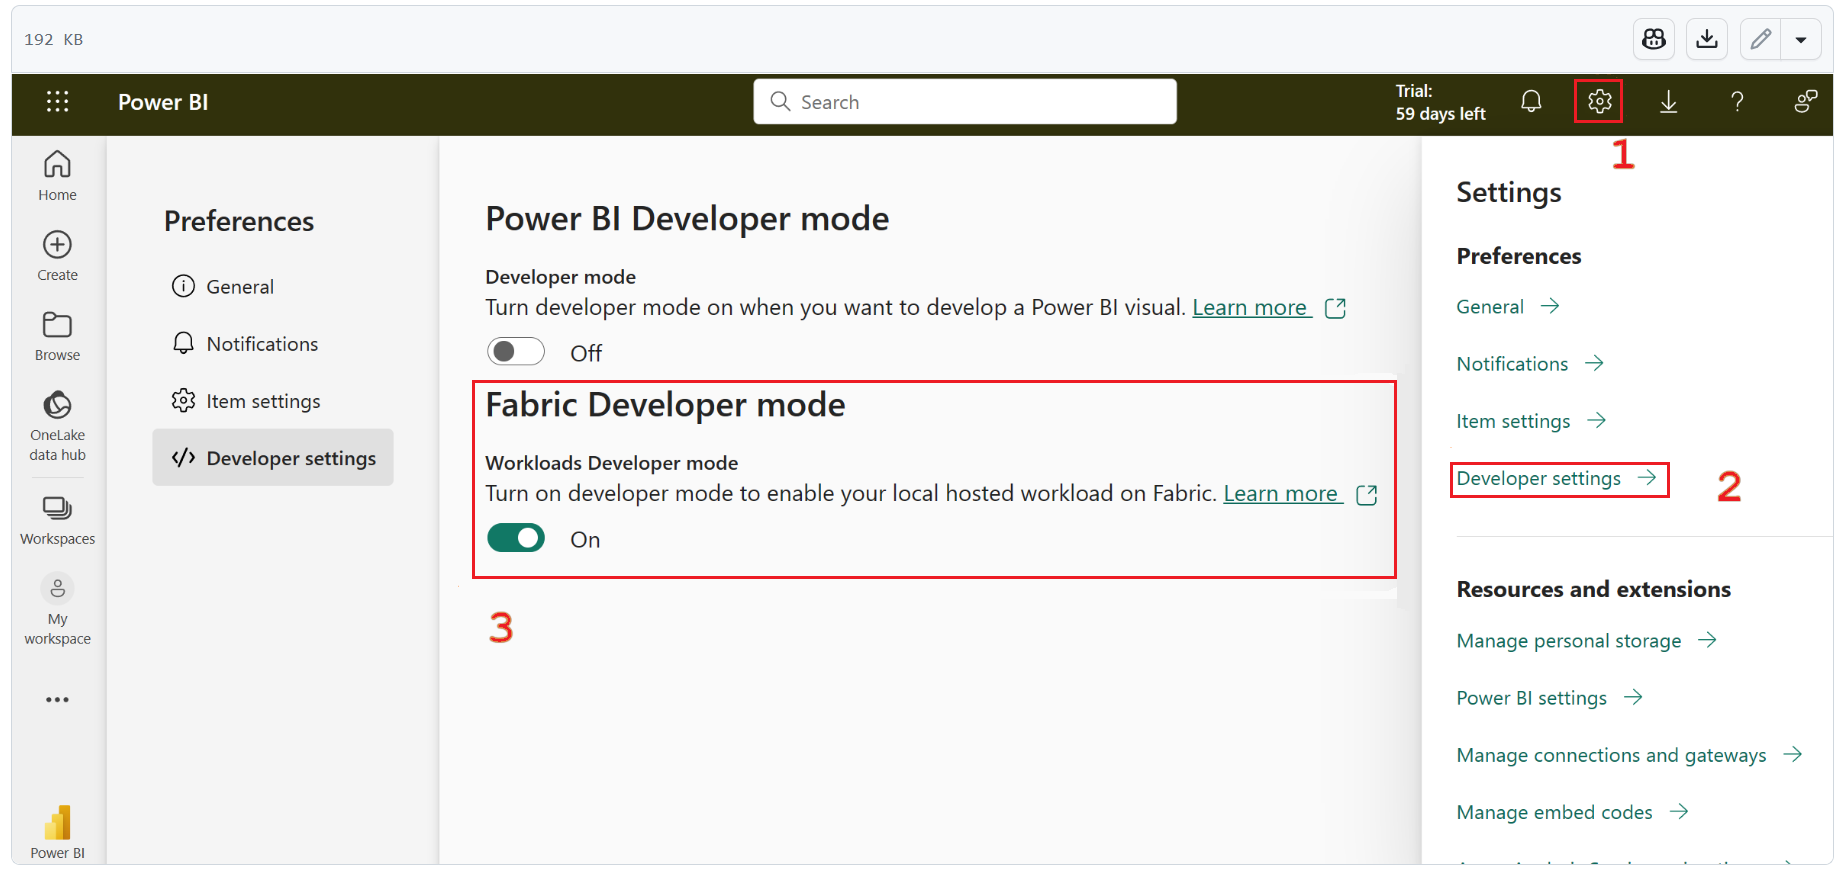
- Allows you to observe changes in Fabric in real time when Fabric developer mode is turned on.
Prerequisites
UX workload web app
This package is built on top of Fluent UI and is designed for React.
UX workload frontend manifest
The UX workload frontend manifest is a JSON resource that the ISV provides. The file contains essential information about the workload, including the URL of the workload web app and various UI details like the display name of the ISV item and associated icons. The ISV can use the manifest file to customize what happens when users interact with items in the Fabric portal.
In this package, the frontend manifest files are located in the package folder. The manifest file contains a detailed description of the workload manifest and its components.
Enable the workload development feature in Fabric
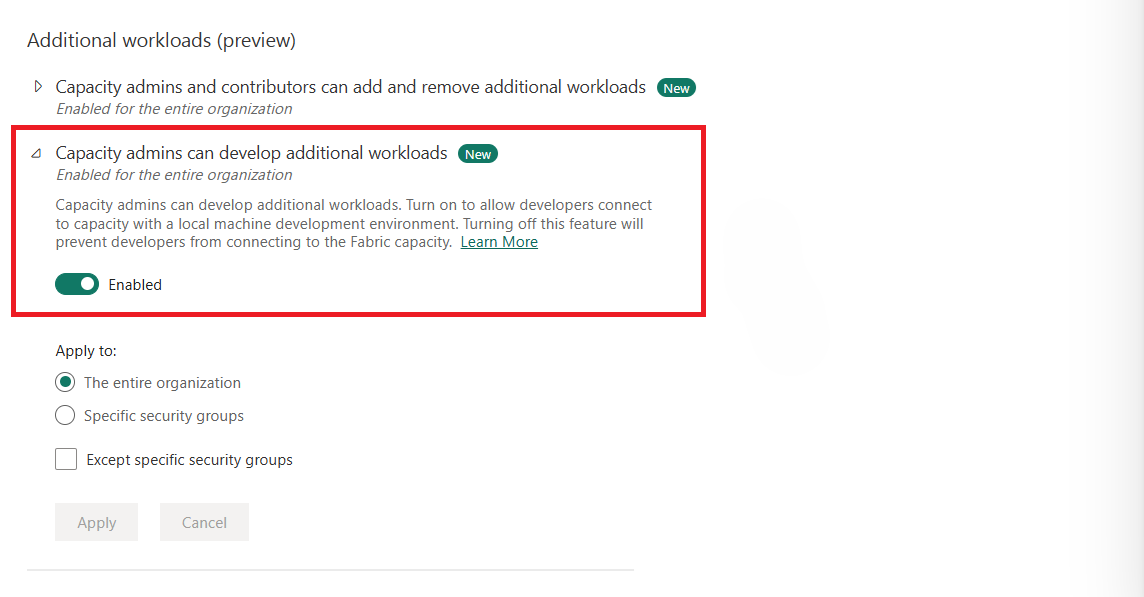
The tenant administrator must first enable the workload development feature in the Microsoft Fabric admin portal. The feature can be enabled for the entire organization or for specific groups within the organization. For a tenant admin, to enable the workload development feature for specific groups, complete the steps that are described in Enable the development tenant setting.
Set up the frontend
To set up the sample project frontend:
Verify that Node.js and npm are installed. The npm installation must be version 9 or later. Otherwise, install the latest versions of Node.js and npm.
Clone the Microsoft Fabric workload development sample repository.
The following list describes the package directory layout, components, and resources:
- Package: The location of the workload package. The package contains frontend resources, including manifests and assets.
- src: The workload code, which includes these resources:
- index.ts: The main initialization file, including
bootstrapand theindex.workerandindex.uiiFrames (see details later in this article). - App.tsx: This file routes paths to pages. For example,
/sample-workload-editoris routed to theSampleWorkloadEditorfunction undercomponents. - assets: The location for images (.jpg, .jpeg, and png) that can be referenced in the manifest and shown in the UI. For example,
assets/github.jpgis set in the manifest as the product icon. - components: The location of the UI code, including the editor view and other views that the sample uses (the ribbon, the authentication page, and panels).
- controller: The controller calls the SDK APIs.
- models: The contracts and models that are used by the UI and for communication with the boilerplate's backend.
- index.ts: The main initialization file, including
- tools: Elements that you can use to create settings and configurations.
- webpack.config.js: Use this file to configure the local Node.js server.
- A web configuration and manifest reader/processor.
- validation: The sample uses
validateSchema.jsto validate product and item JSON file schemas. It's configured to run onnpm start.
Inside the repository folder, go to the Frontend folder to install the project files:
<repository folder>\Frontend> npm installStart the server by running the following command:
<repository folder>\Frontend> npm startThis command starts a local Node.js server (by using webpack) that Microsoft Fabric connects to when it's in developer mode.
For information about port details that appear after the server starts, see the local host server notes.
The current port is
60006.After the localhost server starts, go to URL
127.0.0.1:60006/manifeststo open the aggregated manifest that's created in the Frontend/Package folder.If you change files inside the Frontend/Package folder, run
npm startagain.This setting is persisted in the current browser.
"Hello world" example
To run a "hello world" test scenario:
Start the local server (follow the steps in Get started to run both the frontend and backend workload samples) and ensure that developer mode is enabled.
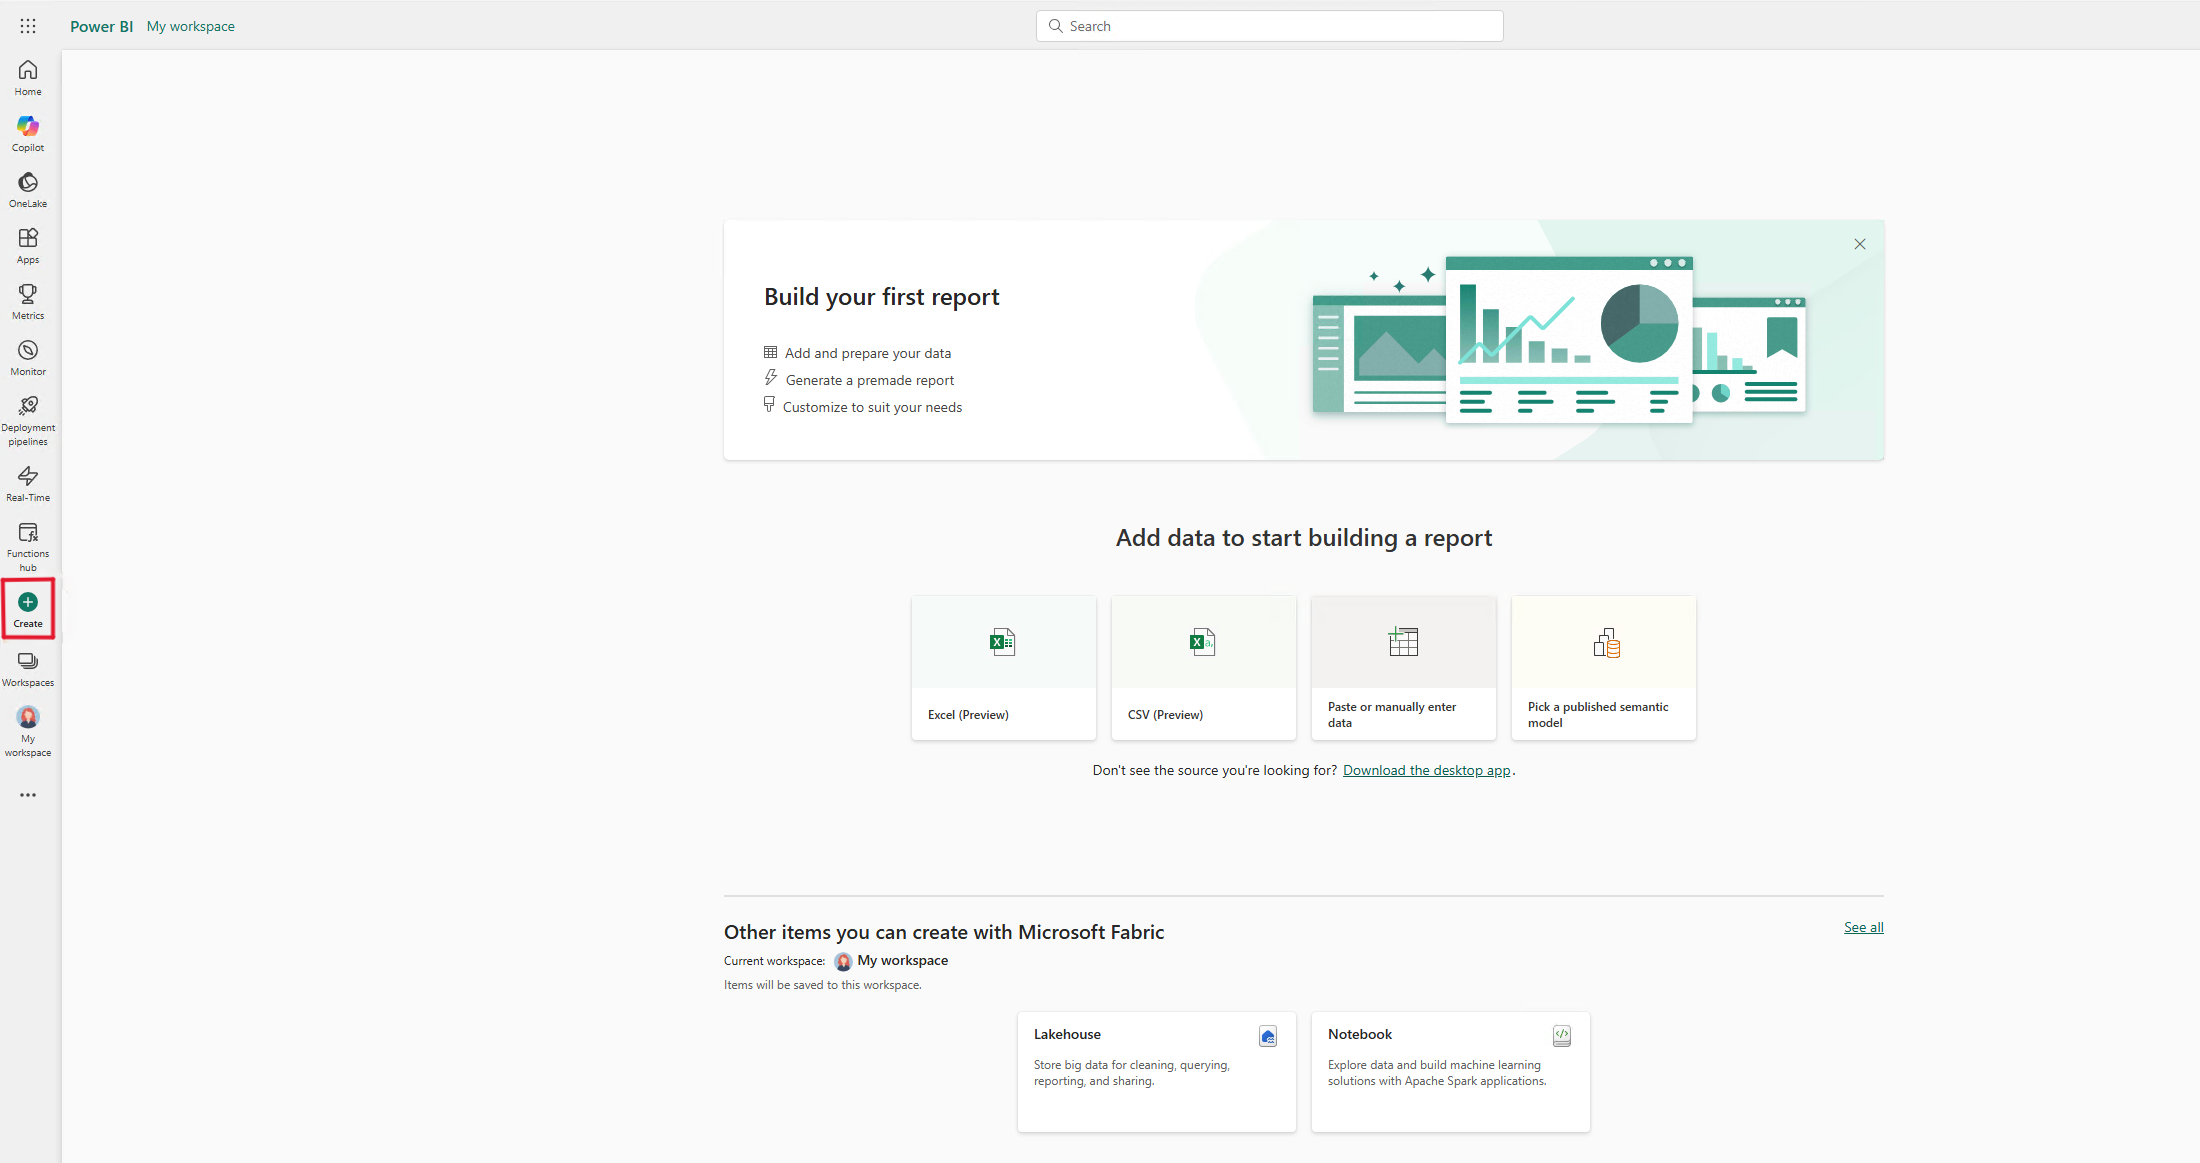
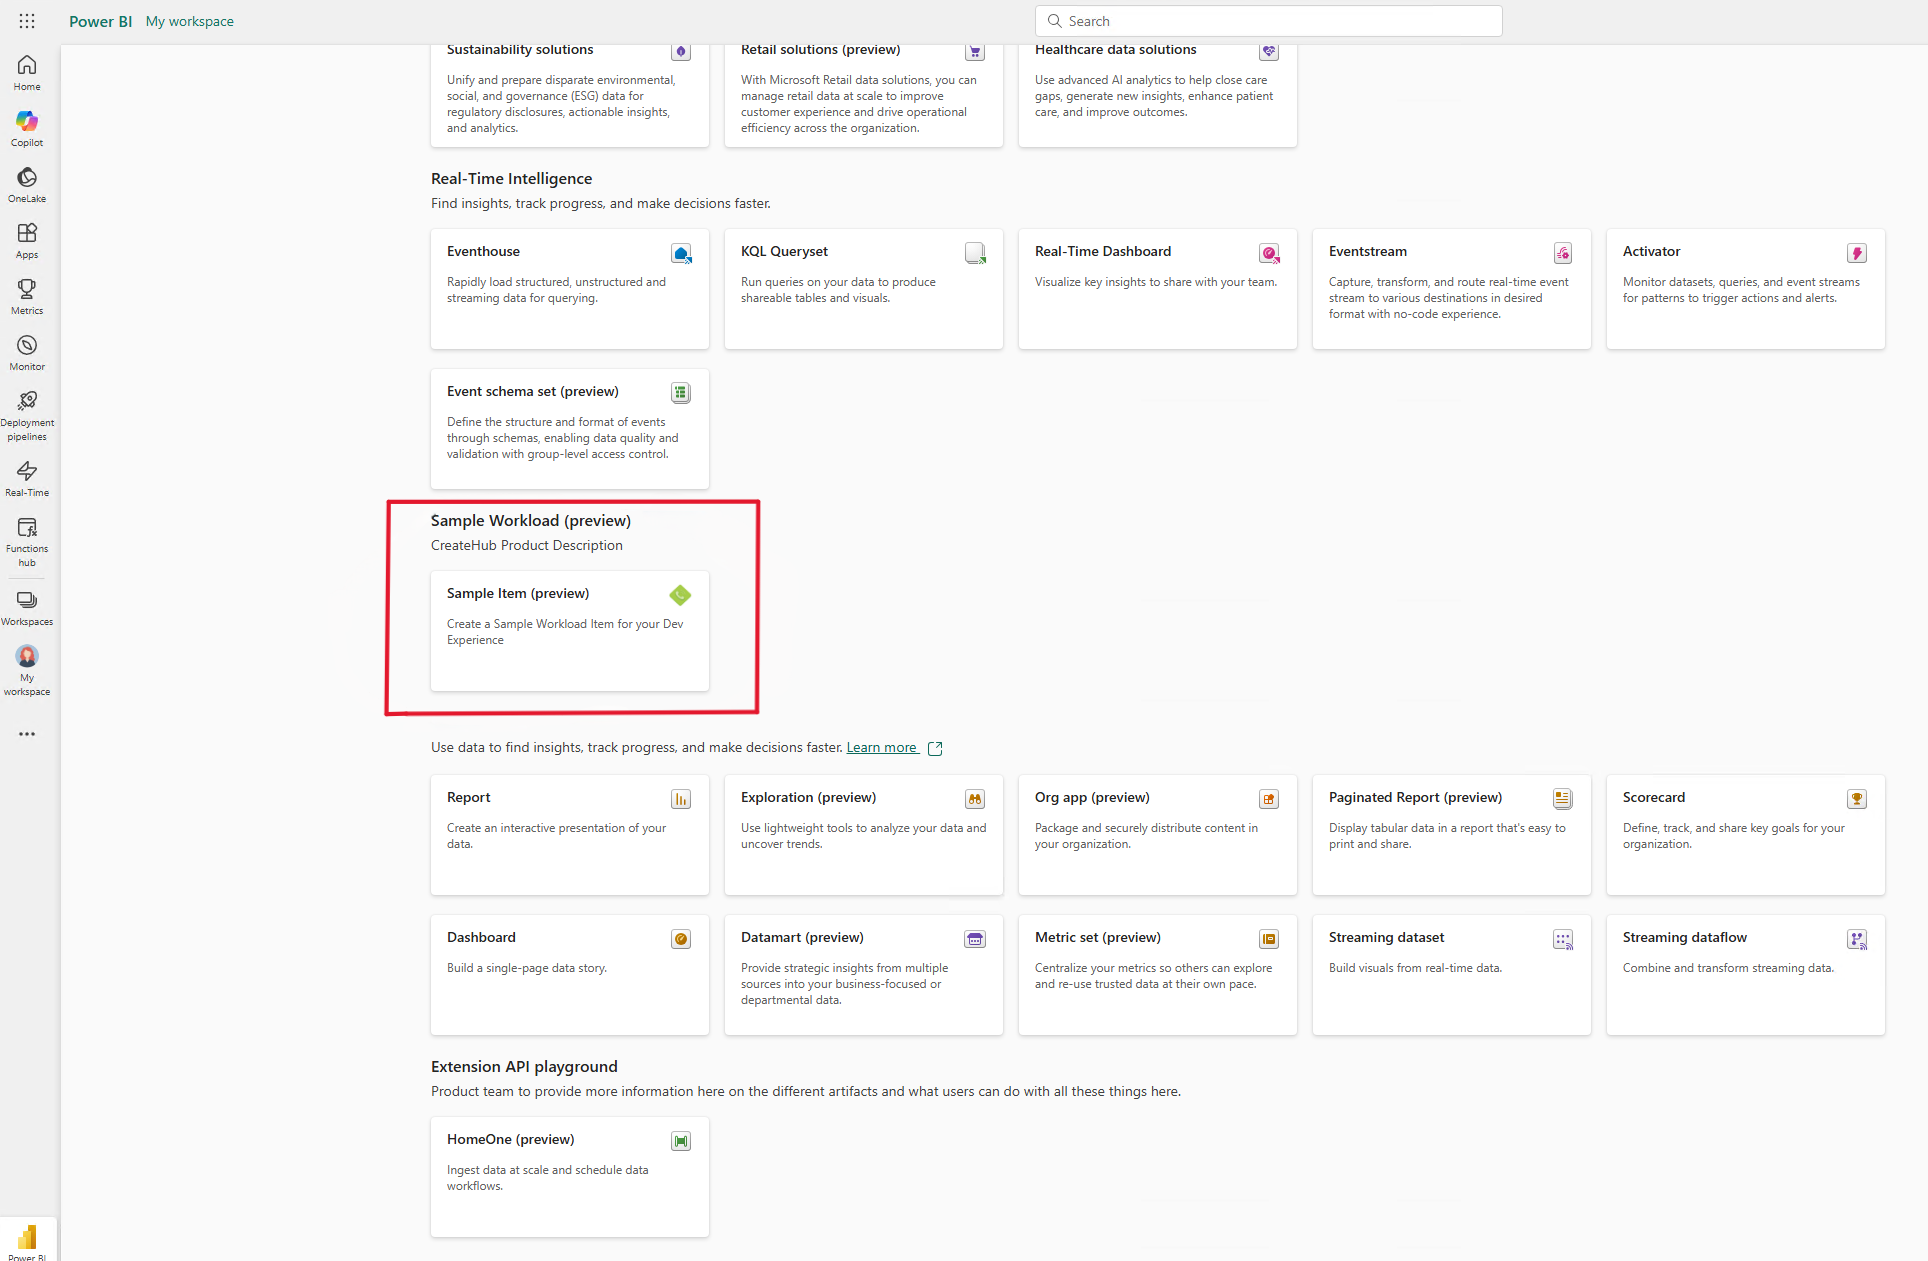
On the workspace menu, select the Create hub icon (sometimes the icon is located in the Show more ellipses).
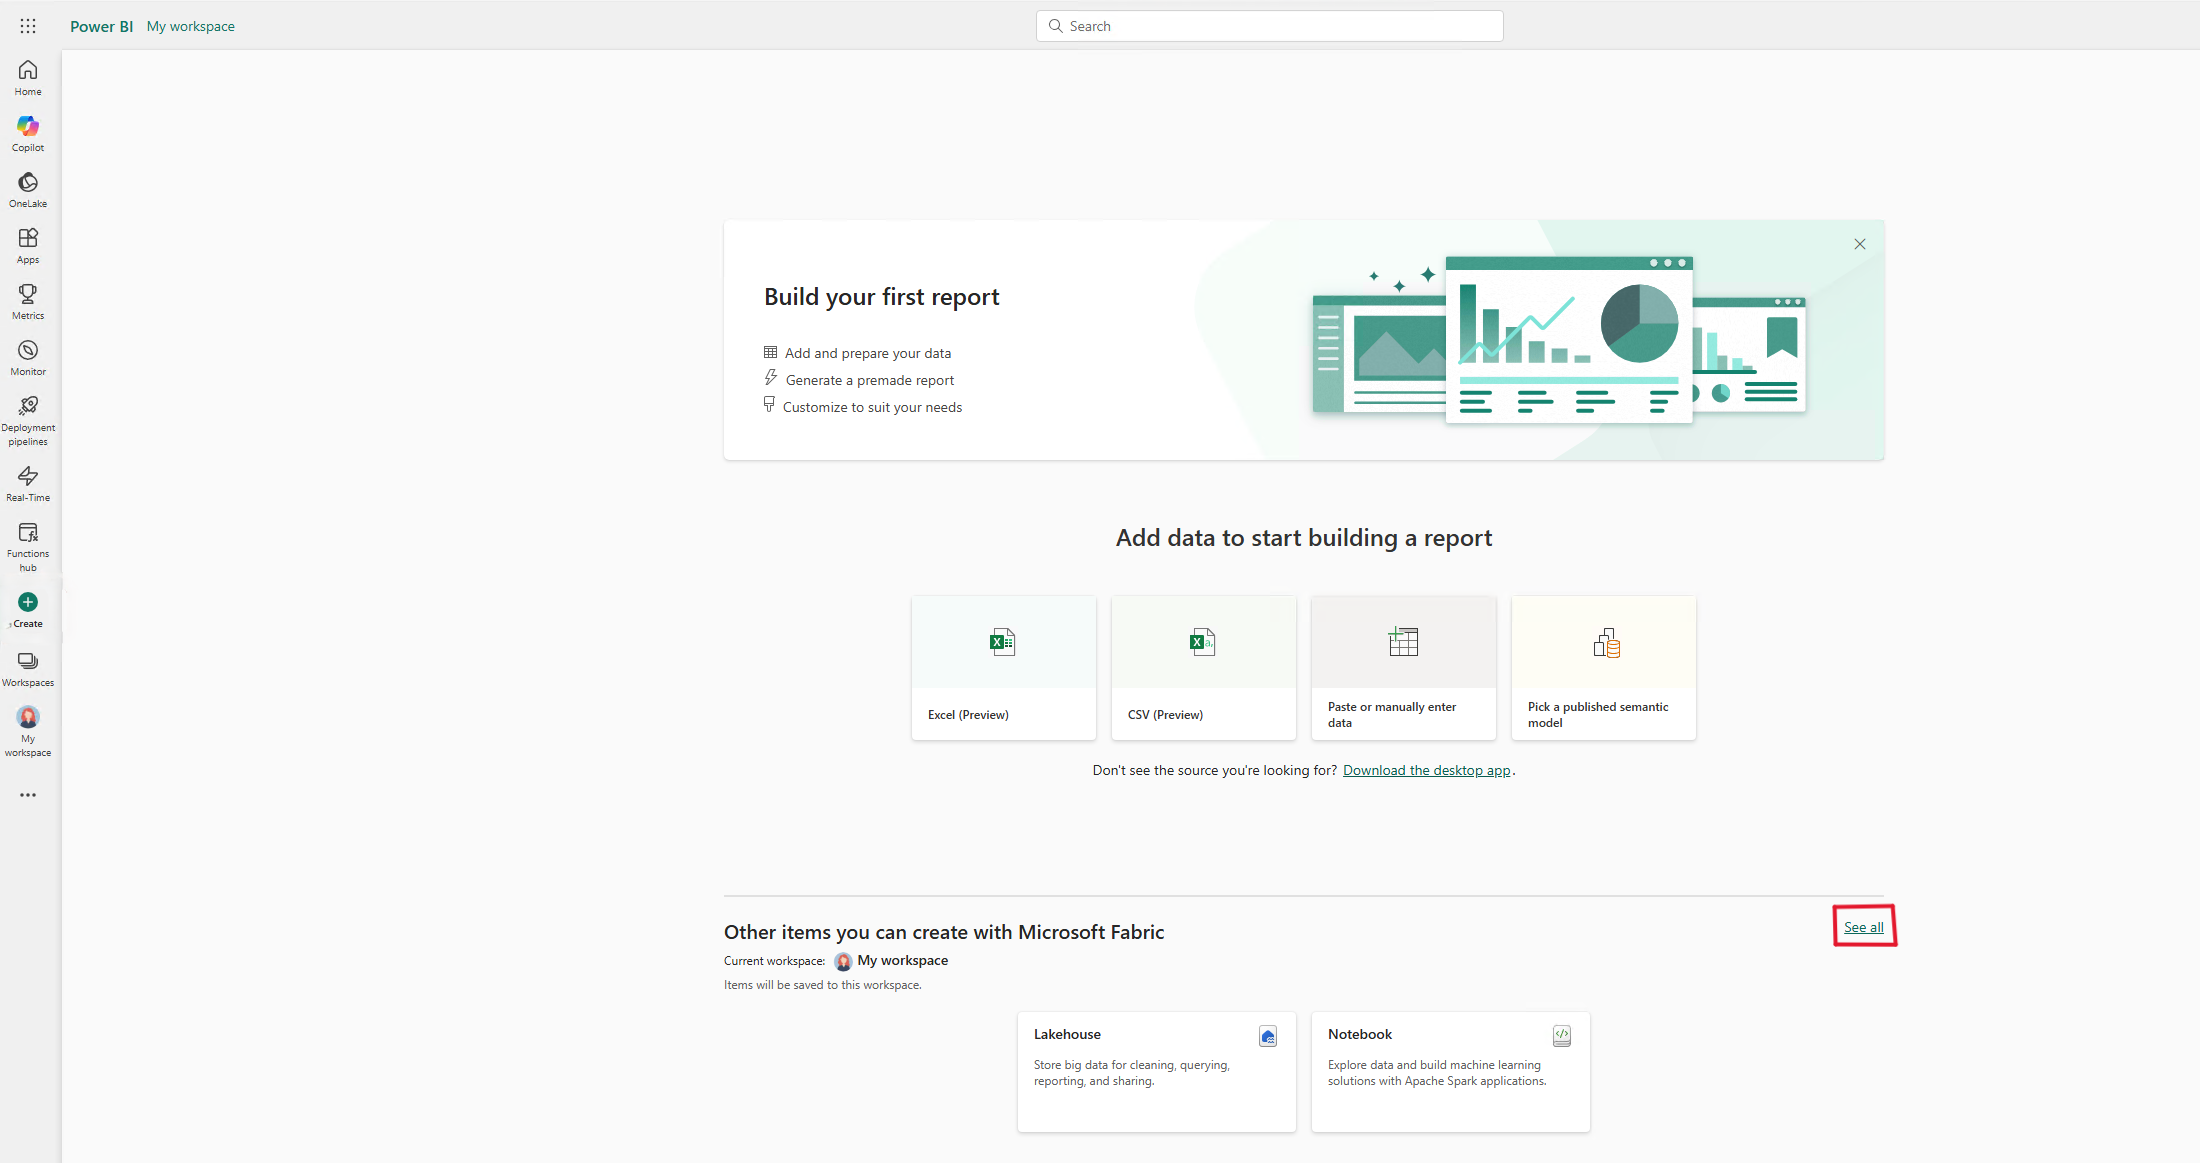
Select See all.
Under Sample Workload, select the Sample Item card to create an item.
The new item looks similar to this example:
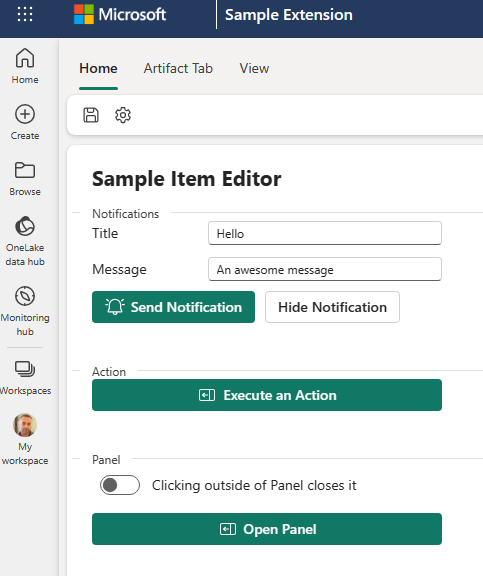
Explore the various controls to see the Fabric WorkloadClient API (the workload SDK) capabilities:
- Open notifications and dialogs
- Go to pages
- Get theme and workload settings
- Execute actions
Most of the available SDK functionalities are either configured as button actions or registered as callbacks. The results typically are a notification or a message box that shows that an API was invoked.
For example:
Execute an Action calls the action.execute() API with an action named sample.Action. The action's functionality is to show a notification.
Select Save on the ribbon to call the dialog.open() API. The API opens a dialog in which a user enters a name and saves the item in Fabric. For more information about the dialog, see the CRUD section.
The Get Theme Settings button shows a list of Fabric theme configurations (via the theme.get() API).
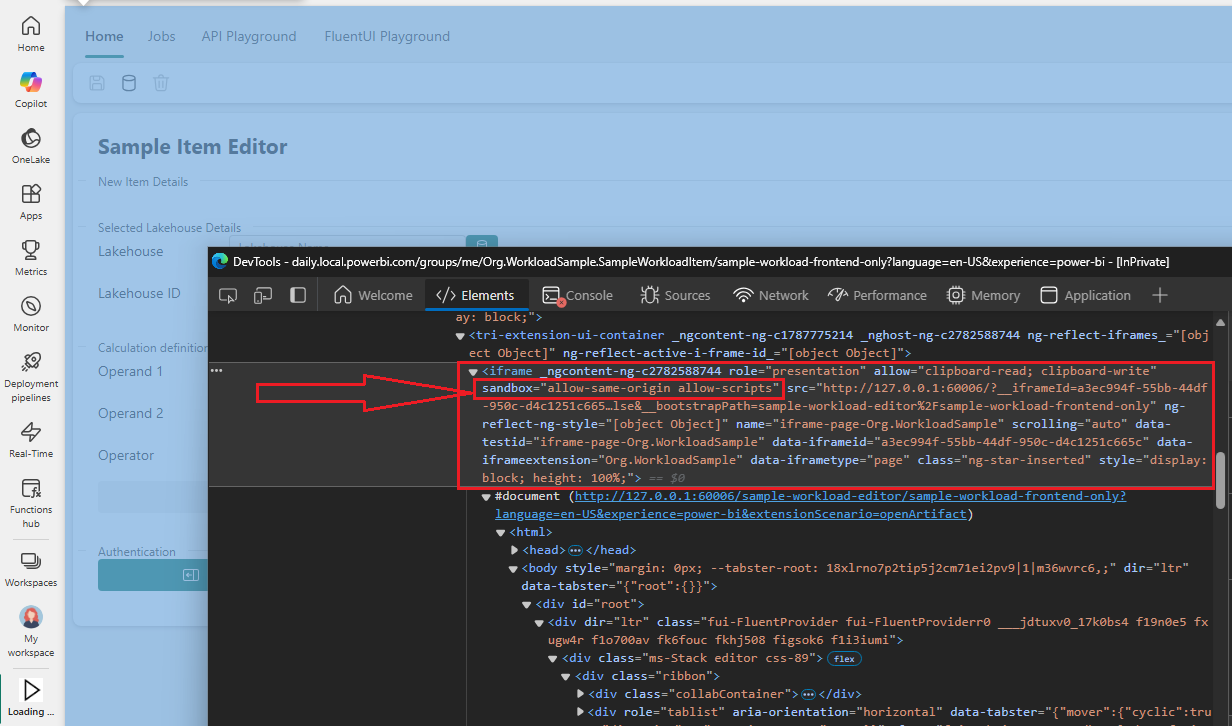
The sample workload UI is hosted in a Fabric sandboxed iframe element that is shown in developer mode for the webpage.
Note
The sandboxed iframe element supports the attributes allow-same-origin and allow-scripts.
For more information about sandbox and attributes, see MDN Web Docs.
Understand the code
The following sections describe the code elements and relevant considerations.
bootstrap()
Before bootstrapping, check the path to see if you need to close the window. This step is required if you use the authentication API.
const redirectUriPath = '/close';
const url = new URL(window.location.href);
if (url.pathname?.startsWith(redirectUriPath)) {
    window.close();
}
Every Fabric workload app must support initialization in two modes:
UI mode: An app in UI mode is loaded in visible iFrames. It listens for its own route changes to render corresponding UI components like pages, panels, and dialogs.
Worker mode: An app in worker mode runs in an invisible iFrame. The invisible iFrame is primarily used to receive external commands and to then respond to them.
The @ms-fabric/workload-client API provides a bootstrap() method to simplify initialization steps. The bootstrap() method internally detects whether the current app is loaded in UI mode or worker mode. Then it calls the appropriate initialization method (initializeUI or initializeWorker). When initialization is complete, bootstrap() notifies the Fabric micro-frontend framework of initialization success or failure.
bootstrap({
    initializeWorker: (params) =>
        import('./index.worker').then(({ initialize }) => initialize(params)),
    initializeUI: (params) =>
        import('./index.ui').then(({ initialize }) => initialize(params)),
});
index.worker
index.worker is the main onAction registration. It handles events that the Fabric host sends, which are triggered by executed actions.
The actions can be sent by the workload to Fabric and then called back into the onAction handler, or they can be initiated by the Fabric host. For example, when you select Create Sample Item - Frontend Only, Fabric triggers the action open.createSampleWorkloadFrontendOnly, and the onAction handler initiates opening the workload main UI page. The current workspace objectId value also is passed into the frontend-only experience.
The sequence is shown in the following code example:
   workloadClient.action.onAction((message) => {
        switch (message.action) {
            /**
             * This opens the frontend-only experience, so you can experiment with the UI without using CRUD operations.
             * You can still save the item if the backend is connected and registered.
             */
            case 'open.createSampleWorkloadFrontendOnly':
                const { workspaceObjectId: workspaceObjectId1 } = data as ItemCreateContext;
                return workloadClient.page.open({
                    workloadName: 'Org.WorkloadSample',
                    route: {
                        path: `/sample-workload-frontend-only/${workspaceObjectId1}`,
                    },
                });

                // . . . elided for brevity . . .
            default:
                throw new Error('Unknown action received');
        }
    });
index.ui
The initialize() function renders the React DOM where the App function is embedded. To invoke the API calls, pass the workloadClient SDK handle, which is used throughout the code.
The FluentProvider class ensures style consistency across the various FluentUI controls. Here's an example:
ReactDOM.render(
      <FluentProvider theme={fabricLightTheme}>
           <App
               history={history}
               workloadClient={workloadClient}
           />
       </FluentProvider>,
       document.querySelector("#root")
   );
Development flow
- The
Appfunction routes the code toSampleWorkloadEditor. The function returns a value forReact.JSX.Element. - The function contains the UI structure. The UI structure contains the ribbon and page controls like buttons and input fields.
- Information that's collected from the user is stored via the React
useState()hook. - Handlers of the UI controls call the
SampleWorkloadControllerfunctions and pass the relevant state variables. - To support the CRUD operations, the state of the created/loaded item is stored in
artifactItemwithworkspaceObjectIdand a sample implementation of payload variables.
The following examples use the notification.open() API:
State:
   const [apiNotificationTitle, setNotificationTitle] = useState<string>('');
   const [apiNotificationMessage, setNotificationMessage] = useState<string>('');
UI:
These examples configure specific UI elements:
Title:
<Field label="Title" validationMessage={notificationValidationMessage} orientation="horizontal" className="field">
    <Input size="small" placeholder="Notification Title" onChange={e => setNotificationTitle(e.target.value)} />
  </Field>
Send button:
<Button icon={<AlertOn24Regular />} appearance="primary" onClick={() => onCallNotification()} > Send Notification </Button>Handler:
function onCallNotification() {
  ... elided for brevity
   callNotificationOpen(apiNotificationTitle, apiNotificationMessage, undefined, undefined, workloadClient, setNotificationId);
};
Controller:
  export async function callNotificationOpen(
    title: string,
    message: string,
    type: NotificationType = NotificationType.Success,
    duration: NotificationToastDuration = NotificationToastDuration.Medium,
    workloadClient: WorkloadClientAPI,
    setNotificationId?: Dispatch<SetStateAction<string>>) {

    const result = await workloadClient.notification.open({
        notificationType: type,
        title,
        duration,
        message
    });
    if (type == NotificationType.Success && setNotificationId) {
        setNotificationId(result?.notificationId);
    }
}
CRUD operations
While a frontend-only development scenario is easily supported, the full end-to-end developer experience requires saving, reading, and editing existing workload items.
The backend implementation guide describes in detail how to set up and use the backend.
When the backend is up and running and the Org.WorkloadSample.SampleWorkloadItem type is registered in Fabric, you can perform CRUD operations on this type.
The following operations are exposed by using the ItemCrud API.
CREATE
To make a sample call to create, use the following example that shows saving the workload item for the first time:
 const params: CreateItemParams = {
        workspaceObjectId,
        payload: { itemType, displayName, description, workloadPayload: JSON.stringify(workloadPayload), payloadContentType: "InlineJson", }
    };
 const result: CreateItemResult = await workloadClient.ItemCrud.createItem(params);
Our sample implementation stores the created item in artifactItem.
The item is created in the currently selected workspace. The workspace must be assigned to the capacity that is set in the backend configuration. For more information, see the backend documentation.
An attempt to create an item under a noncompatible workspace fails:
The
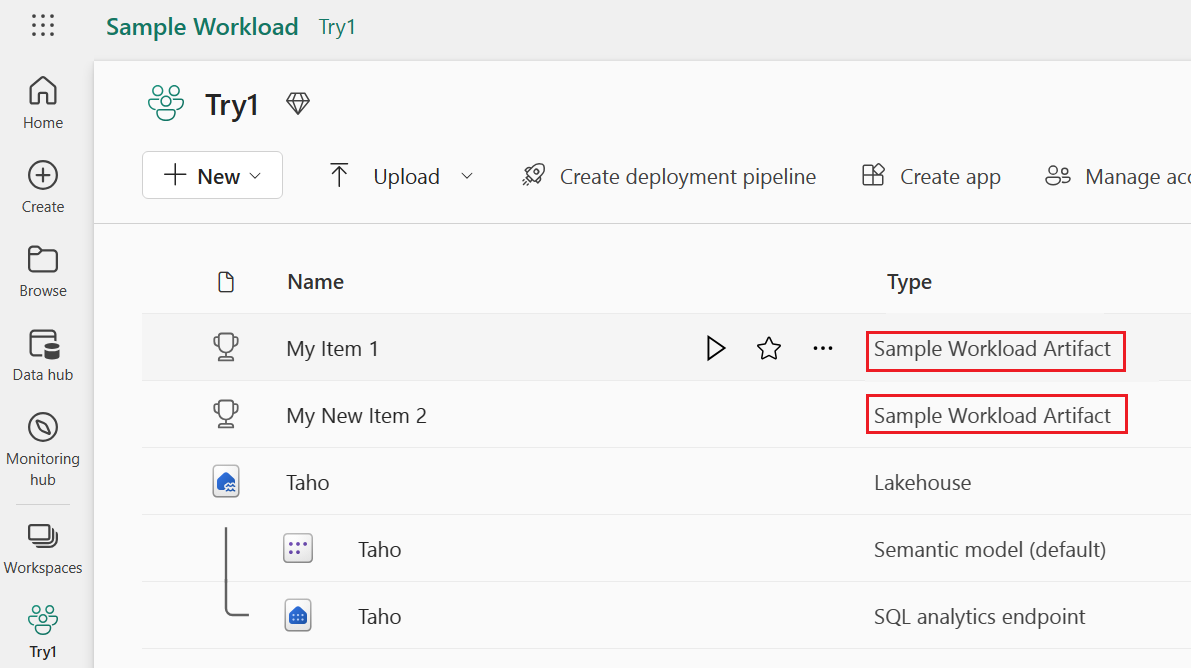
onCreateFabricItemcallback in the backend blocks theCREATEcall. A failure at that point causes the operation to fail, and no item is created in Fabric. For more information, see the backend's debugging and troubleshooting documentation.Currently, a saved item doesn't automatically appear in the workspace. To view a saved item in the workspace, refresh the page.
GET
When you select an existing sample workload item in the workspace view, Fabric goes to the route that is defined in the frontend manifest in artifacts > editor > path:
"items": [
  {
   "name": "Org.WorkloadSample.SampleWorkloadItem",
   "editor": {
    "workload": "Org.WorkloadSample",
    "path": "/sample-workload-editor"
   },
When you invoke itemCrud.getItem, data is loaded from both the Fabric backend and the workload backend. The data from both sources is loaded into the artifactItem object of the open GUI.
UPDATE
To update an existing item, use itemCrud.updateItem. The workload payload is updated by the workload backend. In Fabric, only the item's lastModifiedTime changes after an update.
DELETE
You can call the delete operation either in the Fabric workspace view as a general action available for all items or via an explicit call from the workload to itemCrud.deleteItem.
Both types of calls go through the workload backend's onDeleteItem callback.
View authentication activity
In the sample workload editor, you can view authentication activity.
Before you use the authentication API, configure your app to authenticate by using Microsoft Entra ID.
Also ensure that your env.dev file is configured correctly. For more information, see Configure the workload local manifest and acquire a token for your application.
Debug
To see the worker and UI iframe elements, in the browser, select F12 to open the browser developer tools. Select the Sources tab.

You can place a breakpoint in the worker iframe element and see the main switch on the incoming action. You can also debug the UI iframe element. For example, you can debug the code inside SampleWorkloadEditor.
Fluent UI controls
UX workloads use Fluent UI controls for visual consistency with Fabric and for ease of development. The sample workload project provides examples of how to use the most common controls.
For more information, see Fluent UI.
Frontend manifest customization
The frontend manifest describes the frontend aspects of the workload, including product appearance, names, visual assets, and available actions. The frontend manifest is the main point of contact between Fabric and the workload.
For our sample workload, the manifest is loaded into Fabric in Developer mode. Manifest sections, definitions, and examples of the manifest are shown in the frontend manifest files.
Changes to the manifest's entries, action settings, and updates to visual assets are shown in real time after you refresh the page.
Client SDK supported APIs
The following APIs are supported:
- notification.open
- notification.hide
- panel.open
- panel.close
- action.onAction
- action.execute
- navigation.navigate
- navigation.onNavigate
- navigation.onBeforeNavigateAway
- navigation.onAfterNavigateAway
- page.open
- dialog.openDialog
- dialog.openMessageBox
- dialog.close
- theme.get
- theme.onChange
- settings.get
- settings.onChange
- errorHandling.openErrorDialog
- errorHandling.handleRequestFailure
- itemCrud.createItem
- itemCrud.getItem
- itemCrud.updateItem
- itemCrud.deleteItem
- itemSchedule.runItemJob
- itemSchedule.cancelItemJob
- itemRecentRuns.open
For more information, see @ms-fabric/workload-client package.