Enable single sign-on for an enterprise application with a relying party STS
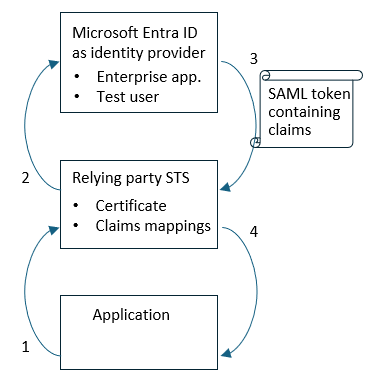
In this article, you use the Microsoft Entra admin center to enable single sign-on (SSO) for an enterprise application which is dependent upon a relying party security token service (STS). The relying party STS supports the Security Assertion Markup Language (SAML), and can be integrated with Microsoft Entra as an enterprise application. After you configure SSO, your users can sign in to the application by using their Microsoft Entra credentials.
If your application will integrate directly with Microsoft Entra for single sign-on, and does not require a relying party Security Token Service (STS), then see the article Enable single sign-on for an enterprise application.
We recommend that you use a nonproduction environment to test the steps in this article, before configuring an application in a production tenant.
Prerequisites
To configure SSO, you need:
- A relying party STS, such as Active Directory Federation Services (AD FS) or PingFederate, with HTTPS endpoints
- You'll need the entity identifier (entity ID) of the relying party STS. This must be unique across all relying party STS and applications configured in a Microsoft Entra tenant. There cannot be two applications in a single Microsoft Entra tenant with the same entity identifier. For example, if Active Directory Federation Services (AD FS) is the relying party STS, then the identifier may be a URL of the form
http://{hostname.domain}/adfs/services/trust. - You'l also need the assertion consumer service URL, or reply URL, of the relying party STS. This URL must be a
HTTPSURL to securely transfer SAML tokens from Microsoft Entra to the relying party STS as part of single sign-on to an application. For example, if AD FS is the relying party STS, then the URL may be of the formhttps://{hostname.domain}/adfs/ls/.
- You'll need the entity identifier (entity ID) of the relying party STS. This must be unique across all relying party STS and applications configured in a Microsoft Entra tenant. There cannot be two applications in a single Microsoft Entra tenant with the same entity identifier. For example, if Active Directory Federation Services (AD FS) is the relying party STS, then the identifier may be a URL of the form
- An application, which has already been integrated with that relying party STS
- One of the following roles in Microsoft Entra: Cloud Application Administrator, Application Administrator
- A test user in Microsoft Entra who can sign into the application
Note
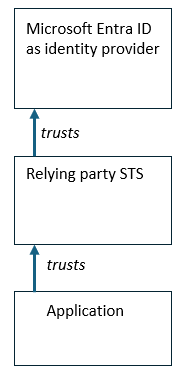
This tutorial assumes that there is one Microsoft Entra tenant, one relying party STS, and one application connected to the relying party STS. This tutorial shows how to configure Microsoft Entra to use the entity identifier provided by the relying party STS to determine the appropriate enterprise application, to send a SAML token in a response. If you had more than one application connected to a single relying party STS, then Microsoft Entra wouldn't be able to distinguish between those two applications when issuing SAML tokens. Configuring different entity identifiers is outside the scope of this tutorial.
Create an application in Microsoft Entra
First, create an enterprise application in Microsoft Entra, which enables Microsoft Entra to generate SAML tokens for the relying party STS to provide to the application.
- Sign in to the Microsoft Entra admin center as at least a Cloud Application Administrator.
- Browse to Identity > Applications > Enterprise applications > All applications.
- If you have already configured an application representing the relying party STS, then enter the name of the existing application in the search box, select the application from the search results, and continue at the next section.
- Select New application.
- Select Create your own application.
- Type the name of the new application in the input name box, select Integrate any other application you don't find in the gallery (Non-gallery), and select Create.
Configure single sign-on in the application
In the Manage section of the left menu, select Single sign-on to open the Single sign-on pane for editing.
Select SAML to open the SSO configuration page.
In the Basic SAML configuration box, select Edit. The identifier and reply URL must be set before further SAML configuration changes can be made.
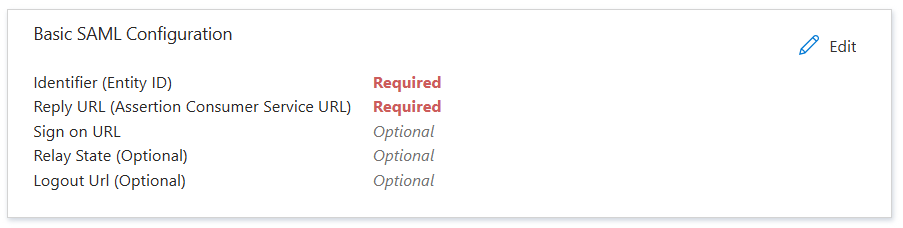
In the Basic SAML configuration page, under Identifier (Entity ID), if there's no identifier listed, select Add identifier. Type the identifier for the application as provided by the relying party STS. For example, the identifier may be a URL of the form
http://{hostname.domain}/adfs/services/trust.In the Basic SAML configuration page, under Reply URL (Assertion Consumer Service URL), select Add reply URL. Type the HTTPS URL of the relying party STS Assertion Consumer Service. For example, the URL may be of the form
https://{hostname.domain}/adfs/ls/.Optionally, configure the sign on, relay state, or logout URLs, if required by the relying party STS.
Select Save.
Download metadata and certificates from Microsoft Entra
Your relying party STS may require the federation metadata from Microsoft Entra as the identity provider in order to complete the configuration. The federation metadata and associated certificates are provided in the SAML Certificates section of the Basic SAML configuration page. For more information, see federation metadata.
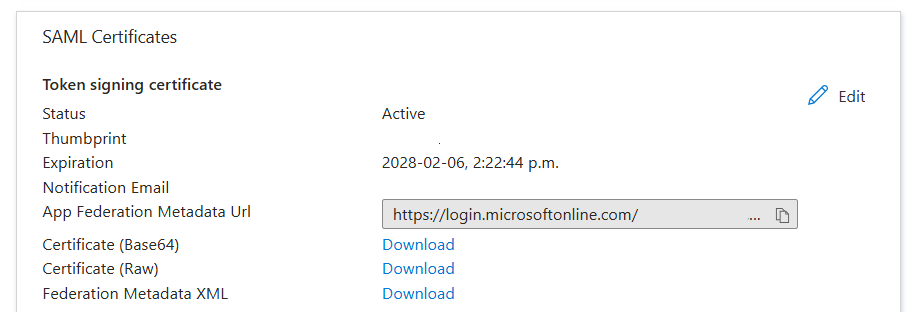
- If your relying party STS can download federation metadata from an Internet endpoint, then copy the value next to the App Federation Metadata Url.
- If your relying party STS requires a local XML file containing the federation metadata, then select Download next to Federation Metadata XML.
- If your relying party STS requires the certificate of the identity provider, then select Download next to either the Certificate (Base64) or Certificate (Raw).
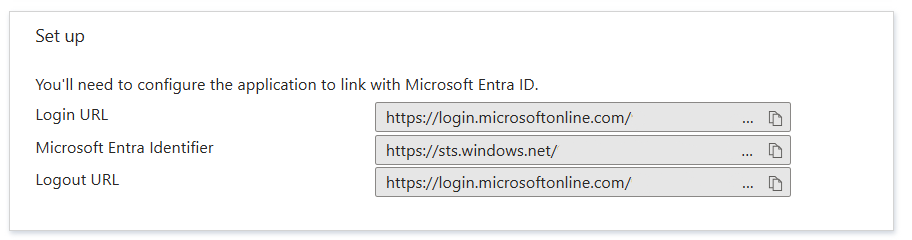
- If your relying party STS does not support federation metadata, then copy the Login URL and MIcrosoft Entra Identifier to configure your relying party STS.
Configure claims issued by Microsoft Entra
By default, only a few attributes from Microsoft Entra users are included in the SAML token Microsoft Entra sends to the relying party STS. You can add additional claims which your applications require, and change the attribute provided in the SAML name identifier. For more information on standard claims, see SAML token claims reference.
- In the Attributes & Claims box, select Edit.
- To change which Entra ID attribute is sent as the value of the Name identifier, select the row Unique User Identifier (Name ID). You can change the source attribute to another Microsoft Entra built-in or extension attribute. Then select Save.
- To change which Entra ID attribute is sent as the value of a claim already configured, select the row in the Additional claims section.
- To add a new claim, select Add new claim.
- When complete, select SAML-based Sign-on to close this screen.
Configure who can sign-in to the application
When testing the configuration, you should assign a designated test user to the application in Microsoft Entra, to validate that the user is able to sign on to the application via Microsoft Entra and the relying party STS.
- In the Manage section of the left menu, select Properties.
- Ensure that the value of Enabled for users to sign-in is set to Yes.
- Ensure that the value of Assignment required is set to Yes.
- If you made any changes, select Save.
- In the Manage section of the left menu, select Users and groups.
- Select Add user/group.
- Select None selected.
- In the search box, type the name of the test user, then pick the user and select Select.
- Select Assign to assign the user to the default User role of the application.
- In the Security section of the left menu, select Conditional Access.
- Select What if.
- Select No user or service principal selected, select No user selected, and select the user previously assigned to the application.
- Select Any cloud app, and select the enterprise application.
- Select What if. Validate that any policies that will apply allow the user to sign into the application.
Configure Microsoft Entra as an identity provider in your relying party STS
Next, import the federation metadata into your relying party STS. The following steps are shown using AD FS, but another relying party STS could be used instead.
- In the claims provider trust list of your relying party STS, select Add Claims Provider Trust, and select Start.
- Depending on whether you downloaded the federation metadata from Microsoft Entra, select Import data about the the claims provider published online or on a local network, or Import data about the claims provider from a file.
- You may need to also provide the certificate of Microsoft Entra to the relying party STS.
- When your configuration of Microsoft Entra as an identity provider is complete, confirm that:
- The claims provider identifier is a URI of the form
https://sts.windows.net/{tenantid}. - If using the Microsoft Entra ID global service, the endpoints for SAML single sign-on are URI of the form
https://login.microsoftonline.com/{tenantid}/saml2. For national clouds, see Microsoft Entra authentication & national clouds. - A certificate of Microsoft Entra is recognized by the relying party STS.
- No encryption is configured.
- The claims configured in Microsoft Entra are listed as available for claims rule mappings in your relying party STS. If you subsequently added additional claims, you may need to also add them to the configuration of the identity provider in your relying party STS.
- The claims provider identifier is a URI of the form
Configure claims rules in your relying party STS
Once the claims that Microsoft Entra will send as the identity provider are known to the relying party STS, you'll need to map or transform those claims into the claims required by your application. The following steps are shown using AD FS, but another relying party STS could be used instead.
- In the claims provider trust list of your relying party STS, select the claims provider trust for Microsoft Entra, and select Edit Claims Rules.
- For each claim provided by Microsoft Entra and required by your application, select Add Rule. In each rule, select Pass through or Filter an Incoming Claim, or Transform an Incoming Claim, based on the requirements of your application.
Test the single sign-on to your application
After the application is configured in Microsoft Entra and your relying party STS, users can sign into it by authenticating to Microsoft Entra, and having a token provided by Microsoft Entra transformed by your relying party STS into the form and claims required by your application.
This tutorial illustrates testing the sign-in flow using a web-based application which implements the relying party initiated single sign-on pattern. For more information, see Single sign-on SAML protocol.
- In a web browser private browsing session, connect to the application and initiate the login process. The application redirects the web browser to the relying party STS, and the relying party STS determines the identity providers which can provide appropriate claims.
- In the relying party STS, if prompted, select the Microsoft Entra identity provider. The relying party STS redirects the web browser to the Microsoft Entra login endpoint,
https://login.microsoftonline.comif using the Microsoft Entra ID global service. - Sign in to Microsoft Entra using the identity of the test user, previously configured in the step configure who can sign-in to the application. Microsoft Entra then locates the enterprise application based on the entity identifier, and redirect the web browser to the relying party STS reply URL endpoint, with the web browser transporting the SAML token.
- The relying party STS validates the SAML token was issued by Microsoft Entra, then extract and transform the claims from the SAML token, and redirect the web browser to the application. Confirm that your application has received the required claims from Microsoft Entra via this process.
Complete configuration
- After testing the initial sign-on configuration, you'll need to ensure that your relying party STS stays up to date as new certificates are added to Microsoft Entra. Some relying party STS may have a built-in process to monitor the federation metadata of the identity provider.
- This tutorial illustrated configuring single sign-in. Your relying party STS may also support SAML single sign-out. For more information on this capability, see Single Sign-Out SAML Protocol.
- You can remove the assignment of the test user to the application. You can use other features such as dynamic groups or entitlement management to assign users to the application. For more information, see Quickstart: Create and assign a user account.