Add federation with SAML/WS-Fed identity providers
Applies to:  Workforce tenants External tenants (learn more)
Your Microsoft Entra tenant can be directly federated with external organizations that use a SAML or WS-Fed identity provider (IdP). Users from the external organization can then use their own IdP-managed accounts to sign in to your apps or resources, either during invitation redemption or self-service sign-up, without having to create new Microsoft Entra credentials. The user is redirected to their IdP when signing up or signing in to your app, and then returned to Microsoft Entra once they successfully sign in.
Note
SAML/WS-Fed federation is currently in preview for external tenants and is generally available for workforce tenants.
Prerequisites
- Review the configuration considerations in SAML/WS-Fed identity providers.
- A workforce tenant or an external tenant.
How to configure SAML/WS-Fed IdP federation
Step 1: Determine if the partner needs to update their DNS text records
Use the following steps to determine if the partner needs to update their DNS records to enable federation with you.
Check the partner's IdP passive authentication URL to see if the domain matches the target domain or a host within the target domain. In other words, when setting up federation for
fabrikam.com:- If the passive authentication endpoint is
https://fabrikam.comorhttps://sts.fabrikam.com/adfs(a host in the same domain), no DNS changes are needed. - If the passive authentication endpoint is
https://fabrikamconglomerate.com/adfsorhttps://fabrikam.co.uk/adfs, the domain doesn't match the fabrikam.com domain, so the partner needs to add a text record for the authentication URL to their DNS configuration.
- If the passive authentication endpoint is
If DNS changes are needed based on the previous step, ask the partner to add a TXT record to their domain's DNS records, like the following example:
fabrikam.com. IN TXT DirectFedAuthUrl=https://fabrikamconglomerate.com/adfs
Step 2: Configure the partner organization’s IdP
Next, your partner organization needs to configure their IdP with the required claims and relying party trusts. For federation to work properly, Microsoft Entra External ID requires the external IdP to send certain attributes and claims, which must be configured at the external IdP.
Note
To illustrate how to configure a SAML/WS-Fed IdP for federation, we use Active Directory Federation Services (AD FS) as an example. See the article Configure SAML/WS-Fed IdP federation with AD FS, which gives examples of how to configure AD FS as a SAML 2.0 or WS-Fed IdP in preparation for federation.
To configure a SAML 2.0 identity provider
Microsoft Entra External ID requires the SAML 2.0 response from the external IdP to include specific attributes and claims. The necessary attributes and claims can be configured at the external IdP by either:
- Linking to the online security token service XML file, or
- Manually entering the values
Refer to the following tables for the required values.
Note
Ensure the value matches the cloud for which you're setting up external federation.
Table 1. Required attributes for the SAML 2.0 response from the IdP.
| Attribute | Value for a workforce tenant | Value for an external tenant |
|---|---|---|
| AssertionConsumerService | https://login.microsoftonline.com/login.srf |
https://<tenantID>.ciamlogin.com/login.srf |
| Audience | https://login.microsoftonline.com/<tenant ID>/ (Recommended) Replace <tenant ID> with the tenant ID of the Microsoft Entra tenant you're setting up federation with.In the SAML request sent by Microsoft Entra ID for external federations, the Issuer URL is a tenanted endpoint (for example, https://login.microsoftonline.com/<tenant ID>/). For any new federations, we recommend that all our partners set the audience of the SAML or WS-Fed based IdP to a tenanted endpoint. Any existing federations configured with the global endpoint (for example, urn:federation:MicrosoftOnline) continue to work, but new federations stop working if your external IdP is expecting a global issuer URL in the SAML request sent by Microsoft Entra ID. |
https://login.microsoftonline.com/<tenant ID>/Replace <tenant ID> with the tenant ID of the Microsoft Entra tenant you're setting up federation with. |
| Issuer | The issuer URI of the partner's IdP, git stfor example http://www.example.com/exk10l6w90DHM0yi... |
The issuer URI of the partner's IdP, for example http://www.example.com/exk10l6w90DHM0yi... |
Table 2. Required claims for the SAML 2.0 token issued by the IdP.
| Attribute Name | Value |
|---|---|
| NameID Format | urn:oasis:names:tc:SAML:2.0:nameid-format:persistent |
http://schemas.xmlsoap.org/ws/2005/05/identity/claims/emailaddress |
emailaddress |
To configure a WS-Fed identity provider
Microsoft Entra External ID requires the WS-Fed message from the external IdP to include specific attributes and claims. The necessary attributes and claims can be configured at the external IdP by either:
- Linking to the online security token service XML file, or
- Manually entering the values
Note
Currently, the two WS-Fed providers that have been tested for compatibility with Microsoft Entra ID are AD FS and Shibboleth.
Required WS-Fed attributes and claims
The following tables show requirements for specific attributes and claims that must be configured at the third-party WS-Fed IdP. To set up federation, the following attributes must be received in the WS-Fed message from the IdP. These attributes can be configured by linking to the online security token service XML file or by entering them manually.
Refer to the following tables for the required values.
Note
Ensure the value matches the cloud for which you're setting up external federation.
Table 3. Required attributes in the WS-Fed message from the IdP.
| Attribute | Value for a workforce tenant | Value for an external tenant |
|---|---|---|
| PassiveRequestorEndpoint | https://login.microsoftonline.com/login.srf |
https://<tenantID>.ciamlogin.com/login.srf |
| Audience | https://login.microsoftonline.com/<tenant ID>/ (Recommended) Replace <tenant ID> with the tenant ID of the Microsoft Entra tenant you're setting up federation with.In the SAML request sent by Microsoft Entra ID for external federations, the Issuer URL is a tenanted endpoint (for example, https://login.microsoftonline.com/<tenant ID>/). For any new federations, we recommend that all our partners set the audience of the SAML or WS-Fed based IdP to a tenanted endpoint. Any existing federations configured with the global endpoint (for example, urn:federation:MicrosoftOnline) continue to work, but new federations stop working if your external IdP is expecting a global issuer URL in the SAML request sent by Microsoft Entra ID. |
https://login.microsoftonline.com/<tenant ID>/ Replace <tenant ID> with the tenant ID of the Microsoft Entra tenant you're setting up federation with. |
| Issuer | The issuer URI of the partner's IdP, for example http://www.example.com/exk10l6w90DHM0yi... |
The issuer URI of the partner's IdP, for example http://www.example.com/exk10l6w90DHM0yi... |
Table 4. Required claims for the WS-Fed token issued by the IdP.
| Attribute | Value |
|---|---|
| ImmutableID | http://schemas.microsoft.com/LiveID/Federation/2008/05/ImmutableID |
| emailaddress | http://schemas.xmlsoap.org/ws/2005/05/identity/claims/emailaddress |
Step 3: Configure SAML/WS-Fed IdP federation in Microsoft Entra External ID
Next, configure federation with the IdP configured in step 1 in Microsoft Entra External ID. You can use either the Microsoft Entra admin center or the Microsoft Graph API. It might take 5-10 minutes before the federation policy takes effect. During this time, don't attempt to complete self-service sign-up or redeem an invitation for the federation domain. The following attributes are required:
- Issuer URI of the partner's IdP
- Passive authentication endpoint of partner IdP (only https is supported)
- Certificate
To add the IdP to your tenant in the Microsoft Entra admin center
Sign in to the Microsoft Entra admin center as at least an External Identity Provider Administrator.
If you have access to multiple tenants, use the Settings icon
 in the top menu and switch to your tenant from the Directories menu.
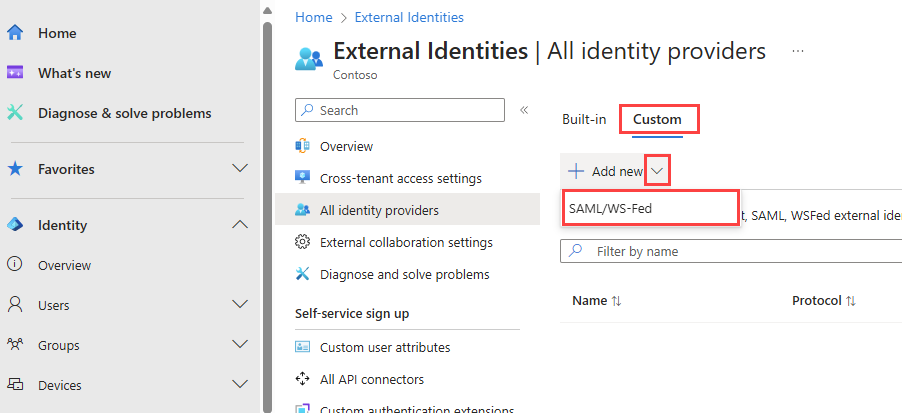
Browse to Identity > External Identities > All identity providers.
Select the Custom tab, and then select Add new > SAML/WS-Fed.
On the New SAML/WS-Fed IdP page, enter the following:
- Display name - Enter a name to help you identify the partner's IdP.
- Identity provider protocol - Select SAML or WS-Fed.
- Domain name of federating IdP - Enter your partner’s IdP target domain name for federation. During this initial configuration, enter just one domain name. You can add more domains later.
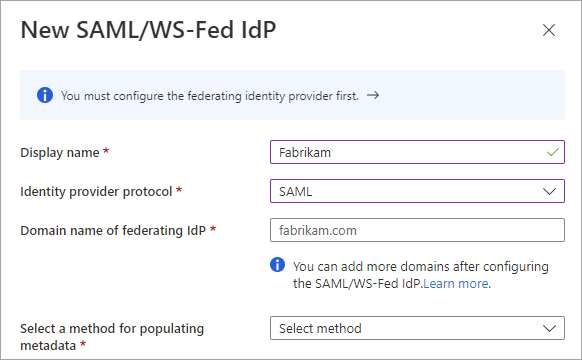
Select a method for populating metadata. If you have a file that contains the metadata, you can automatically populate the fields by selecting Parse metadata file and browsing for the file. Or, you can select Input metadata manually and enter the following information:
- The Issuer URI of the partner's SAML IdP, or the Entity ID of the partner's WS-Fed IdP.
- The Passive authentication endpoint of the partner's SAML IdP, or the Passive requestor endpoint of the partner's WS-Fed IdP.
- Certificate - The signing certificate ID.
- Metadata URL - The location of the IdP's metadata for automatic renewal of the signing certificate.
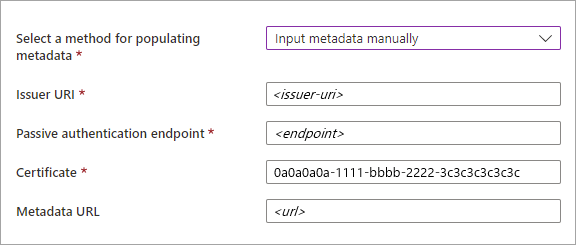
Note
Metadata URL is optional. However, we strongly recommend it. If you provide the metadata URL, Microsoft Entra ID can automatically renew the signing certificate when it expires. If the certificate is rotated for any reason before the expiration time or if you don't provide a metadata URL, Microsoft Entra ID is unable to renew it. In this case, you need to update the signing certificate manually.
Select Save. The identity provider is added to the SAML/WS-Fed identity providers list.

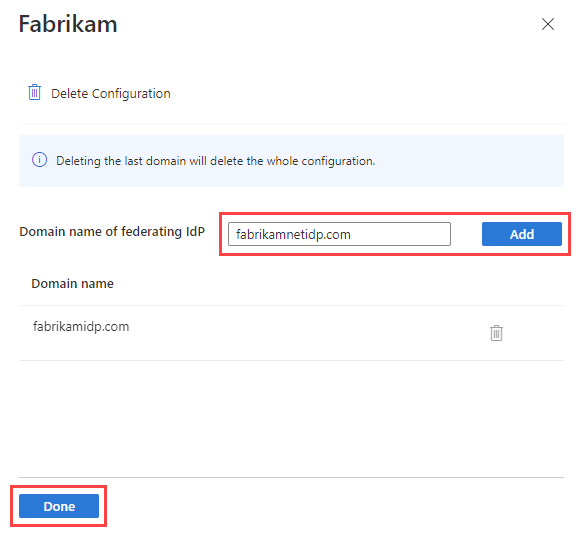
(Optional) To add more domain names to this federating identity provider:
Select the link in the Domains column.

Next to Domain name of federating IdP, type the domain name, and then select Add. Repeat for each domain you want to add. When you're finished, select Done.


To configure federation using the Microsoft Graph API
You can use the Microsoft Graph API samlOrWsFedExternalDomainFederation resource type to set up federation with an identity provider that supports either the SAML or WS-Fed protocol.
Step 4: Configure redemption order (B2B collaboration in workforce tenants)
If you're configuring federation in your workforce tenant for B2B collaboration with a verified domain, make sure the federated IdP is used first during invitation redemption. Configure the Redemption order settings in your cross-tenant access settings for inbound B2B collaboration. Move SAML/WS-Fed identity providers to the top of the Primary identity providers list to prioritize redemption with the federated IdP. For B2B collaboration with a verified domain, make the federated IdP the primary identity provider for invitation redemption. over other identity providers during invitation redemption.
You can test your federation setup by inviting a new B2B guest user. For details, see Add Microsoft Entra B2B collaboration users in the Microsoft Entra admin center.
Note
You can configure the invitation redemption order using the Microsoft Graph REST API (beta version). See Example 2: Update default invitation redemption configuration in the Microsoft Graph reference documentation.
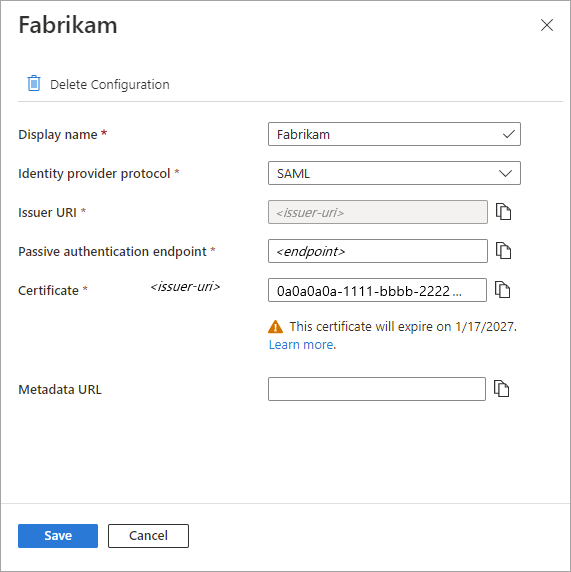
How to update the certificate or configuration details
On the All identity providers page, you can view the list of SAML/WS-Fed identity providers configured and their certificate expiration dates. From this list, you can renew certificates and modify other configuration details.
Sign in to the Microsoft Entra admin center as at least an External Identity Provider Administrator.
Browse to Identity > External Identities > All identity providers.
Select the Custom tab.
Scroll to an identity provider in the list or use the search box.
To update the certificate or modify configuration details:
- In the Configuration column for the identity provider, select the Edit link.
- On the configuration page, modify any of the following details:
- Display name - Display name for the partner's organization.
- Identity provider protocol - Select SAML or WS-Fed.
- Passive authentication endpoint - The partner IdP's passive requestor endpoint.
- Certificate - The ID of the signing certificate. To renew it, enter a new certificate ID.
- Metadata URL - The URL containing the partner's metadata, used for automatic renewal of the signing certificate.
- Select Save.
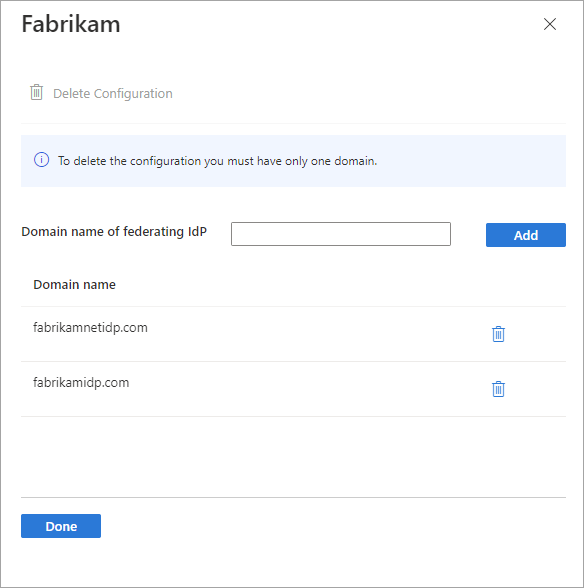
To edit the domains associated with the partner, select the link in the Domains column. In the domain details pane:
- To add a domain, type the domain name next to Domain name of federating IdP, and then select Add. Repeat for each domain you want to add.
- To delete a domain, select the delete icon next to the domain.
- When you're finished, select Done.
Note
To remove federation with a partner, first delete all domains except one, and then follow the steps in the next section.
How to remove federation
You can remove your federation configuration. If you do, federation guest users who already redeemed their invitations can no longer sign in. But you can give them access to your resources again by resetting their redemption status. To remove a configuration for an IdP in the Microsoft Entra admin center:
Sign in to the Microsoft Entra admin center as at least an External Identity Provider Administrator.
Browse to Identity > External Identities > All identity providers.
Select the Custom tab, and then scroll to the identity provider in the list or use the search box.
Select the link in the Domains column to view the IdP's domain details.
Delete all but one of the domains in the Domain name list.
Select Delete Configuration, and then select Done.
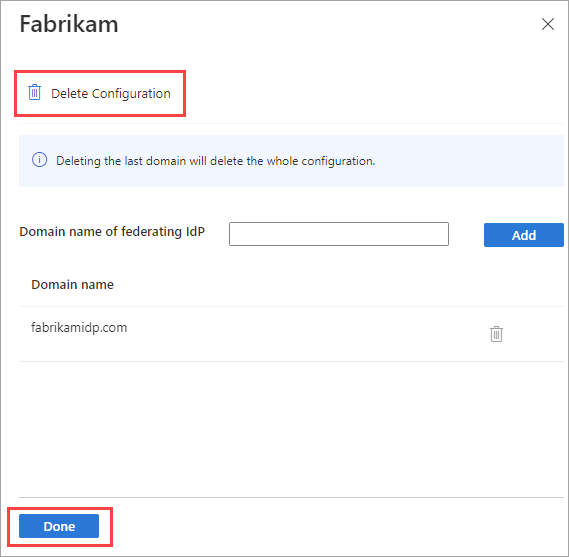
Select OK to confirm deletion.
You can also remove federation using the Microsoft Graph API samlOrWsFedExternalDomainFederation resource type.
Next steps
- External tenants: Add the SAML/WS-Fed identity provider to a user flow.
- Workforce tenants: Learn more about the invitation redemption experience when external users sign in with various identity providers.