Migrate assignment rules and segments
Use the Configuration Migration tool to migrate assignment rules and segments from one organization to another.
Prerequisites
Before you migrate assignment rules and segments, ensure that the following requirements are met:
- You have one of the following roles:
- System Administrator
- System Customizer
- Familiarize yourself with moving configuration data across environments and organizations with the Configuration Migration tool.
- Download the Configuration Migration tool. The Configuration Migration tool is available as a NuGet package or you can download the tool using Power Platform CLI.
- You have the necessary privileges to Sequence, Segment, Assignment rule, and Segment Attribute. More information: Permissions required
- All the custom entities that are configured in sales accelerator are created in the target environment. More information: Step 6 in configuring sales accelerator
- All the necessary sequences are migrated to the target environment. More information: Migrate sequences from one environment to another
Note
If the migrated sequences used queues and teams, ensure that the queues and teams are migrated first to the target environment and then the sequences.
- Configure the required security roles and calendar settings in the target environment for sales accelerator and work assignments. To understand more about:
Prepare the schema file
The schema file (.xml) contains information about the data that you want to export such as the entities, attributes, relationships, segments, and assignment rules.
- Download the schema file sample-schema-for-work-assignment-migration.xml.
- Open the Configuration Migration tool. Navigate to the folder where you downloaded the tool:
*[your folder]*\Tools\ConfigurationMigration\, and double-click DataMigrationUtility.exe.Note
Set the 'numberofinputthreads' parameter value to 1 in the DataMigrationUtility.exe.config file. If not set correctly, segment import may fail due to concurrency control on the segment attribute record.
- Define the schema of the source data to be exported into a .zip file. More information: Create a schema to export configuration data
Import the schema file to the target environment
After exporting the required data from the source environment, you're now ready to import it to the target environment.
- Open the Configuration Migration tool. Go to the folder where you downloaded the tool:
[your folder]\Tools\ConfigurationMigration\, and double-click DataMigrationUtility.exe. - Import the zipped schema file that you created in the previous section. More information: Import configuration data
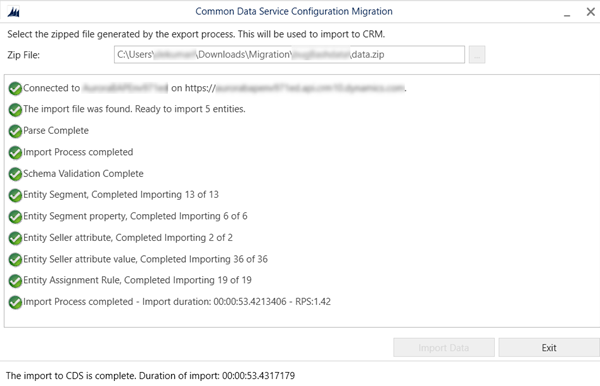
- After the import process is completed successfully, all the checks will turn green, as shown in the image:

Considerations
- All segments and assignment rules migrated to the target environment are in inactive state.
- Rules that are associated with specific users, teams, or queues must be resolved manually after the migration.
- During the migration process, if a new segment is created from the application, the priority order might change.
How prioritization works for migrated segments
The current segment order in the target environment remains the same. However, the priority of incoming segments from the source is determined based on the source segment's priority, following the existing priorities in the target environment.
The following table shows scenarios in which the segments are prioritized in the target environment:
| Scenario | Source segments in the order of priority | Segments to migrate | Target segments in the order of priority | Target segments priority after migration |
|---|---|---|---|---|
| Migrate all segments from source to target | Segment A, Segment B, Segment C, Segment D, Segment E, Default segment | Segment A, Segment B, Segment C, Segment D, Segment E, Default segment | Default segment | Segment A, Segment B, Segment C, Segment D, Segment E, Default segment |
| Migrate selected segments from source to target | Segment A, Segment B, Segment C, Segment D, Segment E, Default segment | Segment A, Segment B, Segment C, Default segment | Default segment | Segment A, Segment B, Segment C, Default segment |
| Migrate all segments from source to target with existing segments | Segment A, Segment B, Segment C, Segment D, Segment E, Default segment | Segment A, Segment B, Segment C, Segment D, Segment E, Default segment | Segment F, Default segment | Segment F, Segment A, Segment B, Segment C, Segment D, Segment E, Default segment |
| Upon subsequent migration of all segments from source to target | Segment A, Segment B, Segment C, Segment D, Segment E, Default segment | Segment A, Segment B, Segment C, Segment D, Segment E, Default segment | Segment B, Segment D, Default segment | Segment B, Segment D, Segment A, Segment C, Segment E, Default segment |
| Upon subsequent migration of selected segments from source to target | Segment A, Segment B, Segment C, Segment D, Segment E, Default segment | Segment C, Segment D, Default segment | Segment B, Segment D, Default segment | Segment B, Segment D, Segment C, Default segment |
| Upon subsequent migration of selected segments from source to target, with some segments deleted in source. | Segment B, Segment C, Segment D, Segment E, Default segment | Segment C, Segment D, Default segment | Segment A, Segment B, Segment D, Default segment | Segment A, Segment B, Segment D, Segment C, Default segment |
| Upon subsequent migration of selected segments from source to target, with some segments existing in target. | Segment A, Segment B, Segment C, Segment D, Segment E, Default segment | Segment B, Segment C, Segment D, Segment E, Default segment | Segment D, Segment F, Segment C, Default segment | Segment D, Segment F, Segment C, Default segment, Segment B, Segment E, Default segment |