Set up a multilingual agent to use in voice channel
Applies to: Dynamics 365 Contact Center—embedded, Dynamics 365 Contact Center—standalone, and Dynamics 365 Customer Service
Note
Copilot Studio bot is renamed as Copilot agent (agent or AI agent). Human agent is now renamed as customer service representative (service representative or representative). You might come across references to the old and new terms while we update the product UI, documentation, and training content.
You can configure routing rules to route voice calls to appropriate agents based on the language that your customer has selected. A multilingual contact center helps you serve global customers who want to interact with your contact center in the language of their choice. You can also set up agents as the first contact who can handle such requests.
Use Bot Framework Composer in Copilot Studio to set up a agent for a multilingual contact center.
The process for setting up the multilingual bot in Copilot Studio is as follows:
Create an agent in Copilot Studio.
Create a topic in Bot Framework Composer.
Configure the greeting topic in Copilot Studio.
Configure the transfer to agent node by using the escalate topic.
Configure workstreams and queues.
Verify the multilingual agent.
Note
The new multilingual chatbots aren't currently supported in Omnichannel for Customer Service.
Prerequisites
- You must install Bot Framework Composer locally on the computer that you'll use to configure the multilingual bot.
- Your agent must be registered in the Azure app registration page. Note the application ID. Learn more in Create an app registration.
Create an agent in Copilot Studio
You'll create an agent in Copilot Studio by selecting the environment in which Omnichannel for Customer Service is configured. For detailed instructions, go to Create an agent.
For example, you can create an agent with the following details:
- Name: A descriptive name for the agent, such as Greeter bot.
- Language: The primary language for the agent, such as English (US).
- Environment: The environment where Omnichannel for Customer Service is configured, such as contoso-printers.
Create a topic in Bot Framework Composer
In Copilot Studio, for the agent that you created, select Topics in the site map, and then in the Topics pane, select the dropdown arrow for New topic. A message appears stating that the application is trying to open Bot Framework Composer. Learn more about how to navigate the Bot Framework Composer in: Tutorial: Create a weather bot with composer.
Select Open, and on the Import your bot to new project dialog that appears, enter the following details:
- Name: A name for the project, such as Multilingual bot.
- Location: Select a folder on the computer.
In Bot Framework Composer, select More commands (...), select Add a dialog, and enter the following details:
- Name: A name such as PVA greeter dialog.
- Description: A brief description.
In the site map, select BeginDialog, select the Add (+) node, and then select Send a response.
In the Bot responses section, select the Add (+) node, and then select Speech.
Select Add alternative, and then add the following text.
<speak version="1.0" xmlns="http://www.w3.org/2001/10/synthesis" xml:lang="en-US"><voice name="en-US-AriaNeural"><lang xml:lang="en-US">Hello ${virtualagent.msdyn_CustomerName}. Welcome to contoso customer support.</lang></voice></speak>Note
The ${virtualagent.msdyn_CustomerName} variable provides the customer name for authenticated customers only through record identification. Learn more in Identify customers automatically
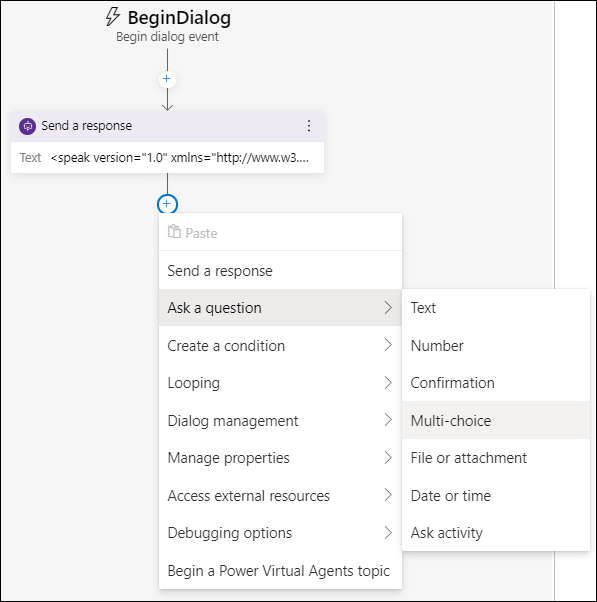
Select the Add (+) node in BeginDialog, point to Ask a question, and then select Multi-choice.

Repeat steps a and b to add the following text.
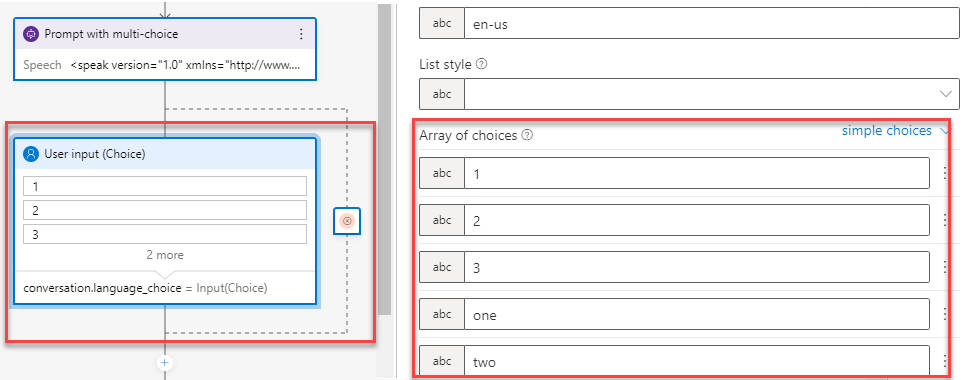
<speak version="1.0" xmlns="http://www.w3.org/2001/10/synthesis" xml:lang="en-US"><voice name="en-US-AriaNeural"><lang xml:lang="en-US">Press or say 1 for English.</lang><break strength="medium"/><lang xml:lang="fr-FR"> Appuyez ou dites 2 pour le français.</lang><break strength="medium"/><lang xml:lang="pt-PT">Pressione 3 para português.</lang></voice></speak>Select the User input box, and enter the following details on the rightmost pane:
- Property: conversation.language_choice
- Array of choices: 1, 2, 3, one, two, three, un, deux, trois, um, dois, três
In Array of choices, specify one choice per expression.

Select the Add (+) node, select Create a condition, and then select Branch Switch (multiple options). Enter the following details:
Condition: conversation.language_choice
Value: 1, 2, 3, One, Two, Three, Un, deux, trois, Um, dois, três
Enter one choice per value.
Select the Add (+) node and then select Manage properties > Set a property and enter the following details:
- Condition: virtualagent.va_CustomerLocale
- Value: en-US
Repeat the steps to Set a property for fr-FR, pt-PT, hi-IN.

The value for the virtualagent.va_CustomerLocale variable will be updated with the language selected by the customer.
Note
You must set the va_CustomerLocale context variable with the locale codes for the languages that you want to support. Learn more in Supported locations and locale codes
Select the Add (+) node, and then select Begin a Power Virtual Agent topic.
In Dialog name, select Escalate.
In the site map, select Publish, and then select Publishing profile.
Select Edit, and then select Login to proceed.
Select the environment and agent, and then select Save.
Select tPublish, select the agent, and then select Publish selected bots.
Select Okay .
In Copilot Studio, refresh Topics. You'll see the topic listed.
Select Publish.
Finish set up in Copilot Studio
- Configure the greeting topic and the escalate topic.
- Configure handoff to Dynamics 365 Customer Service.
Configure workstreams and queues
Use the information in the following articles to configure a voice workstream and a voice queue, and their routing rules.
For example, ensure the following settings:
Configure three voice queues—one each for English, French, and Portuguese—and add the required agents.
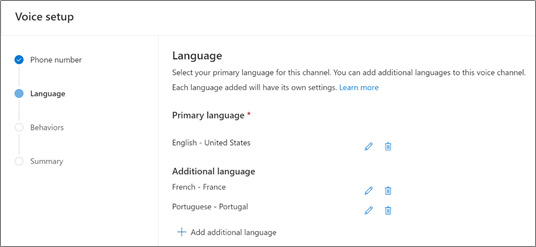
Configure a voice workstream with English as the primary language, and French and Portuguese as additional languages.

In the route to queues rule set of the workstream, use Conversation.CustomerLanguage as the criteria to route the incoming call to different language queues based on the option that's selected by the customer.

In the Bot area of the workstream, edit to add the Copilot Studio agent that you configured.
Verify the multilingual agents
As a customer, call the number that's registered with the voice workstream.
When you're prompted with an interactive voice response (IVR) message, select a language. Verify that the agent routes the call to an agent who can speak with you in the language that you've selected.
Related information
Set up a multilingual contact center
Integrate a Copilot Studio bot