Track website visits, social media clicks, and banner clicks
Important
This article only applies to outbound marketing, which will be removed from the product on June 30, 2025. To avoid interruptions, transition to real-time journeys before this date. More information: Transition overview
Dynamics 365 Customer Insights - Journeys provides several ways to help you get to know your potential customers and to see how they interact with your various marketing initiatives. We've already mentioned that you can see when email recipients open a message or select a message link—and when new or existing contacts submit a form from a marketing page. You've also seen that these actions can affect lead scores and the way contacts flow through your customer journeys.
In addition to these activities, you can also store information, view analytics, and score leads based on:
- How known contacts and anonymous visitors use your website.
- How known contacts and anonymous visitors select links you put in social posts, banner ads, and elsewhere.
In this exercise, we'll look into how to set up website and click tracking.
Set up website tracking and read results
Customer Insights - Journeys can collect information about how your website is used by its individual visitors. To enable the feature, Customer Insights - Journeys generates JavaScript code that you must add to each page that you want to monitor (usually an admin would do this site-wide by using your CMS system). The JavaScript uses cookies to record each page that an individual browser requests from your website. Visitors will remain anonymous until they register by using a Customer Insights - Journeys landing page.
Each such JavaScript that you generate with Customer Insights - Journeys includes a unique ID, which the system uses to group all visits to pages that have that script on them. Customer Insights - Journeys considers all visits to a matching ID to be part of the same website. Many organizations will use just one JavaScript, but you could also choose to generate several different ones if you prefer to organize various sites (or parts of sites) independently of the others.
To set up page analytics for a new website:
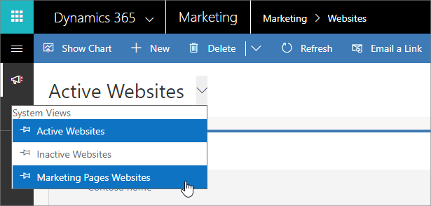
Go to Outbound marketing > Internet Marketing > Marketing websites. You now see a list of existing websites. Make sure you don't already have one set up for your site.
On the command bar, select New. The New Website page opens.

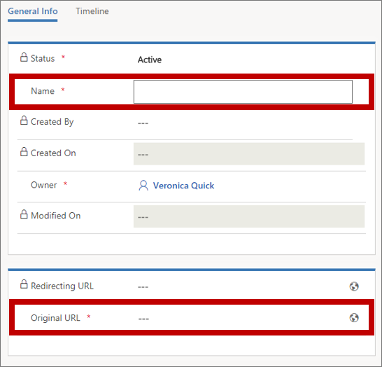
Enter a Name to identify the website (or partial website) that you want to track. A URL and Description might help other users but won't affect the script or its functionality.
Tip
The Timeout setting enables closely grouped visits from a single browser to be recorded as a single session. A new session will start after this period of inactivity from a given browser. The default, 20 minutes, is usually a good value.
On the command bar, select Save.
The page saves your settings and then is reloaded to include code in the JavaScript code field. Copy this code (be sure to select all of it) and share it with your webmaster to ensure it gets placed on each relevant page of your website.
To see your website analytics, go to Outbound marketing > Internet Marketing > Marketing websites and open the website you want to learn about. Here you'll find lists of most-visited pages, geographical information about where people who visit your site come from, and more. Explore the various tabs offered here for more details about how visitors are using your site. The JavaScript code also remains available here in case you need to add it to more pages.
Tip
Each marketing page that you publish from Customer Insights - Journeys automatically includes its own unique JavaScript tracking code and therefore appears on the Marketing websites list page as a discrete website. To view analytics of any of these pages, go to the Marketing websites list view and open its Marketing Pages Websites view.

Set up trackable links with redirect URLs and read results
Customer Insights - Journeys can generate redirect URLs for you. Each redirect URL targets your Customer Insights - Journeys server, which logs the click and then immediately redirects the user to the expected content. This enables you to log clicks on links that you put into social media posts, banner ads, forums, and elsewhere. This information can help you choose the best channels for getting your message out. These records are also mapped to specific contacts when possible (usually because they have submitted a marketing form and therefore have a cookie set in their browser).
To compare the traffic you generate for different channels or campaigns, you should set up a unique redirect URL for each channel and/or campaign where you want to track link clicks. For example, use one redirect URL for links you put on Twitter, another one for Facebook, and another one for banner ads. Then you could see which of these channels produced the most clicks by comparing the related redirect URLs.
To create a redirecting URL:
Go to Outbound marketing > Internet Marketing > Redirect URLs. You now see a list of existing redirect URLs.
On the command bar, select New. The New Redirect URL page opens.

Enter the following:
- Name: Enter an internal name for the redirect URL. If you use this feature often, you should come up with a naming convention that will make it easy to find the right record when you want to come back and view results, for example "Twitter spring campaign" or "LinkedIn banner".
- Original URL: Enter the full URL for the page the redirect URL will target. This is the page that users will actually be expecting when they select the link.
On the command bar, select Save. The page is reloaded with an autogenerated link in the Redirecting URL field. Copy and use this version of the URL in your communications as needed.
To see usage statistics about one of your redirect URLs, go to Outbound marketing > Internet Marketing > Redirect URLs and open the link you want to learn about. The General info tab shows a map of where the clicks occurred, and the Timeline tab provides a list of when each click occurred. Redirect URL interactions are also shown on the Insights form views for leads and contacts for those clicks that the system was able to associate with a lead or contact, which requires a cookie (as described earlier for website tracking).
Important
Many countries/regions (including the European Union) require that you get consent before setting a cookie on a user's machine. It is your organization's responsibility to be aware of, and conform to, all relevant laws and regulations in the markets where you operate, including consent to set cookies. You can read more about the EU regulations at ec.europa.eu/ipg/basics/legal/cookies/. Dynamics 365 Customer Insights - Journeys uses cookies in the following ways:
- Marketing pages created and hosted by Customer Insights - Journeys use cookies to enable the pre-fill feature for known contacts, and to log when any contact opens a marketing page. Customer Insights - Journeys pages and page templates do not include a cookie-consent feature, so you must add it. One way to do this is by adding JavaScript to the
<head>section of your pages using the HTML editor of the page designer. You could develop your own JavaScript or use one of the many free or licensed solutions already available. You could also use the built-in privacy statement for marketing pages to announce your use of cookies; however, this might not be sufficient in all jurisdictions because it won't stop the server from setting the cookie—it just informs visitors that cookies are being used (for more information about this feature, see Configure landing pages. More information: Create and deploy marketing pages - The websites feature uses cookies to log visits to any web page where you place the tracking script. Cookies work together with the marketing-pages feature to identify contacts by matching the visitor IDs to landing-page submissions. If your website already uses cookies and includes a consent feature, then it probably covers the Customer Insights - Journeys website script. However, if you don't have cookie consent built into your website, you must add it before adding the website script to pages that market to residents of relevant countries/regions. More information: Register link clicks and website visits
- The event portal uses a session cookie to enable contacts to sign in and register for events. More information: Set up the event portal. Additionally, it uses cookies to store the user's language.
More information: How Customer Insights - Journeys uses cookies