Use Microsoft Defender for Endpoint Security Settings Management to manage Microsoft Defender Antivirus
Applies to:
- Microsoft Defender XDR
- Microsoft Defender for Endpoint Plan 2
- Microsoft Defender for Endpoint Plan 1
Platforms
- Windows
- Windows Server
- macOS
- Linux
Use the Microsoft Defender for Endpoint Security Settings Management to manage Microsoft Defender Antivirus security policies on devices.
Prerequisites:
Review the prerequisites here.
Note
The Endpoint Security Policies page in the Microsoft Defender portal is available only for users with the Security Administrator role assigned. Any other user role, such as Security Reader, can't access the portal. When a user has the required permissions to view policies in the Microsoft Defender portal, the data is presented based on Intune permissions. If the user is in the scope for Intune role-based access control, it applies to the list of policies presented in the Microsoft Defender portal. We recommend granting security administrators with the Intune built-in role, "Endpoint Security Manager" to effectively align the level of permissions between Intune and the Microsoft Defender portal.
As a security administrator, you can configure different Microsoft Defender Antivirus security policy settings in the Microsoft Defender portal.
Important
Microsoft recommends that you use roles with the fewest permissions. This helps improve security for your organization. Global Administrator is a highly privileged role that should be limited to emergency scenarios when you can't use an existing role.
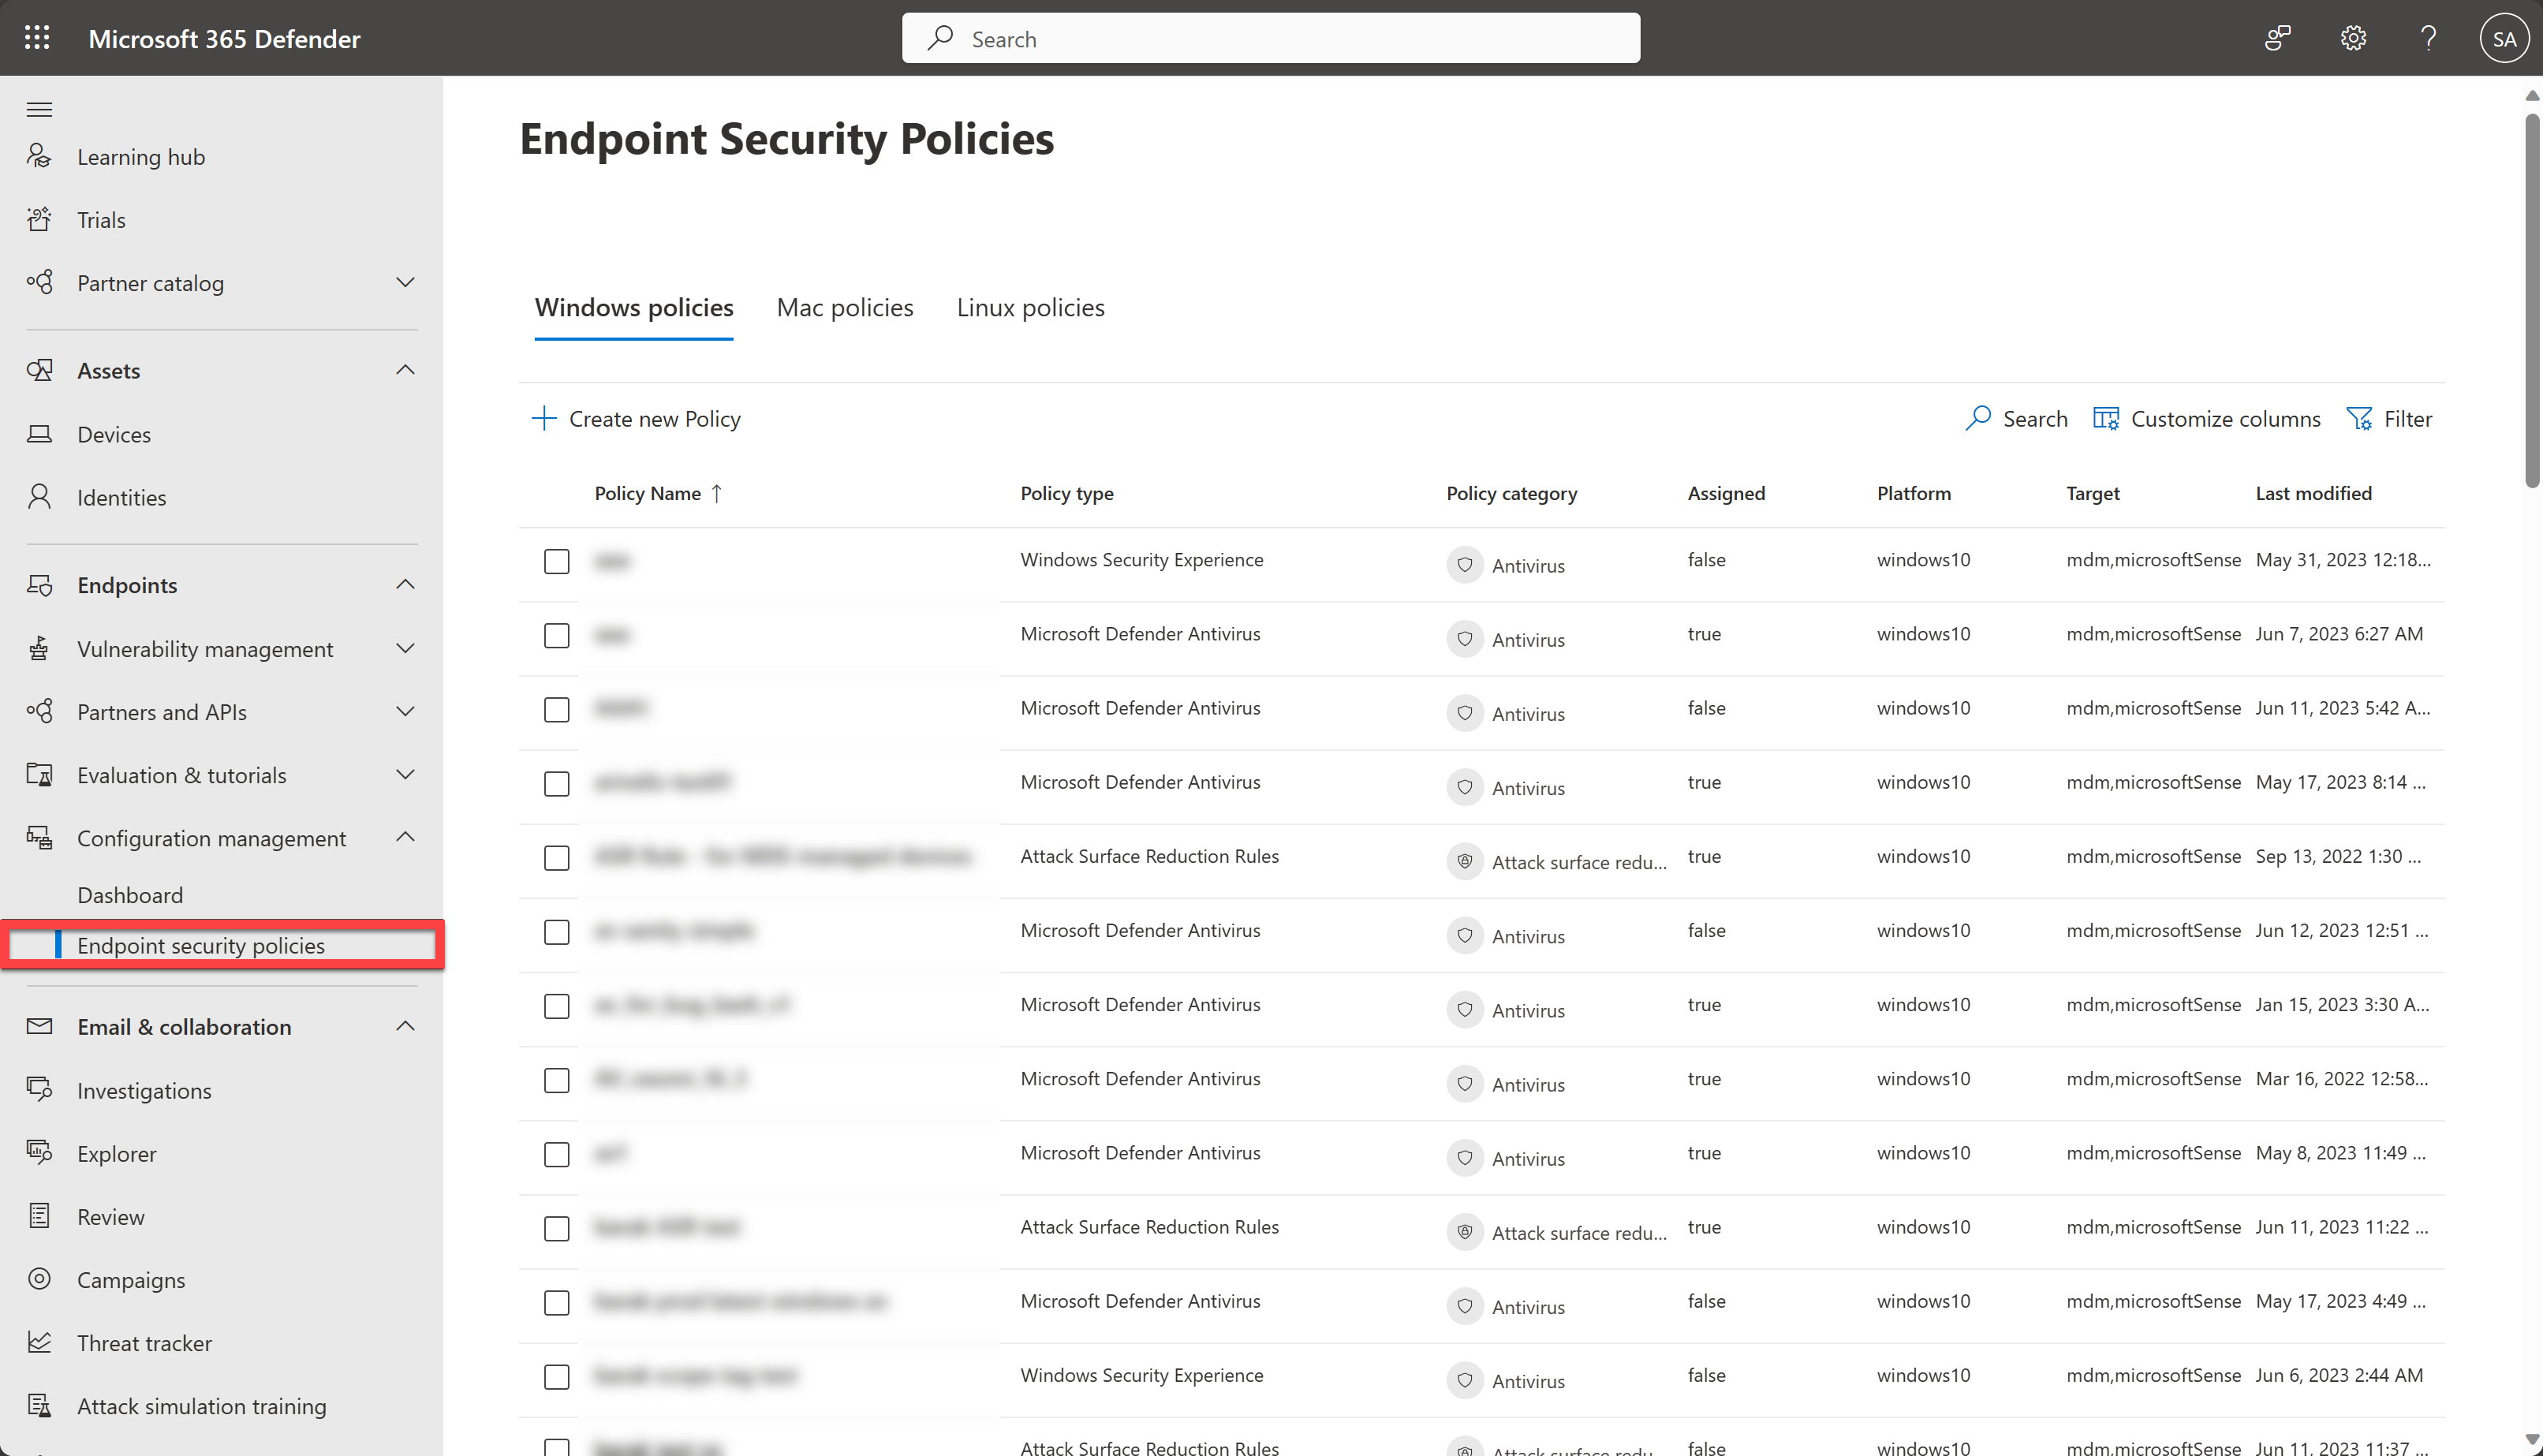
You'll find endpoint security policies under Endpoints > Configuration management > Endpoint security policies.
The following list provides a brief description of each endpoint security policy type:
Antivirus - Antivirus policies help security admins focus on managing the discrete group of antivirus settings for managed devices.
Disk encryption - Endpoint security disk encryption profiles focus on only the settings that are relevant for a devices built-in encryption method, like FileVault or BitLocker. This focus makes it easy for security admins to manage disk encryption settings without having to navigate a host of unrelated settings.
Firewall - Use the endpoint security Firewall policy in Intune to configure a devices built-in firewall for devices that run macOS and Windows 10/11.
Endpoint detection and response - When you integrate Microsoft Defender for Endpoint with Intune, use the endpoint security policies for endpoint detection and response (EDR) to manage the EDR settings and onboard devices to Microsoft Defender for Endpoint.
Attack surface reduction - When Microsoft Defender Antivirus is in use on your Windows 10/11 devices, use Intune endpoint security policies for attack surface reduction to manage those settings for your devices.
Create an endpoint security policy
Sign in to the Microsoft Defender portal using at least a Security Administrator role.
Select Endpoints > Configuration management > Endpoint security policies and then select Create new Policy.
Select a platform from the dropdown list.
Select a template, then select Create policy.
On the Basics page, enter a name and description for the profile, then choose Next.
On the Settings page, expand each group of settings, and configure the settings you want to manage with this profile.
When you're done configuring settings, select Next.
On the Assignments page, select the groups that receive this profile.
Select Next.
On the Review + create page, when you're done, select Save. The new profile is displayed in the list when you select the policy type for the profile you created.
Note
To edit the scope tags, you'll need to go to the Microsoft Intune admin center.
To edit an endpoint security policy
Select the new policy, and then select Edit.
Select Settings to expand a list of the configuration settings in the policy. You can't modify the settings from this view, but you can review how they're configured.
To modify the policy, select Edit for each category where you want to make a change:
- Basics
- Settings
- Assignments
After you've made changes, select Save to save your edits. Edits to one category must be saved before you can introduce edits to more categories.
Verify endpoint security policies
To verify that you have successfully created a policy, select a policy name from the list of endpoint security policies.
Note
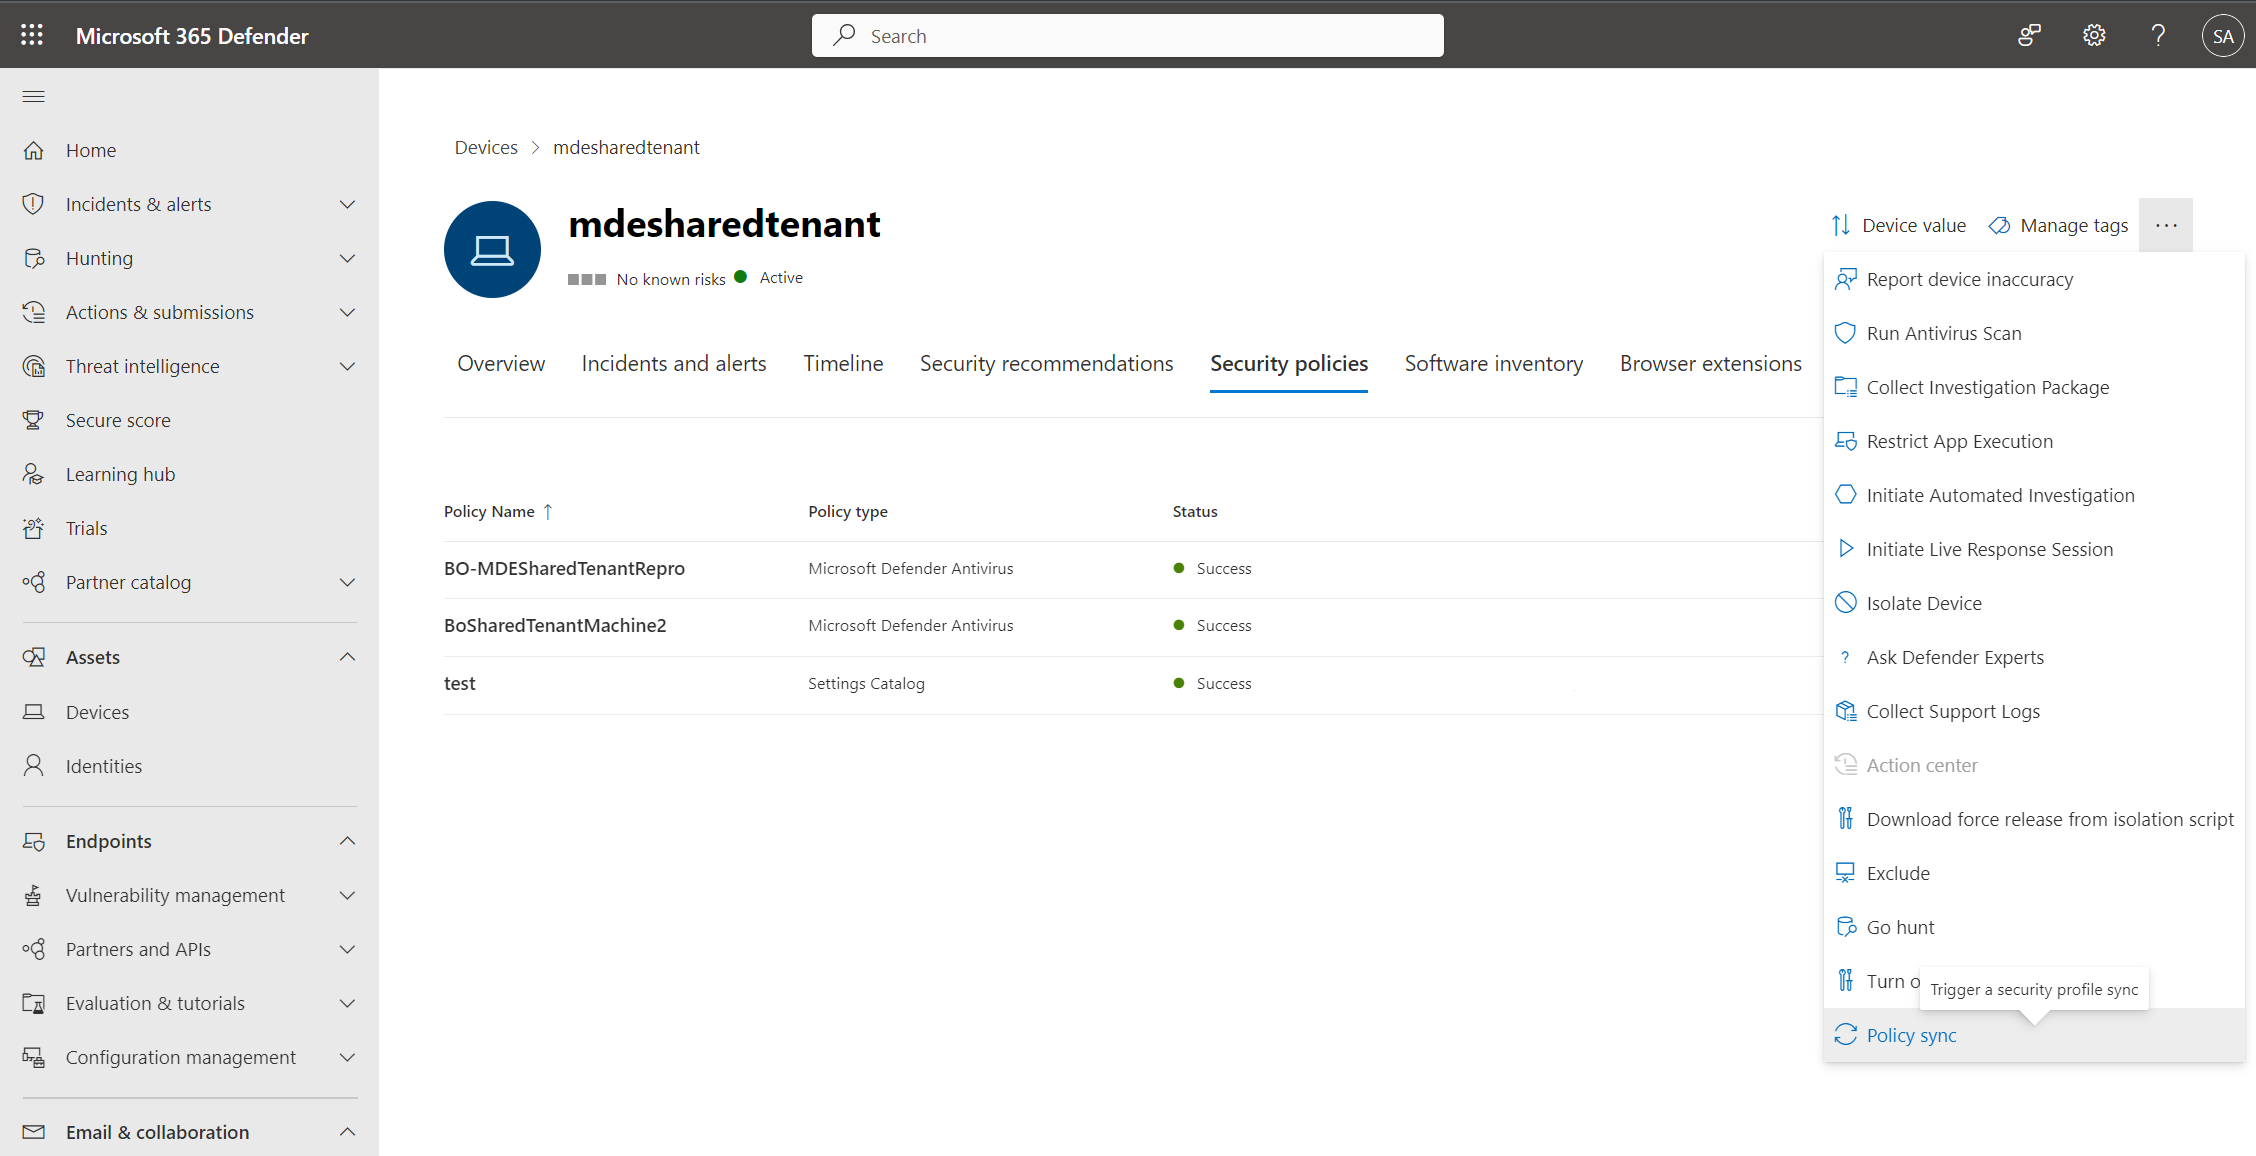
It can take up to 90 minutes for a policy to reach a device. To speed up the process, for devices Managed by Defender for Endpoint, you can select Policy sync from the actions menu so that it's applied in approximately 10 minutes.
The policy page displays details that summarize the status of the policy. You can view a policy's status, which devices it is applied to, and assigned groups.
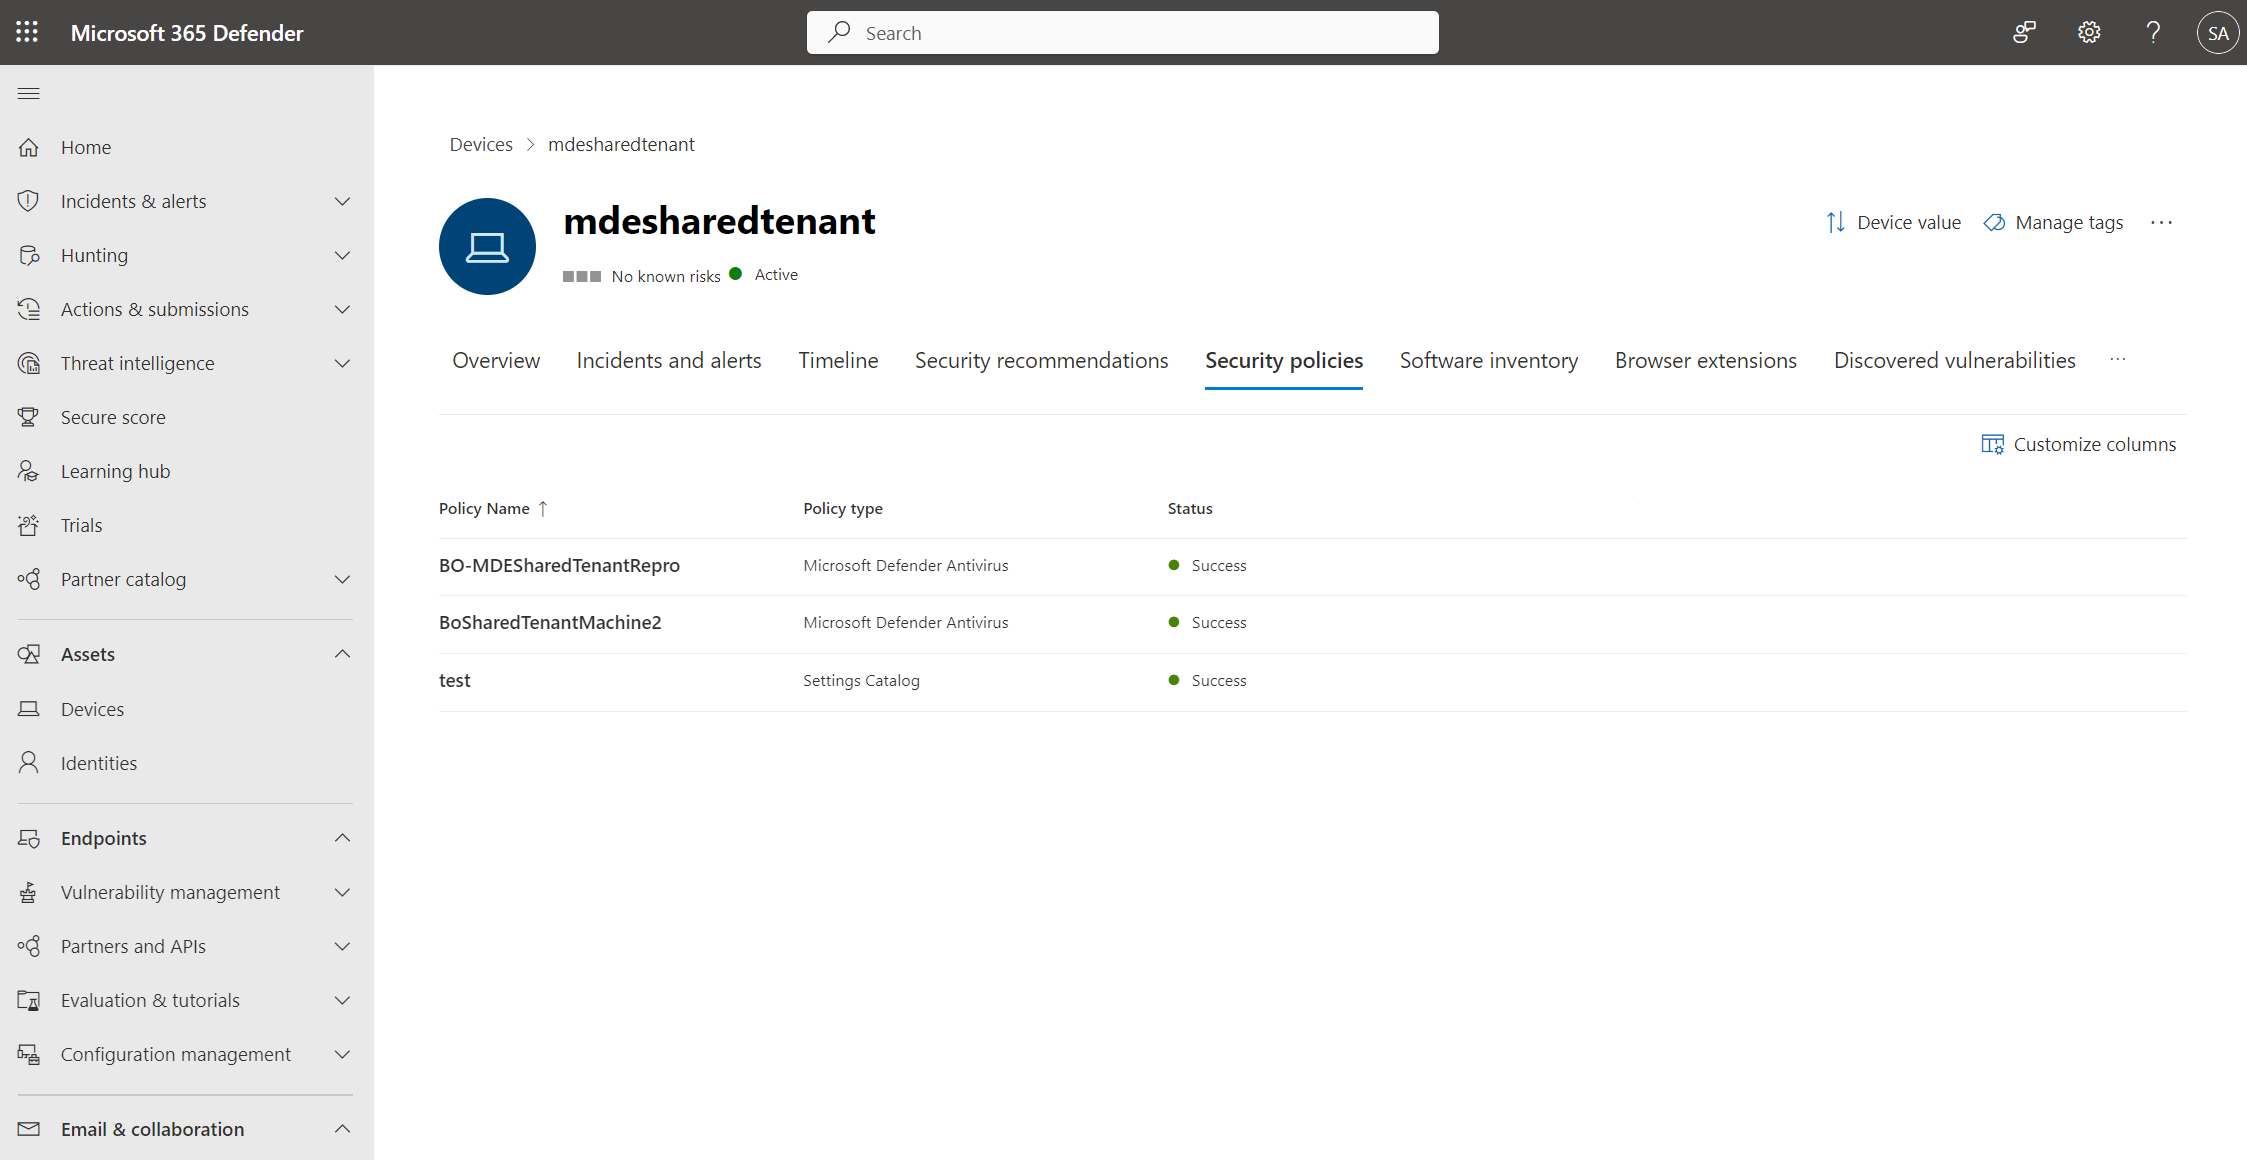
During an investigation, you can also view the Security policies tab in the device page to view the list of policies that are being applied to a particular device. For more information, see Investigating devices.
Antivirus policies for Windows and Windows Server
Real-time Protection (Always-on protection, real-time scanning):
| Description | Settings |
|---|---|
| Allow real-time Monitoring | Allowed |
| Real Time Scan Direction | Monitor all files (bi-directional) |
| Allow Behavior Monitoring | Allowed |
| Allow On Access Protection | Allowed |
| PUA Protection | PUA Protection on |
For more information, see:
- Advanced technologies at the core of Microsoft Defender Antivirus
- Enable and configure Microsoft Defender Antivirus always-on protection
- Behavior monitoring in Microsoft Defender Antivirus
- Detect and block potentially unwanted applications
- Cloud protection features:
| Description | Setting |
|---|---|
| Allow Cloud Protection | Allowed |
| Cloud Block Level | High |
| Cloud Extended time-out | Configured, 50 |
| Submit Samples Consent | Send all samples automatically |
Standard security intelligence updates can take hours to prepare and deliver; our cloud-delivered protection service delivers this protection in seconds. For more information, see Use next-gen technologies in Microsoft Defender Antivirus through cloud-delivered protection.
Scans:
| Description | Setting |
|---|---|
| Allow Email Scanning | Allowed |
| Allow scanning of all downloaded files and attachments | Allowed |
| Allow Script Scanning | Allowed |
| Allow Archive Scanning | Allowed |
| Allow Scanning Network Files | Allowed |
| Allow Full Scan Removable Drive Scanning | Allowed |
| Allow Full Scan On Mapped Network Drives | Not Allowed |
| Archive Max Depth | Not configured |
| Archive Max Size | Not configured |
For more information, see Configure Microsoft Defender Antivirus scanning options.
Security Intelligence updates:
| Description | Setting |
|---|---|
| Signature Update Interval | Configured, 4 |
| Signature Update Fallback Order | InternalDefinitionUpdateServer |
| MicrosoftUpdateServer | MMPC |
| Signature Update File Shares Sources | Not configured |
| Metered Connection Updates | Not allowed (default) |
| Security Intelligence Updates Channel | Not configured |
Note
Where: 'InternalDefinitionUpdateServer' is WSUS with Microsoft Defender Antivirus updates allowed. 'MicrosoftUpdateServer' is Microsoft Update (formerly Windows Update). 'MMPC' is Microsoft Defender security intelligence center (WDSI formerly Microsoft Malware Protection Center) https://www.microsoft.com/en-us/wdsi/definitions.
For more information, see:
- Microsoft Defender Antivirus security intelligence and product updates
- Update channels for security intelligence updates
Engine updates:
| Description | Setting |
|---|---|
| Engine Updates Channel | Not configured |
For more information, see Manage the gradual rollout process for Microsoft Defender updates.
Platform updates:
| Description | Setting |
|---|---|
| Platform Updates Channel | Not configured |
For more information, see Manage the gradual rollout process for Microsoft Defender updates.
Scheduled scan and On-Demand scan:
General settings for Scheduled scan and On-Demand scan
| Description | Setting |
|---|---|
| Check For Signatures Before Running Scan | Disabled (Default) |
| Randomize Schedule Task Times | Not configured |
| Scheduler Randomization Time | Scheduled tasks won't be randomized |
| Avg CPU Load Factor | Not Configured (Default, 50) |
| Enable Low CPU Priority | Disabled (Default) |
| Disable Catchup Full Scan | Enabled (Default) |
| Disable Catchup Quick Scan | Enabled (Default) |
Daily Quick Scan
| Description | Setting |
|---|---|
| Schedule Quick Scan Time | 720 |
Note
In this example, a quick scan runs daily on the Windows clients at 12:00 PM. (720). In this example, we use lunch time, since many devices nowadays are turned off after-hours (e.g laptops).
Weekly Quick Scan or Full Scan
| Description | Setting |
|---|---|
| Scan Parameter | Quick scan (Default) |
| Schedule Scan Day | Windows Clients: Wednesday Windows Servers: Saturday |
| Schedule Scan Time | Windows Clients: 1020 Windows Servers: 60 |
Note
In this example, a quick scan runs for Windows clients on Wednesday's at 5:00 PM. (1020). And for Windows Servers, on Saturday's at 1:00 AM. (60)
For more information, see:
- Configure scheduled quick or full Microsoft Defender Antivirus scans
- Microsoft Defender Antivirus full scan considerations and best practices
Threat severity default action:
| Description | Setting |
|---|---|
| Remediation action for High severity threats | Quarantine |
| Remediation action for Severe threats | Quarantine |
| Remediation action for Low severity threats | Quarantine |
| Remediation action for Moderate severity threats | Quarantine |
| Description | Setting |
|---|---|
| Days To Retain Cleaned Malware | Configured, 60 |
| Allow User UI Access | Allowed. Let users access UI. |
For more information, see Configure remediation for Microsoft Defender Antivirus detections.
Antivirus exclusions:
Local administrator merge behavior:
Disable local administrator AV settings such as exclusions, and set the policies from the Microsoft Defender for Endpoint Security Settings Management as described in the following table:
| Description | Setting |
|---|---|
| Disable Local Admin Merge | Disable Local Admin Merge |
| Description | Setting |
|---|---|
| Excluded Extensions | Add as needed for working around false positives (FPs) and/or troubleshooting high cpu utilizations in MsMpEng.exe |
| Excluded Paths | Add as needed for working around false positives (FPs) and/or troubleshooting high cpu utilizations in MsMpEng.exe |
| Excluded Processes | Add as needed for working around false positives (FPs) and/or troubleshooting high cpu utilizations in MsMpEng.exe |
For more information, see:
- Prevent or allow users to locally modify Microsoft Defender Antivirus policy settings
- Configure custom exclusions for Microsoft Defender Antivirus
Microsoft Defender Core service:
| Description | Setting |
|---|---|
| Disable Core Service ECS Integration | The Defender core service uses the Experimentation and Configuration Service (ECS) to rapidly deliver critical, org-specific fixes. |
| Disable Core Service Telemetry | The Defender core service uses the OneDsCollector framework to rapidly collect telemetry. |
For more information, see Microsoft Defender Core service overview.
Network Protection:
| Description | Setting |
|---|---|
| Enable Network Protection | Enabled (block mode) |
| Allow Network Protection Down Level | Network protection is enabled downlevel. |
| Allow Datagram Processing On Win Server | Datagram processing on Windows Server is enabled. |
| Disable DNS over TCP parsing | DNS over TCP parsing is enabled. |
| Disable HTTP parsing | HTTP parsing is enabled. |
| Disable SSH parsing | SSH parsing is enabled. |
| Disable TLS parsing | TLS parsing is enabled. |
| Enable DNS Sinkhole | DNS Sinkhole is enabled. |
For more information, see Use network protection to help prevent connections to malicious or suspicious sites.
- When you're done configuring settings, select Next.
- On the Assignments tab, select Device Group or User Group or All devices or All Users.
- Select Next.
- On the Review + create tab, review your policy settings, and then select Save.
Attack Surface Reduction rules
To enable Attack Surface Reduction (ASR) rules using the endpoint security policies, perform the following steps:
Sign in to Microsoft Defender XDR.
Go to Endpoints > Configuration management > Endpoint security policies > Windows policies > Create new policy.
Select Windows 10, Windows 11, and Windows Server from the Select Platform drop-down list.
Select Attack Surface Reduction Rules from the Select Template drop-down list.
Select Create policy.
On the Basics page, enter a name and description for the profile; then, choose Next.
On the Configuration settings page, expand the groups of settings and configure the settings that you want to manage with this profile.
Set the policies based on the following recommended settings:
Description Setting Block executable content from email client and webmail Block Block Adobe Reader from creating child processes Block Block execution of potentially obfuscated scripts Block Block abuse of exploited vulnerable signed drivers (Device) Block Block Win32 API calls from Office macros Block Block executable files from running unless they meet a prevalence, age, or trusted list criterion Block Block Office communication application from creating child processes Block Block all Office applications from creating child processes Block [PREVIEW] Block use of copied or impersonated system tools Block Block JavaScript or VBScript from launching downloaded executable content Block Block credential stealing from the Windows local security authority subsystem Block Block Web shell creation for Servers Block Block Office applications from creating executable content Block Block untrusted and unsigned processes that run from USB Block Block Office applications from injecting code into other processes Block Block persistence through WMI event subscription Block Use advanced protection against ransomware Block Block process creations originating from PSExec and WMI commands Block (If you have Configuration Manager (formerly SCCM), or other management tools that use WMI you might need to set this to Audit instead of Block) [PREVIEW] Block rebooting machine in Safe Mode Block Enable Controlled Folder Access Enabled
Tip
Any of the rules might block behavior you find acceptable in your organization. In these cases, add the per-rule exclusions named "Attack Surface Reduction Only Exclusions." Additionally, change the rule from Enabled to Audit to prevent unwanted blocks.
For more information, see Attack surface reduction rules deployment overview.
- Select Next.
- On the Assignments tab, select Device Group or User Group or All devices or All Users.
- Select Next.
- On the Review + create tab, review your policy settings, and then select Save.
Enable Tamper Protection
Sign in to Microsoft Defender XDR.
Go to Endpoints > Configuration management > Endpoint security policies > Windows policies > Create new policy.
Select Windows 10, Windows 11, and Windows Server from the Select Platform drop-down list.
Select Security Experience from the Select Template drop-down list.
Select Create policy. The Create a new policy page appears.
On the Basics page, enter a name and description for the profile in the Name and Description fields, respectively.
Select Next.
On the Configuration settings page, expand the groups of settings.
From these groups, select the settings that you want to manage with this profile.
Set the policies for the chosen groups of settings by configuring them as described in the following table:
Description Setting TamperProtection (Device) On
For more information, see Protect security settings with tamper protection.
Check the Cloud Protection network connectivity
It's important to check that the Cloud Protection network connectivity is working during your penetration testing.
CMD (Run as admin)
cd "C:\Program Files\Windows Defender"
MpCmdRun.exe -ValidateMapsConnection
For more information, see Use the cmdline tool to validate cloud-delivered protection.
Check the platform update version
The latest "Platform Update" version Production channel (GA) is available in Microsoft Update Catalog.
To check which "Platform Update" version you have installed, run the following command in PowerShell using the privileges of an administrator:
Get-MPComputerStatus | Format-Table AMProductVersion
Check the Security Intelligence Update version
The latest "Security Intelligence Update" version is available in Latest security intelligence updates for Microsoft Defender Antivirus and other Microsoft anti-malware - Microsoft Security Intelligence.
To check which "Security Intelligence Update" version you have installed, run the following command in PowerShell using the privileges of an administrator:
Get-MPComputerStatus | Format-Table AntivirusSignatureVersion
Check the Engine Update version
The latest scan "engine update" version is available in Latest security intelligence updates for Microsoft Defender Antivirus and other Microsoft anti-malware - Microsoft Security Intelligence.
To check which "Engine Update" version you have installed, run the following command in PowerShell using the privileges of an administrator:
Get-MPComputerStatus | Format-Table AMEngineVersion
If you find that your settings aren't taking effect, you might have a conflict. For information on how to resolve conflicts, see Troubleshoot Microsoft Defender Antivirus settings.
For False Negatives (FNs) submissions
To information on how to make False Negatives (FNs) submissions, see:
- Submit files in Microsoft Defender for Endpoint if you have Microsoft XDR, Microsoft Defender for Endpoint P2/P1, or Microsoft Defender for Business.
- Submit files for analysis if you have Microsoft Defender Antivirus.


