Quickstart: Create a network security perimeter - Azure CLI
Get started with network security perimeter by creating a network security perimeter for an Azure key vault using Azure CLI. A network security perimeter allows Azure PaaS (PaaS)resources to communicate within an explicit trusted boundary. Next, You create and update a PaaS resources association in a network security perimeter profile. Then you create and update network security perimeter access rules. When you're finished, you delete all resources created in this quickstart.
Important
Network Security Perimeter is in public preview and available in all Azure public cloud regions. This preview version is provided without a service level agreement, and it's not recommended for production workloads. Certain features might not be supported or might have constrained capabilities. For more information, see Supplemental Terms of Use for Microsoft Azure Previews.
Prerequisites
- An Azure account with an active subscription. Create an account for free.
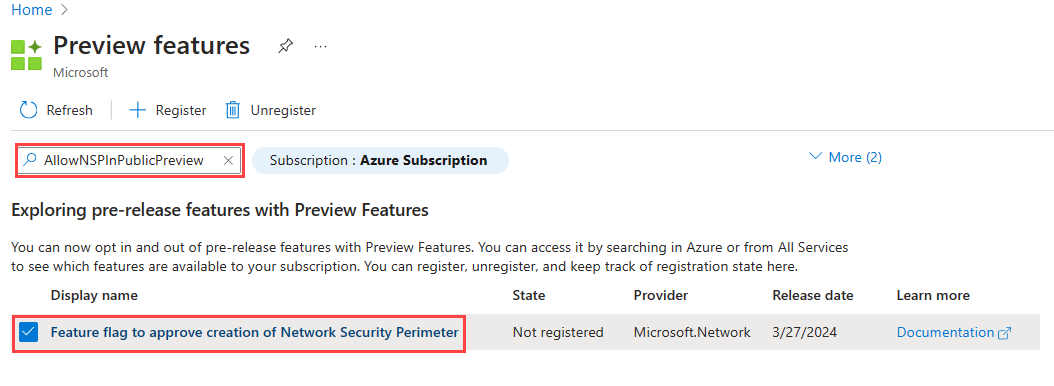
Registration for the Azure Network Security Perimeter public preview is required. To register, add the
AllowNSPInPublicPreviewfeature flag to your subscription.
For more information on adding feature flags, see Set up preview features in Azure subscription.
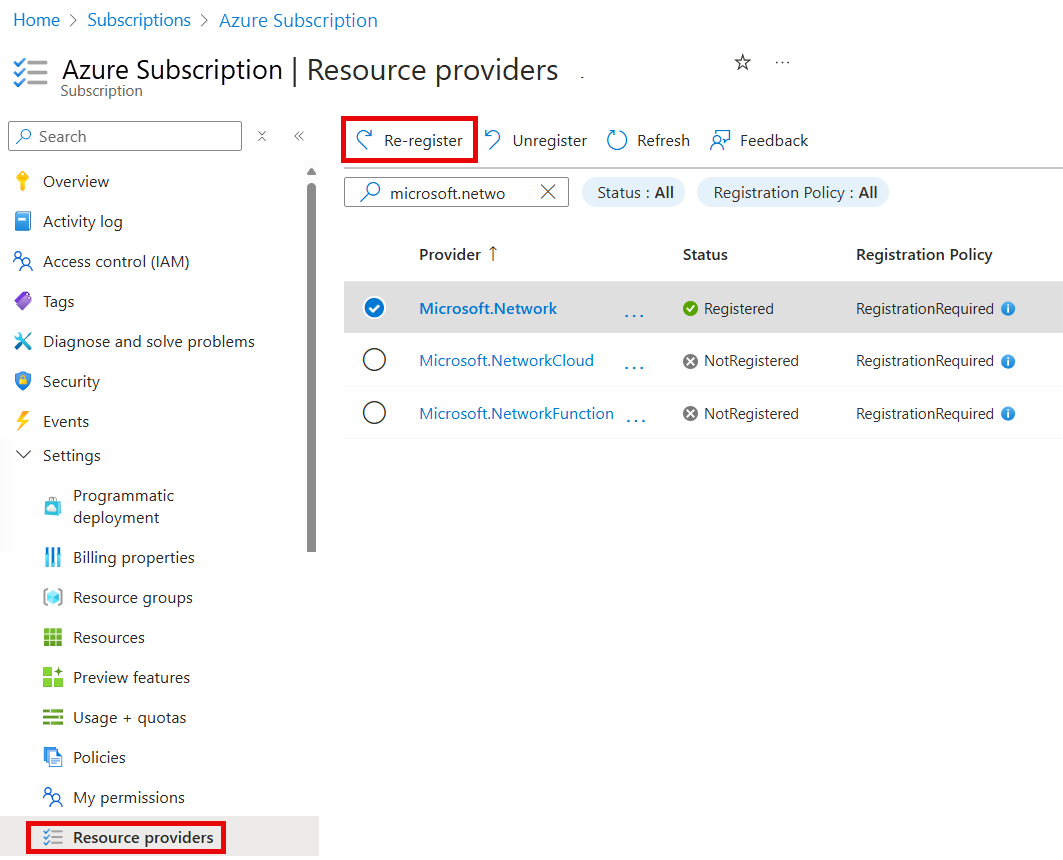
After the feature flag is added, you need to re-register the
Microsoft.Networkresource provider in your subscription.To re-register the
Microsoft.Networkresource provider in the Azure portal, select your subscription, and then select Resource providers. Search forMicrosoft.Networkand select Re-register.
To re-register the
Microsoft.Networkresource provider, use the following Azure PowerShell command:
# Register the Microsoft.Network resource provider
Register-AzResourceProvider -ProviderNamespace Microsoft.Network
To re-register the
Microsoft.Networkresource provider, use the following Azure CLI command:# Register the Microsoft.Network resource provider az provider register --namespace Microsoft.Network
For more information on re-registering resource providers, see Azure resource providers and types.
- The latest Azure CLI, or you can use Azure Cloud Shell in the portal.
- This article requires version 2.38.0 or later of the Azure CLI. If using Azure Cloud Shell, the latest version is already installed.
- After upgrading to the latest version of Azure CLI, import the network security perimeter commands using
az extension add --name nsp.
Use the Bash environment in Azure Cloud Shell. For more information, see Quickstart for Bash in Azure Cloud Shell.
If you prefer to run CLI reference commands locally, install the Azure CLI. If you're running on Windows or macOS, consider running Azure CLI in a Docker container. For more information, see How to run the Azure CLI in a Docker container.
If you're using a local installation, sign in to the Azure CLI by using the az login command. To finish the authentication process, follow the steps displayed in your terminal. For other sign-in options, see Sign in with the Azure CLI.
When you're prompted, install the Azure CLI extension on first use. For more information about extensions, see Use extensions with the Azure CLI.
Run az version to find the version and dependent libraries that are installed. To upgrade to the latest version, run az upgrade.
Connect to your Azure account and select your subscription
To get started, connect to Azure Cloud Shell or use your local CLI environment.
If using Azure Cloud Shell, sign in and select your subscription.
If you installed CLI locally, sign in with the following command:
# Sign in to your Azure account
az login
Once in your shell, select your active subscription locally with the following command:
# List all subscriptions
az account set --subscription <Azure Subscription>

# Re-register the Microsoft.Network resource provider
az provider register --namespace Microsoft.Network
Create a resource group and key vault
Before you can create a network security perimeter, you have to create a resource group and a key vault resource with az group create and az keyvault create.
This example creates a resource group named resource-group in the WestCentralUS location and a key vault named key-vault-YYYYDDMM in the resource group with the following commands:
az group create \
    --name resource-group \
    --location westcentralus

# Create a key vault using a datetime value to ensure a unique name

key_vault_name="key-vault-$(date +%s)"
az keyvault create \
    --name $key_vault_name \
    --resource-group resource-group \
    --location westcentralus \
    --query 'id' \
    --output tsv
Create a network security perimeter
In this step, create a network security perimeter with the az network perimeter create command.
Note
Please don't put any personal identifiable or sensitive data in the network security perimeter rules or other network security perimeter configuration.
az network perimeter create\
    --name network-security-perimeter \
    --resource-group resource-group \
    -l westcentralus
Create and update PaaS resources’ association with a new profile
In this step, you create a new profile and associate the PaaS resource, the Azure Key Vault with the profile using the az network perimeter profile create and az network perimeter association create commands.
Note
For the --private-link-resource and --profile parameter values, replace <PaaSArmId> and <networkSecurityPerimeterProfileId> with the values for the key vault and the profile ID, respectively.
Create a new profile for your network security perimeter with the following command:
# Create a new profile
az network perimeter profile create \
    --name network-perimeter-profile \
    --resource-group resource-group \
    --perimeter-name network-security-perimeter
Associate the Azure Key Vault (PaaS resource) with the network security perimeter profile with the following commands.
# Get key vault id
az keyvault show \
    --name $key_vault_name \
    --resource-group resource-group \
    --query 'id'

# Get the profile id
az network perimeter profile show \
    --name network-perimeter-profile \
    --resource-group resource-group \
    --perimeter-name network-security-perimeter

# Associate the Azure Key Vault with the network security perimeter profile
# Replace <PaaSArmId> and <networkSecurityPerimeterProfileId> with the ID values for your key vault and profile
az network perimeter association create \
    --name network-perimeter-association \
    --perimeter-name network-security-perimeter \
    --resource-group resource-group \
    --access-mode Learning  \
    --private-link-resource "{id:<PaaSArmId>}" \
    --profile "{id:<networkSecurityPerimeterProfileId>}"
Update association by changing the access mode to enforced with the az network perimeter association create command as follows:
az network perimeter association create \
    --name network-perimeter-association \
    --perimeter-name network-security-perimeter \
    --resource-group resource-group \
    --access-mode Enforced  \
    --private-link-resource "{id:<PaaSArmId>}" \
    --profile "{id:<networkSecurityPerimeterProfileId>}"
Manage network security perimeter access rules
In this step, you create, update, and delete a network security perimeter access rules with public IP address prefixes using the az network perimeter profile access-rule create command.
Create an inbound access rule with a public IP address prefix for the profile created with the following command:
# Create an inbound access rule
az network perimeter profile access-rule create \
    --name access-rule \
    --profile-name network-perimeter-profile \
    --perimeter-name network-security-perimeter \
    --resource-group resource-group \
    --address-prefixes "[192.0.2.0/24]"
Update your inbound access rule with another public IP address prefix with the following command:
# Update the inbound access rule
az network perimeter profile access-rule create\
    --name access-rule \
    --profile-name network-perimeter-profile \
    --perimeter-name network-security-perimeter \
    --resource-group resource-group \
    --address-prefixes "['198.51.100.0/24', '192.0.2.0/24']"
If you need to delete an access rule, use the az network perimeter profile access-rule delete command:
# Delete the access rule
az network perimeter profile access-rule delete \
    --Name network-perimeter-association \
    --profile-name network-perimeter-profile \
    --perimeter-name network-security-perimeter \
    --resource-group resource-group
Note
If managed identity is not assigned to the resource which supports it, outbound access to other resources within the same perimeter will be denied. Subscription based inbound rules intended to allow access from this resource will not take effect.
Delete all resources
To delete a network security perimeter and other resources in this quickstart, use the following az network perimeter commands:
    # Delete the network security perimeter association
    az network perimeter association delete \
        --name network-perimeter-association \
        --resource-group resource-group \
        --perimeter-name network-security-perimeter

    # Delete the network security perimeter
    az network perimeter delete \
        --resource-group resource-group \
        --name network-security-perimeter --yes

    # Delete the key vault
    az keyvault delete \
        --name $key_vault_name \
        --resource-group resource-group

    # Delete the resource group
    az group delete \
        --name resource-group \
        --yes \
        --no-wait
Note
Removing your resource association from the network security perimeter results in access control falling back to the existing resource firewall configuration. This may result in access being allowed/denied as per the resource firewall configuration. If PublicNetworkAccess is set to SecuredByPerimeter and the association has been deleted, the resource will enter a locked down state. For more information, see Transition to a network security perimeter in Azure.
