Azure IoT Edge for Linux on Windows virtual multiple NIC configurations
Applies to: ![]() IoT Edge 1.5
IoT Edge 1.5 ![]() IoT Edge 1.4
IoT Edge 1.4
Important
IoT Edge 1.5 LTS and IoT Edge 1.4 LTS are supported releases. IoT Edge 1.4 LTS is end of life on November 12, 2024. If you are on an earlier release, see Update IoT Edge.
By default, the Azure IoT Edge for Linux on Windows (EFLOW) virtual machine has a single network interface card (NIC) assigned. However, you can configure the EFLOW VM with multiple network interfaces by using the EFLOW support for attaching multiple network interfaces to the virtual machine. This functionality may be helpful in numerous scenarios where you may have a networking division or separation into different networks or zones. In order to connect the EFLOW virtual machine to the different networks, you may need to attach different network interface cards to the EFLOW virtual machine.
This article describes how to configure the Azure IoT Edge for Linux on Windows VM to support multiple NICs and connect to multiple networks. This process is divided into the following steps:
- Create and assign a virtual switch
- Create and assign a network endpoint
- Check the VM network configurations
For more information about networking concepts and configurations, see Azure IoT Edge for Linux on Windows Networking and How to configure Azure IoT Edge for Linux on Windows networking.
Prerequisites
- A Windows device with EFLOW already set up. For more information on EFLOW installation and configuration, see Create and provision an IoT Edge for Linux on Windows device using symmetric keys.
- Virtual switch different from the default one used during EFLOW installation. For more information on creating a virtual switch, see Create a virtual switch for Azure IoT Edge for Linux on Windows.
Create and assign a virtual switch
During the EFLOW VM deployment, the VM had a switch assigned for all communications between the Windows host OS and the virtual machine. You always use the switch for VM lifecycle management communications, and it's not possible to delete it.
The following steps in this section show how to assign a network interface to the EFLOW virtual machine. Ensure that the virtual switch and the networking configuration align with your networking environment. For more information about networking concepts like type of switches, DHCP and DNS, see Azure IoT Edge for Linux on Windows networking.
Open an elevated PowerShell session by starting with Run as Administrator.
Check that the virtual switch you assign to the EFLOW VM is available.
Get-VMSwitch -Name "{switchName}" -SwitchType {switchType}Assign the virtual switch to the EFLOW VM.
Add-EflowNetwork -vSwitchName "{switchName}" -vSwitchType {switchType}For example, if you wanted to assign the external virtual switch named OnlineExt, you should use the following command
Add-EflowNetwork -vSwitchName "OnlineExt" -vSwitchType "External"
Check that you correctly assigned the virtual switch to the EFLOW VM.
Get-EflowNetwork -vSwitchName "{switchName}"
For more information about attaching a virtual switch to the EFLOW VM, see PowerShell functions for Azure IoT Edge for Linux on Windows.
Create and assign a network endpoint
Once you successfully assign the virtual switch to the EFLOW VM, create a networking endpoint assigned to virtual switch to finalize the network interface creation. If you're using Static IP, ensure to use the appropriate parameters: ip4Address, ip4GatewayAddress and ip4PrefixLength.
Open an elevated PowerShell session by starting with Run as Administrator.
Create the EFLOW VM network endpoint
If you're using DHCP, you don't need Static IP parameters.
Add-EflowVmEndpoint -vSwitchName "{switchName}" -vEndpointName "{EndpointName}"If you're using Static IP
Add-EflowVmEndpoint -vSwitchName "{switchName}" -vEndpointName "{EndpointName}" -ip4Address "{staticIp4Address}" -ip4GatewayAddress "{gatewayIp4Address}" -ip4PrefixLength "{prefixLength}"For example, if you wanted to create and assign the OnlineEndpoint endpoint with the external virtual switch named OnlineExt, and Static IP configurations (ip4Address=192.168.0.103, ip4GatewayAddress=192.168.0.1, ip4PrefixLenght=24) you should use the following command:
Add-EflowVmEndpoint -vSwitchName "OnlineExt" -vEndpointName "OnlineEndpoint" -ip4Address "192.168.0.103" -ip4GatewayAddress "192.168.0.1" -ip4PrefixLength "24"
Check that you correctly created the network endpoint and assigned it to the EFLOW VM. You should see two network interfaces assigned to the virtual machine.
Get-EflowVmEndpoint
For more information about creating and attaching a network endpoint to the EFLOW VM, see PowerShell functions for Azure IoT Edge for Linux on Windows.
Check the VM network configurations
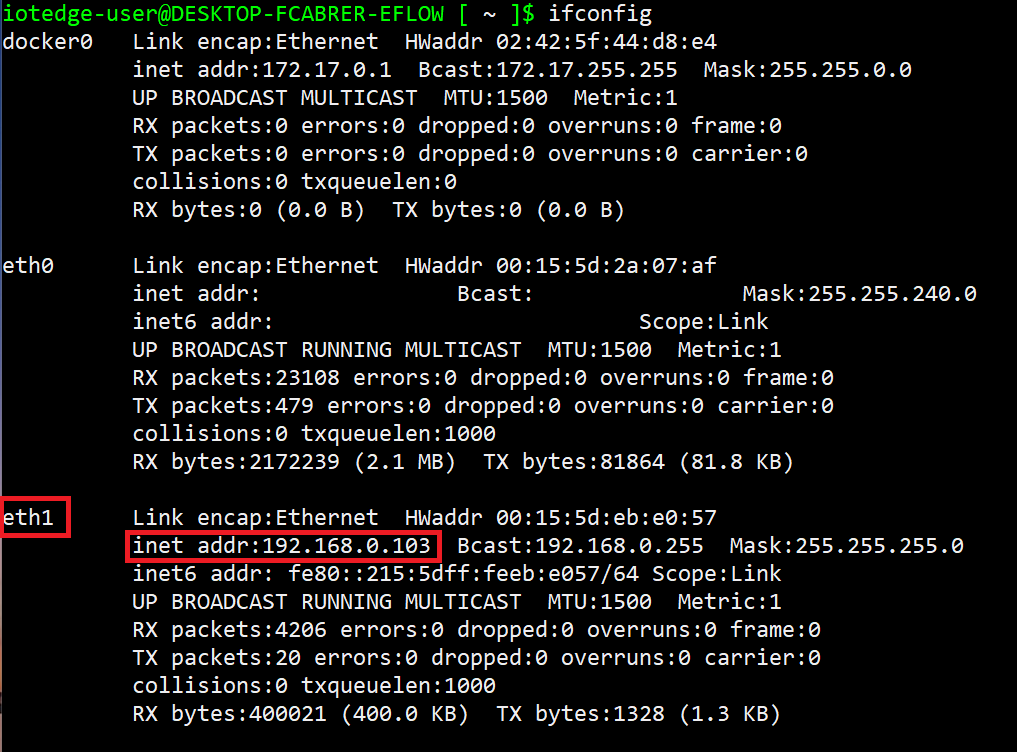
The final step is to make sure the networking configurations applied correctly and the EFLOW VM has the new network interface configured. The new interface shows up as "eth1" if it's the first extra interface added to the VM.
Open PowerShell in an elevated session. You can do so by opening the Start pane on Windows and typing in "PowerShell". Right-click the Windows PowerShell app that shows up and select Run as administrator.
Connect to the EFLOW VM.
Connect-EflowVmOnce inside the VM, check the network interfaces and their configurations using the ifconfig command.
ifconfigThe default interface eth0 is the one used for all the VM management. You should see another interface, like eth1, which is the new interface you assigned to the VM. Following the examples, if you previously assigned a new endpoint with the static IP 192.168.0.103 you should see the interface eth1 with the inet addr: 192.168.0.103.

Next steps
Follow the steps in How to configure networking for Azure IoT Edge for Linux on Windows to make sure you applied all the networking configurations correctly.