Manage billing across multiple tenants using associated billing tenants
You can simplify billing management for your organization by creating multitenant billing relationships using associated billing tenants. A multitenant billing relationship lets you securely share your organization’s billing account with other tenants, while maintaining control over your billing data. You can move subscriptions in different tenants and provide users in those tenants with access to your organization’s billing account. This relationship lets users on those tenants do billing activities like viewing and downloading invoices or managing licenses.
Understand tenant types
Primary billing tenant: The primary billing tenant is the tenant used when the billing account is set up. By default, all subscriptions are created in this tenant and only users from this tenant can get access to the billing account.
Associated billing tenants: An associated billing tenant is a tenant that is linked to your primary billing tenant’s billing account. You can move Microsoft 365 subscriptions to these tenants. You can also assign billing account roles to users in associated billing tenants.
Prerequisites
You must have a Microsoft Customer Agreement - enterprise billing account to use associated billing tenants. An enterprise billing account is a billing account that is created by working with a Microsoft sales representative.
If you don't have one, you don't see the Associated billing tenants option in the Azure portal. You also can't move subscriptions to other tenants or assign roles to users in other tenants.
To learn more about types of billing accounts, see Billing accounts and scopes in the Azure portal.
Access settings for associated billing tenants
When you add an associated billing tenant, you can enable one or both of the following access settings:
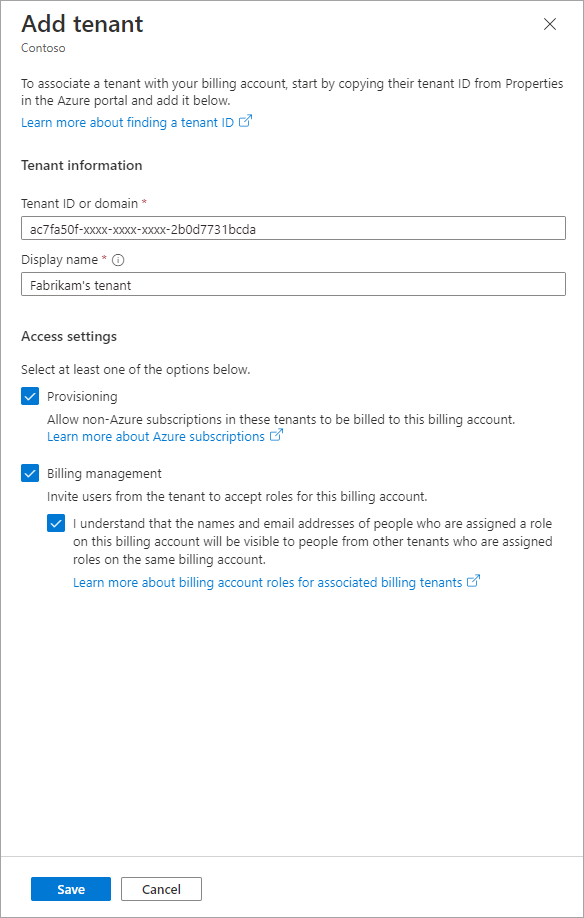
- Billing management: Billing management lets billing account owners assign roles to users in an associated billing tenant, giving them permission to access billing information and make purchasing decisions.
- Provisioning: Provisioning allows you to move Microsoft 365 subscriptions to the associated billing tenants.
Add an associated billing tenant
Before you begin, make sure you have either the tenant ID, or the primary domain name for the tenant you want to add. For more information, see Find a tenant ID or domain name.
Sign in to the Azure portal.
Select Access control (IAM) on the left side of the page.
On the Access control (IAM) page, select Associated billing tenants at the top of the page.
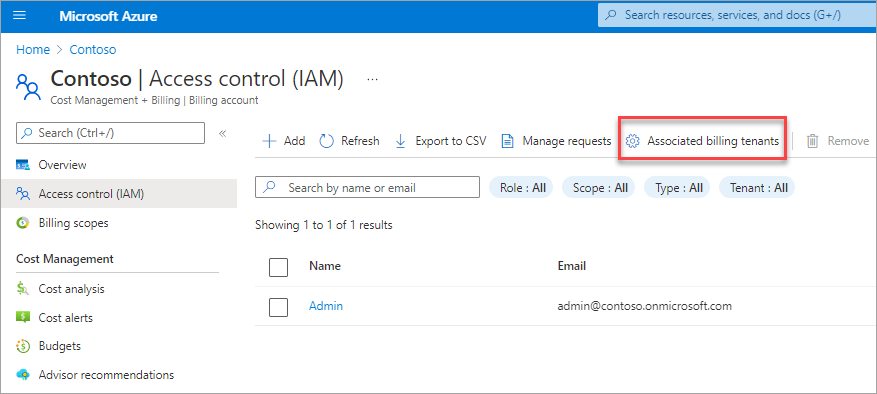
On the Associated billing tenants page, select Add at the top of the page.
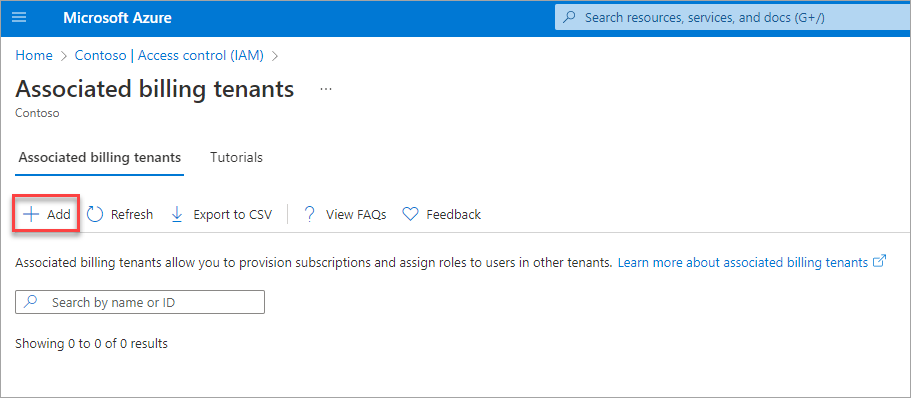
On the Add tenant page, enter a tenant ID or domain name, provide a friendly name and then select one or both options for access settings. For more information about access settings, see Access settings for associated billing tenant.
Note
The Tenant ID is case sensitive.
Note
The friendly name of an associated billing tenant is used to easily identify the tenant in the Cost management + Billing section. The name is different from the display name of the tenant in Microsoft Entra ID.
Select Save.
If the Provisioning access setting is turned on, a unique link is created for you to send to the global administrator of the associated billing tenant. They must accept the request before you can move subscriptions to their tenant.
Assign roles to users from the associated billing tenant
Before assigning roles, make sure you add a tenant as an associated billing tenant and enable billing management access setting.
Important
Any user with a role in the billing account can see all users from all tenants who have access to that billing account. For example, Contoso.com is the primary billing tenant. A billing account owner adds Fabrikam.com as an associated billing tenant. Then, the billing account owner adds User1 as a billing account owner. As a result, User1 can see all users who have access to the billing account on both Contoso.com and Fabrikam.com.
To assign roles and send an email invitation
- Sign in to the Azure portal.
- Search for Cost Management + Billing.
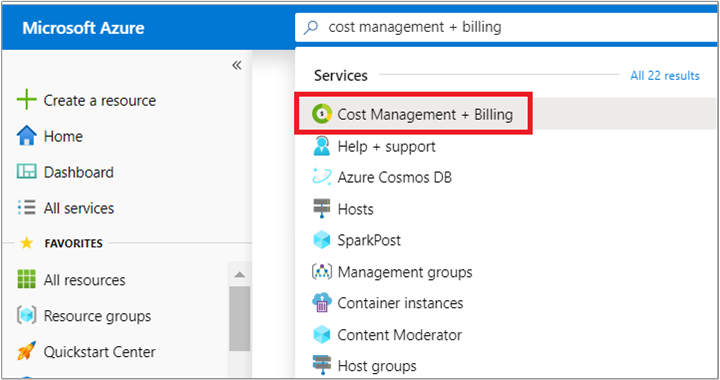
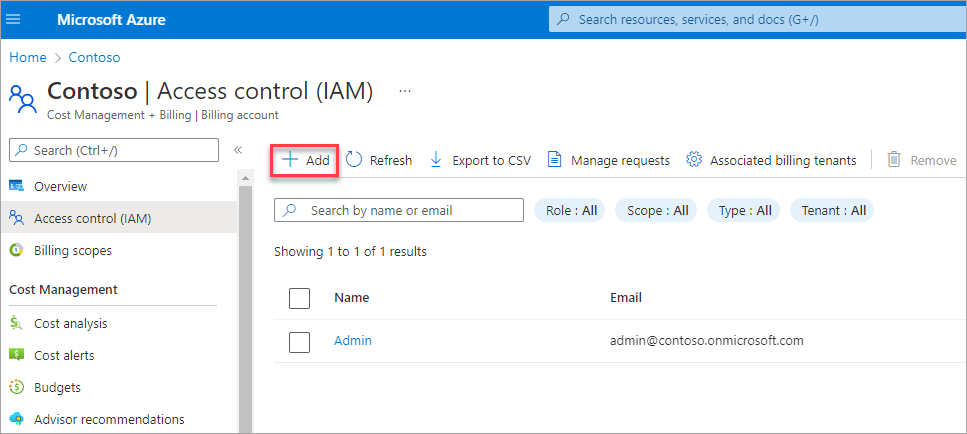
- Select Access control (IAM) on the left side of the page.
- On the Access control (IAM) page, select Add at the top of the page.
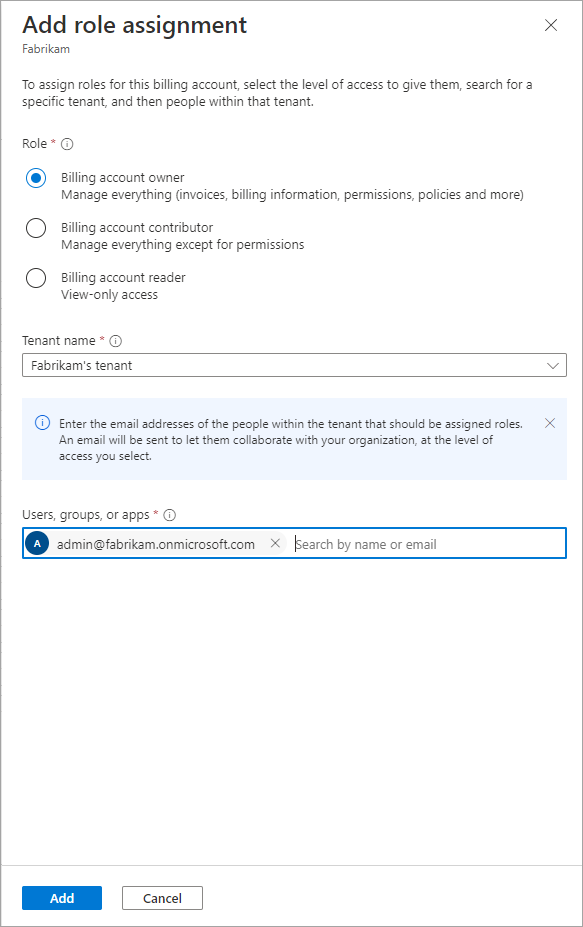
- In the Add role assignment pane, select a role, select the associated billing tenant from the tenant dropdown, then enter the email address of the users, groups, or apps to whom you want to assign roles.
- Select Add.
- The users receive an email with a link to review the role assignment request. After they accept the role, they have access to your billing account.
To manually share the invitation link
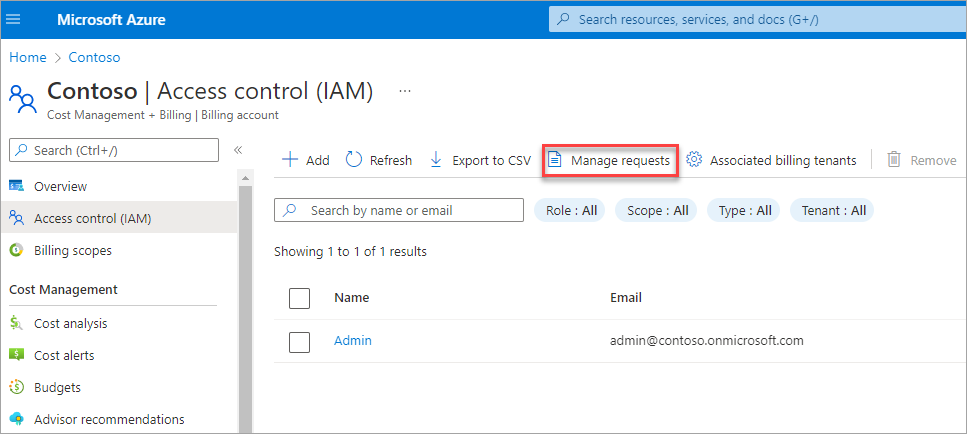
If the users can't receive emails, you can copy the review link and share it with them. Follow the steps in the preceding section then:
- Select Manage requests at the top of the Access control (IAM) page.
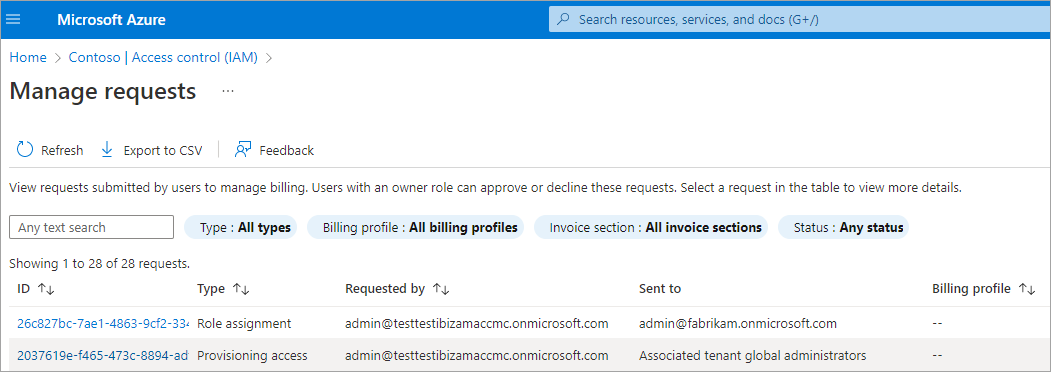
- Select the role assignment request.
- Copy the request URL.
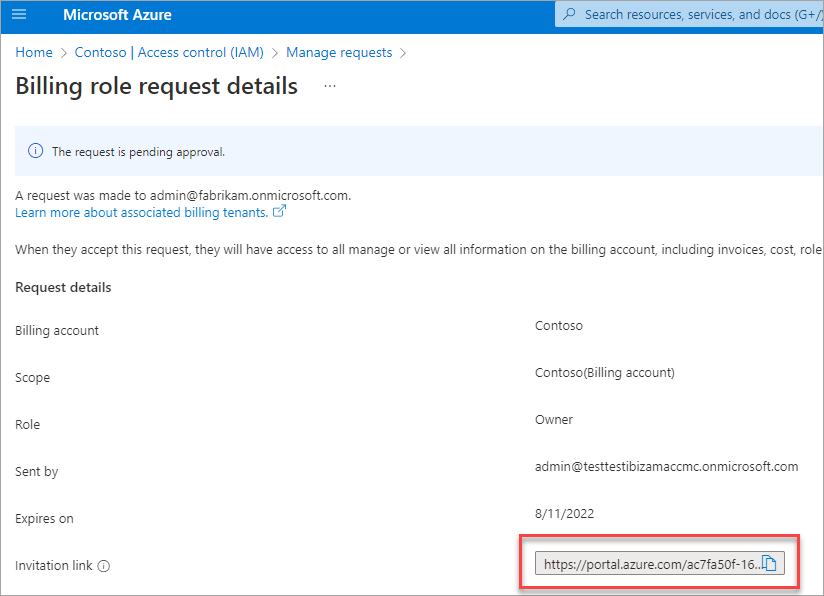
- Manually share the link with the user.
Role assignments through associated billing tenants vs Azure B2B
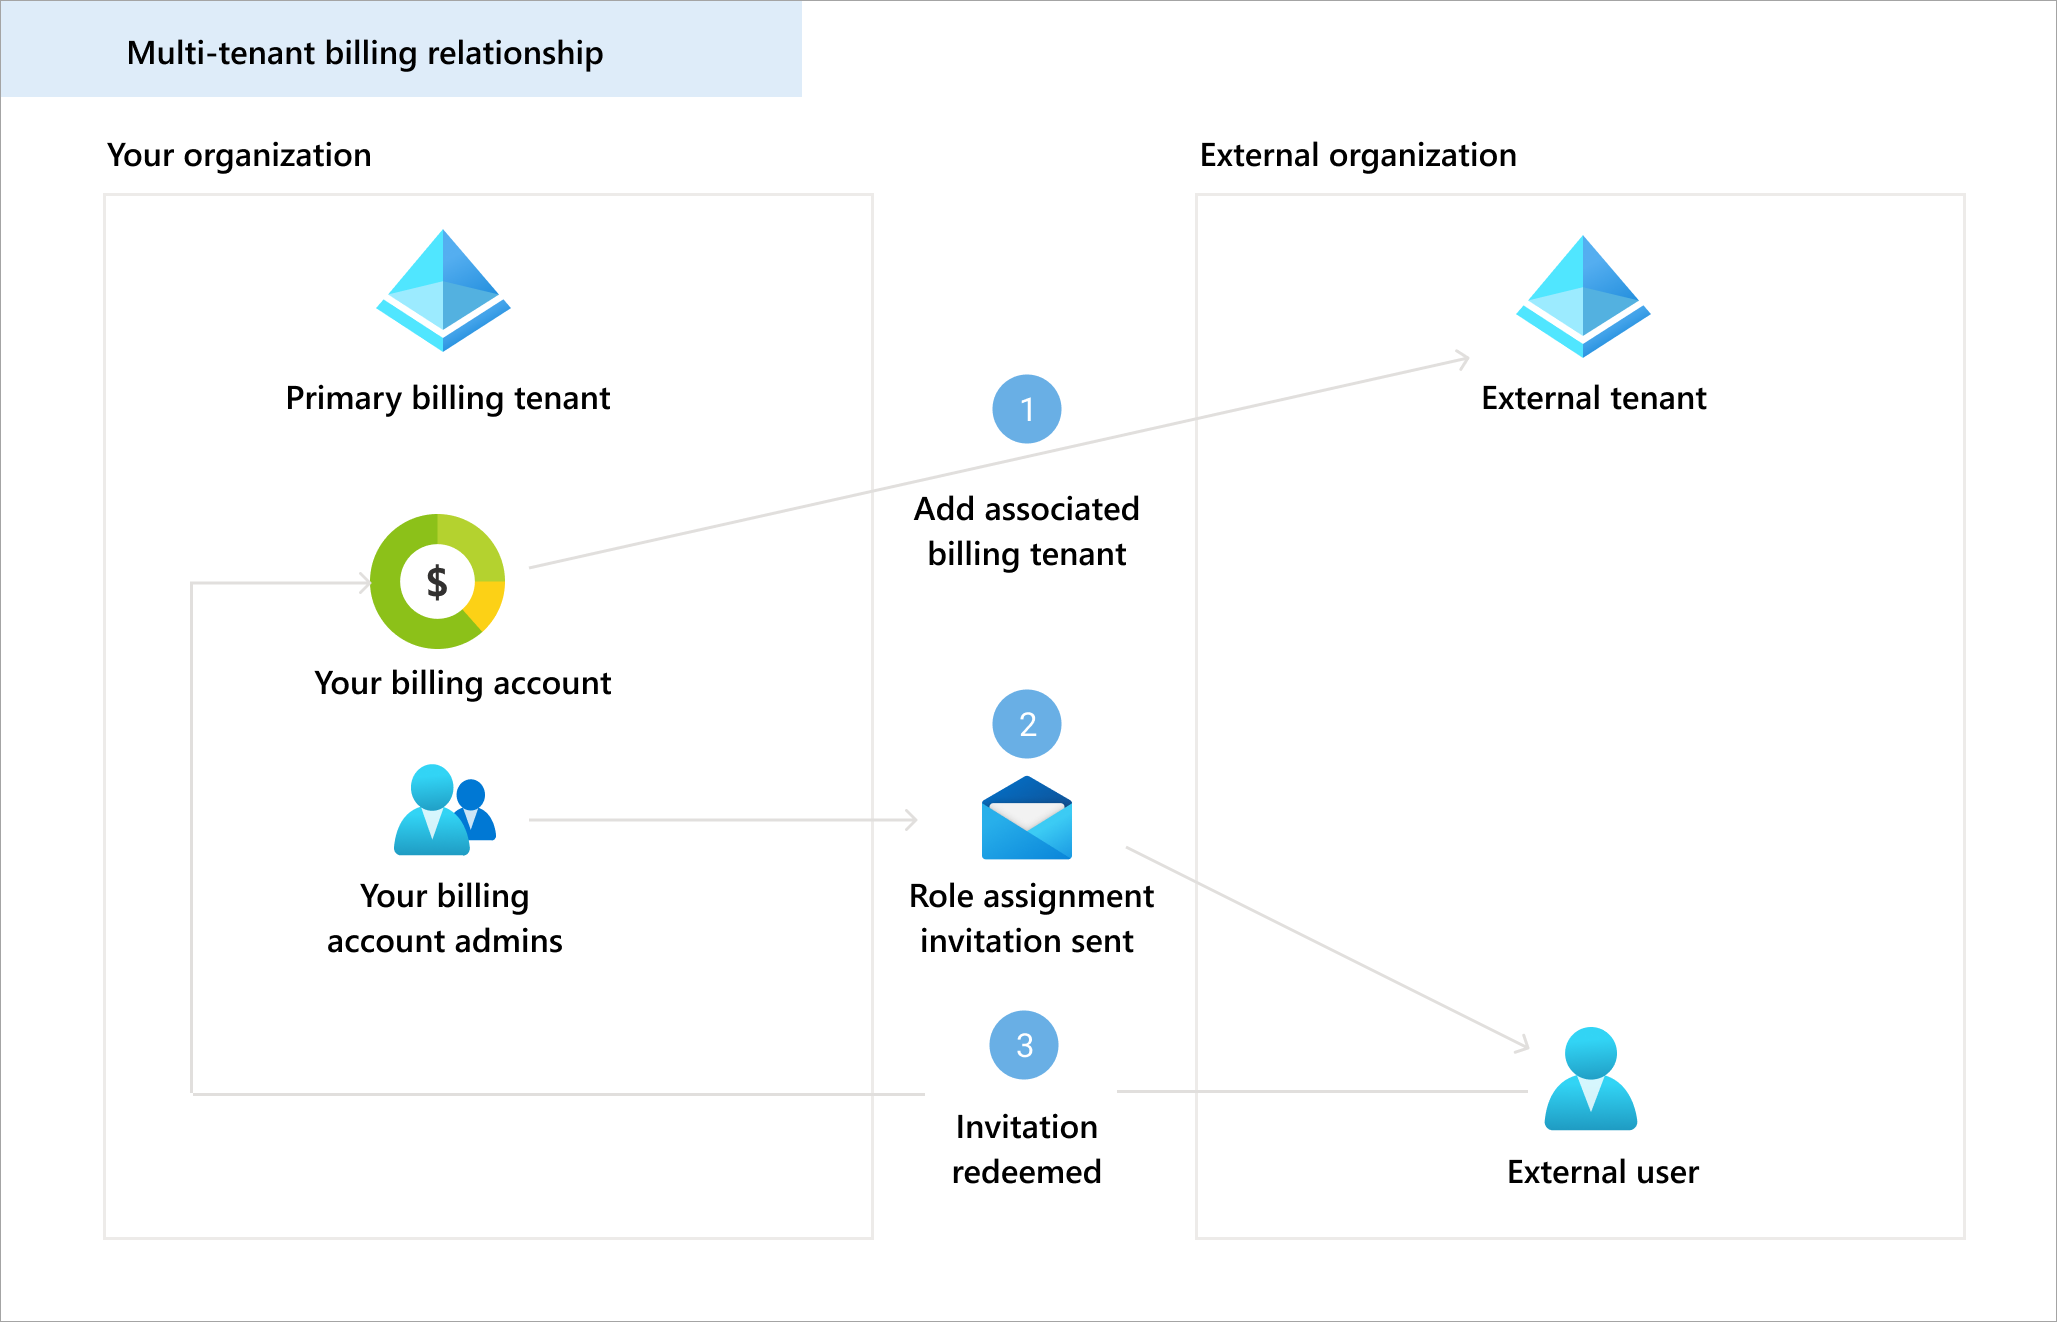
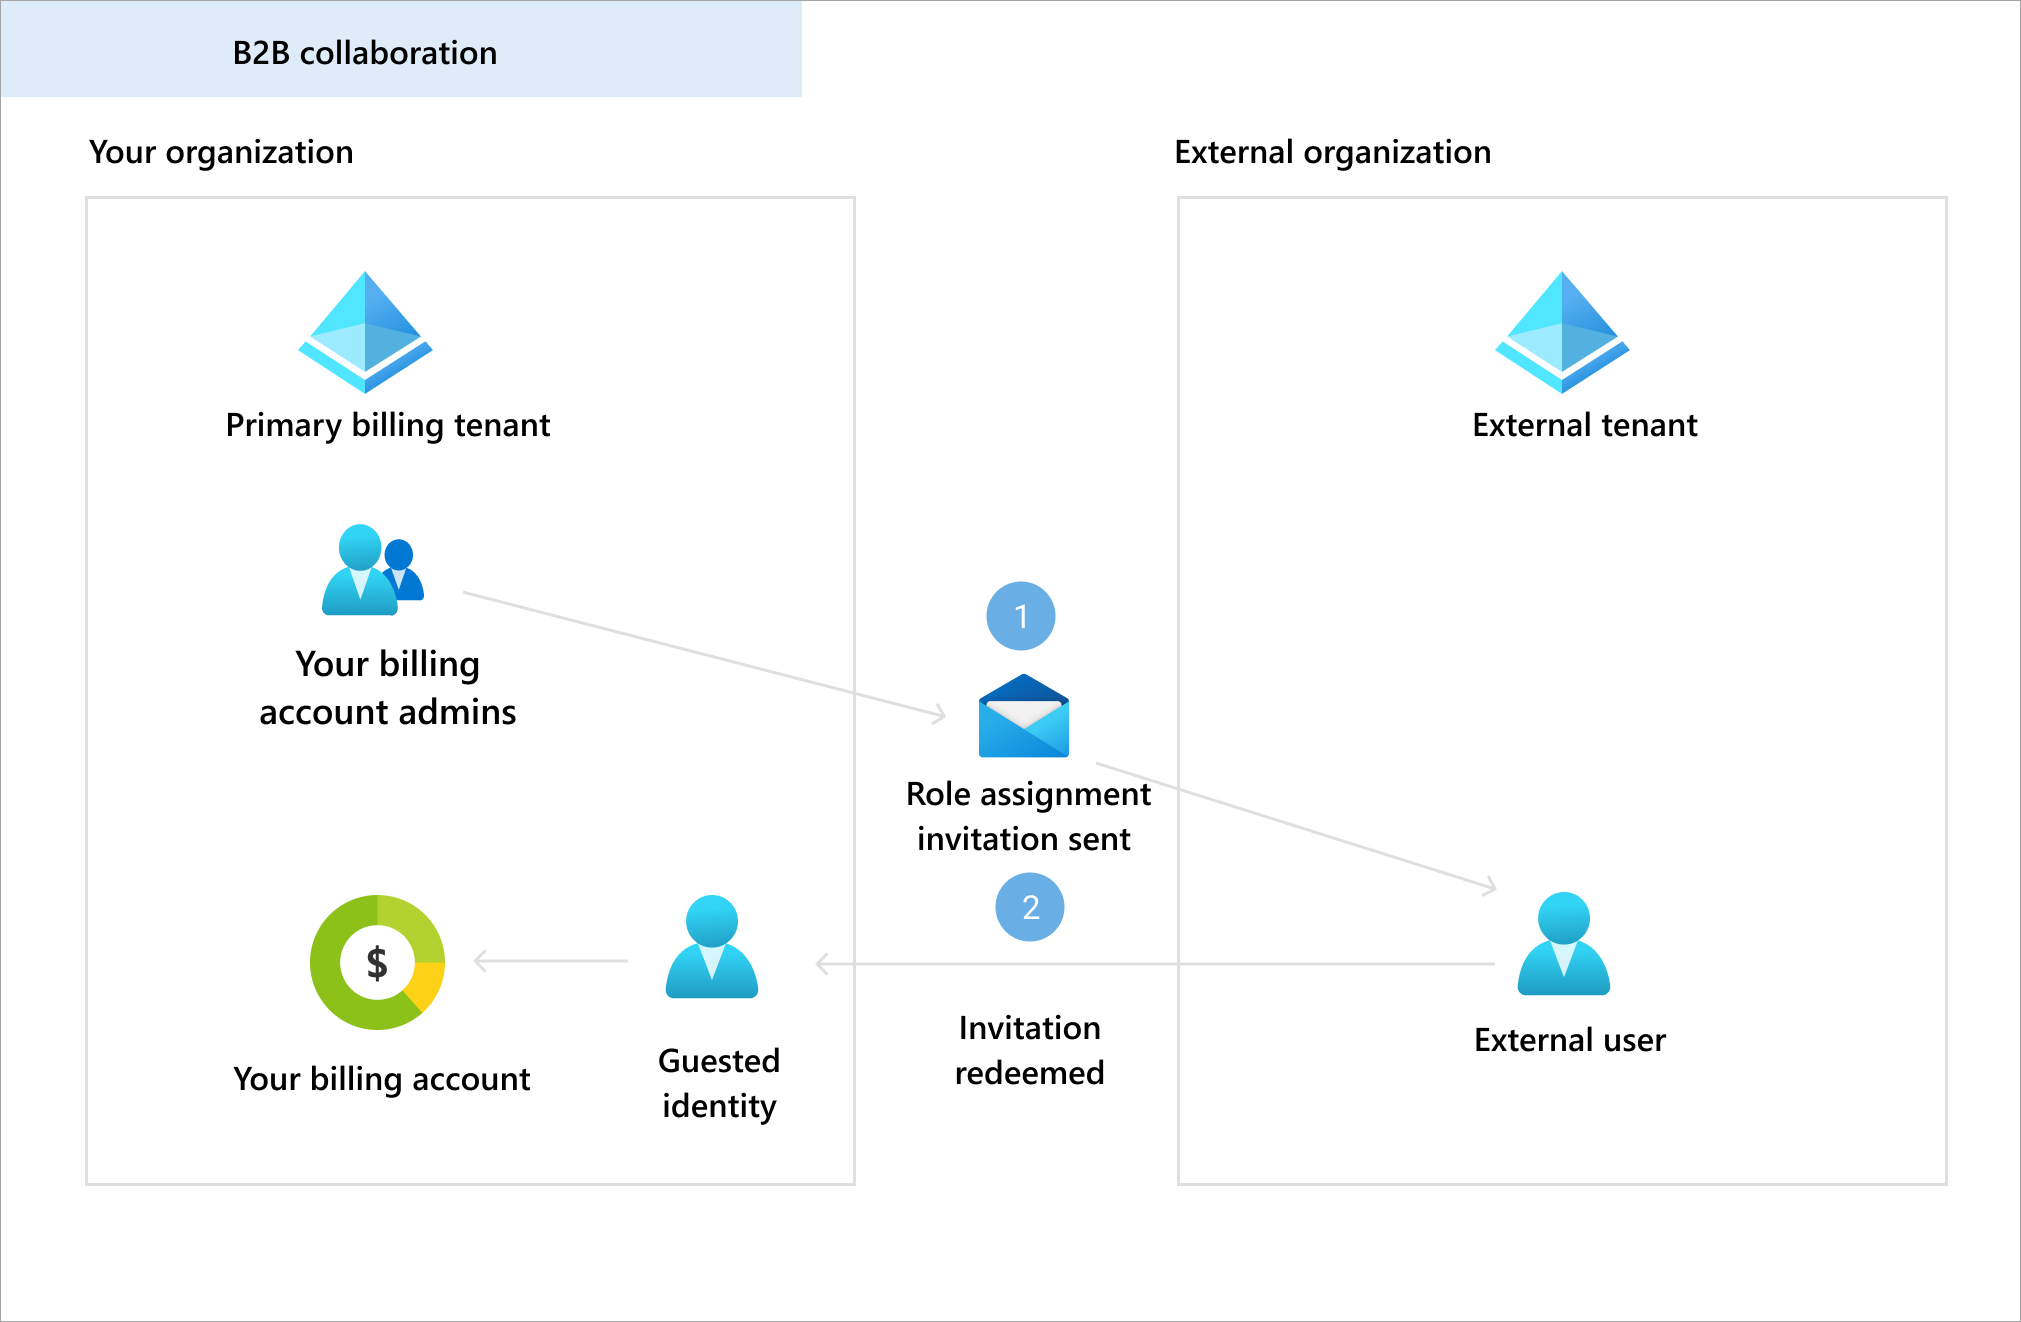
Choosing to assign roles to users from associated billing tenants might be the right approach, depending on the needs of your organization. The following illustrations and table compare using associated billing tenants and Azure B2B to help you decide which approach is right for your organization. To learn more about Azure B2B, see B2B collaboration overview
| Consideration | Associated billing tenants | Azure B2B |
|---|---|---|
| Security | The users that you invite to share your billing account follow their tenant's security policies. | The users that you invite to share your billing account follow your tenant's security policies. |
| Access | The users get access to your billing account in their own tenant and can manage billing and make purchases without switching tenants. | External guest identities are created for users in your tenant and these identities get access to your billing account. Users would have to switch tenant to manage billing and make purchases. |
Move Microsoft 365 subscriptions to a billing tenant
Before moving subscriptions, make sure you add a tenant as an associated billing tenant and enable provisioning access setting. Also the global administrator of the associated billing tenant must accept the provisioning request from your billing account.
Important
You can only move a subscription to an associated billing tenant if all licenses in the subscription are available. If any licenses are assigned, you can’t move the subscription.
- Go to the Microsoft admin center.
- In the admin center, go to the Billing > Your products page.
- Select the name of the product that you want to move to the associated billing tenant.
- On the product details page, in the Licenses assigned from all subscriptions section, select Move to another tenant.
- In the Move subscription to a different tenant pane, search for a tenant name or select a tenant from the list, then select Move subscription.
Move Azure subscriptions to an associated billing tenant
The provisioning setting that you enable for an associated billing tenant doesn't apply for Azure subscriptions. To move Azure subscriptions to an associated billing tenant, see Associate or add an Azure subscription to your Microsoft Entra tenant.
Need help? Contact support
If you need help, contact support to get your issue resolved quickly.
