How to generate client access URL for the clients
A client, be it a browser 💻, a mobile app 📱, or an IoT device 💡, uses a Client Access URL to connect and authenticate with your resource.
The URL follows the below pattern:
- For MQTT clients, it's
wss://<service_name>.webpubsub.azure.com/clients/mqtt/hubs/<hub_name>?access_token=<token>. - For all other clients, it's
wss://<service_name>.webpubsub.azure.com/client/hubs/<hub_name>?access_token=<token>.
This article shows you several ways to get the Client Access URL.
- For quick start, copy one from the Azure portal
- For development, generate the value using Web PubSub server SDK
- If you're using Microsoft Entra ID, you can also invoke the Generate Client Token REST API
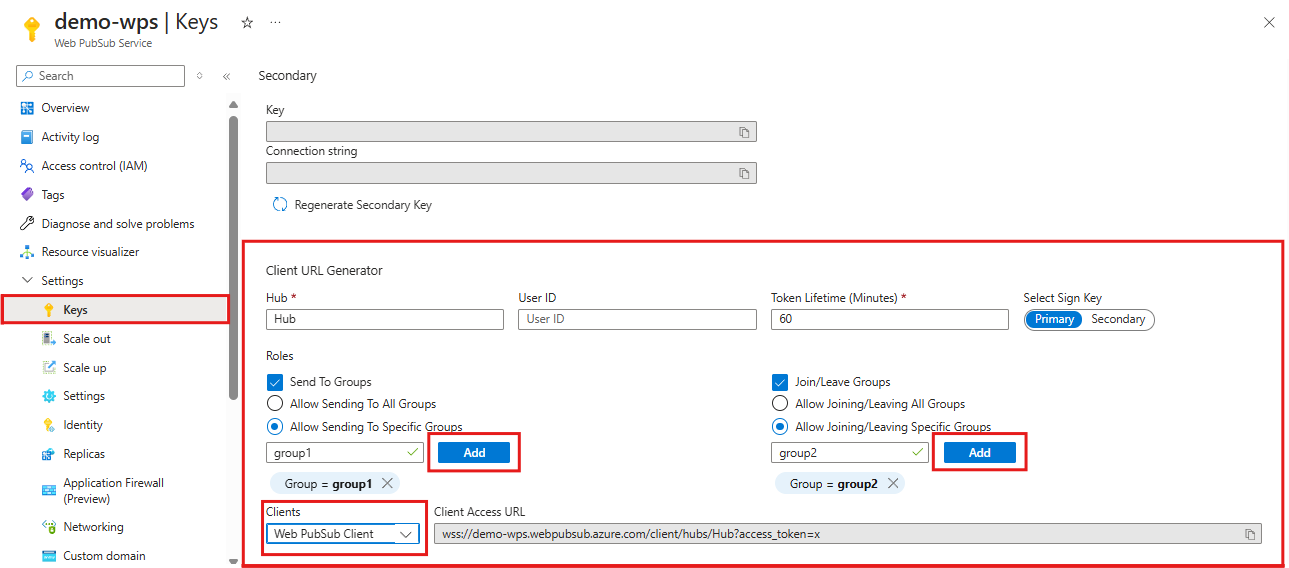
Copy from the Azure portal
In the Keys tab in Azure portal, there's a Client URL Generator tool to quickly generate a Client Access URL for you, as shown in the following diagram. Values input here aren't stored.
Note that for MQTT clients, you should select "MQTT Client" in the dropdown menu in front of the "Client Access URL" text box.
Generate from service SDK
The same Client Access URL can be generated by using the Web PubSub server SDK.
Follow Getting started with server SDK to create a
WebPubSubServiceClientobjectserviceGenerate Client Access URL by calling
WebPubSubServiceClient.getClientAccessToken:Generate client access token
// for web pubsub native clients
let token = await serviceClient.getClientAccessToken();

// for mqtt clients
let token = await serviceClient.getClientAccessToken({ clientProtocol: "mqtt" });
Configure user ID
let token = await serviceClient.getClientAccessToken({ userId: "user1" });Configure the lifetime of the token
let token = await serviceClient.getClientAccessToken({
  expirationTimeInMinutes: 5,
});
Configure a role that can join group
group1directly when it connects using this Client Access URLlet token = await serviceClient.getClientAccessToken({ roles: ["webpubsub.joinLeaveGroup.group1"], });Configure a role that the client can send messages to group
group1directly when it connects using this Client Access URLlet token = await serviceClient.getClientAccessToken({ roles: ["webpubsub.sendToGroup.group1"], });Configure a group
group1that the client joins once it connects using this Client Access URLlet token = await serviceClient.getClientAccessToken({ groups: ["group1"], });
In real-world code, we usually have a server side to host the logic generating the Client Access URL. When a client request comes in, the server side can use the general authentication/authorization workflow to validate the client request. Only valid client requests can get the Client Access URL back.
Generate from REST API :generateToken
You could also use Microsoft Entra ID and generate the token by invoking Generate Client Token REST API.
Note
Web PubSub does not recommend that you create Microsoft Entra ID tokens for Microsoft Entra ID service principals manually. This is because each Microsoft Entra ID token is short-lived, typically expiring within one hour. After this time, you must manually generate a replacement Microsoft Entra ID token. Instead, use our SDKs that automatically generate and replace expired Microsoft Entra ID tokens for you.
Follow Authorize from application to enable Microsoft Entra ID.
Get the Microsoft Entra token.
Use the Microsoft Entra token to invoke
:generateToken.Gather the following information:
Value name How to get the value TenantId TenantId is the value of Directory (tenant) ID on the Overview pane of the application you registered. ClientId ClientId is the value of Application (client) ID from the Overview pane of the application you registered. ClientSecret ClientSecret is the value of the client secret you just added in step #1 Get the Microsoft Entra ID token from Microsoft identity platform
We use CURL tool to show how to invoke the REST APIs. The tool is bundled into Windows 10/11, and you could install the tool following Install CURL.
# set necessary values, replace the placeholders with your actual values
export TenantId=<your_tenant_id>
export ClientId=<your_client_id>
export ClientSecret=<your_client_secret>

curl -X POST "https://login.microsoftonline.com/$TenantId/oauth2/v2.0/token" \
-H "Content-Type: application/x-www-form-urlencoded" \
--data-urlencode "grant_type=client_credentials" \
--data-urlencode "client_id=$ClientId" \
--data-urlencode "client_secret=$ClientSecret" \
--data-urlencode "scope=https://webpubsub.azure.com/.default"
The above curl command sends a POST request to Microsoft identity endpoint to get the Microsoft Entra ID token back. In the response you see the Microsoft Entra ID token in
access_tokenfield. Copy and store it for later use.Use the Microsoft Entra ID token to invoke
:generateToken# Replace the values in {} with your actual values. export Hostname={your_service_hostname} export Hub={your_hub} export Microsoft_Entra_Token={Microsoft_entra_id_token_from_previous_step} curl -X POST "https://$Hostname/api/hubs/$Hub/:generateToken?api-version=2024-01-01" \ -H "Authorization: Bearer $Microsoft_Entra_Token" \ -H "Content-Type: application/json"If you need to generate the token for MQTT clients, append the
clientType=mqttparameter to the URL:export Hostname={your_service_hostname} export Hub={your_hub} export Microsoft_Entra_Token={Microsoft_entra_id_token_from_previous_step} curl -X POST "https://$Hostname/api/hubs/$Hub/:generateToken?api-version=2024-01-01&clientType=mqtt" \ -H "Authorization: Bearer $Microsoft_Entra_Token" \ -H "Content-Type: application/json"After running the
cURLcommand, you should get a response like this:{ "token": "ABCDEFG.ABC.ABC" }