Install and enable Network ATC on Azure Local, version 22H2
Applies to: Azure Local 2311.2 and later
This article provides information on how to install and enable Network ATC on an existing Azure Local instance running version 22H2. After Network ATC is enabled, you can take advantage of several benefits and utilize this configuration across all new deployments.
Important
- Before you apply the solution upgrade, make sure to install and enable Network ATC on your existing Azure Local instance. If Network ATC is already enabled on your existing system, you can skip this step.
- We recommend that you set up Network ATC after you have upgraded the operating system from version 22H2 to version 23H2. For more information, see Upgrade Azure Local to the latest version 23H2 via PowerShell.
About Network ATC
Network ATC stores information in the system database, which is then replicated to other machines in the system. From the initial machine, other machines in the system see the change in the system database and create a new intent. Here, we set up the system to receive a new intent. Additionally, we control the rollout of the new intent by stopping or disabling the Network ATC service on machines that have virtual machines (VM) on them.
Benefits
For Azure Local, Network ATC provides the following benefits:
- Reduces host networking deployment time, complexity, and errors.
- Deploys the latest Microsoft validated and supported best practices.
- Ensures configuration consistency across the system.
- Eliminates configuration drift.
Before you begin
Before you install and enable Network ATC on your existing Azure Local, make sure:
- You're on a host that doesn't have a running VM on it.
- You're on a system that has running workloads.
Steps to install and enable Network ATC
Important
If you don't have running workloads on your Azure Local machines, execute Step 4: Remove the existing configuration on the paused machine without running VMs to remove any previous configurations that could conflict with Network ATC, then add your intent(s) following the standard procedures found in Deploy host networking with Network ATC
Step 1: Install Network ATC
In this step, you install Network ATC on every machine in the system using the following command. No reboot is required.
Install-WindowsFeature -Name NetworkATC
Step 2: Stop the Network ATC service
To prevent Network ATC from applying the intent while VMs are running, stop or disable the Network ATC service on all machines that aren't paused. Use these commands:
Set-Service -Name NetworkATC -StartupType Disabled
Stop-Service -Name NetworkATC
Step 3: Pause one machine in the system
When you pause one machine in the system, all workloads are moved to other machines, making your machine available for changes. The paused machine is then migrated to Network ATC. To pause your machine, use the following command:
Suspend-ClusterNode
Step 4: Remove the existing configuration on the paused machine without running VMs
In this step, we eliminate any previous configurations, such as VMSwitch, Data Center Bridging (NetQos) policy for RDMA traffic, and Load Balancing Failover (LBFO), which might interfere with Network ATC’s ability to implement the new intent. Although Network ATC attempts to adopt existing configurations with matching names; including NetQos and other settings, it’s easier to remove the current configuration and allow Network ATC to redeploy the necessary configuration items and more.
If you have more than one VMSwitch on your system, make sure you specify the switch attached to the adapters being used in the intent.
To remove the existing VMSwitch configuration, run the following command:
Get-VMSwitch -Name <VMSwitchName> | Remove-VMSwitch -force
To remove your existing NetQos configurations, use the following commands:
Get-NetQosTrafficClass | Remove-NetQosTrafficClass
Get-NetQosPolicy | Remove-NetQosPolicy -Confirm:$false
Get-NetQosFlowControl | Disable-NetQosFlowControl
LBFO isn't supported in Azure Local. However, if you accidentally deployed an LBFO team it should be removed using the following command:
Get-NetLBFOTeam | Remove-NetLBFOTeam -Confirm:$true
If your machines were configured via Virtual Machine Manager (VMM), those configuration objects may need to be removed as well.
Step 5: Start the Network ATC service
As a precaution, to control the speed of the rollout, we paused the machine and then stopped and disabled the Network ATC service in the previous steps. Since Network ATC intents are implemented system-wide, perform this step only once.
To start the Network ATC service, on the paused machine only, run the following command:
Start-Service -Name NetworkATC
Set-service -Name NetworkATC -StartupType Automatic
Step 6: Add the Network ATC intent
There are various intents that you can add. Identify the intent or intents you'd like by using the examples in the next section.
To add the Network ATC intent, run the Add-NetIntent command with the appropriate options for the intent you want to deploy.
Example intents
Network ATC modifies how you deploy host networking, not what you deploy. You can deploy multiple scenarios if each scenario is supported by Microsoft. Here are some examples of common host networking patterns and the corresponding PowerShell commands for Azure Local.
These examples aren't the only combinations available, but they should give you an idea of the possibilities.
For simplicity we only demonstrate two physical adapters per SET team, however it's possible to add more. For more information, see Network reference patterns overview for Azure Local.
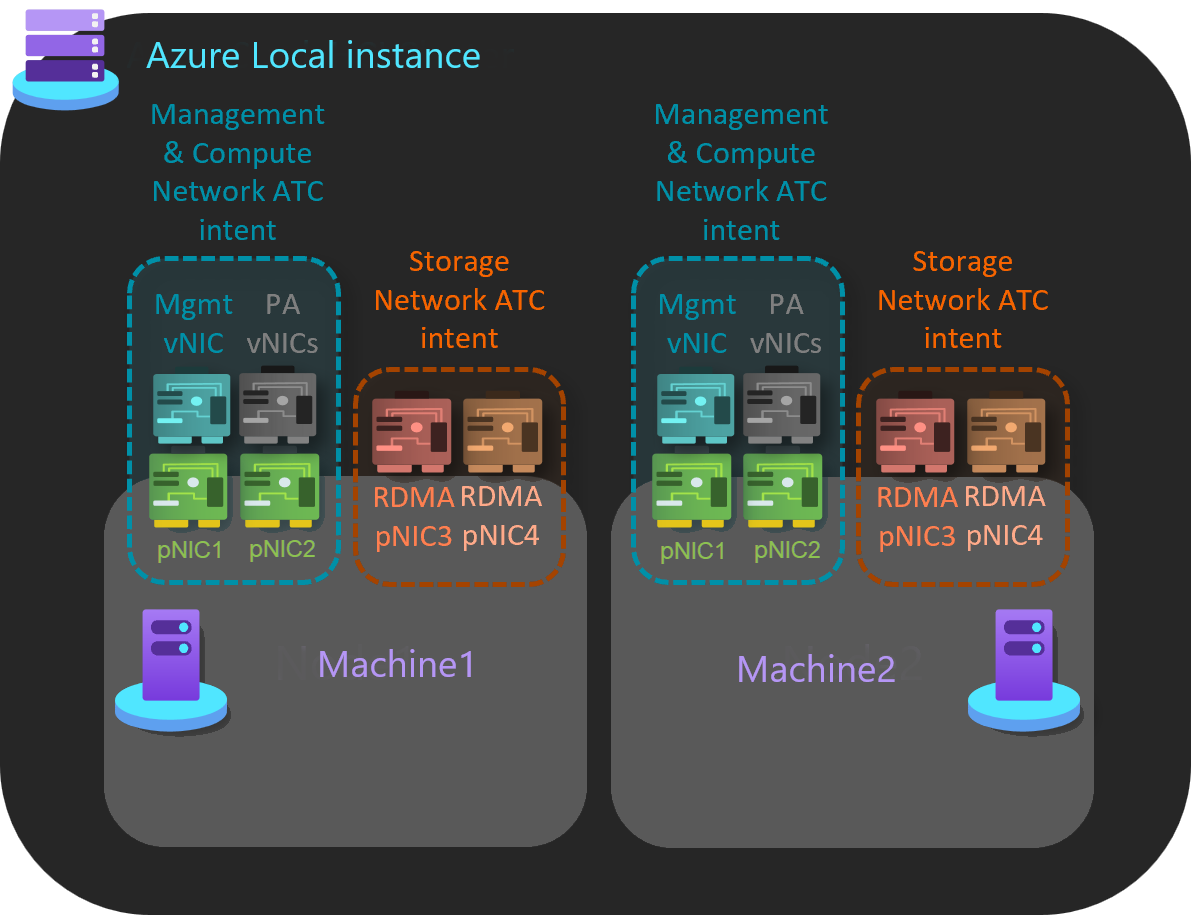
Group management and compute in one intent with a separate intent for storage
In this example, there are two intents that are managed across machines.
Management and compute: This intent uses a dedicated pair of network adapter ports.
Storage: This intent uses a dedicated pair of network adapter ports.
Here's an example to implement this host network pattern:
Add-NetIntent -Name Management_Compute -Management -Compute -AdapterName pNIC1, pNIC2

Add-NetIntent -Name Storage -Storage -AdapterName pNIC3, pNIC4
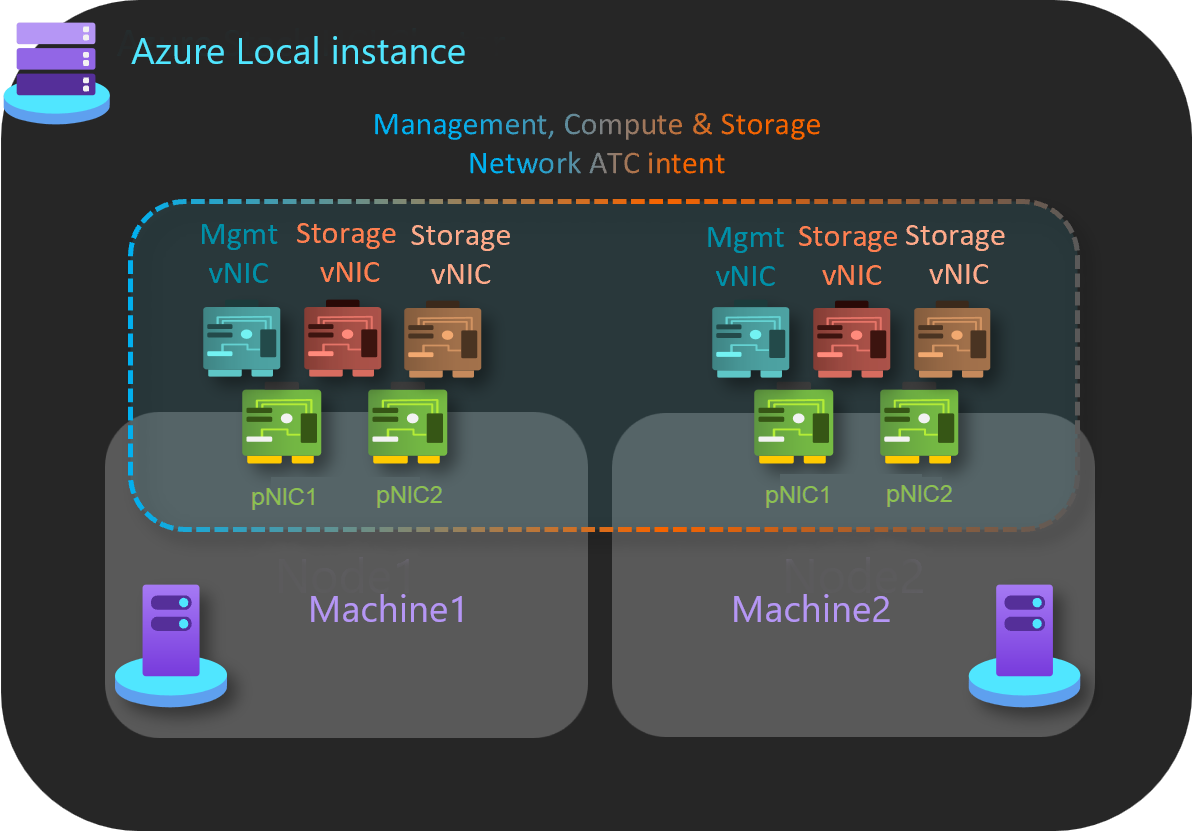
Group all traffic on a single intent
In this example, there's a single intent managed across machines.
Management, Compute, and Storage: This intent uses a dedicated pair of network adapter ports.
Here's an example to implement this host network pattern:
Add-NetIntent -Name MgmtComputeStorage -Management -Compute -Storage -AdapterName pNIC1, pNIC2
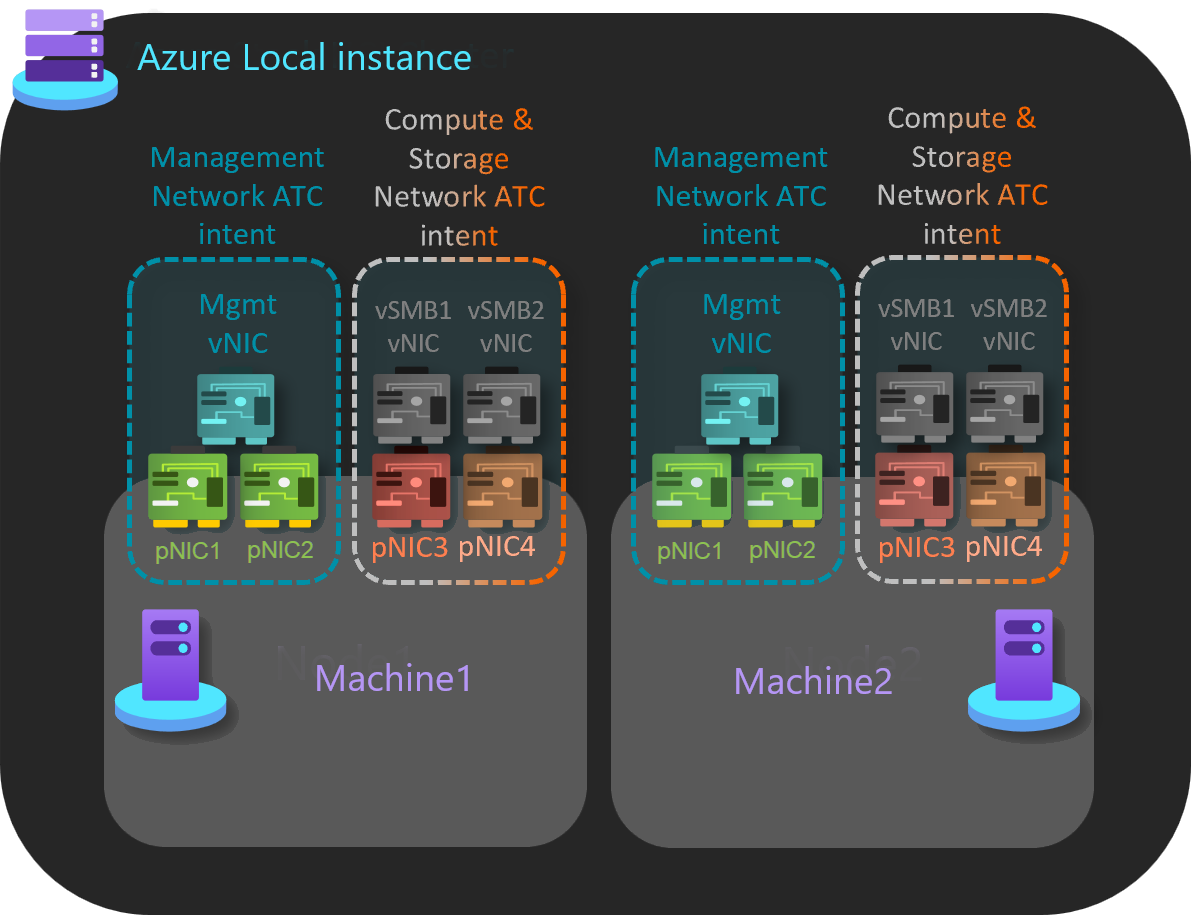
Group compute and storage traffic on one intent with a separate management intent
In this example, there are two intents that are managed across machines.
Management: This intent uses a dedicated pair of network adapter ports.
Compute and Storage: This intent uses a dedicated pair of network adapter ports.
Here's an example to implement this host network pattern:
Add-NetIntent -Name Mgmt -Management -AdapterName pNIC1, pNIC2

Add-NetIntent -Name Compute_Storage -Compute -Storage -AdapterName pNIC3, pNIC4
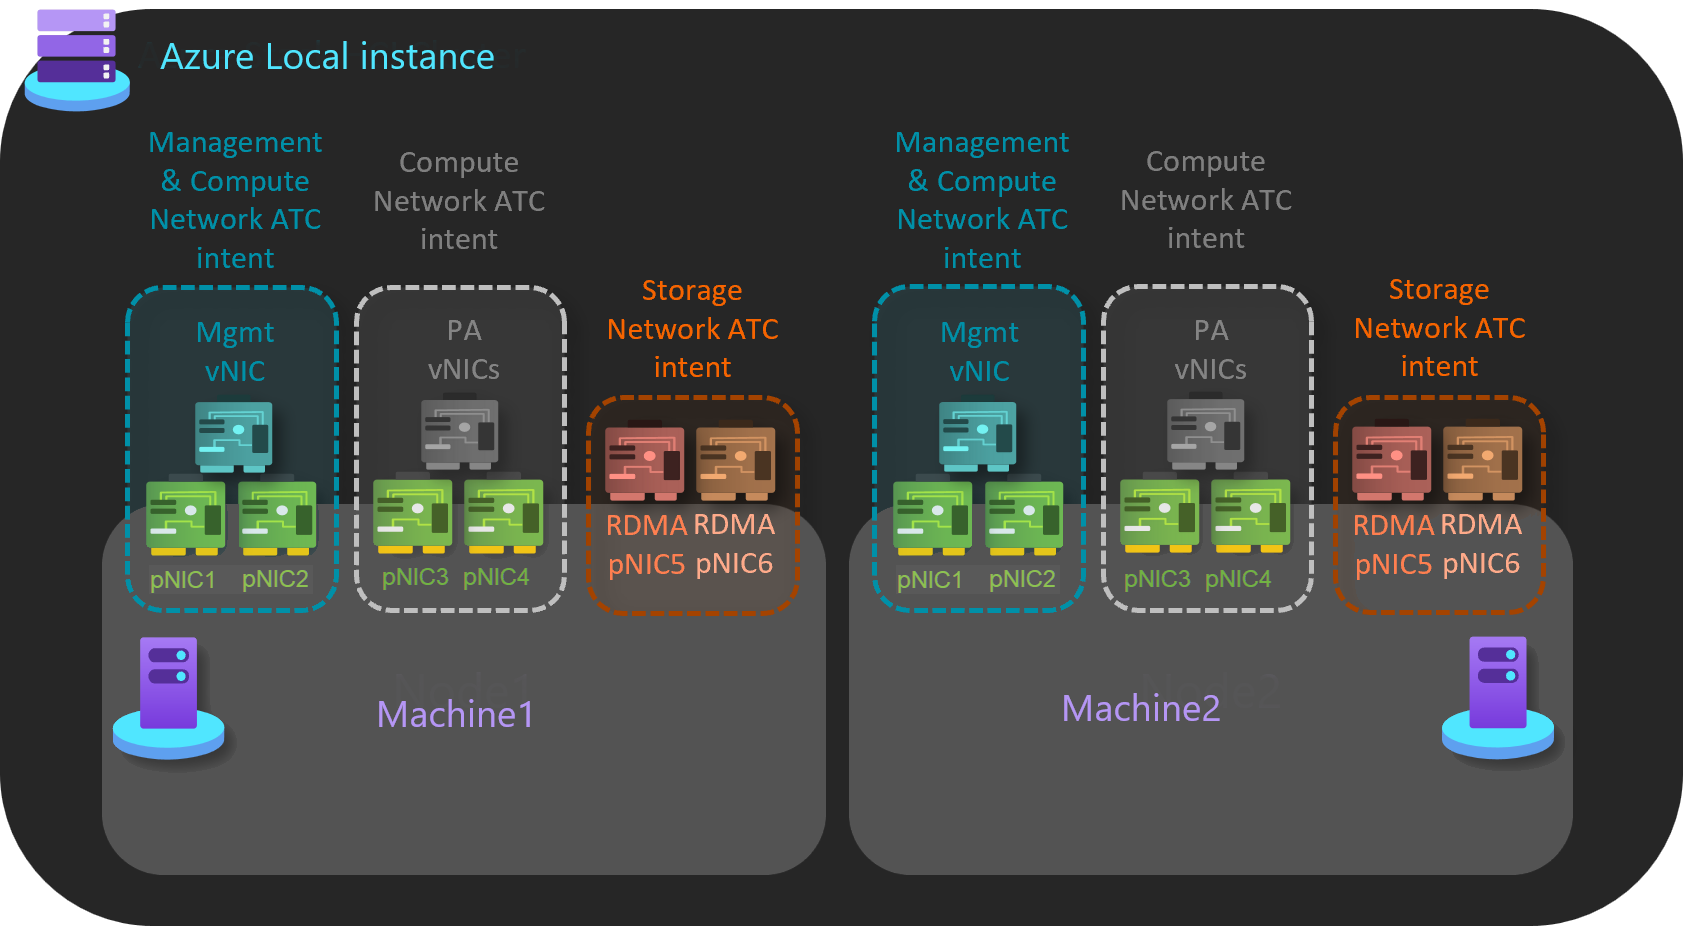
Fully disaggregated host networking
In this example, there are three intents that are managed across machines.
Management: This intent uses a dedicated pair of network adapter ports.
Compute: This intent uses a dedicated pair of network adapter ports.
Storage: This intent uses a dedicated pair of network adapter ports.
Here's an example to implement this host network pattern:
Add-NetIntent -Name Mgmt -Management -AdapterName pNIC1, pNIC2

Add-NetIntent -Name Compute -Compute -AdapterName pNIC3, pNIC4

Add-NetIntent -Name Storage -Storage -AdapterName pNIC5, pNIC6
Step 7: Verify the deployment on one machine
The Get-NetIntentStatus command shows the deployment status of the requested intents. The result returns one object per intent for each machine in the system. For example, if you have a three-node system with two intents, you should see six objects, each with their own status, returned by the command.
To verify your machines's successful deployment of the intents submitted in step 5, run the following command:
Get-NetIntentStatus -Name <IntentName>
Here's an example of the output:
PS C:\Users\administrator.CONTOSO> Get-NetlntentStatus

IntentName                  : convergedintent
Host                        : node1
IsComputelntentSet          : True
IsManagementlntentSet       : True
IsStoragelntentSet          : True
IsStretchlntentSet          : False
LastUpdated                 : 07/23/2024 11:11:15
LastSuccess                 : 07/23/2024 11:11:15
RetryCount                  : 0
LastConfigApplied           : 1
Error                       :
Progress                    : 1 of 1
ConfigurationStatus         : Success
ProvisioningStatus          : Completed
Ensure that each intent added has an entry for the host you're working on. Also, make sure the ConfigurationStatus shows Success.
If the ConfigurationStatus shows Failed, check to see if the error message indicates the reason for the failure. You can also review the Microsoft-Windows-Networking-NetworkATC/Admin event logs for more details on the reason for the failure. For some examples of failure resolutions, see Common Error Messages.
Step 8: Rename the VMSwitch on other machines
In this step, you move from the machine deployed with Network ATC to the next machine and migrate the VMs from this second machine. You must verify that the second machine has the same VMSwitch name as the machine deployed with Network ATC.
Important
After the virtual switch is renamed, you must disconnect and reconnect each VM so that it can appropriately cache the new name of the virtual switch. This is a disruptive action that requires planning to complete. If you do not perform this action, live migrations will fail with an error indicating the virtual switch doesn't exist on the destination.
Renaming the virtual switch is a non-disruptive change and can be done on all the machines simultaneously. Run the following command:
#Run on the machine where you configured Network ATC
Get-VMSwitch | ft Name

#Run on the next machine to rename the virtual switch
Rename-VMSwitch -Name 'ExistingName' -NewName 'NewATCName'
After your switch is renamed, disconnect and reconnect your vNICs for the VMSwitch name change to go through. The command below can be used to perform this action for all VMs:
$VMSW = Get-VMSwitch
$VMs = Get-VM
$VMs | %{Get-VMNetworkAdapter -VMName $_.name | Disconnect-VMNetworkAdapter ; Get-VMNetworkAdapter -VMName $_.name | Connect-VMNetworkAdapter -SwitchName $VMSW.name}
You don't change the Network ATC VMSwitch for two reasons:
- Network ATC ensures that all machines in the system have the same name to support live migration and symmetry.
- Network ATC implements and controls the names of configuration objects. Otherwise, you'd need to ensure this configuration artifact is perfectly deployed.
Step 9: Resume the machine
To reenter or put your system back in service, run the following command:
Resume-ClusterNode
Note
To apply the Network ATC settings across your Azure Local, repeat steps 1 through 5 (skip deleting the virtual switch as it was renamed), step 7, and step 9 for each machine of the system.
Next step
Learn how to Assess solution upgrade readiness for Azure Local.


