Quickstart: Use Azure Redis in Python
In this Quickstart, you incorporate Azure Managed Redis (preview) or Azure Cache for Redis into a Python script to have access to a secure, dedicated cache that is accessible from any application within Azure.
Skip to the code on GitHub
If you want to skip straight to the code, see the Python quickstart on GitHub.
Prerequisites
- Azure subscription - create one for free
- Python 3
- For macOS or Linux, download from python.org.
- For Windows 11, use the Windows Store.
Create an Azure Managed Redis (preview) instance
To create an Azure Managed Redis (preview) instance, sign in to the Azure portal and select Create a resource.
On the New page, in the search box type Azure Cache for Redis.
On the New Redis Cache page, configure the settings for your new cache.
Setting Choose a value Description Subscription Drop down and select your subscription. The subscription under which to create this new Azure Managed Redis instance. Resource group Drop down and select a resource group, or select Create new and enter a new resource group name. Name for the resource group in which to create your cache and other resources. By putting all your app resources in one resource group, you can easily manage or delete them together. DNS name Enter a name that is unique in the region. The cache name must be a string between 1 and 63 characters when combined with the cache's region name that contain only numbers, letters, or hyphens. (If the cache name is fewer than 45 characters long it should work in all currently available regions.) The name must start and end with a number or letter, and can't contain consecutive hyphens. Your cache instance's host name is \<DNS name\>.\<Azure region\>.redis.azure.net.Location Drop down and select a location. Azure Managed Redis is available in selected Azure regions. Cache type Drop down and select the performance tier and cache size. The tier determines the performance of the Redis instance, while the cache size determines the memory available to store data. For guidance on choosing the right performance tier, see Choosing the right tier 
Select Next: Networking and select either a public or private endpoint.
Select Next: Advanced.
Configure any Redis modules you wan to add to the instance.
By default, for a new managed cache:
- Microsoft Entra ID is enabled.
- Access Keys Authentication is disabled for security reasons.
Important
For optimal security, we recommend that you use Microsoft Entra ID with managed identities to authorize requests against your cache if possible. Authorization by using Microsoft Entra ID and managed identities provides superior security and ease of use over shared access key authorization. For more information about using managed identities with your cache, see Use Microsoft Entra ID for cache authentication.
Set Clustering policy to Enterprise for a nonclustered cache, or to OSS for a clustered cache. For more information on choosing Clustering policy, see Cluster policy.

If you're using Active geo-replication, it must be configured during creation. For more information, see Configure active geo-replication for Azure Managed Redis instances.
Important
You can't change the clustering policy of an Azure Managed Redis (preview) instance after you create it. If you're using RediSearch, the Enterprise cluster policy is required, and
NoEvictionis the only eviction policy supported.Important
If you're using this cache instance in a geo-replication group, eviction policies cannot be changed after the instance is created. Be sure to know the eviction policies of your primary nodes before you create the cache. For more information on active geo-replication, see Active geo-replication prerequisites.
Important
You can't change modules after you create a cache instance. Modules must be enabled at the time you create an Azure Cache for Redis instance. There is no option to enable the configuration of a module after you create a cache.
Select Next: Tags and skip.
Select Next: Review + create.
Review the settings and select Create.
It takes several minutes for the Redis instance to create. You can monitor progress on the Azure Managed Redis Overview page. When Status shows as Running, the cache is ready to use.
Create an Azure Cache for Redis instance
To create a cache, sign in to the Azure portal. On the portal menu, select Create a resource.

On the Get Started pane, enter Azure Cache for Redis in the search bar. In the search results, find Azure Cache for Redis, and then select Create.

On the New Redis Cache pane, on the Basics tab, configure the following settings for your cache:
Setting Action Description Subscription Select your Azure subscription. The subscription to use to create the new instance of Azure Cache for Redis. Resource group Select a resource group, or select Create new and enter a new resource group name. A name for the resource group in which to create your cache and other resources. By putting all your app resources in one resource group, you can easily manage or delete them together. DNS name Enter a unique name. The cache name must be a string of 1 to 63 characters that contains only numbers, letters, and hyphens. The name must start and end with a number or letter, and it can't contain consecutive hyphens. Your cache instance's host name is \<DNS name>.redis.cache.windows.net.Location Select a location. An Azure region that is near other services that use your cache. Cache SKU Select a SKU. The SKU determines the size, performance, and feature parameters that are available for the cache. For more information, see Azure Cache for Redis overview. Cache size Select a cache size. For more information, see Azure Cache for Redis overview. Select the Networking tab or select Next: Networking.
On the Networking tab, select a connectivity method to use for the cache.
Select the Advanced tab or select Next: Advanced.
On the Advanced pane, verify or select an authentication method based on the following information:

- By default, for a new Basic, Standard, or Premium cache, Microsoft Entra Authentication is enabled and Access Keys Authentication is disabled.
- For Basic or Standard caches, you can choose the selection for a non-TLS port.
- For Standard and Premium caches, you can choose to enable availability zones. You can't disable availability zones after the cache is created.
- For a Premium cache, configure the settings for non-TLS port, clustering, managed identity, and data persistence.
Important
For optimal security, we recommend that you use Microsoft Entra ID with managed identities to authorize requests against your cache if possible. Authorization by using Microsoft Entra ID and managed identities provides superior security and ease of use over shared access key authorization. For more information about using managed identities with your cache, see Use Microsoft Entra ID for cache authentication.
(Optional) Select the Tags tab or select Next: Tags.
(Optional) On the Tags tab, enter a tag name and value if you want to categorize your cache resource.
Select the Review + create button.
On the Review + create tab, Azure automatically validates your configuration.
After the green Validation passed message appears, select Create.
A new cache deployment occurs over several minutes. You can monitor the progress of the deployment on the Azure Cache for Redis Overview pane. When Status displays Running, the cache is ready to use.
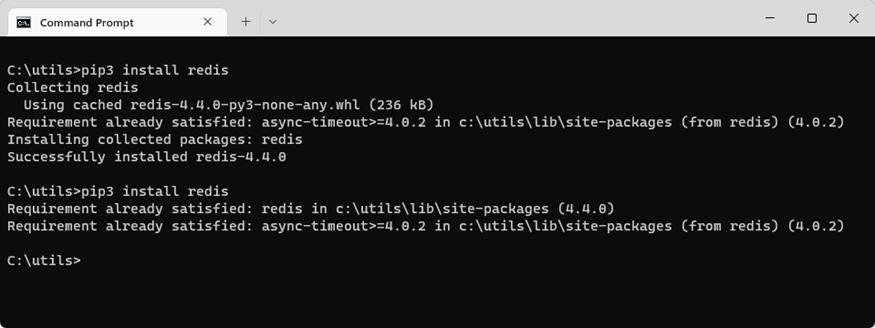
Install redis-py library
Redis-py is a Python interface to Redis. Use the Python packages tool, pip, to install the redis-py package from a command prompt.
The following example used pip3 for Python 3 to install redis-py on Windows 11 from an Administrator command prompt.
Create a Python script to access your cache
Create a Python script to that uses either Microsoft Entra ID or access keys to connect to your Azure Managed Redis (preview) instance. We recommend you use Microsoft Entra ID.
Use Microsoft Entra ID authentication on your cache
Azure Redis caches, except for Enterprise and Enterprise Flash tiers, have Microsoft Entra Authentication enabled by default. Access keys are disabled by default.
Important
Microsoft recommends using Microsoft Entra ID authentication for the most secure authentication experience instead of using passwords or access keys. The authentication described in this section of the article uses access keys, which require a very high degree of trust in the application and carries risks not present when using Microsoft Entra ID. Use the approach in this document only when Microsoft Entra ID authentication is not viable.
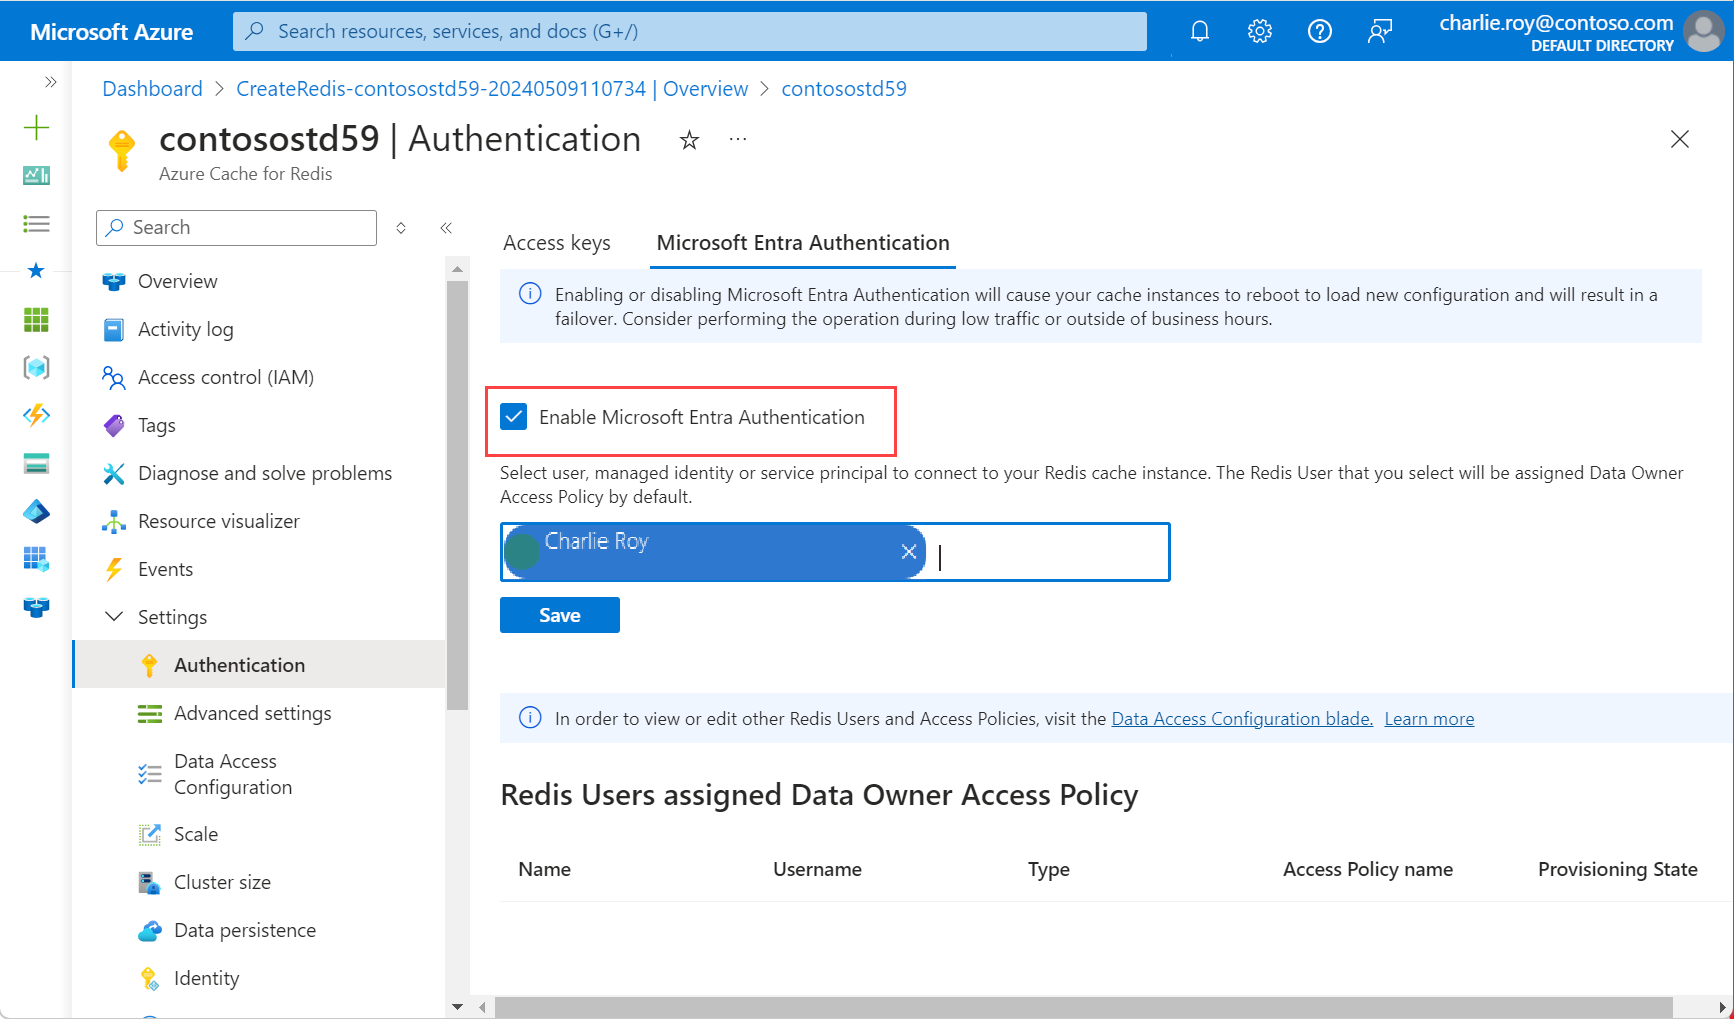
In the Azure portal, select the cache where you'd like to use Microsoft Entra token-based authentication.
Select Authentication from the Resource menu.
Select Select member and enter the name of a valid user. The user you enter is automatically assigned Data Owner Access Policy by default when you select Save. You can also enter a managed identity or service principal to connect to your cache instance.
For information on using Microsoft Entra ID with Azure CLI, see the reference pages for identity.
Install the Microsoft Authentication Library
Install the Microsoft Authentication Library (MSAL). This library allows you to acquire security tokens from Microsoft identity to authenticate users.
You can use the Python Azure identity client library available that uses MSAL to provide token authentication support. Install this library using
pip:
pip install azure-identity
Create a Python script using Microsoft Entra ID
Create a new text file, add the following script, and save the file as
PythonApplication1.py.Replace
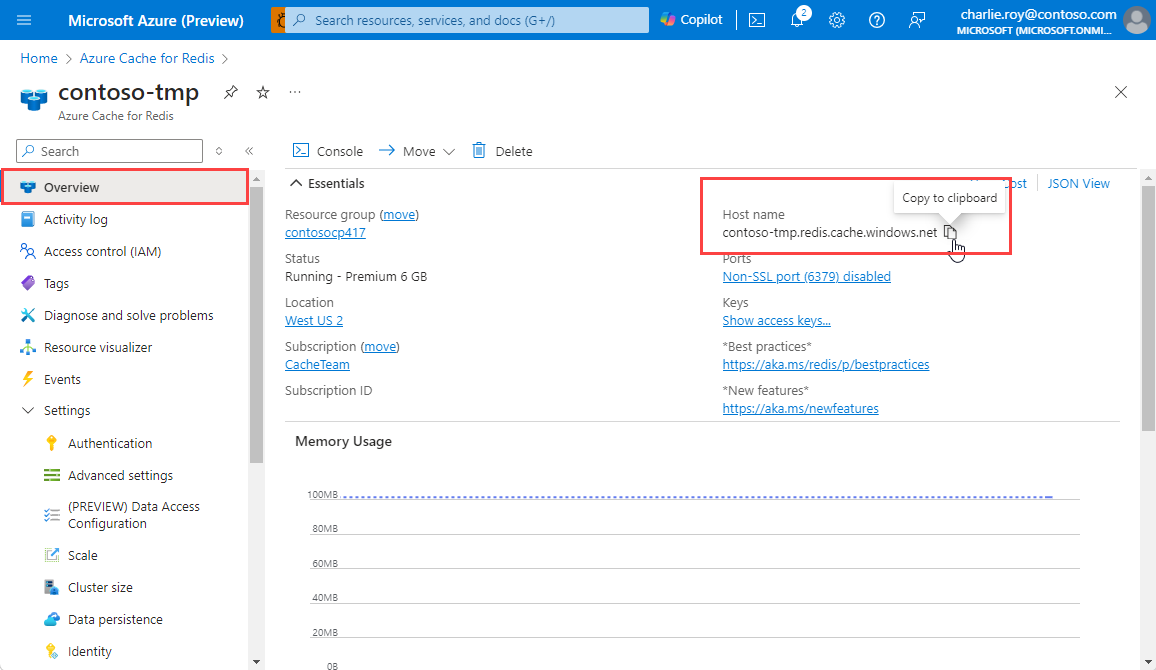
<Your Host Name>with the value from your Azure Cache for Redis instance. Your host name is of the form<DNS name>.<region>.redis.azure.net.Replace
<Your Username>with the values from your Microsoft Entra ID user.import redis from azure.identity import DefaultAzureCredential scope = "https://redis.azure.com/.default" host = "<Your Host Name>" port = 10000 user_name = "<Your Username>" def hello_world(): cred = DefaultAzureCredential() token = cred.get_token(scope) r = redis.Redis(host=host, port=port, ssl=True, # ssl connection is required. username=user_name, password=token.token, decode_responses=True) result = r.ping() print("Ping returned : " + str(result)) result = r.set("Message", "Hello!, The cache is working with Python!") print("SET Message returned : " + str(result)) result = r.get("Message") print("GET Message returned : " + result) result = r.client_list() print("CLIENT LIST returned : ") for c in result: print(f"id : {c['id']}, addr : {c['addr']}") if __name__ == '__main__': hello_world()Before you run your Python code from a Terminal, make sure you authorize the terminal for using Microsoft Entra ID.
azd auth loginRun
PythonApplication1.pywith Python. You should see results like the following example: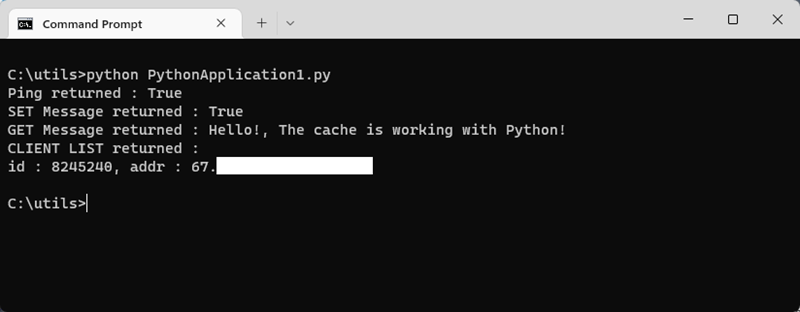
Create a Python script using reauthentication
Microsoft Entra ID access tokens have limited lifespans, averaging 75 minutes. In order to maintain a connection to your cache, you need to refresh the token. This example demonstrates how to do this using Python.
Create a new text file, add the following script. Then, save the file as
PythonApplication2.py.Replace
<Your Host Name>with the value from your Azure Managed Redis (preview) instance. Your host name is of the form<DNS name>.<region>.redis.azure.net.Replace
<Your Username>with the values from your Microsoft Entra ID user.import time import logging import redis from azure.identity import DefaultAzureCredential scope = "https://redis.azure.com/.default" host = "<Your Host Name>" port = 10000 user_name = "<Your Username>" def re_authentication(): _LOGGER = logging.getLogger(__name__) cred = DefaultAzureCredential() token = cred.get_token(scope) r = redis.Redis(host=host, port=port, ssl=True, # ssl connection is required. username=user_name, password=token.token, decode_responses=True) max_retry = 3 for index in range(max_retry): try: if _need_refreshing(token): _LOGGER.info("Refreshing token...") tmp_token = cred.get_token(scope) if tmp_token: token = tmp_token r.execute_command("AUTH", user_name, token.token) result = r.ping() print("Ping returned : " + str(result)) result = r.set("Message", "Hello!, The cache is working with Python!") print("SET Message returned : " + str(result)) result = r.get("Message") print("GET Message returned : " + result) result = r.client_list() print("CLIENT LIST returned : ") for c in result: print(f"id : {c['id']}, addr : {c['addr']}") break except redis.ConnectionError: _LOGGER.info("Connection lost. Reconnecting.") token = cred.get_token(scope) r = redis.Redis(host=host, port=port, ssl=True, # ssl connection is required. username=user_name, password=token.token, decode_responses=True) except Exception: _LOGGER.info("Unknown failures.") break def _need_refreshing(token, refresh_offset=300): return not token or token.expires_on - time.time() < refresh_offset if __name__ == '__main__': re_authentication()Run
PythonApplication2.pywith Python. You should see results like the following example:
Unlike the first example, If your token expires, this example automatically refreshes it.

Create a Python script to access your cache
Create a Python script to that uses either Microsoft Entra ID or access keys to connect to your Redis instance. We recommend you use Microsoft Entra ID.
Use Microsoft Entra ID authentication on your cache
Azure Redis caches, except for Enterprise and Enterprise Flash tiers, have Microsoft Entra Authentication enabled by default. Access keys are disabled by default.
Important
Microsoft recommends using Microsoft Entra ID authentication for the most secure authentication experience instead of using passwords or access keys. The authentication described in this section of the article uses access keys, which require a very high degree of trust in the application and carries risks not present when using Microsoft Entra ID. Use the approach in this document only when Microsoft Entra ID authentication is not viable.
In the Azure portal, select the cache where you'd like to use Microsoft Entra token-based authentication.
Select Authentication from the Resource menu.
Select Select member and enter the name of a valid user. The user you enter is automatically assigned Data Owner Access Policy by default when you select Save. You can also enter a managed identity or service principal to connect to your cache instance.
For information on using Microsoft Entra ID with Azure CLI, see the reference pages for identity.
Install the Microsoft Authentication Library
Install the Microsoft Authentication Library (MSAL). This library allows you to acquire security tokens from Microsoft identity to authenticate users.
You can use the Python Azure identity client library available that uses MSAL to provide token authentication support. Install this library using
pip:
pip install azure-identity
Create a Python script using Microsoft Entra ID
Create a new text file, add the following script, and save the file as
PythonApplication1.py.Replace
<Your Host Name>with the value from your Azure Cache for Redis instance. Your host name is of the form<DNS name>.redis.cache.windows.net.Replace
<Your Username>with the values from your Microsoft Entra ID user.import redis from azure.identity import DefaultAzureCredential scope = "https://redis.azure.com/.default" host = "<Your Host Name>" port = 6380 user_name = "<Your Username>" def hello_world(): cred = DefaultAzureCredential() token = cred.get_token(scope) r = redis.Redis(host=host, port=port, ssl=True, # ssl connection is required. username=user_name, password=token.token, decode_responses=True) result = r.ping() print("Ping returned : " + str(result)) result = r.set("Message", "Hello!, The cache is working with Python!") print("SET Message returned : " + str(result)) result = r.get("Message") print("GET Message returned : " + result) result = r.client_list() print("CLIENT LIST returned : ") for c in result: print(f"id : {c['id']}, addr : {c['addr']}") if __name__ == '__main__': hello_world()Before you run your Python code from a Terminal, make sure you authorize the terminal for using Microsoft Entra ID.
azd auth loginRun
PythonApplication1.pywith Python. You should see results like the following example:
Create a Python script using reauthentication
Microsoft Entra ID access tokens have limited lifespans, averaging 75 minutes. In order to maintain a connection to your cache, you need to refresh the token. This example demonstrates how to do this using Python.
Create a new text file, add the following script. Then, save the file as
PythonApplication2.py.Replace
<Your Host Name>with the value from your Azure Cache for Redis instance. Your host name is of the form<DNS name>.redis.cache.windows.net.Replace
<Your Username>with the values from your Microsoft Entra ID user.import time import logging import redis from azure.identity import DefaultAzureCredential scope = "https://redis.azure.com/.default" host = "<Your Host Name>" port = 6380 user_name = "<Your Username>" def re_authentication(): _LOGGER = logging.getLogger(__name__) cred = DefaultAzureCredential() token = cred.get_token(scope) r = redis.Redis(host=host, port=port, ssl=True, # ssl connection is required. username=user_name, password=token.token, decode_responses=True) max_retry = 3 for index in range(max_retry): try: if _need_refreshing(token): _LOGGER.info("Refreshing token...") tmp_token = cred.get_token(scope) if tmp_token: token = tmp_token r.execute_command("AUTH", user_name, token.token) result = r.ping() print("Ping returned : " + str(result)) result = r.set("Message", "Hello!, The cache is working with Python!") print("SET Message returned : " + str(result)) result = r.get("Message") print("GET Message returned : " + result) result = r.client_list() print("CLIENT LIST returned : ") for c in result: print(f"id : {c['id']}, addr : {c['addr']}") break except redis.ConnectionError: _LOGGER.info("Connection lost. Reconnecting.") token = cred.get_token(scope) r = redis.Redis(host=host, port=port, ssl=True, # ssl connection is required. username=user_name, password=token.token, decode_responses=True) except Exception: _LOGGER.info("Unknown failures.") break def _need_refreshing(token, refresh_offset=300): return not token or token.expires_on - time.time() < refresh_offset if __name__ == '__main__': re_authentication()Run
PythonApplication2.pywith Python. You should see results like the following example:
Unlike the first example, If your token expires, this example automatically refreshes it.
Clean up resources
If you want to continue to use the resources you created in this article, keep the resource group.
Otherwise, if you're finished with the resources, you can delete the Azure resource group that you created to avoid charges.
Important
Deleting a resource group is irreversible. When you delete a resource group, all the resources in it are permanently deleted. Make sure that you do not accidentally delete the wrong resource group or resources. If you created the resources inside an existing resource group that contains resources you want to keep, you can delete each resource individually instead of deleting the resource group.
To delete a resource group
Sign in to the Azure portal, and then select Resource groups.
Select the resource group you want to delete.
If there are many resource groups, use the Filter for any field... box, type the name of your resource group you created for this article. Select the resource group in the results list.
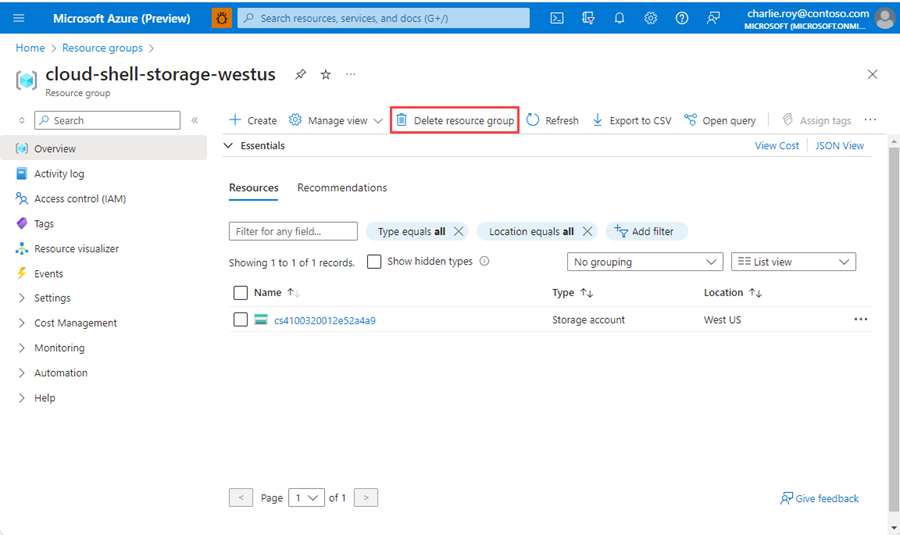
Select Delete resource group.
You're asked to confirm the deletion of the resource group. Type the name of your resource group to confirm, and then select Delete.
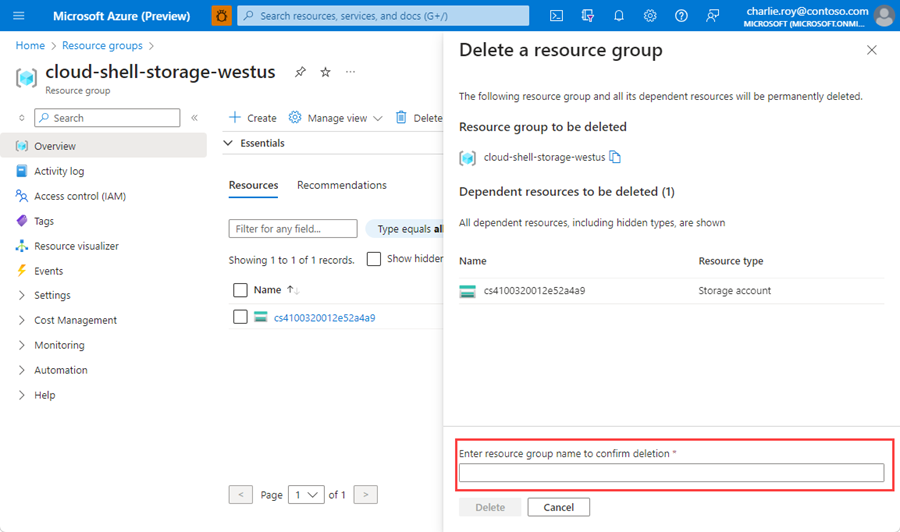
After a few moments, the resource group and all of its resources are deleted.