Deploy a client application to connect to a MongoDB cluster on Azure Kubernetes Service (AKS)
After deploying the MongoDB cluster on AKS, you can deploy a sample client application to interact with MongoDB. This tutorial builds upon the MongoDB cluster deployment covered in previous guides.
Connect to the MongoDB shell
In this section, you connect to the MongoDB shell. Once you're connected, you create a database and collection, insert data, and run queries.
Create a pod named
percona-clientin the${AKS_MONGODB_NAMESPACE}namespace in your cluster using thekubectl runcommand.kubectl -n "${AKS_MONGODB_NAMESPACE}" run -i --rm --tty percona-client --image=${MY_ACR_REGISTRY}.azurecr.io/percona-server-mongodb:7.0.8-5 --restart=Never -- bash -ilConnect to the MongoDB shell using the following command. Make sure to replace
databaseAdmin,databaseAdminPassword, andAKS_MONGODB_CLUSTER_NAMEwith the actual values you obtained from the previous tutorial.mongosh "mongodb://${databaseAdmin}:${databaseAdminPassword}@${AKS_MONGODB_CLUSTER_NAME}-mongos.mongodb.svc.cluster.local/admin?replicaSet=rs0&ssl=false&directConnection=true"In the MongoDB shell, create the database and collection using the following script:
// Connect to MongoDB
use employeeDB;

// Create the employees collection and insert 200 records
for (let i = 1; i <= 200; i++) {
    db.employees.insertOne({
        Id: i,
        EmployeeId: `E${1000 + i}`,
        FirstName: `FirstName${i}`,
        LastName: `LastName${i}`,
        Department: `Department${(i % 10) + 1}`
    });
}
In the MongoDB shell, you can perform various queries on the
employeescollection. The following commands show some example queries you can run:# Find all employees db.employees.find().pretty(); # Find an employee by EmployeeId db.employees.find({ EmployeeId: "E1001" }).pretty(); # Find employees in a specific department db.employees.find({ Department: "Department1" }).pretty(); # Count the number of employees in a specific department db.employees.countDocuments({ Department: "Department1" }); # Count the total number of records in the employee collection db.employees.countDocuments();
Create and update secrets
To deploy the mongo-express client app, you first need to create secrets specific to mongo-express in Azure Key Vault and update your secret store you created in the previous tutorial.
Create a
mongo-expressbasic-auth username and password secret to use to log in to the client app using the following script andaz keyvault secret setcommands:#This function generates secrets of 32 characters using only alphanumeric characters generateRandomPasswordString() { cat /dev/urandom | LC_ALL=C tr -dc 'a-zA-Z0-9' | fold -w 32 | head -n 1 } az keyvault secret set --vault-name $MY_KEYVAULT_NAME --name MONGOEXPRESS-CONFIG-BASICAUTH-USERNAME --value MONGOEXPRESSADMINUSER --output table az keyvault secret set --vault-name $MY_KEYVAULT_NAME --name MONGOEXPRESS-CONFIG-BASICAUTH-PASSWORD --value $(generateRandomPasswordString) --output tableCreate a secret for the
mongo-expressconfig server details using theaz keyvault secret setcommand.az keyvault secret set --vault-name $MY_KEYVAULT_NAME --name MONGODB-CONFIG-SERVER --value ${MY_CLUSTER_NAME}-${AKS_MONGODB_NAMESPACE}-mongos.mongodb.svc.cluster.local --output tableUpdate the secrets in the secret store you created in the previous tutorial using the
kubectl applycommand.kubectl apply -f - <<EOF apiVersion: external-secrets.io/v1beta1 kind: ExternalSecret metadata: name: ${AKS_MONGODB_SECRETS_NAME} namespace: ${AKS_MONGODB_NAMESPACE} spec: refreshInterval: 1h secretStoreRef: kind: SecretStore name: azure-store target: name: "${AKS_MONGODB_SECRETS_NAME}" creationPolicy: Owner data: # name of the SECRET in the Azure KV (no prefix is by default a SECRET) - secretKey: MONGODB_BACKUP_USER remoteRef: key: MONGODB-BACKUP-USER - secretKey: MONGODB_BACKUP_PASSWORD remoteRef: key: MONGODB-BACKUP-PASSWORD - secretKey: MONGODB_DATABASE_ADMIN_USER remoteRef: key: MONGODB-DATABASE-ADMIN-USER - secretKey: MONGODB_DATABASE_ADMIN_PASSWORD remoteRef: key: MONGODB-DATABASE-ADMIN-PASSWORD - secretKey: MONGODB_CLUSTER_ADMIN_USER remoteRef: key: MONGODB-CLUSTER-ADMIN-USER - secretKey: MONGODB_CLUSTER_ADMIN_PASSWORD remoteRef: key: MONGODB-CLUSTER-ADMIN-PASSWORD - secretKey: MONGODB_CLUSTER_MONITOR_USER remoteRef: key: MONGODB-CLUSTER-MONITOR-USER - secretKey: MONGODB_CLUSTER_MONITOR_PASSWORD remoteRef: key: MONGODB-CLUSTER-MONITOR-PASSWORD - secretKey: MONGODB_USER_ADMIN_USER remoteRef: key: MONGODB-USER-ADMIN-USER - secretKey: MONGODB_USER_ADMIN_PASSWORD remoteRef: key: MONGODB-USER-ADMIN-PASSWORD - secretKey: PMM_SERVER_API_KEY remoteRef: key: PMM-SERVER-API-KEY - secretKey: MONGOEXPRESS_CONFIG_BASICAUTH_USERNAME remoteRef: key: MONGOEXPRESS-CONFIG-BASICAUTH-USERNAME - secretKey: MONGOEXPRESS_CONFIG_BASICAUTH_PASSWORD remoteRef: key: MONGOEXPRESS-CONFIG-BASICAUTH-PASSWORD - secretKey: MONGODB_CONFIG_SERVER remoteRef: key: MONGODB-CONFIG-SERVER EOFExample output:
externalsecret.external-secrets.io/cluster-aks-mongodb-secrets configured
Deploy Mongo Express
The sample client application uses mongo-express, a web-based MongoDB admin interface built with Node.js, Express, and Bootstrap 5 to perform CRUD operations.
Apply the following YAML manifest using the
kubectl applycommand:kubectl apply -f -<<EOF apiVersion: v1 kind: Service metadata: name: mongo-express namespace: ${AKS_MONGODB_NAMESPACE} spec: type: LoadBalancer ports: - port: 8081 # Service port for HTTP access targetPort: 8081 # Container port for Mongo Express selector: app: mongo-express --- apiVersion: apps/v1 kind: Deployment metadata: name: mongo-express namespace: ${AKS_MONGODB_NAMESPACE} spec: replicas: 1 selector: matchLabels: app: mongo-express template: metadata: labels: app: mongo-express spec: containers: - name: mongo-express image: mongo-express ports: - containerPort: 8081 env: - name: ME_CONFIG_MONGODB_SERVER valueFrom: secretKeyRef: name: ${AKS_MONGODB_SECRETS_NAME} key: MONGODB_CONFIG_SERVER - name: ME_CONFIG_BASICAUTH_USERNAME valueFrom: secretKeyRef: name: ${AKS_MONGODB_SECRETS_NAME} key: MONGOEXPRESS_CONFIG_BASICAUTH_USERNAME - name: ME_CONFIG_BASICAUTH_PASSWORD valueFrom: secretKeyRef: name: ${AKS_MONGODB_SECRETS_NAME} key: MONGOEXPRESS_CONFIG_BASICAUTH_PASSWORD - name: ME_CONFIG_MONGODB_PORT value: "27017" - name: ME_CONFIG_MONGODB_ADMINUSERNAME valueFrom: secretKeyRef: name: ${AKS_MONGODB_SECRETS_NAME} key: MONGODB_DATABASE_ADMIN_USER - name: ME_CONFIG_MONGODB_ADMINPASSWORD valueFrom: secretKeyRef: name: ${AKS_MONGODB_SECRETS_NAME} key: MONGODB_DATABASE_ADMIN_PASSWORD EOFExample output:
service/mongo-express created
deployment.apps/mongo-express created
Test the application
When the application runs, a Kubernetes service exposes the application to the internet. This process might take some time to complete.
Wait for the
mongo-expressservice to deploy and retrieve theEXTERNAL-IPusing the following script.while true; do IP=$(kubectl get service mongo-express -n ${AKS_MONGODB_NAMESPACE} -o jsonpath='{.status.loadBalancer.ingress[0].ip}') if [[ -n $IP ]]; then kubectl get service mongo-express -n ${AKS_MONGODB_NAMESPACE} break else echo "Waiting for LoadBalancer IP..." sleep 5 fi doneWhen the
EXTERNAL-IPis assigned, you see a valid public IP address for the service, as shown in the following example output:NAME TYPE CLUSTER-IP EXTERNAL-IP PORT(S) AGE mongo-express LoadBalancer 10.0.150.235 x.xxx.xx.xxx 8081:30908/TCP 86sOpen your web browser and navigate to
http://<EXTERNAL-IP>:8081.When prompted, enter the
usernameandpasswordset in the deployment configuration. If you need to retrieve the username and password, you can do so using the following commands:#username export Username=$(kubectl get secret ${AKS_MONGODB_SECRETS_NAME} -n ${AKS_MONGODB_NAMESPACE} -o jsonpath="{.data.MONGOEXPRESS_CONFIG_BASICAUTH_USERNAME}" | base64 --decode) #echo $Username #password export Password=$(kubectl get secret ${AKS_MONGODB_SECRETS_NAME} -n ${AKS_MONGODB_NAMESPACE} -o jsonpath="{.data.MONGOEXPRESS_CONFIG_BASICAUTH_PASSWORD}" | base64 --decode) #echo $Password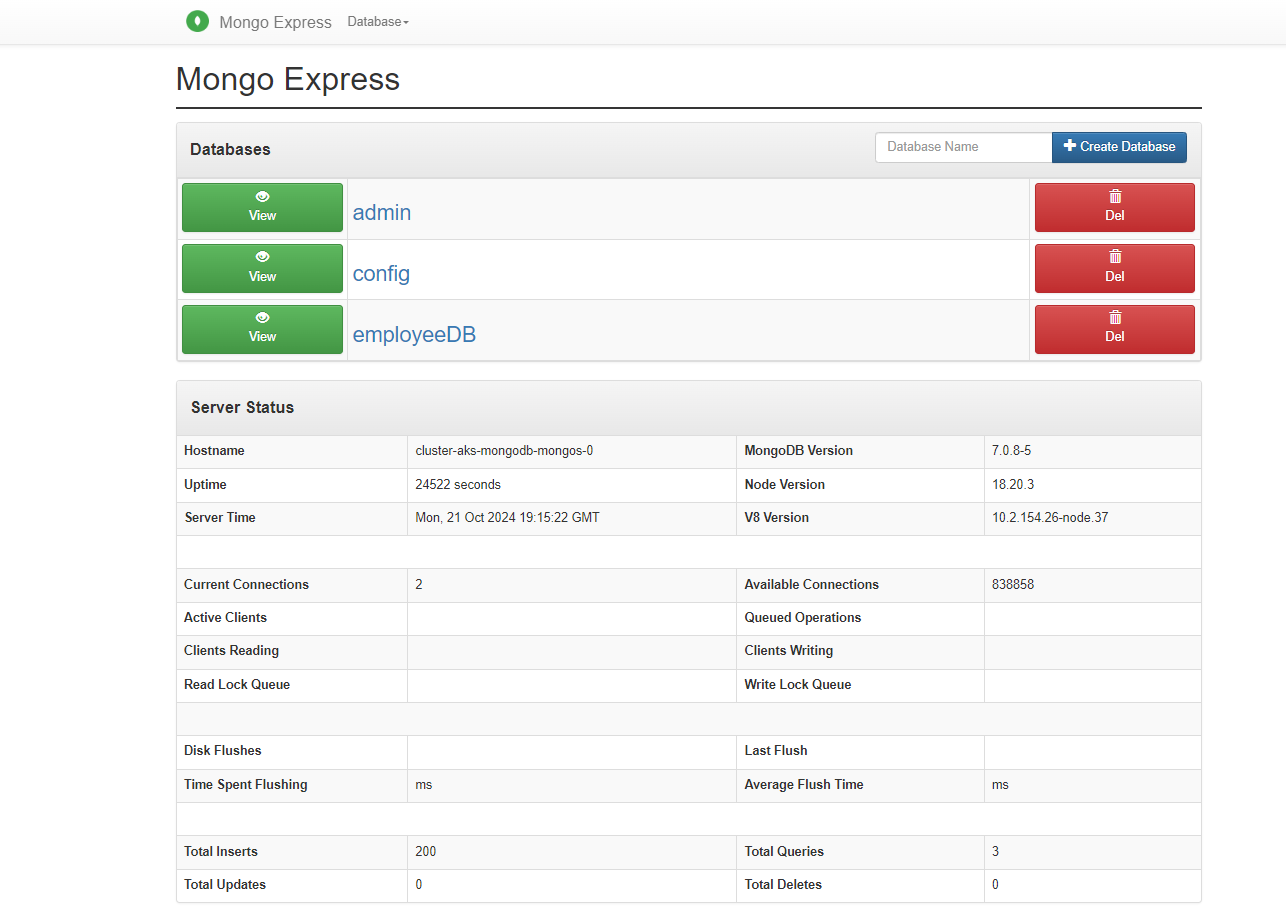

Next step

Azure Kubernetes Service