How to configure a private link for Azure AI Foundry hubs
We have two network isolation aspects. One is the network isolation to access an Azure AI Foundry hub. Another is the network isolation of computing resources in your hub and projects such as compute instances, serverless, and managed online endpoints. This article explains the former highlighted in the diagram. You can use private link to establish the private connection to your hub and its default resources. This article is for Azure AI Foundry (hub and projects). For information on Azure AI services, see the Azure AI services documentation.
You get several hub default resources in your resource group. You need to configure following network isolation configurations.
- Disable public network access of hub default resources such as Azure Storage, Azure Key Vault, and Azure Container Registry.
- Establish private endpoint connection to hub default resources. You need to have both a blob and file private endpoint for the default storage account.
- If your storage account is private, assign roles to allow access.
Prerequisites
You must have an existing Azure Virtual Network to create the private endpoint in.
Important
We do not recommend using the 172.17.0.0/16 IP address range for your VNet. This is the default subnet range used by the Docker bridge network or on-premises.
Disable network policies for private endpoints before adding the private endpoint.
Create a hub that uses a private endpoint
If you are creating a new hub, use the following tabs to select how you are creating the hub (Azure portal or Azure CLI.) Each of these methods requires an existing virtual network:
Note
The information in this document is only about configuring a private link. For a walkthrough of creating a secure hub in the portal, see Create a secure hub in the Azure portal.
From the Azure portal, search for Azure AI Foundry and create a new resource by selecting + New Azure AI.
After configuring the Basics and Storage tabs, select the Networking tab and pick the Network isolation option that best suits your needs.
Scroll down to Workspace Inbound access and choose + Add.
Input required fields. When selecting the Region, select the same region as your virtual network.
Add a private endpoint to a hub
Use one of the following methods to add a private endpoint to an existing hub:
From the Azure portal, select your hub.
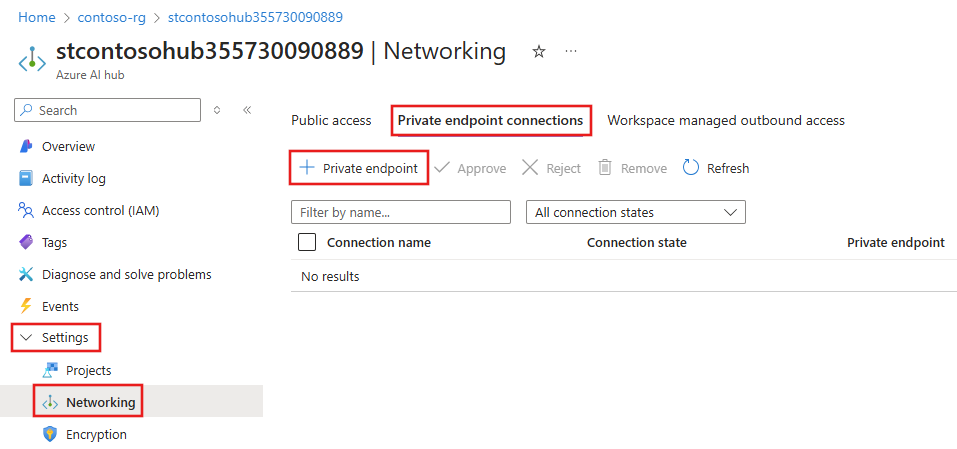
From the left side of the page, select Settings, Networking, and then select the Private endpoint connections tab. Select + Private endpoint.

When going through the forms to create a private endpoint, be sure to:
- From Basics, select the same the Region as your virtual network.
- From Resource, select
amlworkspaceas the target sub-resource. - From the Virtual Network form, select the virtual network and subnet that you want to connect to.
After populating the forms with any additional network configurations you require, use the Review + create tab to review your settings and select Create to create the private endpoint.
Remove a private endpoint
You can remove one or all private endpoints for a hub. Removing a private endpoint removes the hub from the Azure Virtual Network that the endpoint was associated with. Removing the private endpoint might prevent the hub from accessing resources in that virtual network, or resources in the virtual network from accessing the workspace. For example, if the virtual network doesn't allow access to or from the public internet.
Warning
Removing the private endpoints for a hub doesn't make it publicly accessible. To make the hub publicly accessible, use the steps in the Enable public access section.
To remove a private endpoint, use the following information:
From the Azure portal, select your hub.
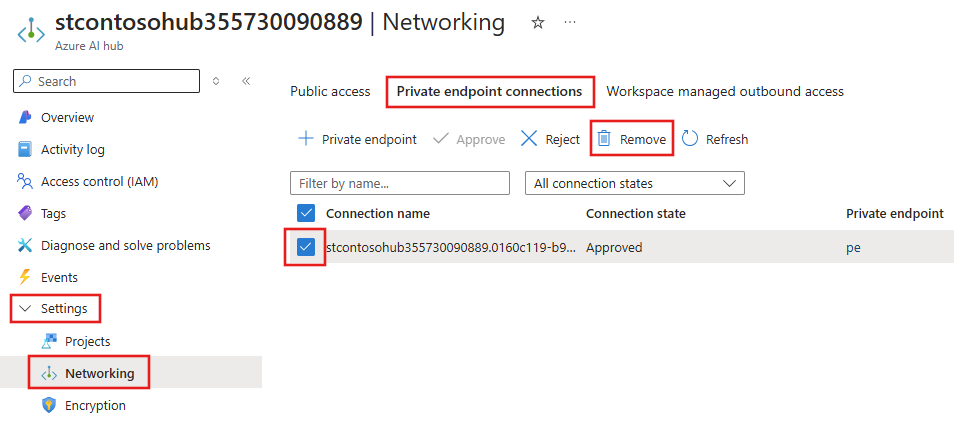
From the left side of the page, select Settings, Networking, and then select the Private endpoint connections tab.
Select the endpoint to remove and then select Remove.

Enable public access
In some situations, you might want to allow someone to connect to your secured hub over a public endpoint, instead of through the virtual network. Or you might want to remove the workspace from the virtual network and re-enable public access.
Important
Enabling public access doesn't remove any private endpoints that exist. All communications between components behind the virtual network that the private endpoint(s) connect to are still secured. It enables public access only to the hub, in addition to the private access through any private endpoints.
To enable public access, use the following steps:
- From the Azure portal, select your hub.
- From the left side of the page, select Networking and then select the Public access tab.
- Select Enabled from all networks, and then select Save.
Private storage configuration
If your storage account is private (uses a private endpoint to communicate with your project), you perform the following steps:
Our services need to read/write data in your private storage account using Allow Azure services on the trusted services list to access this storage account with following managed identity configurations. Enable the system assigned managed identity of Azure AI Service and Azure AI Search, then configure role-based access control for each managed identity.
Role Managed Identity Resource Purpose Reference ReaderAzure AI Foundry project Private endpoint of the storage account Read data from the private storage account. Storage File Data Privileged ContributorAzure AI Foundry project Storage Account Read/Write prompt flow data. Prompt flow doc Storage Blob Data ContributorAzure AI Service Storage Account Read from input container, write to preprocess result to output container. Azure OpenAI Doc Storage Blob Data ContributorAzure AI Search Storage Account Read blob and write knowledge store Search doc. Tip
Your storage account may have multiple private endpoints. You need to assign the
Readerrole to each private endpoint for your Azure AI Foundry project managed identity.Assign the
Storage Blob Data readerrole to your developers. This role allows them to read data from the storage account.Verify that the project's connection to the storage account uses Microsoft Entra ID for authentication. To view the connection information, go to the Management center, select Connected resources, and then select the storage account connections. If the credential type isn't Entra ID, select the pencil icon to update the connection and set the Authentication method to Microsoft Entra ID.
For information on securing playground chat, see Securely use playground chat.
Custom DNS configuration
See Azure Machine Learning custom DNS article for the DNS forwarding configurations.
If you need to configure custom DNS server without DNS forwarding, use the following patterns for the required A records.
<AI-STUDIO-GUID>.workspace.<region>.cert.api.azureml.ms<AI-PROJECT-GUID>.workspace.<region>.cert.api.azureml.ms<AI-STUDIO-GUID>.workspace.<region>.api.azureml.ms<AI-PROJECT-GUID>.workspace.<region>.api.azureml.msml-<workspace-name, truncated>-<region>-<AI-STUDIO-GUID>.<region>.notebooks.azure.netml-<workspace-name, truncated>-<region>-<AI-PROJECT-GUID>.<region>.notebooks.azure.netNote
The workspace name for this FQDN might be truncated. Truncation is done to keep
ml-<workspace-name, truncated>-<region>-<workspace-guid>at 63 characters or less.<instance-name>.<region>.instances.azureml.msNote
- Compute instances can be accessed only from within the virtual network.
- The IP address for this FQDN is not the IP of the compute instance. Instead, use the private IP address of the workspace private endpoint (the IP of the
*.api.azureml.msentries.)
<instance-name>.<region>.instances.azureml.ms- Only used by theaz ml compute connect-sshcommand to connect to computers in a managed virtual network. Not needed if you aren't using a managed network or SSH connections.<managed online endpoint name>.<region>.inference.ml.azure.com- Used by managed online endpointsmodels.ai.azure.com- Used for deploying Models as a Service
To find the private IP addresses for your A records, see the Azure Machine Learning custom DNS article. To check AI-PROJECT-GUID, go to the Azure portal, select your project, settings, properties, and the workspace ID is displayed.
Limitations
- You might encounter problems trying to access the private endpoint for your hub if you're using Mozilla Firefox. This problem might be related to DNS over HTTPS in Mozilla Firefox. We recommend using Microsoft Edge or Google Chrome.


