Windows 8.1 Deployment: From the ground up – Deploy The Image
Hello Folks,
This is the last post in this series. In previous posts we covered
- Generate an inventory of our environment
- Setup our workbench to build our image
- Started building our image by importing the OS and Drivers
- Finalized the Image with Packages and Application
Today we’ll use the image we already created and we will deploy it to our XP test machine and we’ll prepare the Windows Deployment Server to deploy it using PXE boot.
There is one issue with this plan. Some of the tools in the ADK for Windows 8.1 don’t support Windows XP. (User State Migration Tool version 6.3 and BOOTSECT.EXE). So what can you do? I'll summarize here but Michael Niehaus wrote about this in detail in his blog here. the just of it is that you need
- Update some scripts from customized ones (see Michael’s post for the files)
- Install the ADK for Windows 8 on a separate Windows 7 or Windows 8 system so you can copy 2 components from it.
- Copy the USMT files and the BOOTSECT.EXE from the system with the ADK for Windows 8 to the deployment share.
- Update the deployment share to rebuild the image with the files we just copied.
Now we are ready to deploy our image. First we will setup Windows Deployment Services to deploy the image using a network-based installation.
1- In server manager on our DC01 we’ll install the Windows Deployment Service and the Management tools
2- When prompted by the install wizard ensure that you select both the deployment server and the Transport server. The transport server is used to create multicast namespaces that transmit data. The deployment server is used to configure and remotely install Windows operating systems and it depends on the core parts of Transport Server.
Complete the wizard and finish installing WDS.
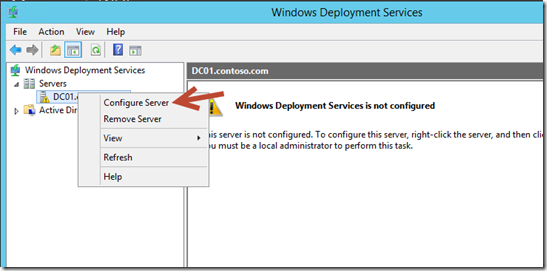
3- Once this is done you need to use the Windows Deployment Services Management Console in the Tools menu and configure the WDS service.
4- In the Configuration Wizard, Select Integrated with Active Directory in the Install Option page.
5- and in the Remote Installation Folder location pick a location where WDS will store the boot files and images. In our case we put that on the D: drive.
6- The Proxy DHCP Server page is where we will identify if your WDS is co-existing with your DHCP server. In our case it’s all on the DC so we ensure that both check boxes are selected to enable the coexistence.
7- The PXE initial settings allows you to decide how you want to respond to machines requesting boot images and installation. For our lab we selected Respond to all client computers (without requiring administrator approval). after that just complete the wizard and finish the configuration.
8- our WDS server is installed and configured. It’s now time to import the boot images from our MDT image so they can be deployed through WDS. right-click Boot images and select “Add boot image”.
9- Browse to D:\DeploymentShare\Boot\ and select LitetouchPE_x86.wim for the 32bit image. In our case we imported both 32 and 64 bit boot wim files.
Complete the wizard by giving your boot images proper Names and descriptions. (very useful if you have multiple images) and complete the wizard.
10- The last thing to do for the WDS server is to start the service by right-clicking the server and under All-Tasks click Start.
That’s it. WDS is ready to serve up your MDT image as noted in the following screen captures of machines with no OS, booting from the network to install the image.
From a Windows XP machine in our environment all we need to do is execute the BDD_Autorun script from \\DC01\deploymentShare$ and follow the instructions to deploy a fresh version of Window 8 and retain the files and profiles store locally. (the BDD_ scripts names are leftover from when MDT was called Business Desktop Deployment Toolkit)
So… you’re ready to experiment. Download Windows Server 2012 R2 and create your lab environment. (Instructions can be found here) to experiment. we did not go in depth on customizing the deployment and automating it but there are lots of online resources to help you with that.
Now you have one less excuse for not deploying a modern OS.
Have fun!
Cheers!
Pierre Roman | Technology Evangelist
Twitter | Facebook | LinkedIn


