Extensibility in Dynamics AX 2012 R3 CU8 (CRT, RetailServer, MPOS) Part 2 – New data entity
Overview
This blog is to expand the knowledge you gained in part 1 of the series (https://blogs.msdn.com/b/axsa/archive/2015/02/17/extensibility-in-dynamics-ax-2012-r3-cu8-crt-retailserver-mpos-part-1.aspx). In case you get stuck, I recommended that you make yourself familiar with part 1 first. Some of the information from there is required and assumed.
The steps are based on the Dynamics AX 2012 R3 CU8 VM image that can be requested via LCS (https://lcs.dynamics.com/Logon/Index) which most partners have access to (Contoso sample). Alternatively, PartnerSource (https://mbs.microsoft.com/partnersource/northamerica/) can be used to download the VM as well. Make sure you get the CU8 version.
It is recommended to review some of the online resources around the Retail solution, either now or during the processes of following this blog (https://technet.microsoft.com/en-us/library/jj710398.aspx).
The areas this blog covers are:
- AX: Adding a new data entity, related to a retail store, and populating it by means of a job (no UI)
- CDX: configuring CDX in order to include the new table in data synchronizations
- CRT: adding a new data entity and new service
- RetailServer: exposing a new controller for the new entity; adding new ODATA action
- MPOS: adding plumbing to call RetailServer; updating UI to expose data
A future blog will cover topics and suggestions for changing existing CRT code. Stay tuned for that.
The changed code is available in ZIP format which includes the files that have been added or changed only. It can be applied (after backing up your existing SDK) on top of the
“Retail SDK CU8” folder. Note that the ZIP file includes the changes from part 1 as well.
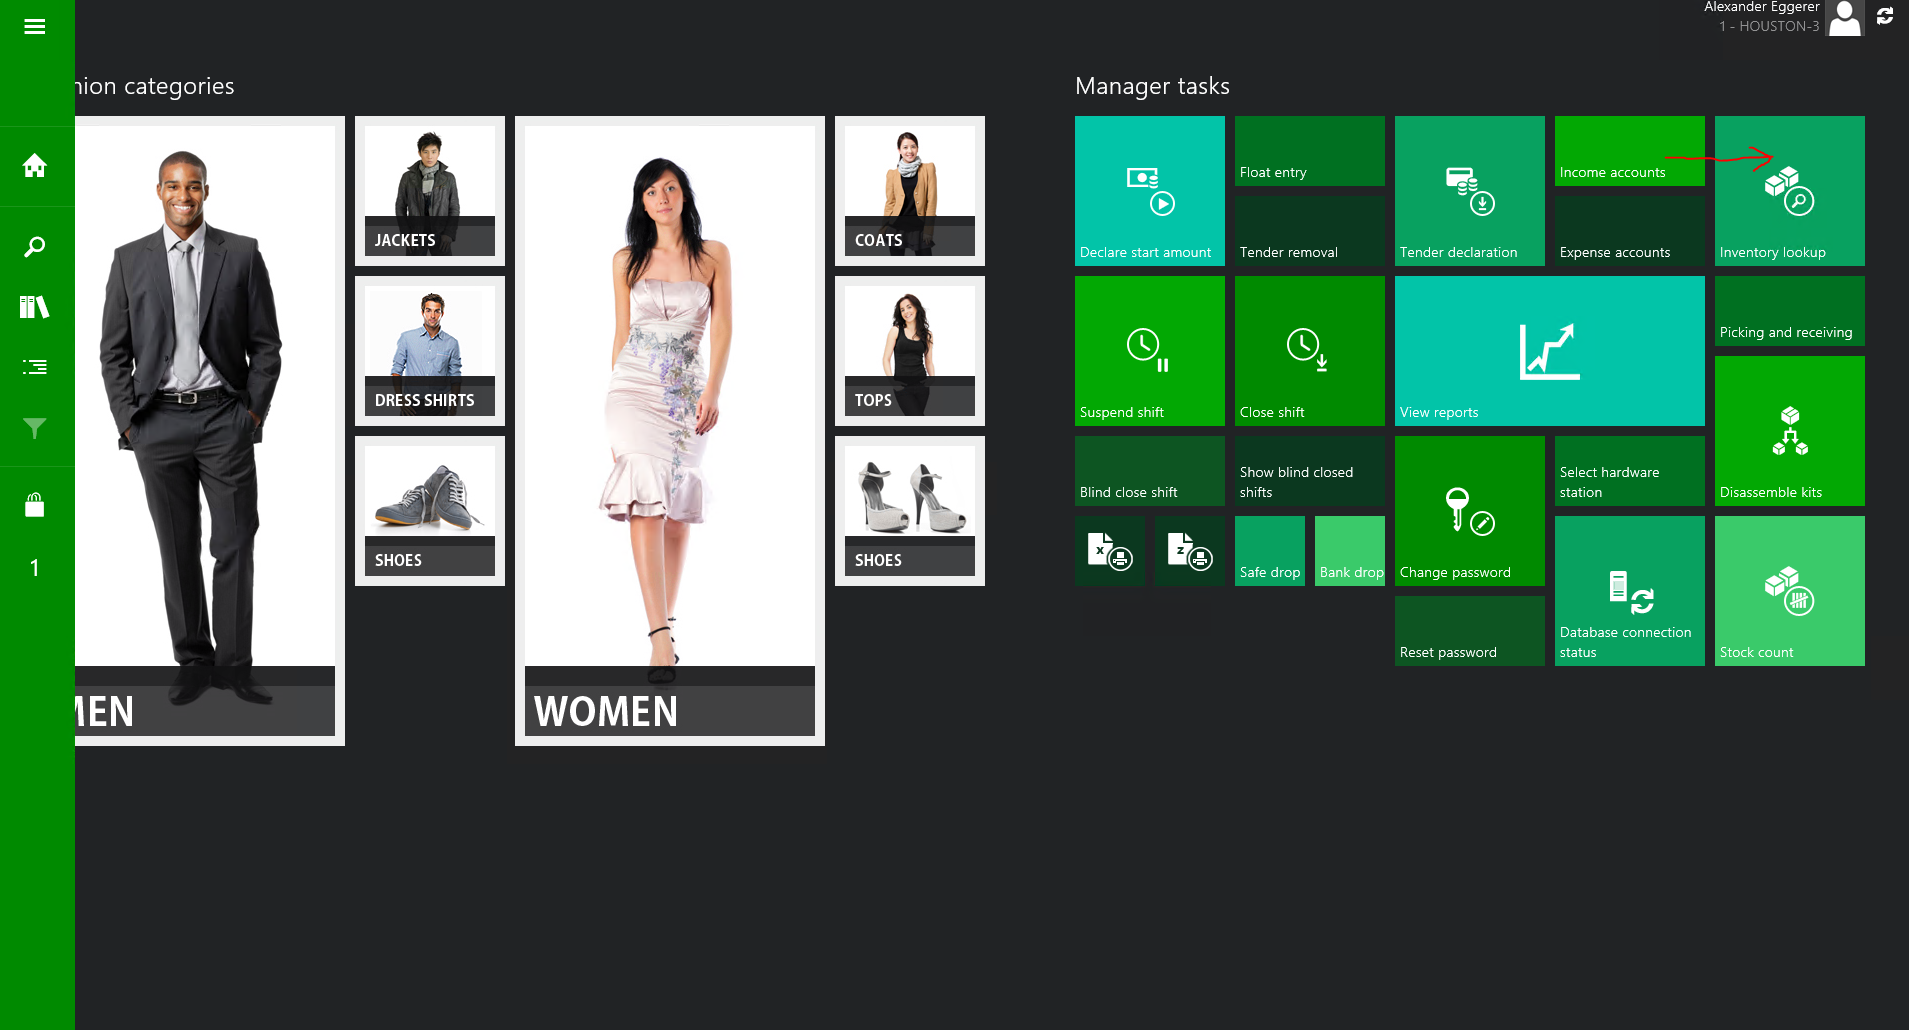
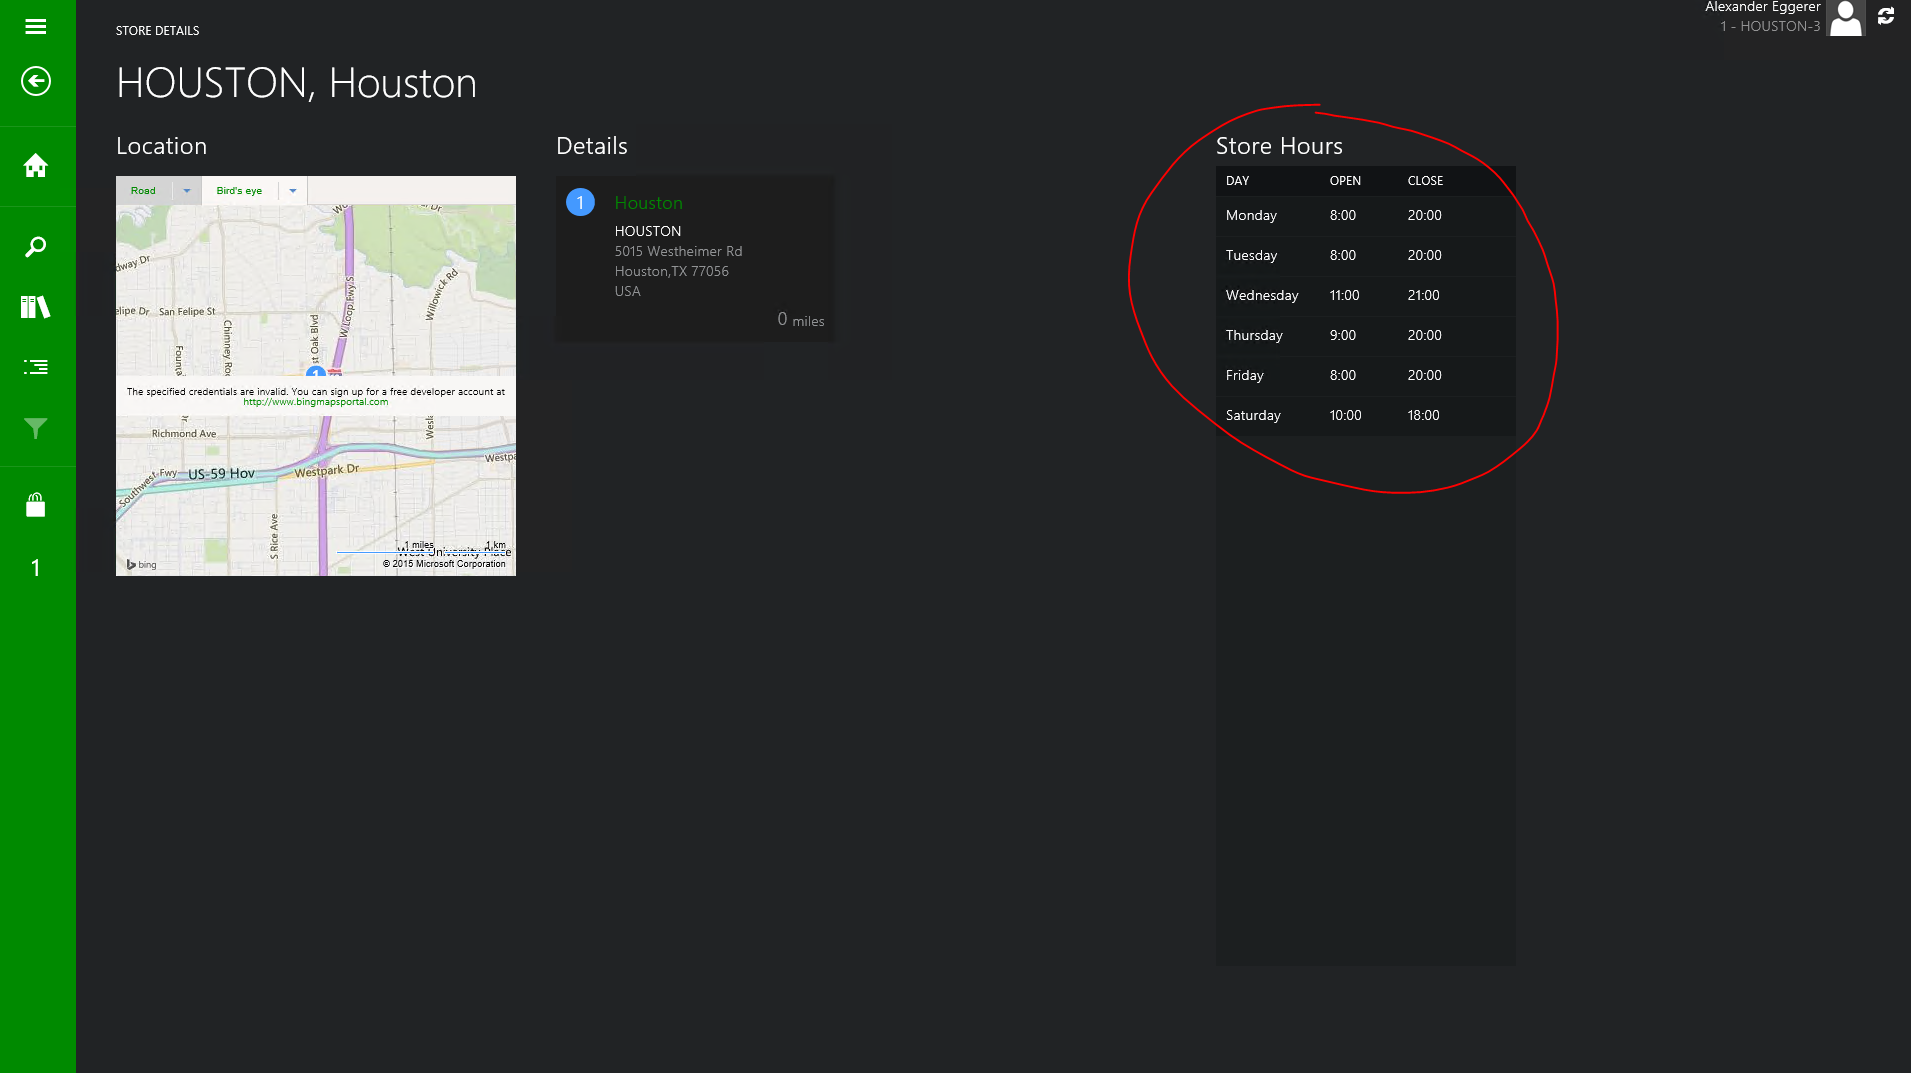
This sample customization will update the MPOS terminal to show more detailed opening times for a store. Remember that a store worker can look up item availability across multiple stores. Imagine that as part of that flow, the worker would like to advise the customer if a particular store is open or not. See the screen shot below for the UI flow:
Notes:
- The sample is to illustrate the process of a simple customization. It is not intended for product use.
- All changes are being made under the login contoso\emmah. If you use a different account, or different demo data altogether please adjust the below steps accordingly.
High-level steps
The following steps need to be carried out:
- Setup the Retail SDK CU8 for development (see part 1)
- Prepare MPOS to be run from Visual Studio from unchanged SDK code (see part 1)
- Activate the MPOS device (see part 1)
- Include new entity in AX
- Configure CDX to sync new entity
- Channel schema update and test
- Add CRT entity, service, request, response, datamanager and RetailServer controller with new action
- Update client framework to call RetailServer endpoint
- Update client framework channel manager with new functionality
- Update client framework’s view model
- Update MPOS’s view to consume updated view model
- Test
Detailed steps
Setup the Retail SDK CU8 for development
See part 1 at https://blogs.msdn.com/b/axsa/archive/2015/02/17/extensibility-in-dynamics-ax-2012-r3-cu8-crt-retailserver-mpos-part-1.aspx.
Prepare MPOS to be run from Visual Studio from unchanged SDK code
See part 1 at https://blogs.msdn.com/b/axsa/archive/2015/02/17/extensibility-in-dynamics-ax-2012-r3-cu8-crt-retailserver-mpos-part-1.aspx.
Activate the MPOS device
See part 1 at https://blogs.msdn.com/b/axsa/archive/2015/02/17/extensibility-in-dynamics-ax-2012-r3-cu8-crt-retailserver-mpos-part-1.aspx.
Include new entity in AX
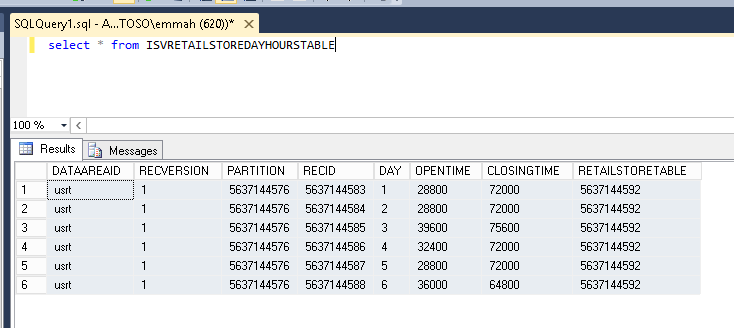
In order to store the store hours per store, we will be using a new table called ISVRetailStoreDayHoursTable. It will store the day, and open and closing times for each store.
As part of the ZIP folder you can find the xpo file at SampleInfo\Sample2_StoreDayHours.xpo. Import this file into AX. It includes 2 items: the table and a simple job that populates sample data for the Houston store.
Run the job named Temp_InsertData at least once. Then inspect the table with SQL Server Management studio:
Configure CDX to sync new entity
In AX, add a new location table and the appropriate columns to the AX 2012 R3 schema (USRT/Retail/Setup/Retail Channel Schema)
Create a new scheduler subjob (USRT/Retail/Setup/Scheduler subjobs)
Click transfer field list and make sure that the fields match as above.
Add the new subjob to the 1070 Channel configuration job (USRT/Retail/Setup/Scheduler Job)
Edit the table distribution XML to include the new table (USRT/Retail/Setup/Retail Channel Schema)
The easiest is to get the XML out of the text box, edit it outside with a XML editor, and then get it back in. The change you need to do is to add this XML fragment:
<Table name="ISVRETAILSTOREDAYHOURSTABLE">
<LinkGroup>
<Link type="FieldMatch" fieldName="RetailStoreTable" parentFieldName="RecId" />
</LinkGroup>
</Table>
in two places. Both times, it needs to be added inside the RetailStoreTable table XML node.
At the end, click Generate Classes (USRT/Retail/Setup/Retail Channel Schema/AX 2012 R3)
Channel schema update and test
The equivalent change to the table schema must be made in the channel side. This has to be done to all channel databases. Use SQL Server Management Studio and create the table. Since this is a sample, we won’t add stored procedures, we just do that in code. However, it is recommended to use sprocs for performance and security reasons.
The file can be found in the ZIP folder at SampleInfo\ChannelSchemaUpdates.txt
Now, go back to AX and run the 1070 job (USRT/Retail/Periodic/Distribution Schedule/1070/Run now)
Then, verify in AX that the job succeeded (USRT/Retail/Inquiries/Download Sessions/Process status messages). You should see a status of “Applied” for the stores.
Add CRT entity, service, request, response, datamanager and RetailServer controller with new action
Use the solution in the ZIP file at SampleInfo\RSCRTExtension\RSCRTExtension.sln and inspect he code.
Since this part is based on part 1, I assume you have:
- already configured the pre.settings file (for rapid deployment as part of the build into RetailServer’s bin directory),
- already configured RetailServer’s version of commerceRuntime.config to include the new CRT extension dll, and
- already configured RetailServer’s web.config file to include our new extension dll.
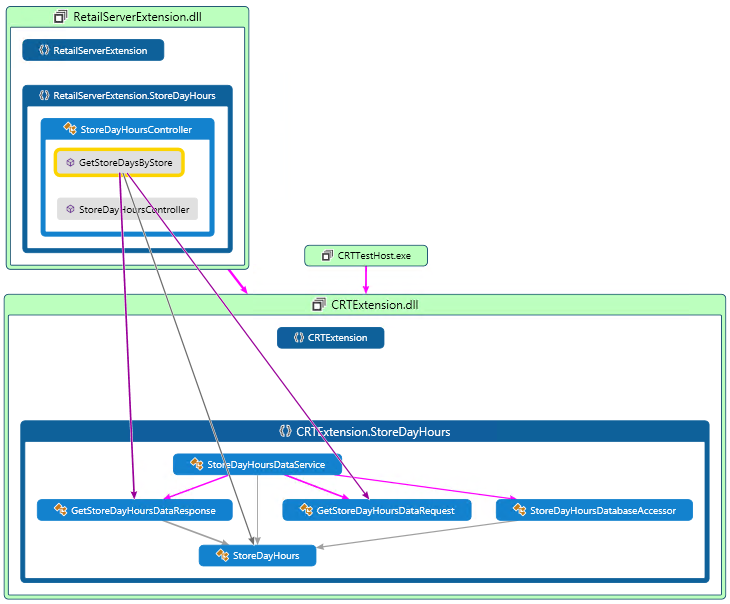
Here is a code map view of the code changes required:
You can see that we need a CRT request, response, service, dataaccessor and entity. Additionally, RetailServer is customized to include a new StoreDayHoursController that exposes a new ODATA endpoint, GetStoreDaysByStore. That endpoint uses the CRT and the request object to get a response. It does not use the data service directly.
If you have configured all right, compiled the solution and fired up the ODATA metadata url of RetailServer (https://ax2012r2a.contoso.com:35080/RetailServer/v1/$metadata), you should see the new action:
Update client framework to call RetailServer endpoint
The first step is to make MPOS aware of the new entity and the new endpoint. This is basically proxy code similar to what tools like wsdl.exe would generate for .NET web services. The Retail team is investigating to provide a tool for automatic regeneration in a future release.
CommerceTypes.ts
This is a class that specifies the new entity, both as an interface and a class.
export interface StoreDayHours {
DayOfWeek: number;
OpenTime: number;
CloseTime: number;
ExtensionProperties?: Entities.CommerceProperty[];
}
export class StoreDayHoursClass implements StoreDayHours {
public DayOfWeek: number;
public OpenTime: number;
public CloseTime: number;
public ExtensionProperties: Entities.CommerceProperty[];
/**
* Construct an object from odata response.
*
* @param {any} odataObject The odata result object.
*/
constructor(odataObject?: any) {
odataObject = odataObject || {};
this.DayOfWeek = odataObject.DayOfWeek ? odataObject.DayOfWeek : null;
this.OpenTime = odataObject.OpenTime ? odataObject.OpenTime : null;
this.CloseTime = odataObject.CloseTime ? odataObject.CloseTime : null;
this.ExtensionProperties = undefined;
if (odataObject.ExtensionProperties) {
this.ExtensionProperties = [];
for (var i = 0; i < odataObject.ExtensionProperties.length; i++) {
this.ExtensionProperties[i] = odataObject.ExtensionProperties[i] ? new CommercePropertyClass(odataObject.ExtensionProperties[i]) : null;
}
}
}
}
CommerceContext.ts
This is a class that exposes the ODATA data service to the rest of MPOS.
public storeDayHoursEntity(storeId?: string): StoreDayHoursDataServiceQuery {
return new StoreDayHoursDataServiceQuery(this._dataServiceRequestFactory, "StoreDayHoursCollection", "StoreDayHours", Entities.StoreDayHoursClass, storeId);
}
export class StoreDayHoursDataServiceQuery extends DataServiceQuery<Entities.StoreDayHours> {
constructor(dataServiceRequestFactory: IDataServiceRequestFactory, entitySet: string, entityType: string, returnType?: any, key?: any) {
super(dataServiceRequestFactory, entitySet, entityType, returnType, key);
}
public getStoreDaysByStoreAction(storeId: string): IDataServiceRequest {
var oDataActionParameters = new Commerce.Model.Managers.Context.ODataActionParameters();
oDataActionParameters.parameters = { StoreNumber: storeId};
return this.createDataServiceRequestForAction('GetStoreDaysByStore', Entities.StoreDayHoursClass, 'true', oDataActionParameters);
}
}
Update client framework channel manager with new functionality
Now, we got the low-level proxy code done, we need to expose the new functionality in a more consumable way to the rest of application framework. An appropriate location for the new functionality is the IChannelManager as it already encompasses similar functionality that is of more global, channel-related nature.
IChannelManager.ts:
getStoreDayHoursAsync(storeId: string): IAsyncResult<Entities.StoreDayHours[]>;
ChannelManager.ts:
public getStoreDayHoursAsync(storeId: string): IAsyncResult<Entities.StoreDayHours[]> {
Commerce.Tracer.Information("ChannelManager.getStoreDayHoursAsync()");
var query = this._commerceContext.storeDayHoursEntity();
var action = query.getStoreDaysByStoreAction(storeId);
return action.execute<Entities.StoreDayHours[]>(this._callerContext);
}
Update client framework’s view model
The view model is an abstraction of the view that exposes public properties and commands for any view implementation to use. Here are the 3 things we need to do in order to customize the existing StoreDetailsViewModel:
- a variable that holds the result for view to bind to and a variable called isStoreDayHoursVisible that view can use to toggle visibility of the UI:
public storeDayHours: ObservableArray<Model.Entities.StoreDayHours>;
public isStoreDayHoursVisible: Computed<boolean>;
- data initialization in the constructor:
// empty array
this.storeDayHours = ko.observableArray([]);
this.isStoreDayHoursVisible = ko.computed(() => {
return ArrayExtensions.hasElements(this.storeDayHours());
});
- data retrieval function to be called by the view
public getStoreDayHours(): IVoidAsyncResult {
var asyncResult = new VoidAsyncResult(this.callerContext);
Commerce.Tracer.Information("StoreDetailsViewModel.getStoreDayHours()");
this.channelManager.getStoreDayHoursAsync(this._storeId)
.done((foundStoreDayHours: Model.Entities.StoreDayHours[]) => {
this.storeDayHours(foundStoreDayHours);
Commerce.Tracer.Information("StoreDetailsViewModel.getStoreDayHours() Success");
asyncResult.resolve();
})
.fail((errors: Model.Entities.Error[]) => {
asyncResult.reject(errors);
});
return asyncResult;
}
Update POS’s view to consume updated view model
The StoreDetailsView.ts already calls into the view model to get store distance. For simplicity, we just hook into the done() event handler to call the new function:
this.storeDetailsViewModel.getStoreDistance()
.done(() => {
this._storeDetailsVisible(true);
this.indeterminateWaitVisible(false);
this.storeDetailsViewModel.getStoreDayHours()
.done(() => {
this._storeDetailsVisible(true);
this.indeterminateWaitVisible(false);
})
.fail((errors: Model.Entities.Error[]) => {
this.indeterminateWaitVisible(false);
NotificationHandler.displayClientErrors(errors);
});
Lastly, we update the html to expose the data:
Please use the sample code in the ZIP archive as mentioned above. This also includes a few other changes not
detailed here, for example in resoures.resjson, Converters.ts.
Issues and solutions:
If you cannot run MPOS from the Pos.sln file because it is already installed, uninstall the app first. This link may also be helpful: https://blogs.msdn.com/b/wsdevsol/archive/2013/01/28/registration-of-the-app-failed-another-user-has-already-installed-a-packaged-version-of-this-app-an-unpackaged-version-cannot-replace-this.aspx
Happy coding,
Andreas
Original link: https://blogs.msdn.com/b/axsa/archive/2015/05/20/extensibility-in-dynamics-ax-2012-r3-cu8-crt-retailserver-mpos-part-2-new-data-entity.aspx (go back to it for zip file download...)
Retail SDK CU8 - Extensibility Sample 2.zip
Comments
Anonymous
May 20, 2015
If you have any other ideas for the next future blogs, please ping me here. I will try to cover the most requested items first.Anonymous
May 25, 2015
Can you share how to update customers address at MPOS side using CRT extension.Anonymous
July 14, 2015
Hi Andreas, I need to make customer creation offline. Can you please help me on this. Regards, ManishAnonymous
July 22, 2015
We need to show some custom text on MPOS receipt, previously we achieved this with Printing service, there was a class FormModulation.cs with a long switch statement. How can I achieve the same in MPOS, its using SalesOrderManager which resides in a DLL, any ideas ?Anonymous
July 30, 2015
While customizing the above thing in my modern POS. I am facing the issue that User is not authorised to perform the operation. Can anybody help me on this.Anonymous
February 17, 2016
Hi, Can anybody tell me about changing in already existing entity that reflects from channel db or store database to view? for instance taking an example of suspended transaction, i want to show additional column on the screen of suspended transaction what i did is add the column in crt.SalesTransaction, and also update dbo.SalesTransaction and crt.CartsView in store db. I have also modify views where i can see the new added column. However the problem is connecting these two from view to database. I have seen both blogs Part 1 and Part 2 but couldn't succeed because it is not about adding new field in AX and than Store DB it is only about adding a new field in store db and than reflecting the changes on view. Thanks in advance


