How to configure interoperability between Microsoft Exchange Server 2010 Unified Messaging and pbxnsip IP PBX version 3.0
Introduction
This guide describes how to configure interoperability between Microsoft Exchange Server 2010 Unified Messaging and pbxnsip IP PBX version 3.0 . pbxnsipis an IP PBX solution for Windows that supports SIP communication over either the TCP or UDP transport protocols. When configured with a free permanent demo key, pbxnsipcan be used for testing various call flow scenarios in lab environments which host Microsoft Unified Communications products (maximum call duration of 3 minutes).
To request a free permanent demo key for using pbxnsipVersion 3 in a lab environment, visit https://www.pbxnsip.com/sales/trial.php. After completing and submitting the request form, a demo key will be sent to you in email. The Windows 32-bit pbxnsipinstallation package can be downloaded at https://www.pbxnsip.com/download-software/software.php, and it can be installed on either a stand-alone or domain-joined Windows 2003 or Windows 2008 server or virtual machine. At the moment, there is no publicly released 64-bit version of the pbxnsip product available for download, however.
Environment
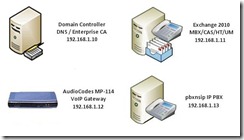
The lab environment described by this configuration guide contains the following server and/or hardware configuration:
Configure pbxnsip
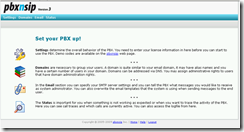
After installing the pbxnsip application, there are many options that must be configured correctly before calls can be routed successfully to or from our lab environment. To begin the configuration of the pbxnsip system, launch Internet Explorer and navigate to https://pbxnsip (or the FQDN or NetBIOS name of the server where pbxnsip was installed).
Settings Menu
The first step of setting up the pbxnsip system involves configuring the options available under the Settings menu. The options available under the Settings menu of the IP PBX affect the overall behavior of the PBX. It is also where you can find the option to enter the permanent demo key that you requested from https://www.pbxnsip.com.
Note: Please accept the default settings unless otherwise specified.
General
System Name – Enter the hostname of the computer where pbxnsip was installed
Default Language – Choose the default language for pbxnsip installation
Time Zone – Choose the correct time zone for the pbxnsip installation
Username/Password – Enter the logon credentials for pbxnsip specified during setupLicense
Enter the permanent demo license key that was mailed to you from pbxnsipPorts
RTP Port Range Start/End – Verify that this port range is accessible/not firewalled
Follow RTP – Enabled/On
Codec Preference – Choose G.711U for North America/Japan, G.711A for Europe
Lock Codec During Conversation – Enabled/On
Packet Length – 20 msLogging
Log Level – 5
Log Length – 300 Lines
Log Filename – pbxnsip.log
SIP Logging – Enable all SIP logging eventsOther Settings
There are a number of other configuration options that can be found under the Settings menu, however the configuration of these menu options will not be covered by this guide.Configuration – Used to import/export configuration settings for the system
Certificate – Used to enable TLS communication for the system
Music on Hold – Allows custom music on hold definition files to be enabled
Plug and Play – Provides common configuration settings for many IP phones
Access – Used to configure network restrictions based on IP/Subnet
Domains Menu
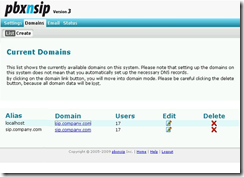
The second step of setting up the pbxnsip system involves configuring the various domains that the IP PBX will support. A default domain called sip.company.com is automatically created whenever pbxnsip is installed for the first time. Although a new domain can be created from scratch, we will instead edit the existing default domain to support our lab environment.
To begin editing the default domain, click on the Edit option beside either the localhost or sip.company.com aliases in the list of current domains.
Note: Do NOT remove the localhost domain alias. This will cause all call routing to fail.
Edit Domain
Although there are a number of configuration options available under the Edit Domain menu, only the Primary Name entry must be changed to support our lab environment. Enter the Fully Qualified Distinguished Name (FQDN) of the computer that hosts the pbxnsip application.Note: Do NOT use the domain name sip.contoso.com. This is a common internal DNS host record used by Office Communicator clients to find the IP address of an OCS Enterprise Pool or Standard Edition Front End server.
Primary Name – Change this value to {computername}.contoso.com (e.g., pbxnsip.contoso.com)
Domain Administration Menu
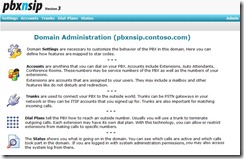
After editing the Primary Name of the default domain, you will find pbxnsip.contoso.com in the list of Current Domains. Click on the hyperlink pbxnsip.contoso.com to open the Domain Administration (pbxnsip.contoso.com) configuration menu. The Domain Administration menu is where all PBX-specific configuration options can be found.
Note: Please accept the default settings unless otherwise specified.
Settings Menu
There four configuration menus that are available under the Settings tab of the Domain Administration menu. The options contained within the Domain Settings menu control voice mail settings, feature access codes, and phone provisioning information.
Domain Settings
Country Code – Enter the value ‘1’ for the United States, or your country code
Area Code – Enter ‘704’ or your area code/region code
VoiceMail Timeout – 20 seconds
Calling own extension number goes to mailbox – YesOther Settings
There are a number of other configuration options that can be found under the Settings menu, however the configuration of these menu options will not be covered by this guide.Feature Codes – Short-cut key combinations for common tasks
Address Book – List of contact/numbers which are accessible by all users on the system
Buttons – Controls how IP phones are automatically provisioned by the system
Accounts Menu
You will find that there are a number of extensions which are already defined for the system, ranging from 41 – 76. These exist because we chose to edit the default domain and use it as a template rather than create a new domain altogether.
Our UM Dial Plan is based on a 5 digit extension scheme. Considering this, we need to modify a few of the entries to make them 5 digits in length, and we will remove any extensions that we do not need. To begin editing the existing extensions, click the Edit option beside extension 41.
First Name Last Name Extension UM Extension/Dial Plan PBX UserA 60001 60001 / PBXNSIP Dial Plan PBX UserB 60002 60002 / PBXNSIP Dial Plan For each of these users, edit an existing account within pbxnsip by populating the following values on the General tab of each account:
Account Number – Enter 60001 or the extension of one of your users
First Name – Enter PBX or the first name of one of your users
Last Name – Enter UserA or the last name of one of your users
SIP Password – Enter 60001 (and repeat to confirm)
Web Password – Enter 60001 (and repeat to confirm)
PIN – Enter 60001 (and repeat to confirm)
Block Outgoing Caller ID – NoWhen completed, our list of user accounts should appear as follows:
Trunks Menu
The Trunks menu is used to configure routing targets for calls that are handled by the pbxnsip system. In our Unified Communications lab, there are two possible routing targets, as shown in the table below:
Routing Target IP Address Protocol/Transport Exchange 2010 Unified Messaging 192.168.1.11 SIP / TCP AudioCodes MP-114 VoIP Gateway 192.168.1.12 SIP / TCP With this in mind, one or more SIP trunks need to be created to support call routing in our lab environment. Since we chose to edit the existing default domain rather than to create a new domain, you will find an existing ‘PSTN Gateway (1)’ entry in the list of available trunks. Not only will we edit the existing PSTN Gateway trunk to accommodate our needs, we will also create an additional trunk for Exchange 2010 Unified Messaging.
Note: Please accept the default settings unless otherwise specified.
Edit the PSTN Gateway Trunk
Name – AudioCodes MP-114
Type – SIP Gateway
Direction – Inbound and Outbound
Domain – audiocodes.contoso.com (DNS name for AudioCodes MP-114 VoIP Gateway)
Outbound Proxy – 192.168.1.12:5060;transport=tcp (IP address of AudioCodes device)
Override Codec Preference –G.711U (for North America) / G.711A (for Europe)
Lock Codec during Conversation – Yes
Accept Redirect – Yes
Interpret SIP URI always as Telephone Number – YesCreate New Exchange 2010 Unified Messaging Trunk
Name – Exchange 2010 UM Server
Type – SIP Gateway
Direction – Inbound and Outbound
Domain – exchangeum.contoso.com (DNS name of ExchangeUM Server)
Outbound Proxy – 192.168.1.11:5060;transport=tcp (IP address of ExchangeUM Server)
Override Codec Preference –G.711U (for North America) / G.711A (for Europe)
Lock Codec during Conversation – Yes
Accept Redirect – Yes
Interpret SIP URI always as Telephone Number – Yes
Dial-Plans Menu
The Dial-Plans menu is used to configure routing logic for calls that are handled by the pbxnsip system. While trunks may provide a number of possible routing targets for an example, dial plans are used to determine which of the available trunks to use for routing the call. Likewise, each dial plan is configured with one or more pattern matching and/or number masking rules which are used to process dial strings for calls that are handled by the system.
Since we chose to edit the existing default domain rather than to create a new domain, you will find an existing ‘Standard Dialplan’ entry in the list of available Dial Plans. To begin editing the default dial plan, click on the Edit option beside the ‘Standard DialPlan’ entry.
Pref – 200 / Highest Processing Order
Trunk – Exchange 2010 UM Server
Pattern – (6[0,9][0,9][0,9][0,9])
Replacement – {Leave Empty}Pref – 300 / Lowest Processing Order
Trunk – AudioCodes MP-114
Pattern – *
Replacement – {Leave Empty}Status Menu
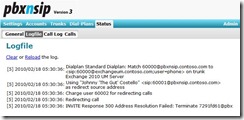
If you experience unexpected call routing issues or call processing failures, the options that are available within the Status Menu can help to troubleshoot problems. One of the most helpful tools can be found under the Logfile tab.
Email Menu
One of the nicest features of the pbxnsip product is its extensive reporting capabilities. The system can be configured to send various usage reports and/or event notifications to an external SMTP server. Although there are a number of reporting options which can be configured under the Email menu, configuring Email options for the system will not be covered by this guide.
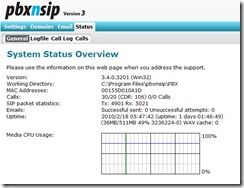
Status Menu
The Status menu provides you with a general overview of the current health of the pbxnsip system.
Upon completing the configuration of the pbxnsip system, restart the pbxnsip server.
Configure Exchange Unified Messaging
Our next task will be to configure Microsoft Exchange 2010 Unified Messaging, which will serve as the voice mail system for pbxnsip. There are several configuration steps that must be completed for call routing to work successfully, including the following:
- Create and configure UM Dial Plans, IP Gateways, and Auto Attendants
- Define pilot numbers for Subscriber Access and Auto Attendants
- Create mailbox enabled user accounts and enable them for UM
UM Dial Plan
1. Complete the information necessary to create a new UM Dial Plan for pbxnsip:
Name of Dial Plan : PBXNSIP Dial Plan
Digits in Extension : 5
URI Type : Telephone Extension
VoIP Security : Unsecured
Country/Region Code : 1
2. Configure the new PBXNSIP Dial Plan object as follows:
Subscriber Access
Pilot Number: 60000Features
Allow callers to transfer to users : Enabled
Allow callers to send voice messages : Enabled
Callers can contact : Anyone in the default Global Address ListDialing Rule Groups
Under In Country/Region Rule Groups, click Add and configure a new rule as follows:
Name : All Outbound Calls Allowed
Number Mask : *
Dialed Number : *
Under International Rule Groups, click Add and configure a new rule as follows:
Name : All Outbound Calls Allowed
Number Mask : *
Dialed Number : *Dialing Restrictions
Allow calls to users within the same Dial Plan : Enabled
Allow calls to extensions : Enabled
Select In-Country/Region Groups from Dial Plan : All Outbound Calls Allowed
Select International Groups from Dial Plan : All Outbound Calls Allowed
3. Assign the PBXNSIP Dial Plan to the Exchange UM Server.
UM IP Gateway
Complete the information necessary to create a new UM IP Gateway object for pbxnsip:
Name of UM IP Gateway : PBXNSIP
IP Address : 192.168.1.13
Dial Plan : PBXNSIP Dial Plan
UM Mailbox Policy
Configure the new PBXNSIP Dial Plan Default Policy object as follows:
PIN Policies
Minimum PIN Length : 4
PIN Lifetime (days) : Disabled (Unlimited)
No. of previous PINs to disallow : 1
Allow common patterns in PIN : EnabledDialing Restrictions
Allow calls to users within the same Dial Plan : Enabled
Allow calls to extensions : Enabled
Select In-Country/Region Groups from Dial Plan : All Outbound Calls Allowed
Select International Groups from Dial Plan : All Outbound Calls Allowed
UM Auto Attendant
1. Complete the information necessary to create a new UM Auto Attendant object for pbxnsip:
Name of UM Auto Attendant : AutoAttendant
Associated UM Dial Plan : PBXNSIP Dial Plan
Pilot Identifier List : 69999
Create as Enabled : Enabled
Create as Speech Enabled : Enabled
2. Configure the new Unified Messaging AutoAttendant object as follows:
General
Auto Attendant is enabled for Directory Lookups: EnabledFeatures
Allow callers to transfer to users : Enabled
Allow callers to send voice messages : Enabled
Callers can contact : Anyone in the default Global Address ListDialing Restrictions
Allow calls to users within the same Dial Plan : Enabled
Allow calls to extensions : Enabled
Select In-Country/Region Groups from Dial Plan : All Outbound Calls Allowed
Select International Groups from Dial Plan : All Outbound Calls Allowed
UM Enabled Users
Complete the information necessary to create two new mailbox-enabled user accounts which are also enabled for Unified Messaging:
User Name : PBX UserA
Email Alias : PBX.UserA
Exchange Database : Default Exchange 2010 Mailbox Database
Unified Messaging Mailbox Policy : PBXNSIP Dial Plan
Manually Specify PIN : {Enter 4 Digit Value}
Manually Entered Mailbox Extension : 60001
User Name : PBX UserB
Email Alias : PBX.UserB
Exchange Database : Default Exchange 2010 Mailbox Database
Unified Messaging Mailbox Policy : PBXNSIP Dial Plan
Manually Specify PIN : {Enter 4 Digit Value}
Manually Entered Mailbox Extension : 60002
Upon completing the configuration of Exchange Unified Messaging, restart both the Microsoft Exchange Unified Messaging and Microsoft Exchange Speech Engine services.
Configure Soft Phone
Our final step involves configuring a soft phone client to connect to the pbxnsip system. One of the more popular freeware soft phone clients that can be used to connect to pbxnsip is 3CX Phone which can be downloaded at the following URL:
3CX Phone - https://tinyurl.com/ylyrrpf
After downloading and installing the 3CX Phone client, use the following configuration steps to connect your soft phone client to the pbxnsip system.
1. Launch the 3CX Phone client.
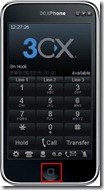
2. Click on the Home button.
3. Select the Connections option.
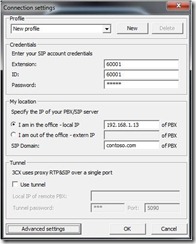
4. Configure the Connection settings as follows, then click OK:
Credentials
Extension: 60001
ID: 60001
Password: 60001My Location
I am in the office – local IP: 192.168.1.13
SIP Domain: contoso.comAdvanced Settings
PBX voicemail: 60000
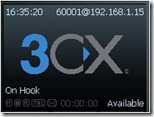
5. Verify that registration with the pbxnsip system was successful.
Conclusion
This information is provided AS-IS with no warranties, and confers no rights. This solution is considered UNSUPPORTED by Microsoft, and as such should not be deployed in a production capacity.
I hope that you have found this configuration guide to be helpful. As always, any questions or comments are always welcome.
-- Dave
