Send messages to an Azure Service Bus topic and receive messages from subscriptions to the topic (JavaScript)
In this tutorial, you complete the following steps:
- Create a Service Bus namespace, using the Azure portal.
- Create a Service Bus topic, using the Azure portal.
- Create a Service Bus subscription to that topic, using the Azure portal.
- Write a JavaScript application to use the @azure/service-bus package to:
- Send a set of messages to the topic.
- Receive those messages from the subscription.
Note
This quick start provides step-by-step instructions for a simple scenario of sending a batch of messages to a Service Bus topic and receiving those messages from a subscription of the topic. You can find pre-built JavaScript and TypeScript samples for Azure Service Bus in the Azure SDK for JavaScript repository on GitHub.
Prerequisites
- An Azure subscription. To complete this tutorial, you need an Azure account. You can activate your MSDN subscriber benefits or sign up for a free account.
- Node.js LTS
- Follow steps in the Quickstart: Use the Azure portal to create a Service Bus topic and subscriptions to the topic. You will use only one subscription for this quickstart.
To use this quickstart with your own Azure account, you need:
- Install Azure CLI, which provides the passwordless authentication to your developer machine.
- Sign in with your Azure account at the terminal or command prompt with
az login. - Use the same account when you add the appropriate role to your resource.
- Run the code in the same terminal or command prompt.
- Note down your topic name and subscription for your Service Bus namespace. You'll need that in the code.
Note
- This tutorial works with samples that you can copy and run using Nodejs. For instructions on how to create a Node.js application, see Create and deploy a Node.js application to an Azure Website, or Node.js Cloud Service using Windows PowerShell.
Create a namespace in the Azure portal
To begin using Service Bus messaging entities in Azure, you must first create a namespace with a name that is unique across Azure. A namespace provides a scoping container for Service Bus resources (queues, topics, etc.) within your application.
To create a namespace:
Sign in to the Azure portal.
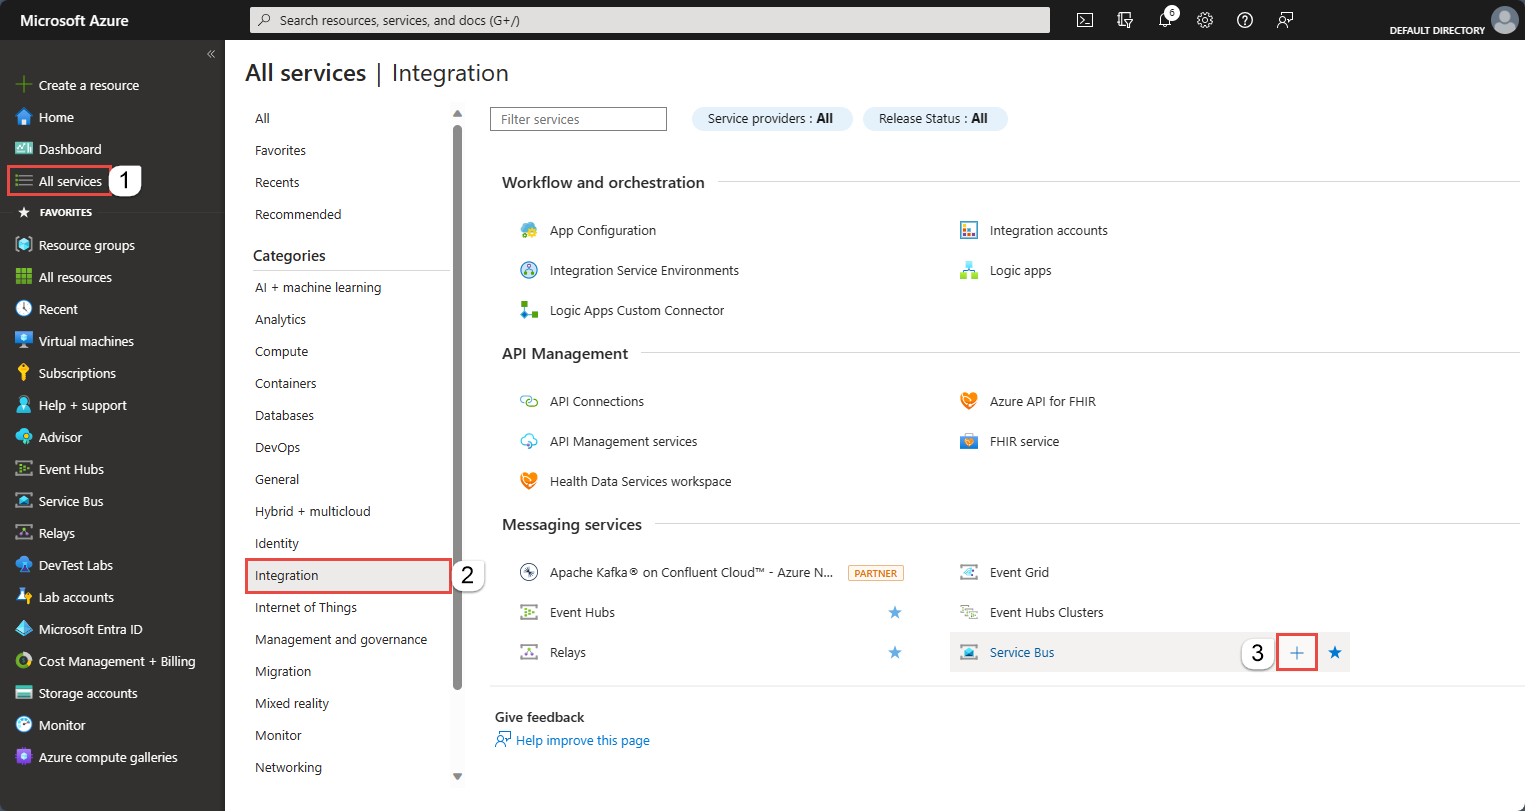
Navigate to the All services page.
On the left navigation bar, select Integration from the list of categories, hover the mouse over Service Bus, and then select + button on the Service Bus tile.
In the Basics tag of the Create namespace page, follow these steps:
For Subscription, choose an Azure subscription in which to create the namespace.
For Resource group, choose an existing resource group, or create a new one.
Enter a name for the namespace. The namespace name should adhere to the following naming conventions:
- The name must be unique across Azure. The system immediately checks to see if the name is available.
- The name length is at least 6 and at most 50 characters.
- The name can contain only letters, numbers, hyphens
-. - The name must start with a letter and end with a letter or number.
- The name doesn't end with
-sbor-mgmt.
For Location, choose the region in which your namespace should be hosted.
For Pricing tier, select the pricing tier (Basic, Standard, or Premium) for the namespace. For this quickstart, select Standard.
If you select Premium tier, select whether you can enable geo-replication for the namespace. The Geo-Replication feature ensures that the metadata and data of a namespace are continuously replicated from a primary region to one or more secondary regions.
Important
If you want to use topics and subscriptions, choose either Standard or Premium. Topics/subscriptions aren't supported in the Basic pricing tier.
If you selected the Premium pricing tier, specify the number of messaging units. The premium tier provides resource isolation at the CPU and memory level so that each workload runs in isolation. This resource container is called a messaging unit. A premium namespace has at least one messaging unit. You can select 1, 2, 4, 8 or 16 messaging units for each Service Bus Premium namespace. For more information, see Service Bus Premium Messaging.
Select Review + create at the bottom of the page.
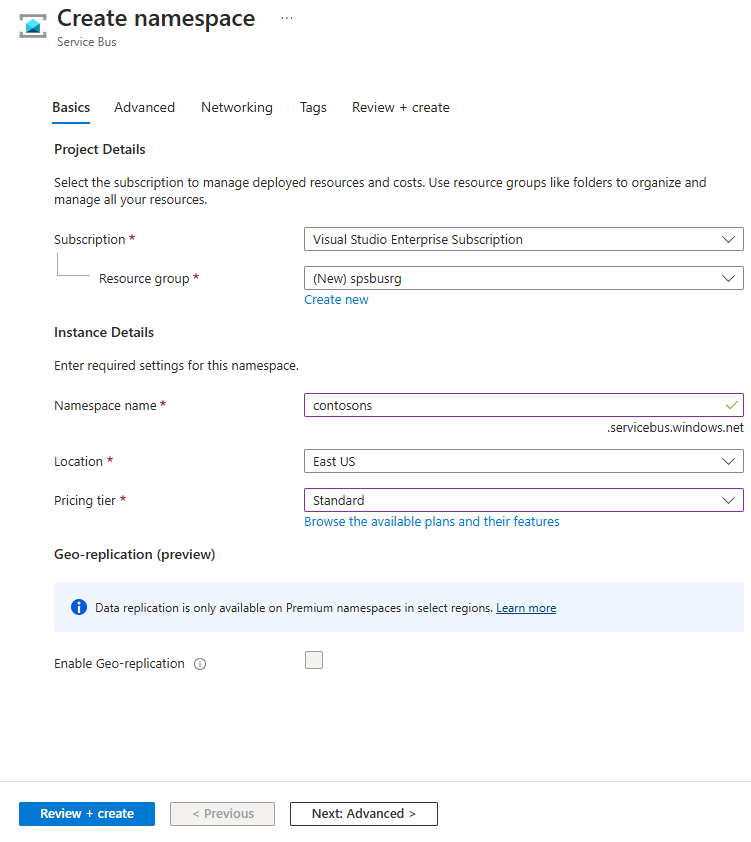
On the Review + create page, review settings, and select Create.
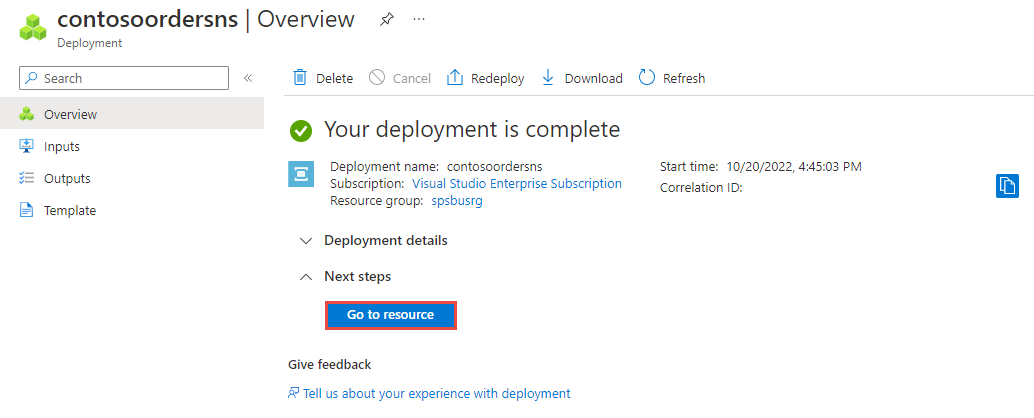
Once the deployment of the resource is successful, select Go to resource on the deployment page.
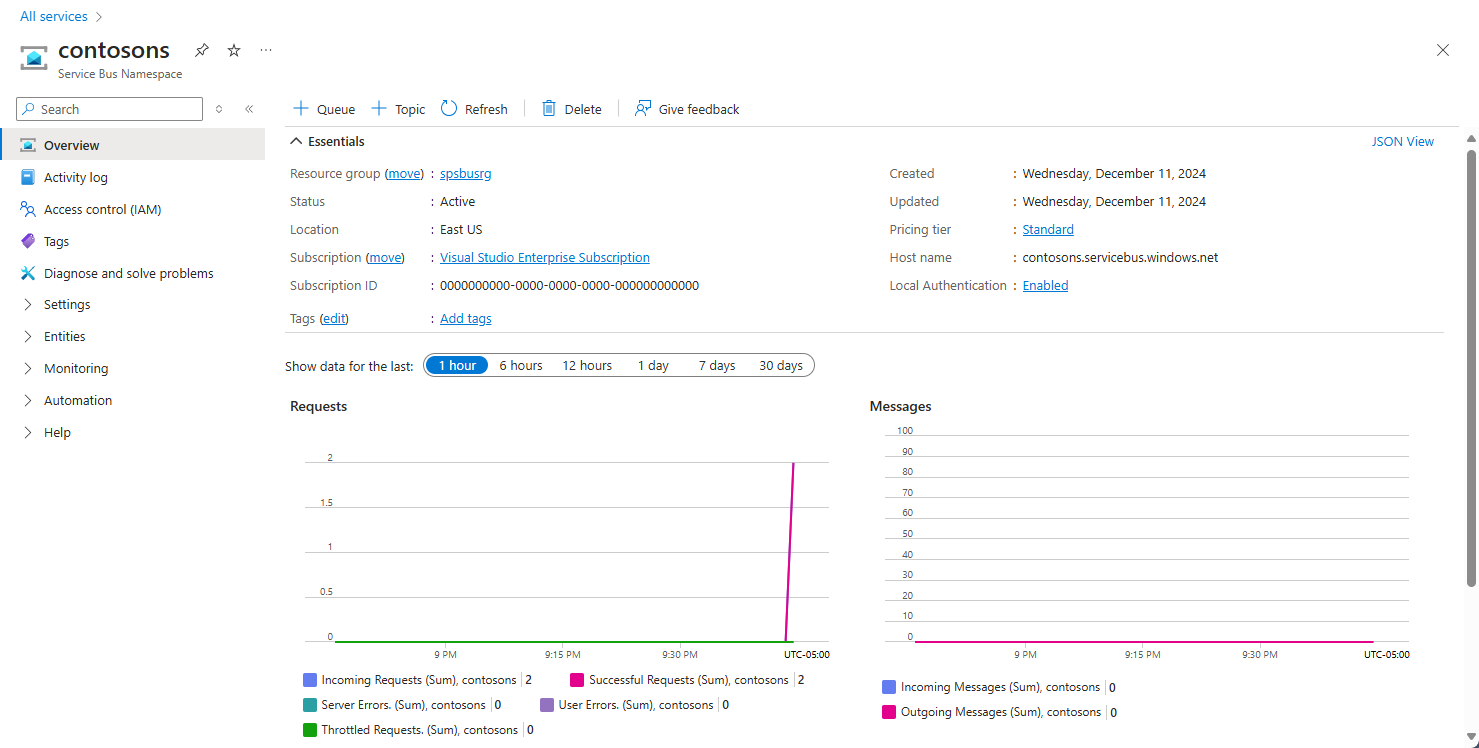
You see the home page for your service bus namespace.
Create a topic using the Azure portal
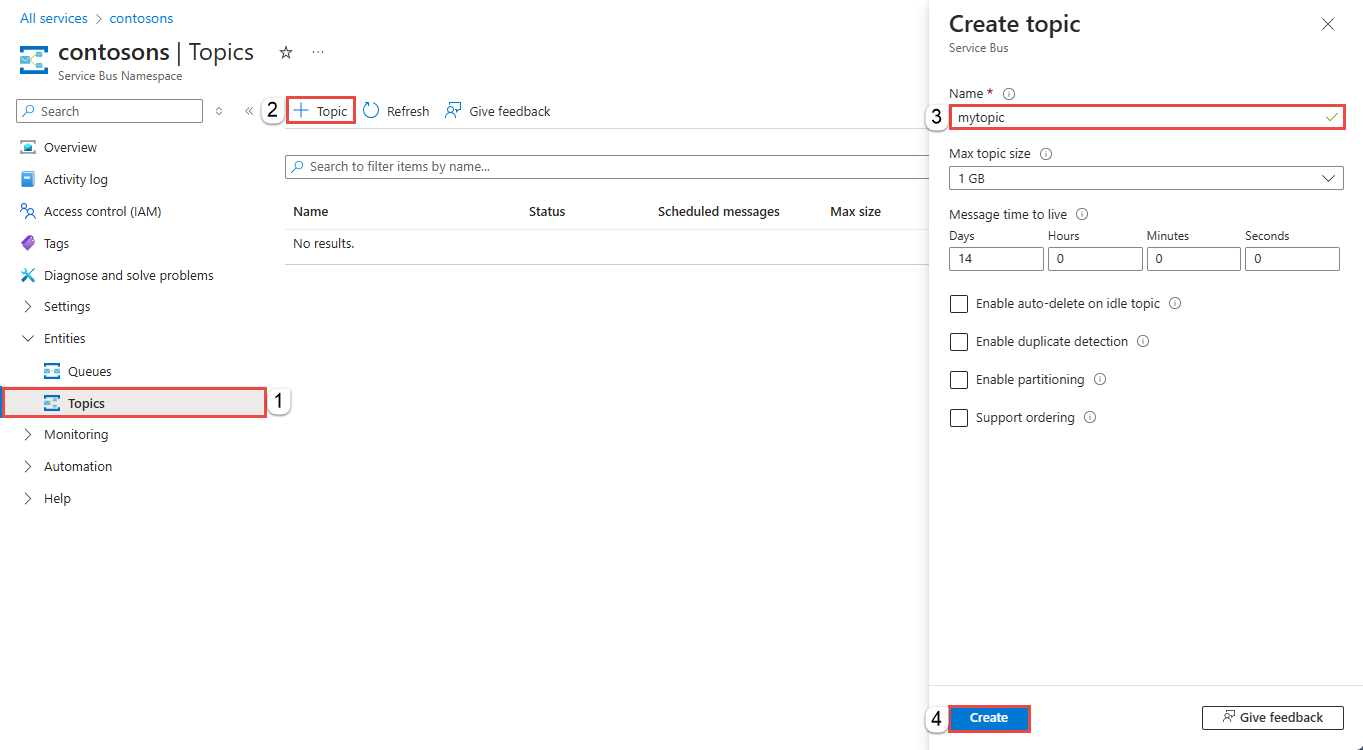
On the Service Bus Namespace page, expand Entities on the navigational menu to the left, and select Topics on the left menu.
Select + Topic on the toolbar.
Enter a name for the topic. Leave the other options with their default values.
Select Create.
Create a subscription to the topic
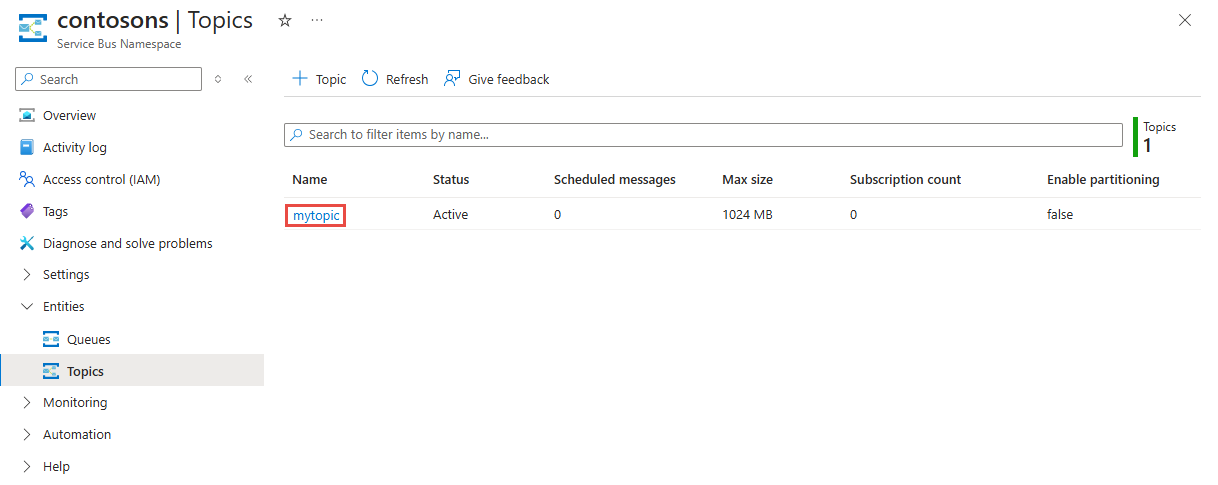
Select the topic that you created in the previous section.
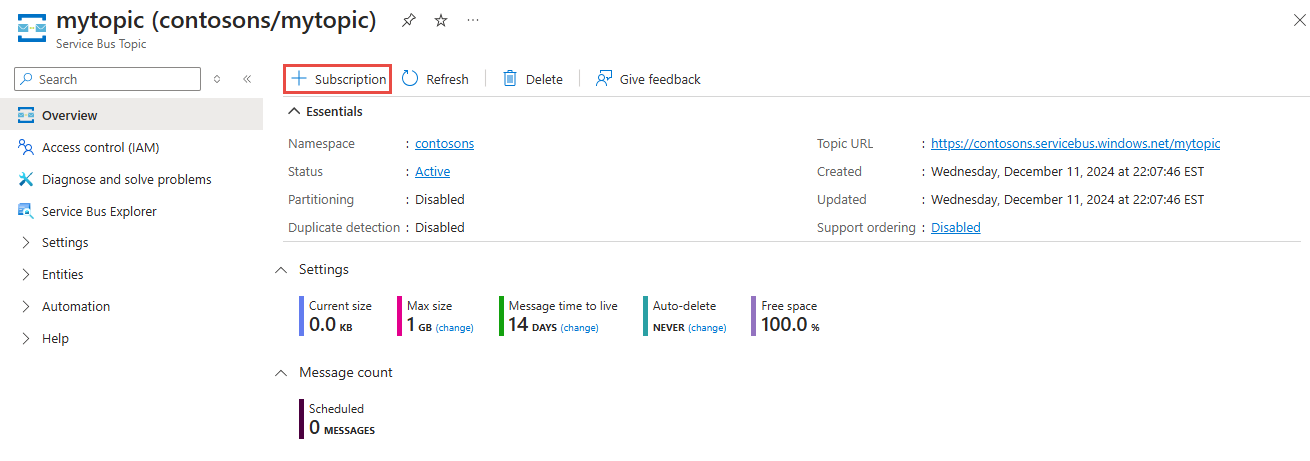
On the Service Bus Topic page, select + Subscription on the toolbar.
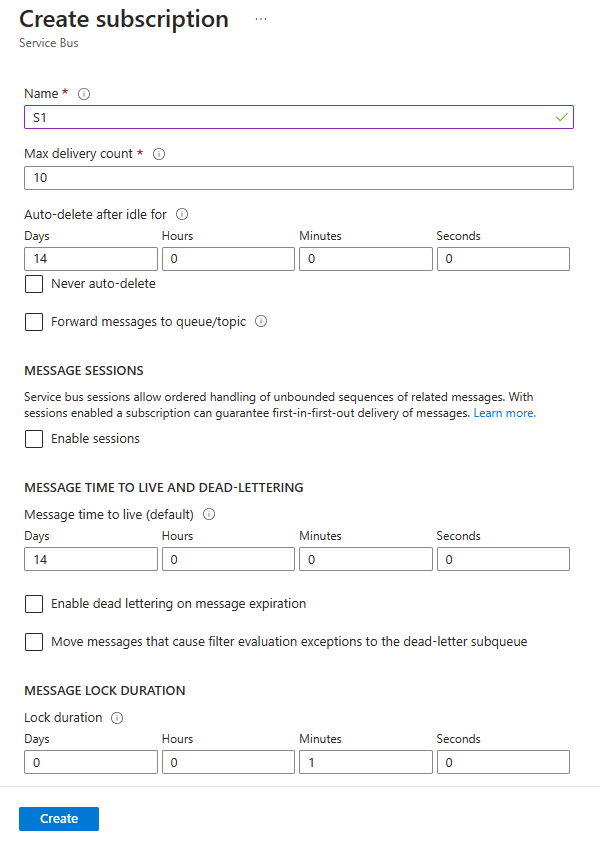
On the Create subscription page, follow these steps:
Enter S1 for name of the subscription.
Then, select Create to create the subscription.
Authenticate the app to Azure
This quick start shows you two ways of connecting to Azure Service Bus: passwordless and connection string.
The first option shows you how to use your security principal in Microsoft Entra ID and role-based access control (RBAC) to connect to a Service Bus namespace. You don't need to worry about having hard-coded connection string in your code or in a configuration file or in a secure storage like Azure Key Vault.
The second option shows you how to use a connection string to connect to a Service Bus namespace. If you are new to Azure, you may find the connection string option easier to follow. We recommend using the passwordless option in real-world applications and production environments. For more information, see Authentication and authorization. You can also read more about passwordless authentication on the overview page.
Assign roles to your Microsoft Entra user
When developing locally, make sure that the user account that connects to Azure Service Bus has the correct permissions. You'll need the Azure Service Bus Data Owner role in order to send and receive messages. To assign yourself this role, you'll need the User Access Administrator role, or another role that includes the Microsoft.Authorization/roleAssignments/write action. You can assign Azure RBAC roles to a user using the Azure portal, Azure CLI, or Azure PowerShell. Learn more about the available scopes for role assignments on the scope overview page.
The following example assigns the Azure Service Bus Data Owner role to your user account, which provides full access to Azure Service Bus resources. In a real scenario, follow the Principle of Least Privilege to give users only the minimum permissions needed for a more secure production environment.
Azure built-in roles for Azure Service Bus
For Azure Service Bus, the management of namespaces and all related resources through the Azure portal and the Azure resource management API is already protected using the Azure RBAC model. Azure provides the below Azure built-in roles for authorizing access to a Service Bus namespace:
- Azure Service Bus Data Owner: Enables data access to Service Bus namespace and its entities (queues, topics, subscriptions, and filters). A member of this role can send and receive messages from queues or topics/subscriptions.
- Azure Service Bus Data Sender: Use this role to give the send access to Service Bus namespace and its entities.
- Azure Service Bus Data Receiver: Use this role to give the receive access to Service Bus namespace and its entities.
If you want to create a custom role, see Rights required for Service Bus operations.
Add Microsoft Entra user to Azure Service Bus Owner role
Add your Microsoft Entra user name to the Azure Service Bus Data Owner role at the Service Bus namespace level. It will allow an app running in the context of your user account to send messages to a queue or a topic, and receive messages from a queue or a topic's subscription.
Important
In most cases, it will take a minute or two for the role assignment to propagate in Azure. In rare cases, it may take up to eight minutes. If you receive authentication errors when you first run your code, wait a few moments and try again.
If you don't have the Service Bus Namespace page open in the Azure portal, locate your Service Bus namespace using the main search bar or left navigation.
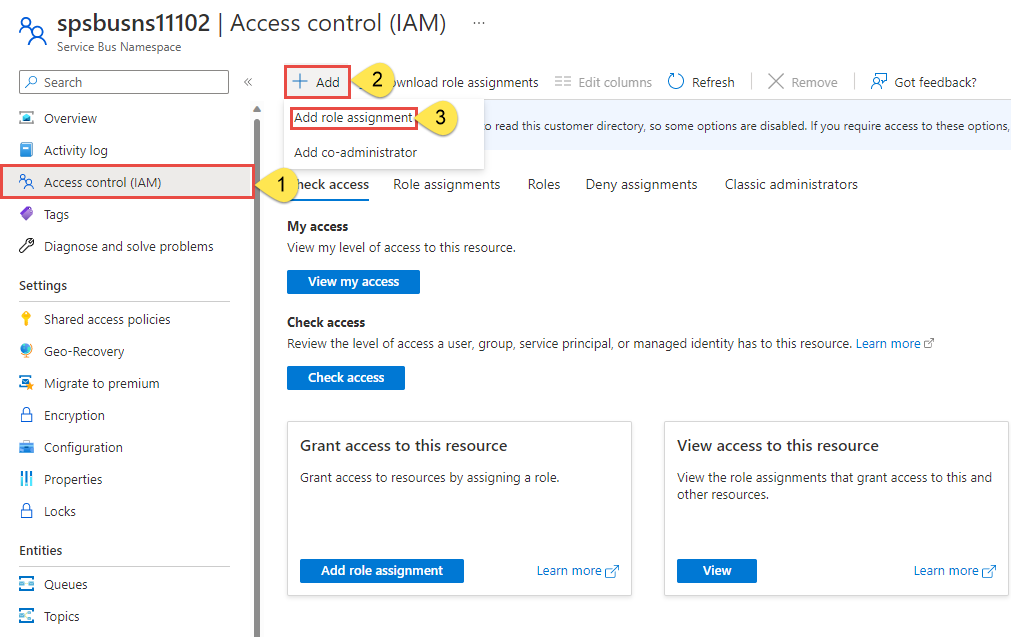
On the overview page, select Access control (IAM) from the left-hand menu.
On the Access control (IAM) page, select the Role assignments tab.
Select + Add from the top menu and then Add role assignment from the resulting drop-down menu.
Use the search box to filter the results to the desired role. For this example, search for
Azure Service Bus Data Ownerand select the matching result. Then choose Next.Under Assign access to, select User, group, or service principal, and then choose + Select members.
In the dialog, search for your Microsoft Entra username (usually your user@domain email address) and then choose Select at the bottom of the dialog.
Select Review + assign to go to the final page, and then Review + assign again to complete the process.
Use Node Package Manager (NPM) to install the package
To install the required npm package(s) for Service Bus, open a command prompt that has
npmin its path, change the directory to the folder where you want to have your samples and then run this command.Install the following packages:
npm install @azure/service-bus @azure/identity
Send messages to a topic
The following sample code shows you how to send a batch of messages to a Service Bus topic. See code comments for details.
You must have signed in with the Azure CLI's az login in order for your local machine to provide the passwordless authentication required in this code.
Open your favorite editor, such as Visual Studio Code
Create a file called
sendtotopic.jsand paste the below code into it. This code will send a message to your topic.Important
The passwordless credential is provided with the DefaultAzureCredential.
const { ServiceBusClient } = require("@azure/service-bus");
const { DefaultAzureCredential } = require("@azure/identity");

// Replace `<SERVICE-BUS-NAMESPACE>` with your namespace
const fullyQualifiedNamespace = "<SERVICE-BUS-NAMESPACE>.servicebus.windows.net";

// Passwordless credential
const credential = new DefaultAzureCredential();

const topicName = "<TOPIC NAME>";

const messages = [
    { body: "Albert Einstein" },
    { body: "Werner Heisenberg" },
    { body: "Marie Curie" },
    { body: "Steven Hawking" },
    { body: "Isaac Newton" },
    { body: "Niels Bohr" },
    { body: "Michael Faraday" },
    { body: "Galileo Galilei" },
    { body: "Johannes Kepler" },
    { body: "Nikolaus Kopernikus" }
 ];

 async function main() {
    // create a Service Bus client using the passwordless authentication to the Service Bus namespace
    const sbClient = new ServiceBusClient(fullyQualifiedNamespace, credential);

    // createSender() can also be used to create a sender for a queue.
    const sender = sbClient.createSender(topicName);

    try {
        // Tries to send all messages in a single batch.
        // Will fail if the messages cannot fit in a batch.
        // await sender.sendMessages(messages);

        // create a batch object
        let batch = await sender.createMessageBatch();
        for (let i = 0; i < messages.length; i++) {
            // for each message in the array

            // try to add the message to the batch
            if (!batch.tryAddMessage(messages[i])) {
                // if it fails to add the message to the current batch
                // send the current batch as it is full
                await sender.sendMessages(batch);

                // then, create a new batch
                batch = await sender.createMessageBatch();

                // now, add the message failed to be added to the previous batch to this batch
                if (!batch.tryAddMessage(messages[i])) {
                    // if it still can't be added to the batch, the message is probably too big to fit in a batch
                    throw new Error("Message too big to fit in a batch");
                }
            }
        }

        // Send the last created batch of messages to the topic
        await sender.sendMessages(batch);

        console.log(`Sent a batch of messages to the topic: ${topicName}`);

        // Close the sender
        await sender.close();
    } finally {
        await sbClient.close();
    }
}

// call the main function
main().catch((err) => {
    console.log("Error occurred: ", err);
    process.exit(1);
 });
Replace
<SERVICE BUS NAMESPACE CONNECTION STRING>with the connection string to your Service Bus namespace.Replace
<TOPIC NAME>with the name of the topic.Then run the command in a command prompt to execute this file.
node sendtotopic.jsYou should see the following output.
Sent a batch of messages to the topic: mytopic
Receive messages from a subscription
You must have signed in with the Azure CLI's az login in order for your local machine to provide the passwordless authentication required in this code.
Open your favorite editor, such as Visual Studio Code
Create a file called receivefromsubscription.js and paste the following code into it. See code comments for details.
const { delay, ServiceBusClient, ServiceBusMessage } = require("@azure/service-bus");
const { DefaultAzureCredential } = require("@azure/identity");

// Replace `<SERVICE-BUS-NAMESPACE>` with your namespace
const fullyQualifiedNamespace = "<SERVICE-BUS-NAMESPACE>.servicebus.windows.net";

// Passwordless credential
const credential = new DefaultAzureCredential();

const topicName = "<TOPIC NAME>";
const subscriptionName = "<SUBSCRIPTION NAME>";

 async function main() {
    // create a Service Bus client using the passwordless authentication to the Service Bus namespace
    const sbClient = new ServiceBusClient(fullyQualifiedNamespace, credential);

    // createReceiver() can also be used to create a receiver for a queue.
    const receiver = sbClient.createReceiver(topicName, subscriptionName);

    // function to handle messages
    const myMessageHandler = async (messageReceived) => {
        console.log(`Received message: ${messageReceived.body}`);
    };

    // function to handle any errors
    const myErrorHandler = async (error) => {
        console.log(error);
    };

    // subscribe and specify the message and error handlers
    receiver.subscribe({
        processMessage: myMessageHandler,
        processError: myErrorHandler
    });

    // Waiting long enough before closing the sender to send messages
    await delay(5000);

    await receiver.close();
    await sbClient.close();
}

// call the main function
main().catch((err) => {
    console.log("Error occurred: ", err);
    process.exit(1);
 });
Replace
<SERVICE BUS NAMESPACE CONNECTION STRING>with the connection string to the namespace.Replace
<TOPIC NAME>with the name of the topic.Replace
<SUBSCRIPTION NAME>with the name of the subscription to the topic.Then run the command in a command prompt to execute this file.
node receivefromsubscription.js
You should see the following output.
Received message: Albert Einstein
Received message: Werner Heisenberg
Received message: Marie Curie
Received message: Steven Hawking
Received message: Isaac Newton
Received message: Niels Bohr
Received message: Michael Faraday
Received message: Galileo Galilei
Received message: Johannes Kepler
Received message: Nikolaus Kopernikus
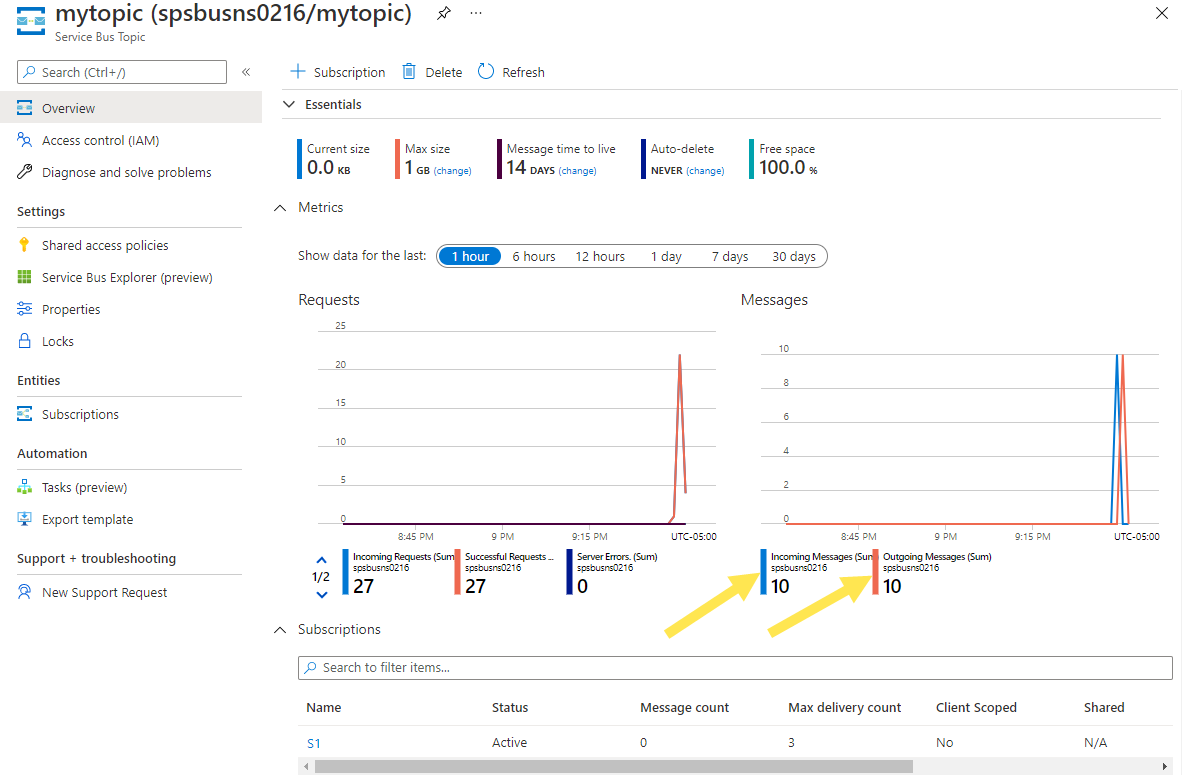
In the Azure portal, navigate to your Service Bus namespace, switch to Topics in the bottom pane, and select your topic to see the Service Bus Topic page for your topic. On this page, you should see 10 incoming and 10 outgoing messages in the Messages chart.
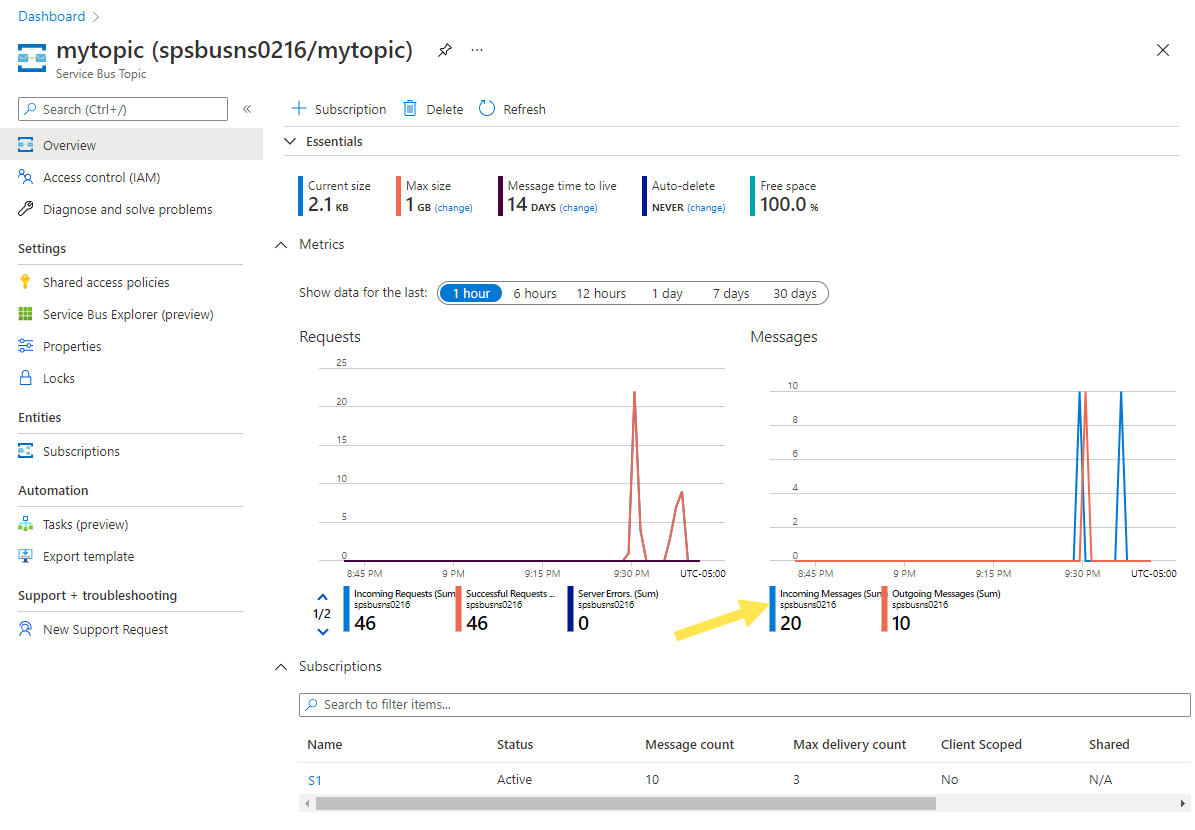
If you run only the send app next time, on the Service Bus Topic page, you see 20 incoming messages (10 new) but 10 outgoing messages.
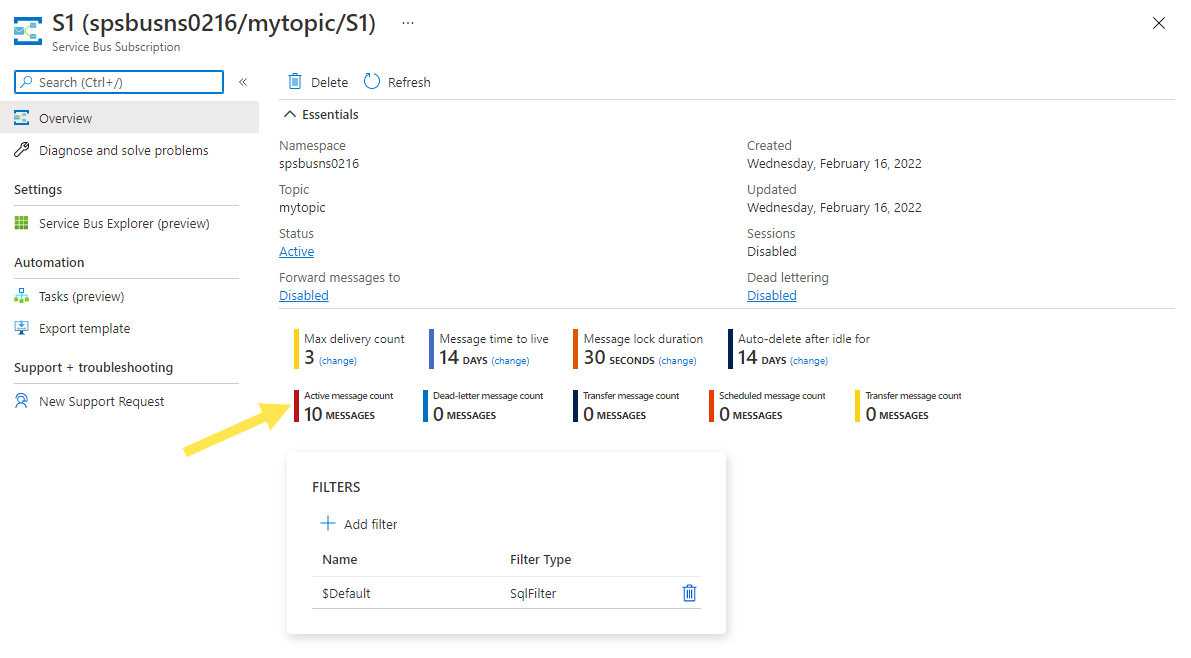
On this page, if you select a subscription in the bottom pane, you get to the Service Bus Subscription page. You can see the active message count, dead-letter message count, and more on this page. In this example, there are 10 active messages that haven't been received by a receiver yet.
Troubleshooting
If you receive an error when running the passwordless version of the JavaScript code about required claims, make sure you are signed in via the Azure CLI command, az login and the appropriate role is applied to your Azure user account.
Clean up resources
Navigate to your Service Bus namespace in the Azure portal, and select Delete on the Azure portal to delete the namespace and the queue in it.
Next steps
See the following documentation and samples:
