Get started with Serverless AI Chat with RAG using LlamaIndex
Simplify AI app development with RAG by using your own data managed by LlamaIndex, Azure Functions, and Serverless technologies. These tools manage infrastructure and scaling automatically, allowing you to focus on chatbot functionality. LlamaIndex handles the data pipeline all the way from ingestion to the streamed response.

Architectural overview
The application flow includes:
- Using the chat interface to enter a prompt.
- Sending the user's prompt to the Serverless API via HTTP calls.
- Receiving the user's prompt then using LlamaIndex framework to process and stream the response. The serverless API uses an engine to create a connection to the Azure OpenAI large language model (LLM) and the vector index from LlamaIndex.
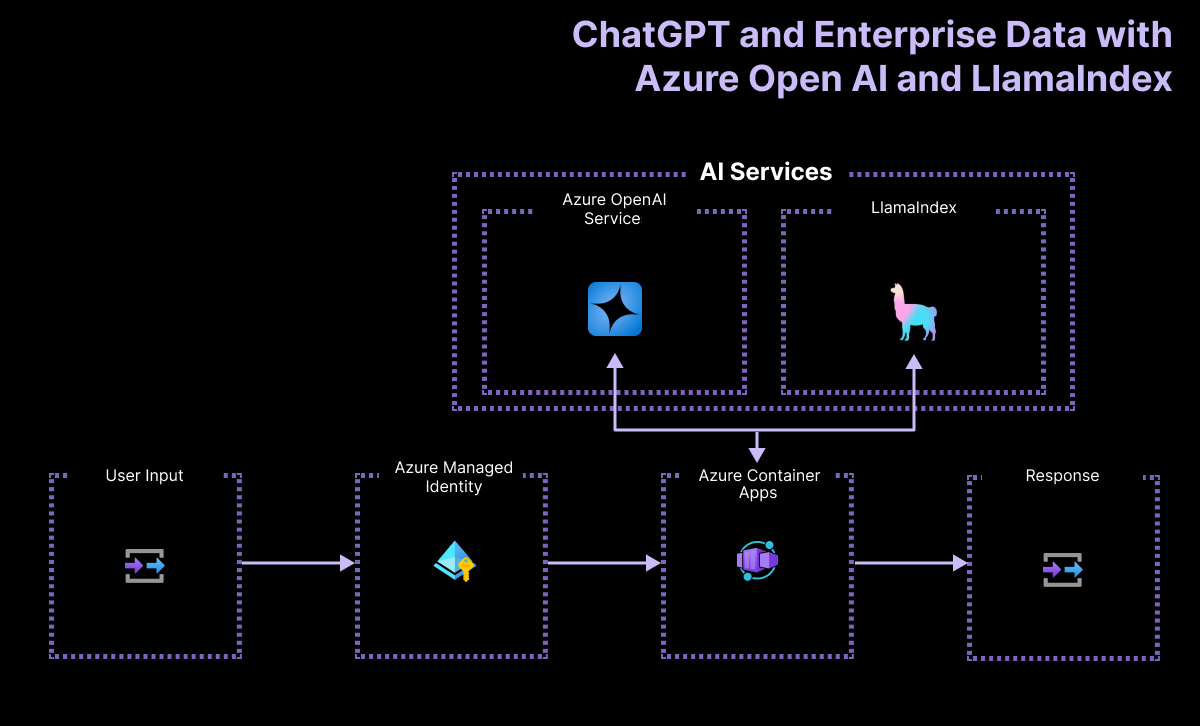
A simple architecture of the chat app is shown in the following diagram:

This sample uses LlamaIndex to generate embeddings and store in its own vector store. LlamaIndex also provides integration with other vector stores including Azure AI Search. That integration isn't demonstrated in this sample.
Where is Azure in this architecture?
The architecture of the application relies on the following services and components:
- Azure OpenAI represents the AI provider that we send the user's queries to.
- LlamaIndex is the framework that helps us ingest, transform, and vectorize our content (PDF file) and create a search index from our data.
- Azure Container Apps is the container environment where the application is hosted.
- Azure Managed Identity helps us ensure best in class security and eliminates the requirements for you as a developer to deal with credentials and API keys.
LlamaIndex manages the data from ingestion to retrieval
To implement a RAG (Retrieval-Augmented Generation) system using LlamaIndex, the following key steps are matched with the LlamaIndex functionality:
| Process | Description | LlamaIndex |
|---|---|---|
| Data Ingestion | Import data from sources like PDFs, APIs, or databases. | SimpleDirectoryReader |
| Chunk Documents | Break down large documents into smaller chunks. | SentenceSplitter |
| Vector index creation | Create a vector index for efficient similarity searches. | VectorStoreIndex |
| Recursive Retrieval (Optional) from index | Manage complex datasets with hierarchical retrieval. | |
| Convert to Query Engine | Convert the vector index into a query engine. | asQueryEngine |
| Advanced query setup (Optional) | Use agents for a multi-agent system. | |
| Implement the RAG pipeline | Define an objective function that takes user queries and retrieves relevant document chunks. | |
| Perform Retrieval | Process queries and rerank documents. | RetrieverQueryEngine, CohereRerank |
Prerequisites
A development container environment is available with all dependencies required to complete this article. You can run the development container in GitHub Codespaces (in a browser) or locally using Visual Studio Code.
To use this article, you need the following prerequisites:
- An Azure subscription - Create one for free
- Azure account permissions - Your Azure Account must have Microsoft.Authorization/roleAssignments/write permissions, such as User Access Administrator or Owner.
- A GitHub account.
Open development environment
Use the following instructions to deploy a preconfigured development environment containing all required dependencies to complete this article.
GitHub Codespaces runs a development container managed by GitHub with Visual Studio Code for the Web as the user interface. For the most straightforward development environment, use GitHub Codespaces so that you have the correct developer tools and dependencies preinstalled to complete this article.
Important
All GitHub accounts can use Codespaces for up to 60 hours free each month with 2 core instances. For more information, see GitHub Codespaces monthly included storage and core hours.
Open in codespace.
Wait for the codespace to start. This startup process can take a few minutes.
In the terminal at the bottom of the screen, sign in to Azure with the Azure Developer CLI.
azd auth loginComplete the authentication process.
The remaining tasks in this article take place in the context of this development container.
Deploy and run
The sample repository contains all the code and configuration files you need to deploy the serverless chat app to Azure. The following steps walk you through the process of deploying the sample to Azure.
Deploy chat app to Azure
Important
Azure resources created in this section incur immediate costs, primarily from the Azure AI Search resource. These resources may accrue costs even if you interrupt the command before it is fully executed.
To provision the Azure resources and deploy the source code, run the following Azure Developer CLI command:
azd upUse the following table to answer the prompts:
Prompt Answer Environment name Keep it short and lowercase. Add your name or alias. For example, john-chat. It's used as part of the resource group name.Subscription Select the subscription to create the resources in. Location (for hosting) Select a location near you from the list. Location for the OpenAI model Select a location near you from the list. If the same location is available as your first location, select that. Wait until app is deployed. It might take 5-10 minutes for the deployment to complete.
After successfully deploying the application, you see two URLs displayed in the terminal.
Select that URL labeled
Deploying service webappto open the chat application in a browser.
Use chat app to get answers from PDF files
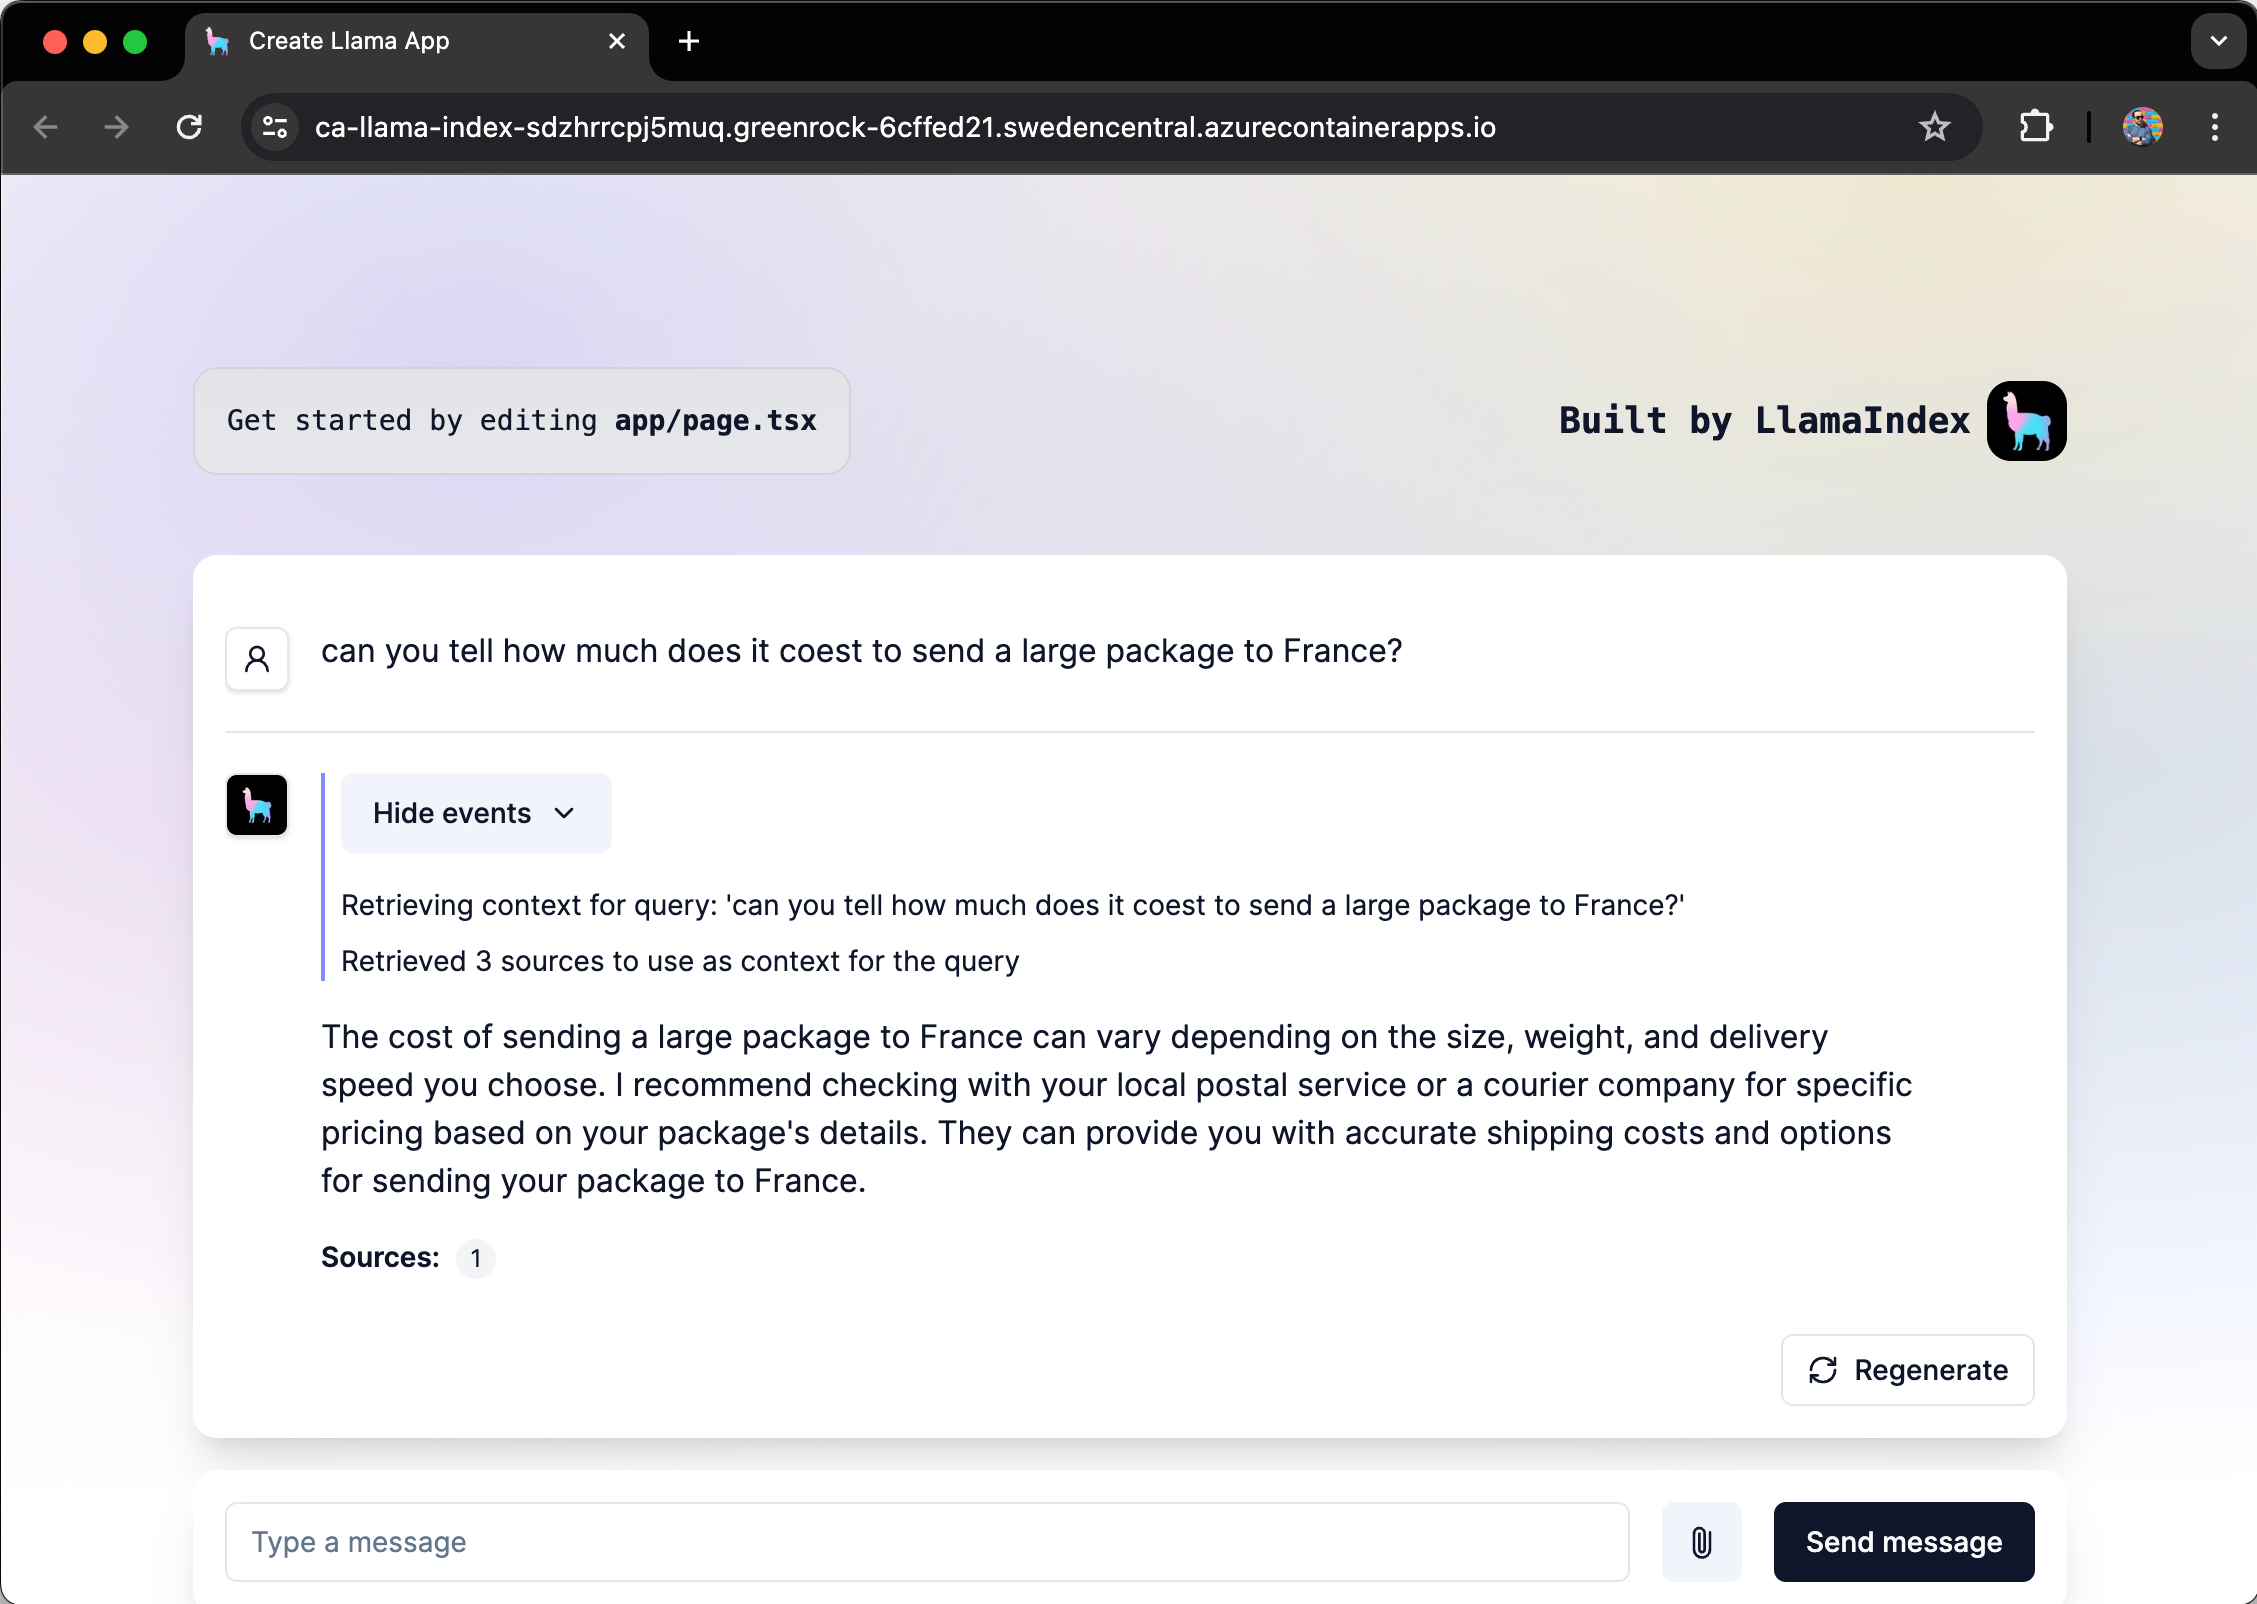
The chat app is preloaded with information about the physical standards for domestic postal mail from a PDF file catalog. You can use the chat app to ask questions about the mailing letter and packages. The following steps walk you through the process of using the chat app.
In the browser, select or enter How much does it cost to send a large package to France?.
LlamaIndex derives the answer uses the PDF file and streams the response.

The answer comes from Azure OpenAI with influence from the PDF data ingested into the LlamaIndex vector store.
Clean up resources
To clean up resources, there are two things to address:
- Azure resources, you can clean the resources up with Azure Developer CLI, azd.
- Your developer environment; either GitHub Codespaces or DevContainers via Visual Studio Code.
Clean up Azure resources
The Azure resources created in this article are billed to your Azure subscription. If you don't expect to need these resources in the future, delete them to avoid incurring more charges.
Run the following Azure Developer CLI command to delete the Azure resources and remove the source code:
azd down --purge
Clean up developer environments
Deleting the GitHub Codespaces environment ensures that you can maximize the amount of free per-core hours entitlement you get for your account.
Important
For more information about your GitHub account's entitlements, see GitHub Codespaces monthly included storage and core hours.
Sign into the GitHub Codespaces dashboard (https://github.com/codespaces).
Locate your currently running Codespaces sourced from the
Azure-Samples/llama-index-javascriptGitHub repository.
Open the context menu,
..., for the codespace and then select Delete.
Get help
This sample repository offers troubleshooting information.
If your issue isn't addressed, log your issue to the repository's Issues.
