Common attachment blocking scenarios for mail flow rules in Exchange Online
In Exchange Online organizations or standalone Exchange Online Protection (EOP) organizations without Exchange Online mailboxes, you might need to block or reject certain types of messages to meet legal or compliance requirements, or to meet specific business needs. This article discusses examples of common scenarios for blocking all attachments which you can set up using mail flow rules (also known mail flow rules).
Notes:
For more examples showing how to block specific attachments by using mail flow rules, see Use mail flow rules to inspect message attachments in Exchange Online.
Anti-malware polices EOP allow you to block specific file types by turning on and configuring the common attachment types filter. For instructions, see Configure anti-malware policies in EOP.
To get started using mail flow rules to block certain message types, do the following steps:
- Open the Exchange admin center (EAC). For more information, see Exchange admin center in Exchange Online.
- Go to Mail flow > Rules.
- Select + Add a rule and then select Create a new rule.
- In the Set rule conditions page that opens, configure the following settings:
- In the Name box, specify a name for the rule.
- Select the conditions and actions you want.
Note
In the EAC, the smallest attachment size that you can enter is 1 kilobyte, which should detect most attachments. However, if you want to detect every possible attachment of any size, you need to use PowerShell to adjust the attachment size to 1 byte after you create the rule in the EAC. To connect to PowerShell, see Connect to Exchange Online PowerShell or Connect to standalone Exchange Online Protection PowerShell.
Embedded images are treated as attachments (for example, messages with a picture in the signature). For this reason, we don't recommend using a very small value for the attachment size since unexpected messages will be blocked.
Example 1: Block messages with attachments, and notify the sender
If you don't want certain people in your organization to send or receive attachments greater than 10 Megabytes, you can set up a mail flow rule to block messages with attachments of this size.
In this example, all messages sent to or from the organization with attachments greater than 10 Megabytes are blocked.

If all you want to do is block the message, you might want to stop rule processing once this rule is matched. Scroll down the rule dialog box, and select the Stop processing more rules checkbox.
Example 2: Notify intended recipients when an inbound message is blocked
If you want to reject a message but let the intended recipient know what happened, you can use the Notify the recipient with a message action.
You can include placeholders in the notification message so that it includes information about the original message. The placeholders must be enclosed in two percent signs (%%), and when the notification message is sent, the placeholders are replaced with information from the original message. You can also use basic HTML such as <br>, <b>, <i>, and <img> in the message.
| Type of information | Placeholder |
|---|---|
| Sender of the message. | %%From%% |
| Recipients listed on the "To" line. | %%To%% |
| Recipients listed on the "Cc" line. | %%Cc%% |
| Subject of the original message. | %%Subject%% |
| Headers from the original message. This list is similar to the list of headers in a delivery status notification (DSN) generated for the original message. | %%Headers%% |
| Date the original message was sent on. | %%MessageDate%% |
In this example, all messages that contain attachments and are sent to people inside your organization are blocked, and the recipient is notified.

Example 3: Modify the subject line for notifications
When a notification is sent to the recipient, the subject line is the subject of the original message. If you want to modify the subject so that it's clearer to the recipient, you must use two mail flow rules:
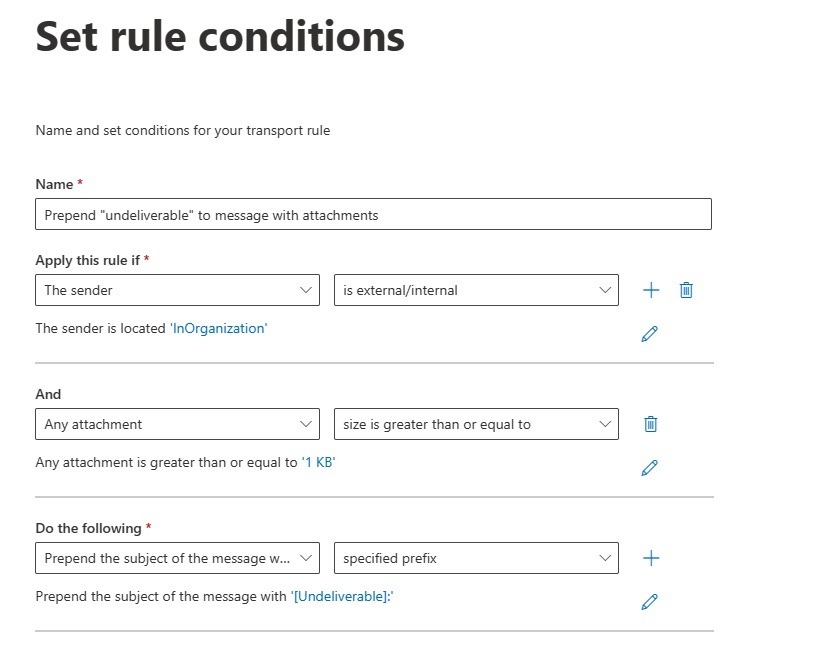
The first rule adds the word "undeliverable" to the beginning of the subject of any messages with attachments.
The second rule blocks the message and sends a notification message to the sender using the new subject of the original message.
Important
The two rules must have identical conditions. Rules are processed in order; so, the first rule adds the word "undeliverable", and the second rule blocks the message and notifies the recipient.
Here's what the first rule would look like if you want to add "undeliverable" to the subject:

And the second rule does the blocking and notification (the same rule from Example 2):

Example 4: Apply a rule with a time limit
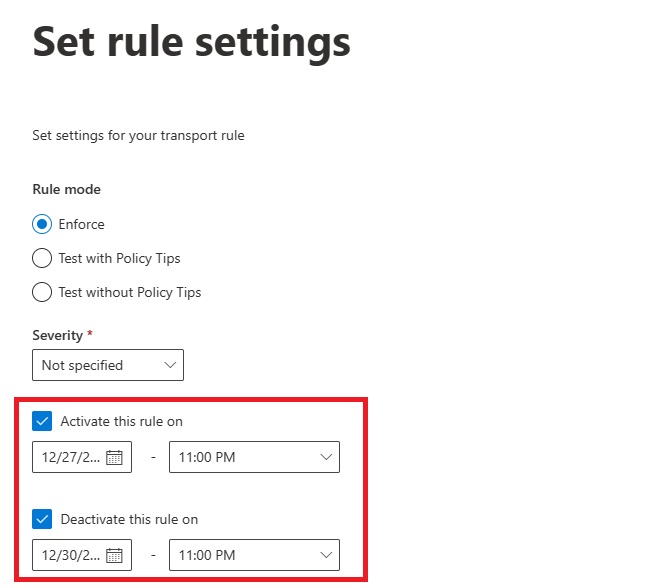
If you have a malware outbreak, you might want to apply a rule with a time limit so that you temporarily block attachments. For example, the following rule has both a start and stop day and time:

Example 5: Block messages based on attachment file extension
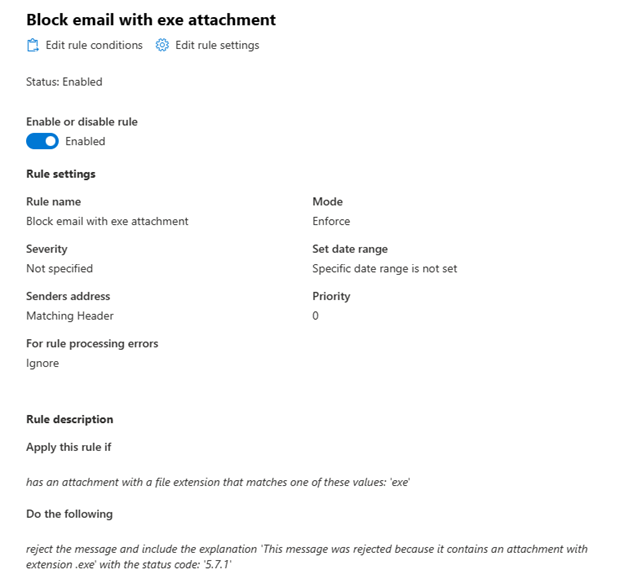
If you want to prevent users from sending or receiving messages that have attachments with specific file extensions, you can create a transport rule in Microsoft 365. This can help you protect your organization from malicious or unwanted files, such as executable programs, scripts, or macros. In this example, you will learn how to create a transport rule that blocks messages based on the file name extension of the attachment.
Steps to create a transport rule
To create a transport rule that blocks messages with certain attachment types, follow these steps:
Sign in to the Exchange admin center.
Select Mail flow and then select Rules.
Select + Add a rule and then select Create a new rule.
In the Name box, specify a name for the new rule.
Select the Apply this rule if drop-down list, point to Any attachment, and then select File extension includes these words.
In the Specify words or phrases window, type the file name extension of any attachment that you want to block, and then select the Add button to add the file name extension to the list. When the list is completed, select Save.
Select the Do the following drop-down list, point to Block the message, and then select Reject the message and include an explanation or select Delete the message without notifying anyone.
If it's required, specify a rejection reason to inform users who will receive the non-delivery report (NDR) of the reason that mail delivery failed, and then select Save.
Select the Next button.
On the next page, specify any additional options, such as rule mode and rule activation or deactivation time, and then select Next.
After reviewing the rule, select Finish.
By default, the transport rule is created as disabled. Make sure you toggle the Enable or disable rule switch to enable the rule.
Use PowerShell to create a rule that blocks messages with executable attachments
Use the following syntax to create a rule to block messages that contain executable attachments:
New-TransportRule -Name "<UniqueName>" -AttachmentHasExecutableContent $true [-RejectMessageEnhancedStatusCode <5.7.1 | 5.7.900 to 5.7.999>] [-RejectMessageReasonText "<Text>"] [-DeleteMessage $true]
Notes:
If you use the RejectMessageEnhancedStatusCode parameter without the RejectMessageReasonText parameter, the default text is: Delivery not authorized, message refused.
If you use the RejectMessageReasonText parameter without the RejectMessageEnhancedStatusCode parameter, the default code is 5.7.1.
This example creates a new rule named Block Executable Attachments that silently deletes messages that contain executable attachments.
New-TransportRule -Name "Block Executable Attachments" -AttachmentHasExecutableContent $true -DeleteMessage $true
For detailed syntax and parameter information, see New-TransportRule.
