Index data from OneLake files and shortcuts
In this article, learn how to configure a OneLake files indexer for extracting searchable data and metadata data from a lakehouse on top of OneLake.
To configure and run the indexer, you can use:
- 2024-05-01-preview REST API or a newer preview REST API.
- An Azure SDK beta package that provides the feature.
- Import data wizard in the Azure portal.
- Import and vectorize data wizard in the Azure portal.
This article uses the REST APIs to illustrate each step.
Prerequisites
A Fabric workspace. Follow this tutorial to create a Fabric workspace.
A lakehouse in a Fabric workspace. Follow this tutorial to create a lakehouse.
Textual data. If you have binary data, you can use AI enrichment image analysis to extract text or generate descriptions of images. File content can't exceed the indexer limits for your search service tier.
Content in the Files location of your lakehouse. You can add data by:
- Upload into a lakehouse directly
- Use data pipelines from Microsoft Fabric
- Add shortcuts from external data sources like Amazon S3 or Google Cloud Storage.
An AI Search service configured for either a system managed identity or user-assigned assigned managed identity. The AI Search service must reside within the same tenant as the Microsoft Fabric workspace.
A Contributor role assignment in the Microsoft Fabric workspace where the lakehouse is located. Steps are outlined in the Grant permissions section of this article.
A REST client to formulate REST calls similar to the ones shown in this article.
Supported tasks
You can use this indexer for the following tasks:
- Data indexing and incremental indexing: The indexer can index files and associated metadata from data paths within a lakehouse. It detects new and updated files and metadata through built-in change detection. You can configure data refresh on a schedule or on demand.
- Deletion detection: The indexer can detect deletions via custom metadata for most files and shortcuts. This requires adding metadata to files to signify that they have been "soft deleted", enabling their removal from the search index. Currently, it's not possible to detect deletions in Google Cloud Storage or Amazon S3 shortcut files because custom metadata isn't supported for those data sources.
- Applied AI through skillsets: Skillsets are fully supported by the OneLake files indexer. This includes key features like integrated vectorization that adds data chunking and embedding steps.
- Parsing modes: The indexer supports JSON parsing modes if you want to parse JSON arrays or lines into individual search documents. It also supports Markdown parsing mode.
- Compatibility with other features: The OneLake indexer is designed to work seamlessly with other indexer features, such as debug sessions, indexer cache for incremental enrichments, and knowledge store.
Supported document formats
The OneLake files indexer can extract text from the following document formats:
- CSV (see Indexing CSV blobs)
- EML
- EPUB
- GZ
- HTML
- JSON (see Indexing JSON blobs)
- KML (XML for geographic representations)
- Microsoft Office formats: DOCX/DOC/DOCM, XLSX/XLS/XLSM, PPTX/PPT/PPTM, MSG (Outlook emails), XML (both 2003 and 2006 WORD XML)
- Open Document formats: ODT, ODS, ODP
- Plain text files (see also Indexing plain text)
- RTF
- XML
- ZIP
Supported shortcuts
The following OneLake shortcuts are supported by the OneLake files indexer:
OneLake shortcut (a shortcut to another OneLake instance)
Limitations in this preview
Parquet (including delta parquet) file types aren't currently supported.
File deletion isn't supported for Amazon S3 and Google Cloud Storage shortcuts.
This indexer doesn't support OneLake workspace Table location content.
This indexer doesn't support SQL queries, but the query used in the data source configuration is exclusively to add optionally the folder or shortcut to access.
There's no support to ingest files from My Workspace workspace in OneLake since this is a personal repository per user.
Prepare data for indexing
Before you set up indexing, review your source data to determine whether any changes should be made up front. An indexer can index content from one container at a time. By default, all files in the container are processed. You have several options for more selective processing:
Place files in a virtual folder. An indexer data source definition includes a "query" parameter that can be either a lakehouse subfolder or shortcut. If this value is specified, only those files in the subfolder or shortcut within the lakehouse are indexed.
Include or exclude files by file type. The supported document formats list can help you determine which files to exclude. For example, you might want to exclude image or audio files that don't provide searchable text. This capability is controlled through configuration settings in the indexer.
Include or exclude arbitrary files. If you want to skip a specific file for whatever reason, you can add metadata properties and values to files in your OneLake lakehouse. When an indexer encounters this property, it skips the file or its content in the indexing run.
File inclusion and exclusion is covered in the indexer configuration step. If you don't set criteria, the indexer reports an ineligible file as an error and moves on. If enough errors occur, processing might stop. You can specify error tolerance in the indexer configuration settings.
An indexer typically creates one search document per file, where the text content and metadata are captured as searchable fields in an index. If files are whole files, you can potentially parse them into multiple search documents. For example, you can parse rows in a CSV file to create one search document per row. If you need to chunk a single document into smaller passages to vectorize data, consider using integrated vectorization.
Indexing file metadata
File metadata can also be indexed, and that's helpful if you think any of the standard or custom metadata properties are useful in filters and queries.
User-specified metadata properties are extracted verbatim. To receive the values, you must define field in the search index of type Edm.String, with same name as the metadata key of the blob. For example, if a blob has a metadata key of Priority with value High, you should define a field named Priority in your search index and it will be populated with the value High.
Standard file metadata properties can be extracted into similarly named and typed fields, as listed below. The OneLake files indexer automatically creates internal field mappings for these metadata properties, converting the original hyphenated name ("metadata-storage-name") to an underscored equivalent name ("metadata_storage_name").
You still have to add the underscored fields to the index definition, but you can omit indexer field mappings because the indexer makes the association automatically.
metadata_storage_name (
Edm.String) - the file name. For example, if you have a file /mydatalake/my-folder/subfolder/resume.pdf, the value of this field isresume.pdf.metadata_storage_path (
Edm.String) - the full URI of the blob, including the storage account. For example,https://myaccount.blob.core.windows.net/my-container/my-folder/subfolder/resume.pdfmetadata_storage_content_type (
Edm.String) - content type as specified by the code you used to upload the blob. For example,application/octet-stream.metadata_storage_last_modified (
Edm.DateTimeOffset) - last modified timestamp for the blob. Azure AI Search uses this timestamp to identify changed blobs, to avoid reindexing everything after the initial indexing.metadata_storage_size (
Edm.Int64) - blob size in bytes.metadata_storage_content_md5 (
Edm.String) - MD5 hash of the blob content, if available.
Lastly, any metadata properties specific to the document format of the files you're indexing can also be represented in the index schema. For more information about content-specific metadata, see Content metadata properties.
It's important to point out that you don't need to define fields for all of the above properties in your search index - just capture the properties you need for your application.
Grant permissions
The OneLake indexer uses token authentication and role-based access for connections to OneLake. Permissions are assigned in OneLake. There are no permission requirements on the physical data stores backing the shortcuts. For example, if you're indexing from AWS, you don't need to grant search service permissions in AWS.
The minimum role assignment for your search service identity is Contributor.
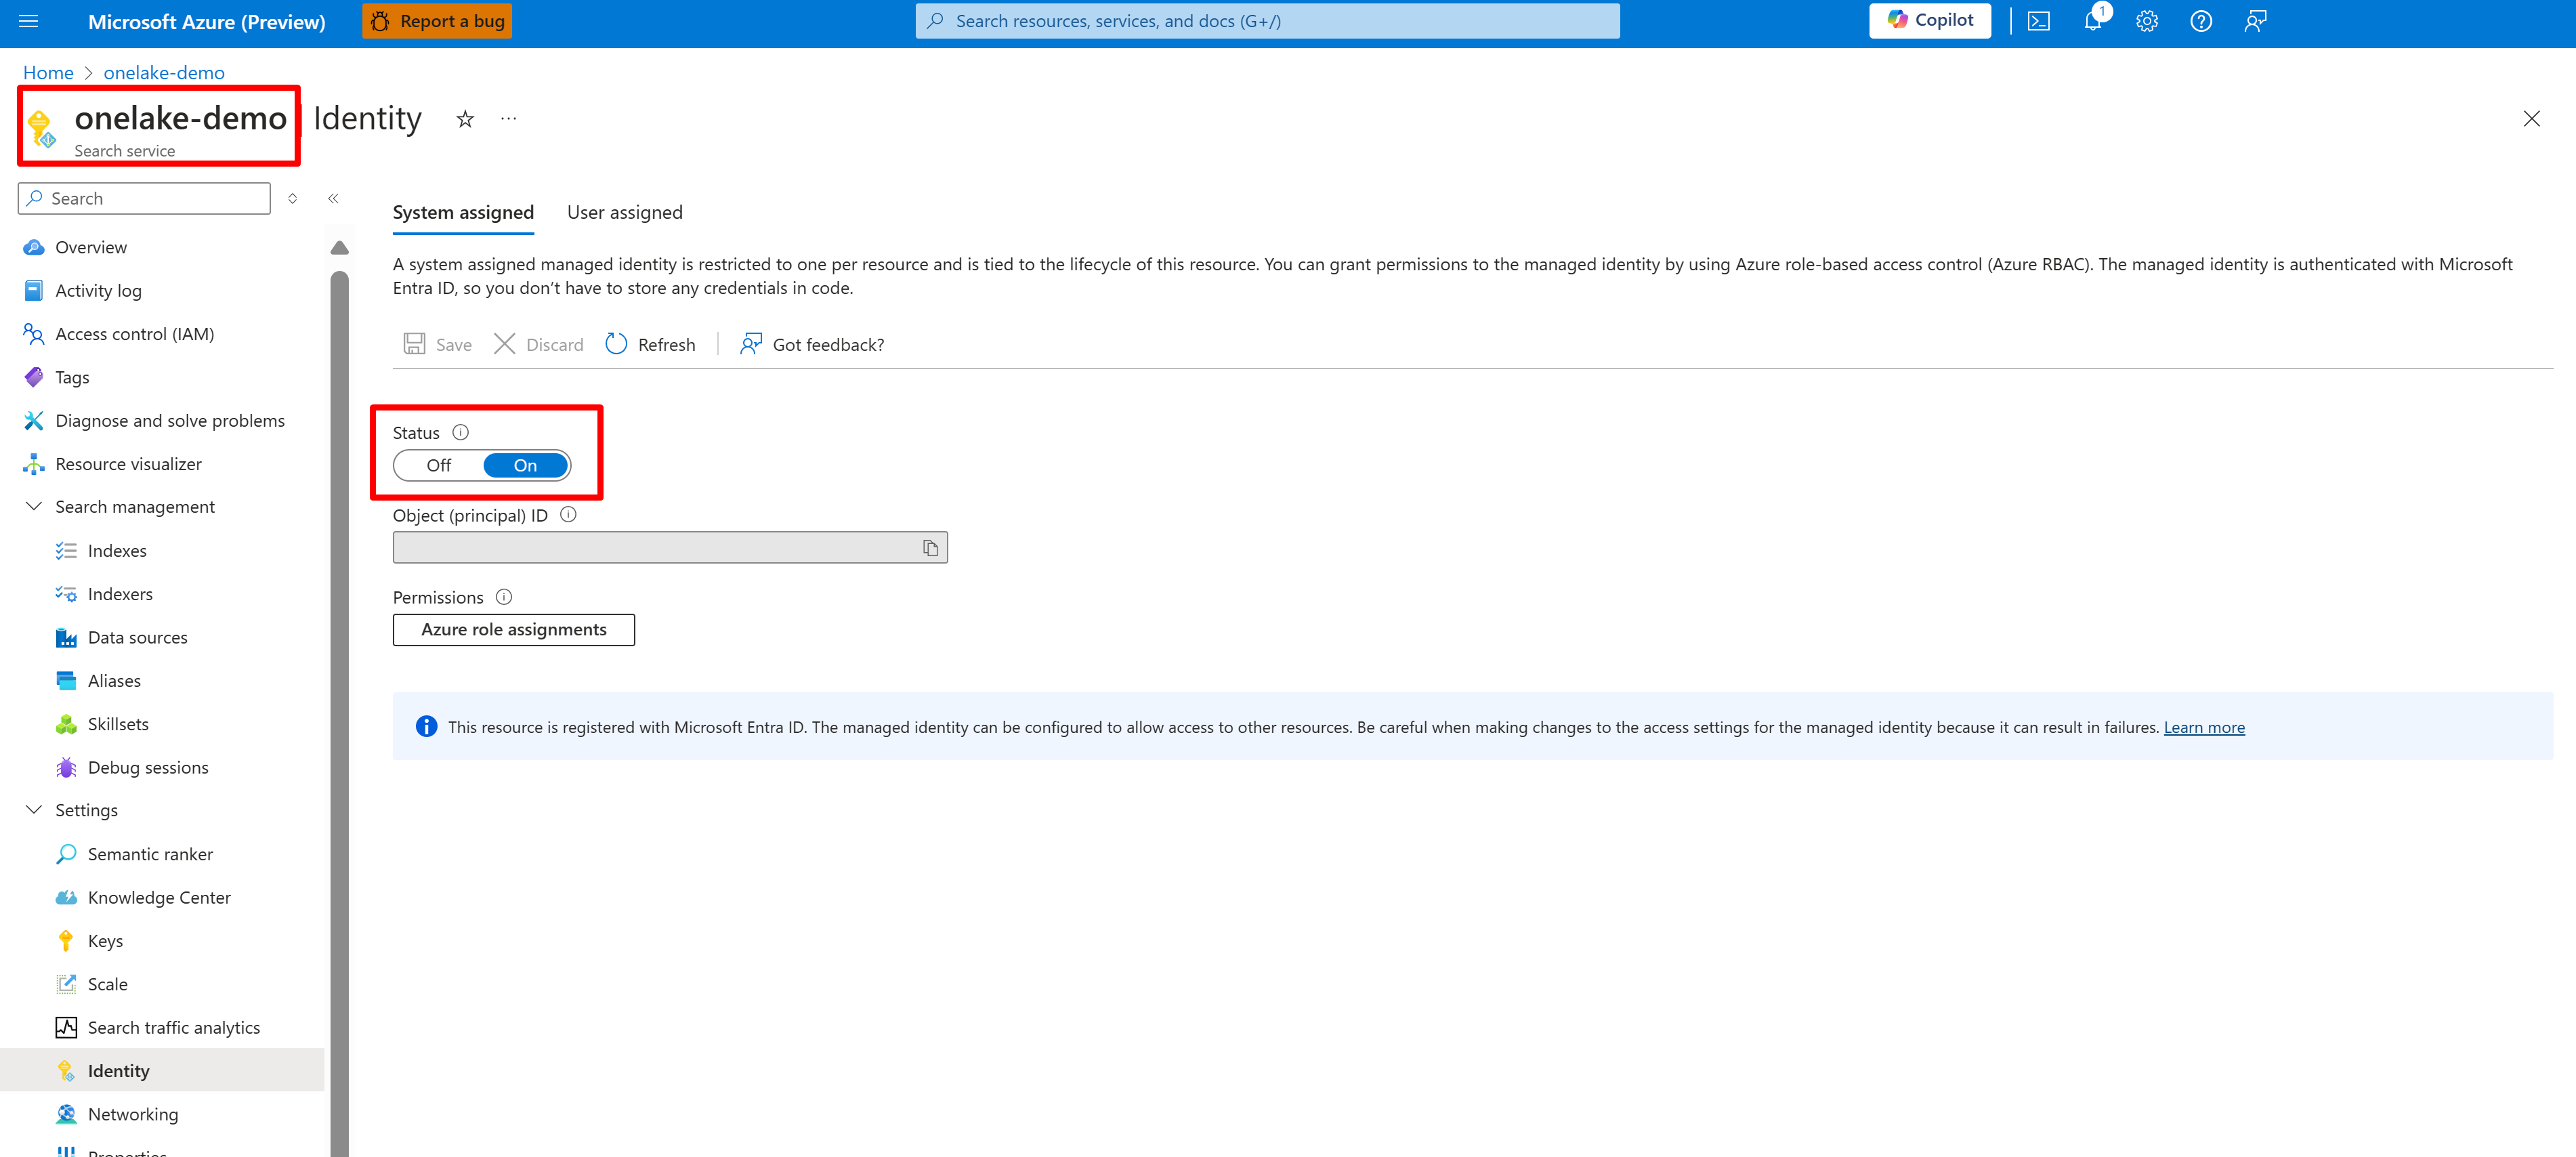
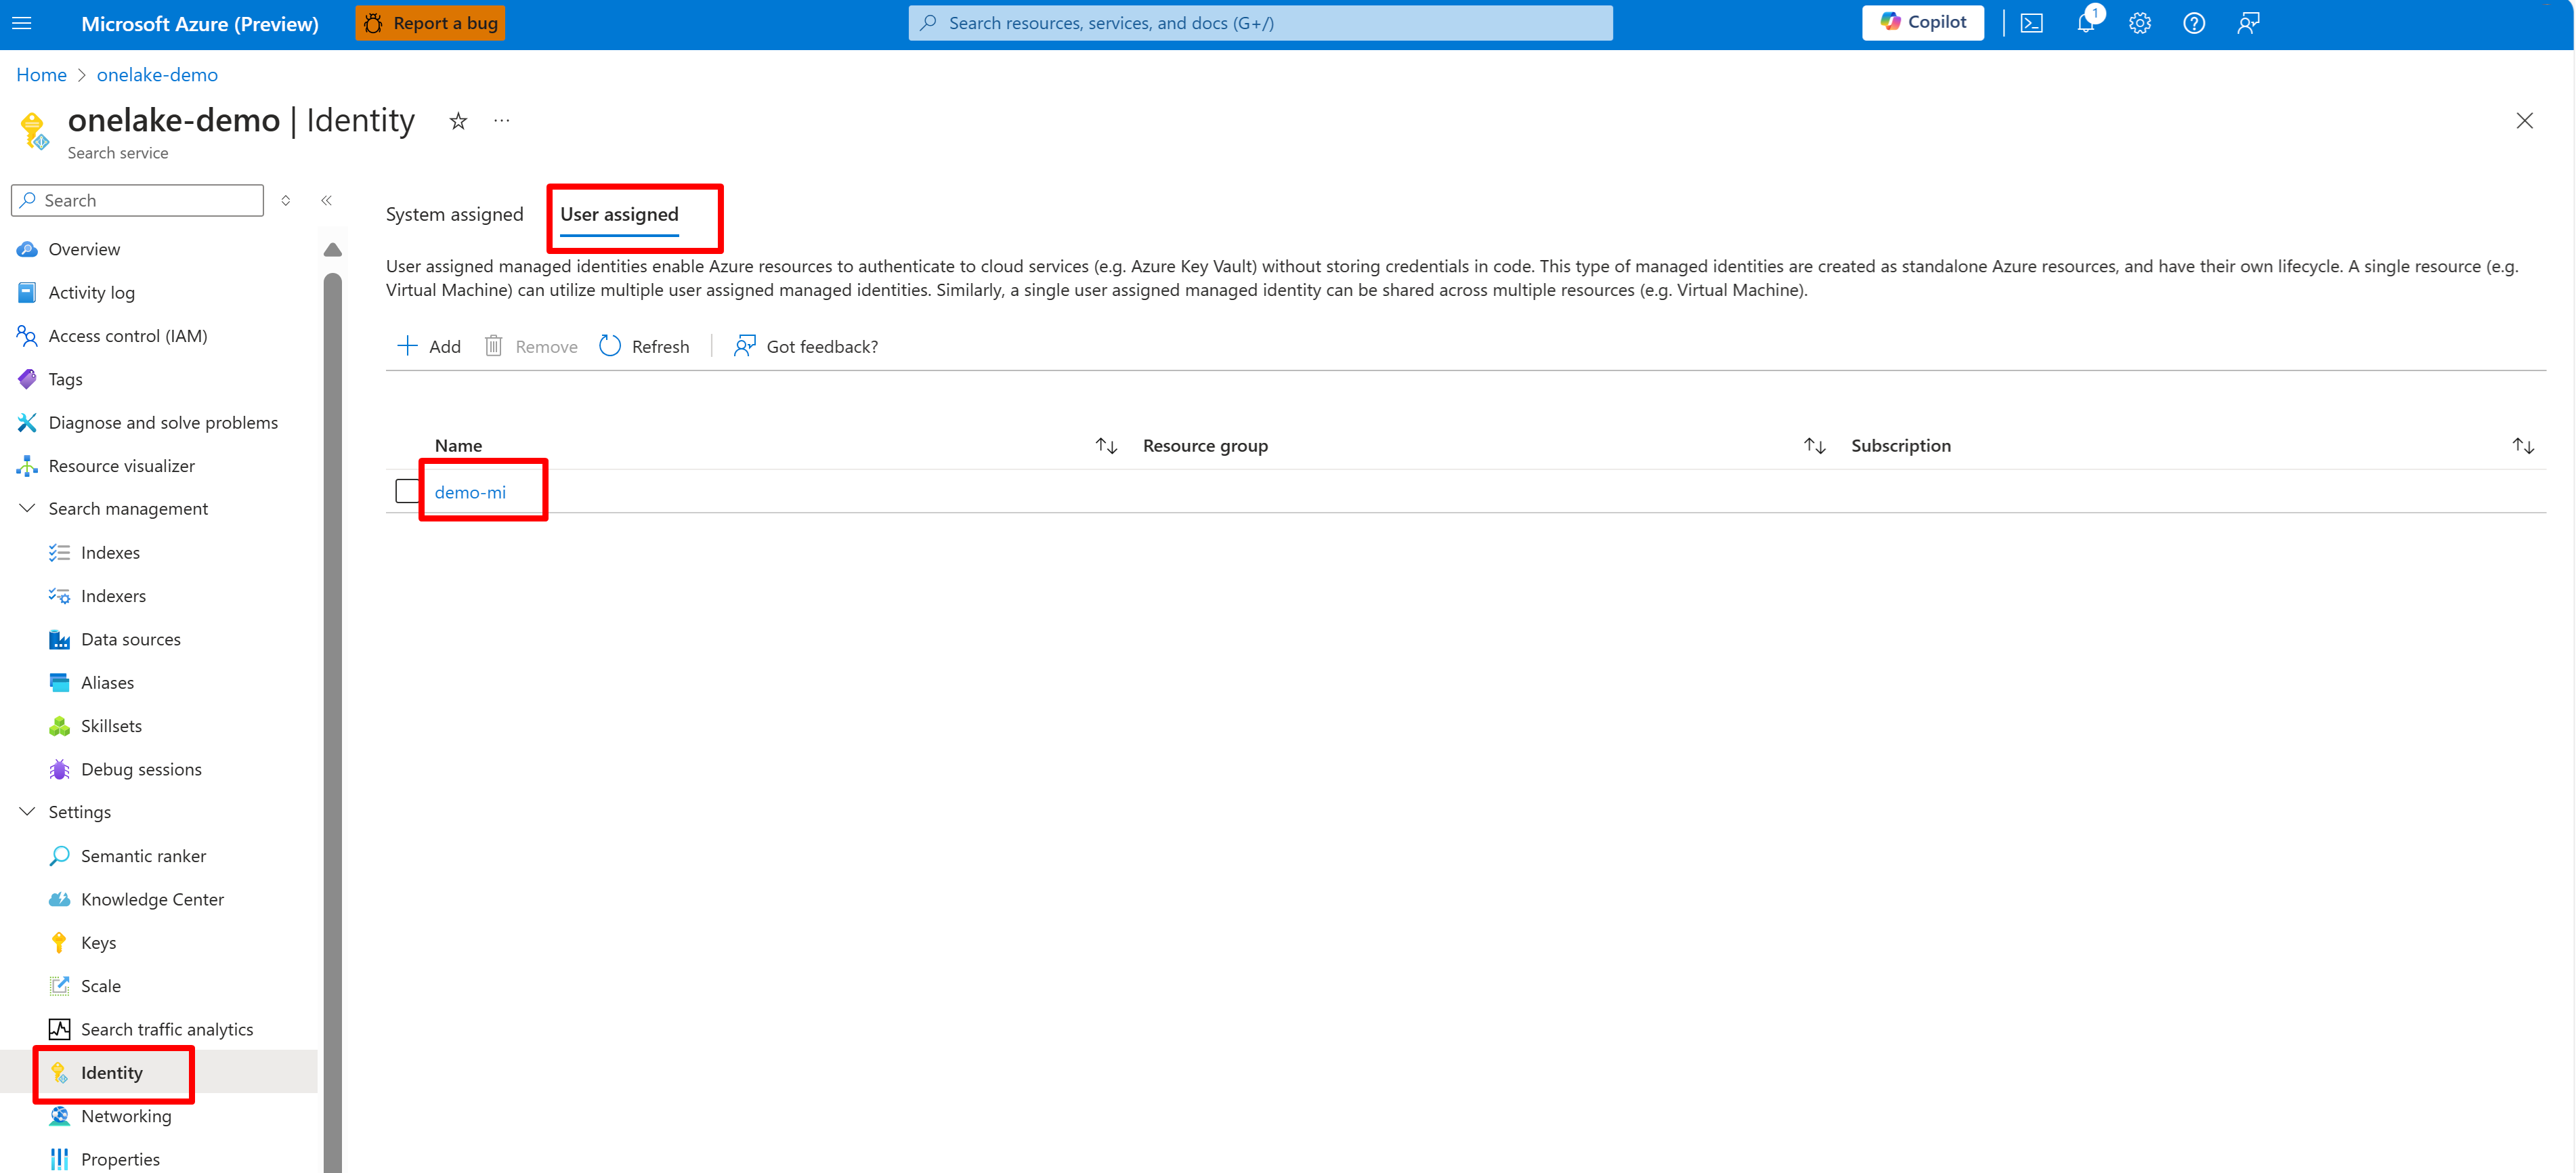
Configure a system or user-managed identity for your AI Search service.
The following screenshot shows a system managed identity for a search service named "onelake-demo".
This screenshot shows a user-managed identity for the same search service.
Grant permission for search service access to the Fabric workspace. The search service makes the connection on behalf of the indexer.
If you use a system-assigned managed identity, search for the name of the AI Search service. For a user-assigned managed identity, search for the name of the identity resource.
The following screenshot shows a Contributor role assignment using a system managed identity.
This screenshot shows a Contributor role assignment using a system managed identity:
Define the data source
A data source is defined as an independent resource so that it can be used by multiple indexers. You must use the 2024-05-01-preview REST API to create the data source.
Use the Create or update a data source REST API to set its definition. These are the most significant steps of the definition.
Set
"type"to"onelake"(required).Get the Microsoft Fabric workspace GUID and the lakehouse GUID:
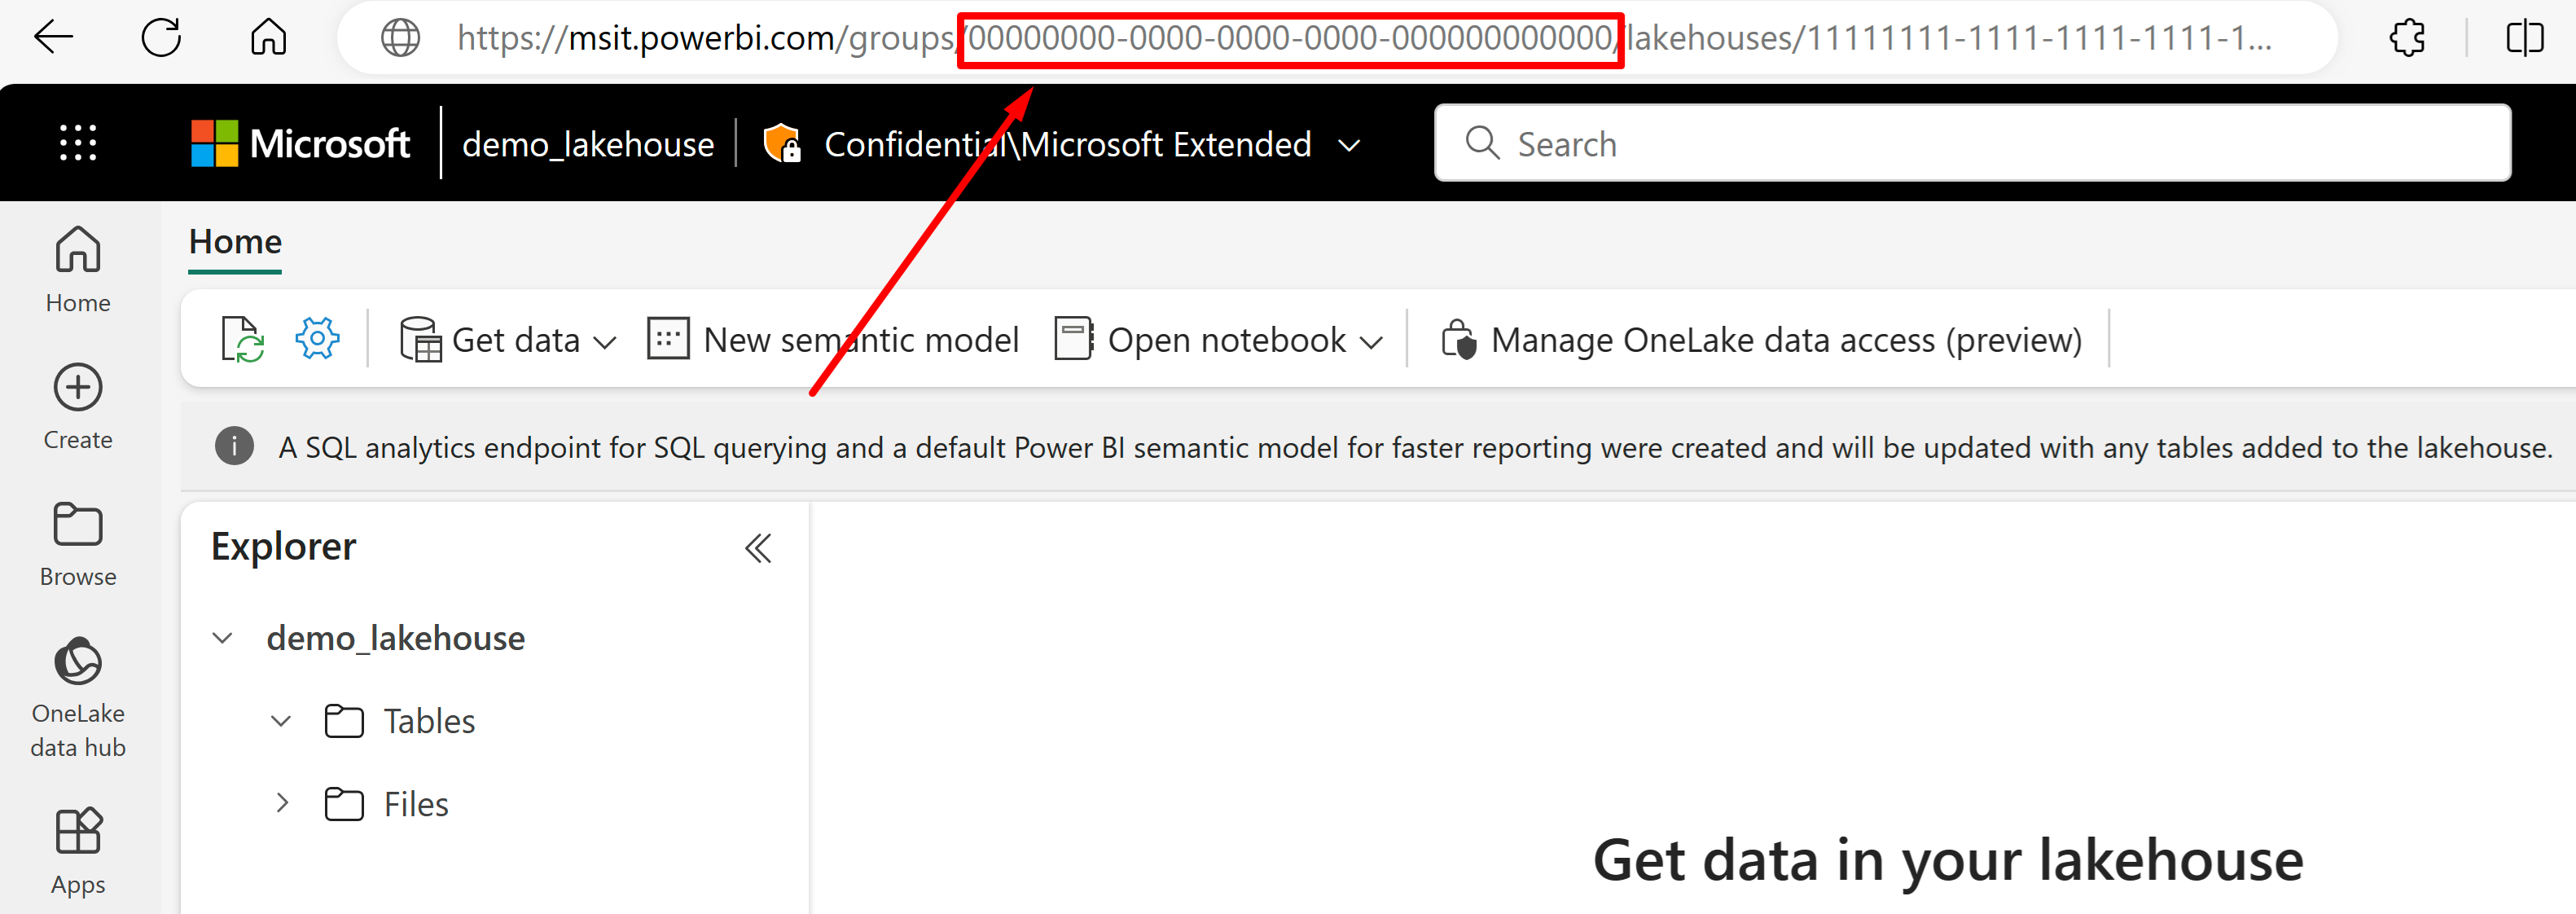
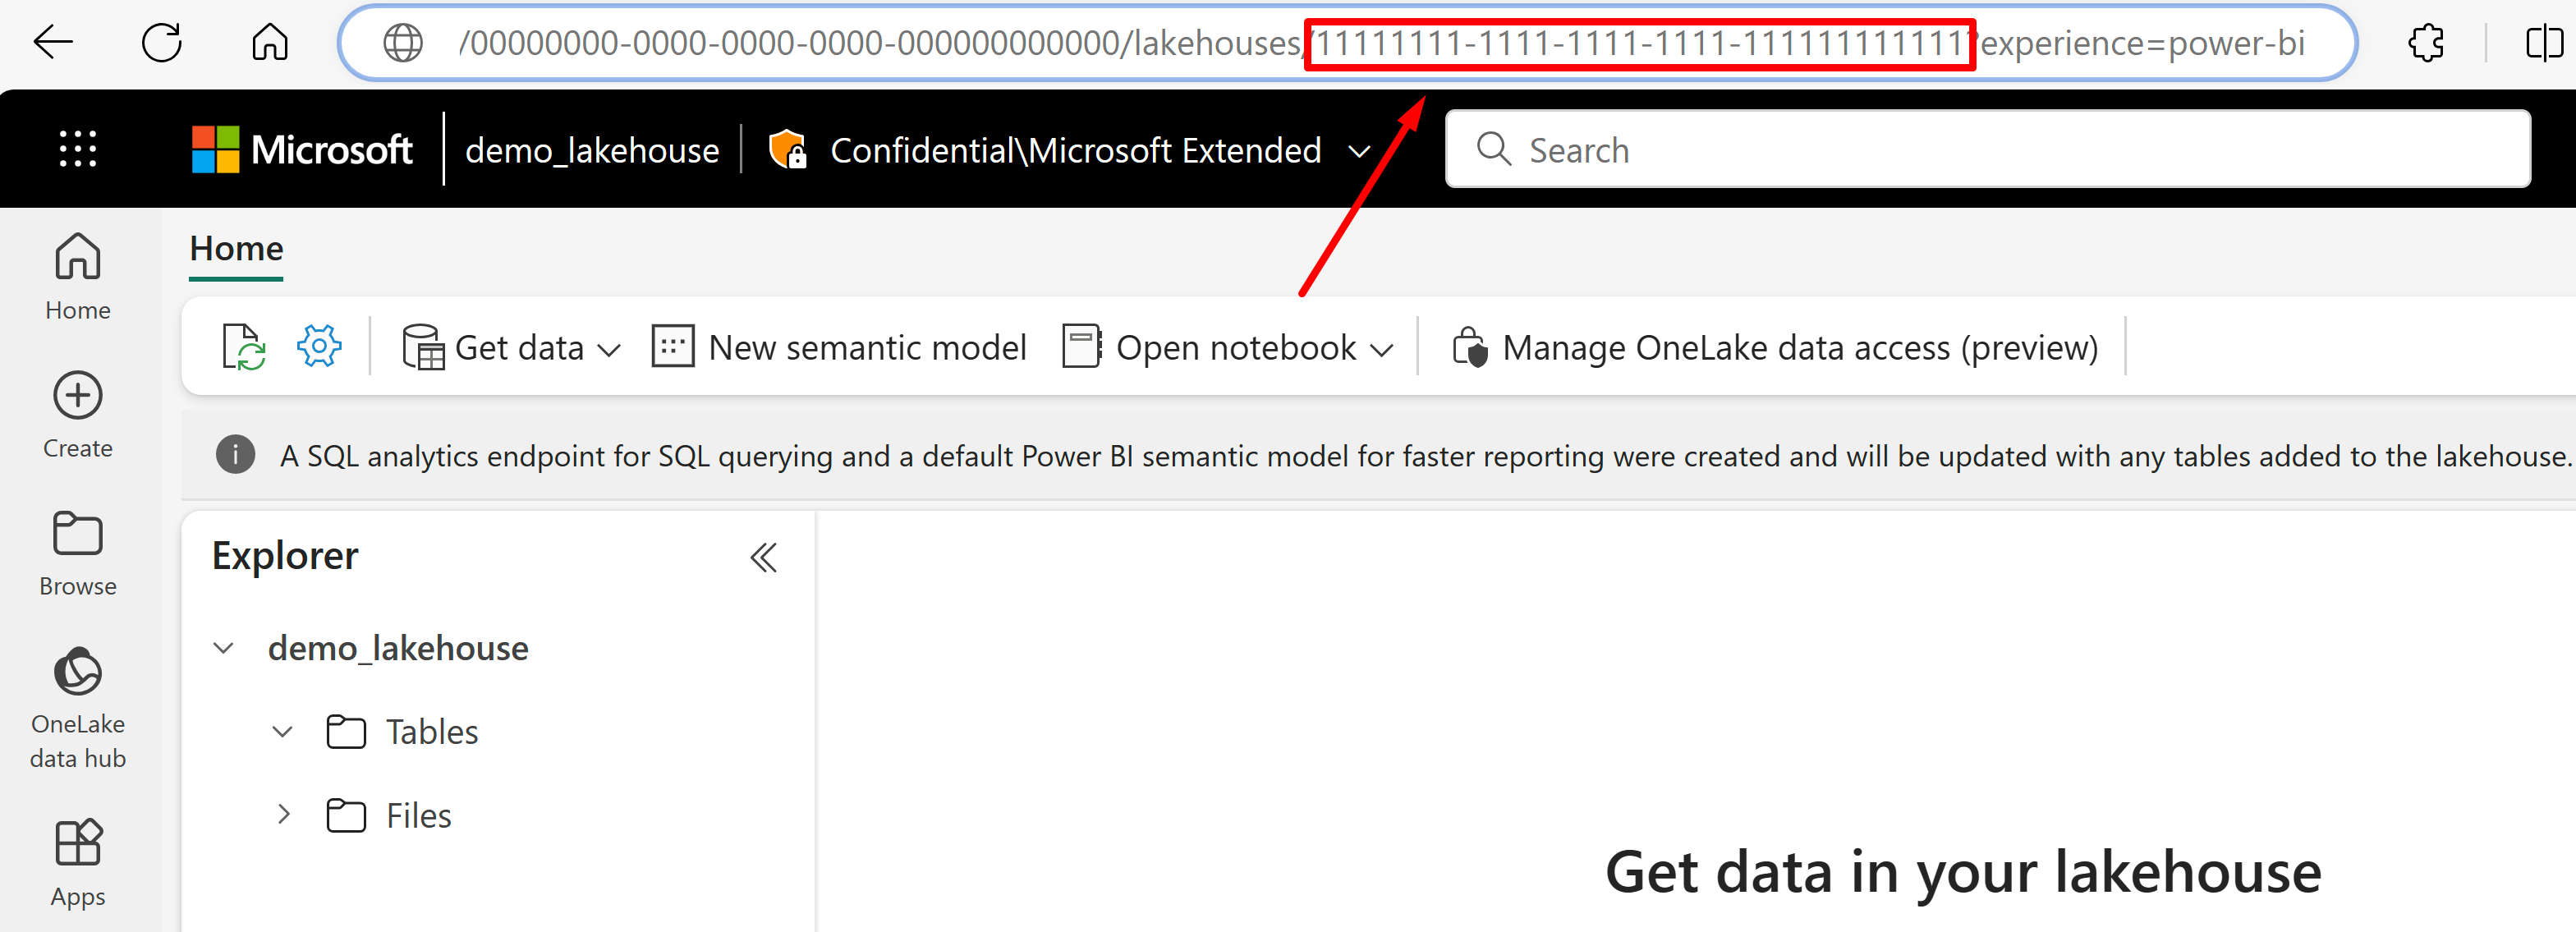
Go to the lakehouse you'd like to import data from its URL. It should look similar to this example: "https://msit.powerbi.com/groups/00000000-0000-0000-0000-000000000000/lakehouses/11111111-1111-1111-1111-111111111111?experience=power-bi". Copy the following values that are used in the data source definition:
Copy the workspace GUID, that we'll call
{FabricWorkspaceGuid}, which is listed right after "groups" in the URL. In this example, it would be 00000000-0000-0000-0000-000000000000.Copy the lakehouse GUID that we'll call
{lakehouseGuid}, which is listed right after "lakehouses" in the URL. In this example, it would be 11111111-1111-1111-1111-111111111111.
Set
"credentials"to the Microsoft Fabric workspace GUID by replacing{FabricWorkspaceGuid}with the value you copied in the previous step. This is the OneLake to access with the managed identity you'll set up later in this guide."credentials": { "connectionString": "ResourceId={FabricWorkspaceGuid}" }Set
"container.name"to the lakehouse GUID, replacing{lakehouseGuid}with the value you copied in the previous step. Use"query"to optionally specify a lakehouse subfolder or shortcut."container": { "name": "{lakehouseGuid}", "query": "{optionalLakehouseFolderOrShortcut}" }Set the authentication method using the user-assigned managed identity, or skip to the next step for system-managed identity.
{
  "name": "{dataSourceName}",
  "description": "description",
  "type": "onelake",
  "credentials": {
    "connectionString": "ResourceId={FabricWorkspaceGuid}"
  },
  "container": {
    "name": "{lakehouseGuid}",
    "query": "{optionalLakehouseFolderOrShortcut}"
  },
  "identity": {
    "@odata.type": "Microsoft.Azure.Search.DataUserAssignedIdentity",
    "userAssignedIdentity": "{userAssignedManagedIdentity}"
  }
}
The
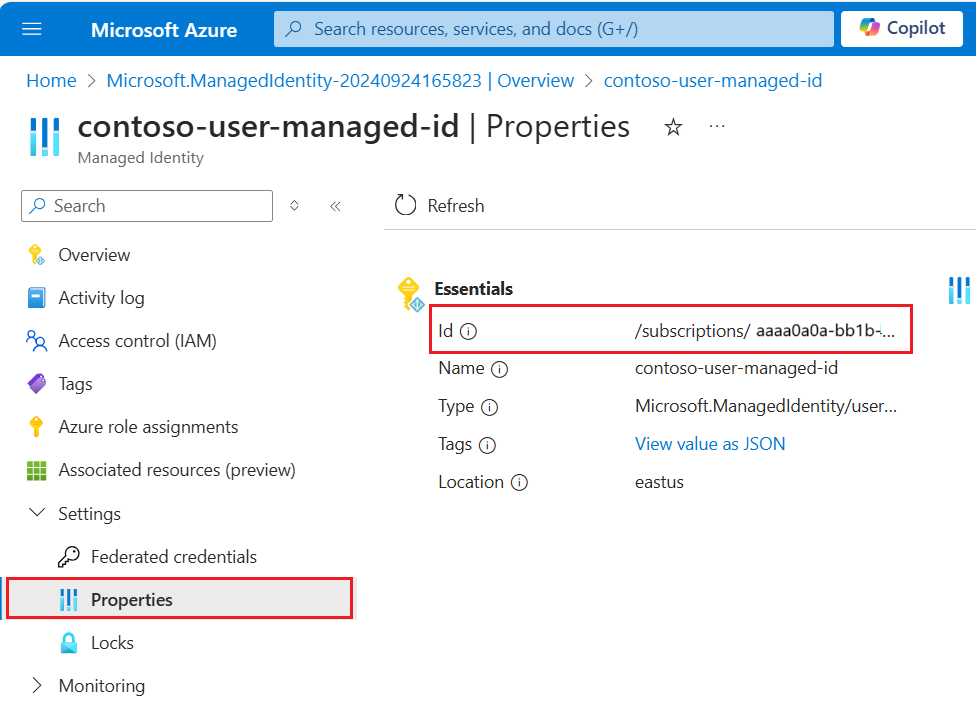
userAssignedIdentityvalue can be found by accessing the{userAssignedManagedIdentity}resource, under Properties and it's calledId.Example:
{
  "name": "mydatasource",
  "description": "description",
  "type": "onelake",
  "credentials": {
    "connectionString": "ResourceId=a0a0a0a0-bbbb-cccc-dddd-e1e1e1e1e1e1"
  },
  "container": {
    "name": "11111111-1111-1111-1111-111111111111",
    "query": "folder_name"
  },
  "identity": {
    "@odata.type": "Microsoft.Azure.Search.DataUserAssignedIdentity",
    "userAssignedIdentity": "/subscriptions/333333-3333-3333-3333-33333333/resourcegroups/myresourcegroup/providers/Microsoft.ManagedIdentity/userAssignedIdentities/demo-mi"
  }
}
Optionally, use a system-assigned managed identity instead. The "identity" is removed from the definition if using system-assigned managed identity.
{
  "name": "{dataSourceName}",
  "description": "description",
  "type": "onelake",
  "credentials": {
    "connectionString": "ResourceId={FabricWorkspaceGuid}"
  },
  "container": {
    "name": "{lakehouseGuid}",
    "query": "{optionalLakehouseFolderOrShortcut}"
  }
}
Example:
{
  "name": "mydatasource",
  "description": "description",
  "type": "onelake",
  "credentials": {
    "connectionString": "ResourceId=a0a0a0a0-bbbb-cccc-dddd-e1e1e1e1e1e1"
  },
  "container": {
    "name": "11111111-1111-1111-1111-111111111111",
    "query": "folder_name"
  }
}
Detect deletions via custom metadata
The OneLake files indexer data source definition can include a soft deletion policy if you want the indexer to delete a search document when the source document is flagged for deletion.
To enable automatic file deletion, use custom metadata to indicate whether a search document should be removed from the index.
Workflow requires three separate actions:
- "Soft-delete" the file in OneLake
- Indexer deletes the search document in the index
- "Hard delete" the file in OneLake
"Soft-deleting" tells the indexer what to do (delete the search document). If you delete the physical file in OneLake first, there's nothing for the indexer to read and the corresponding search document in the index is orphaned.
There are steps to follow in both OneLake and Azure AI Search, but there are no other feature dependencies.
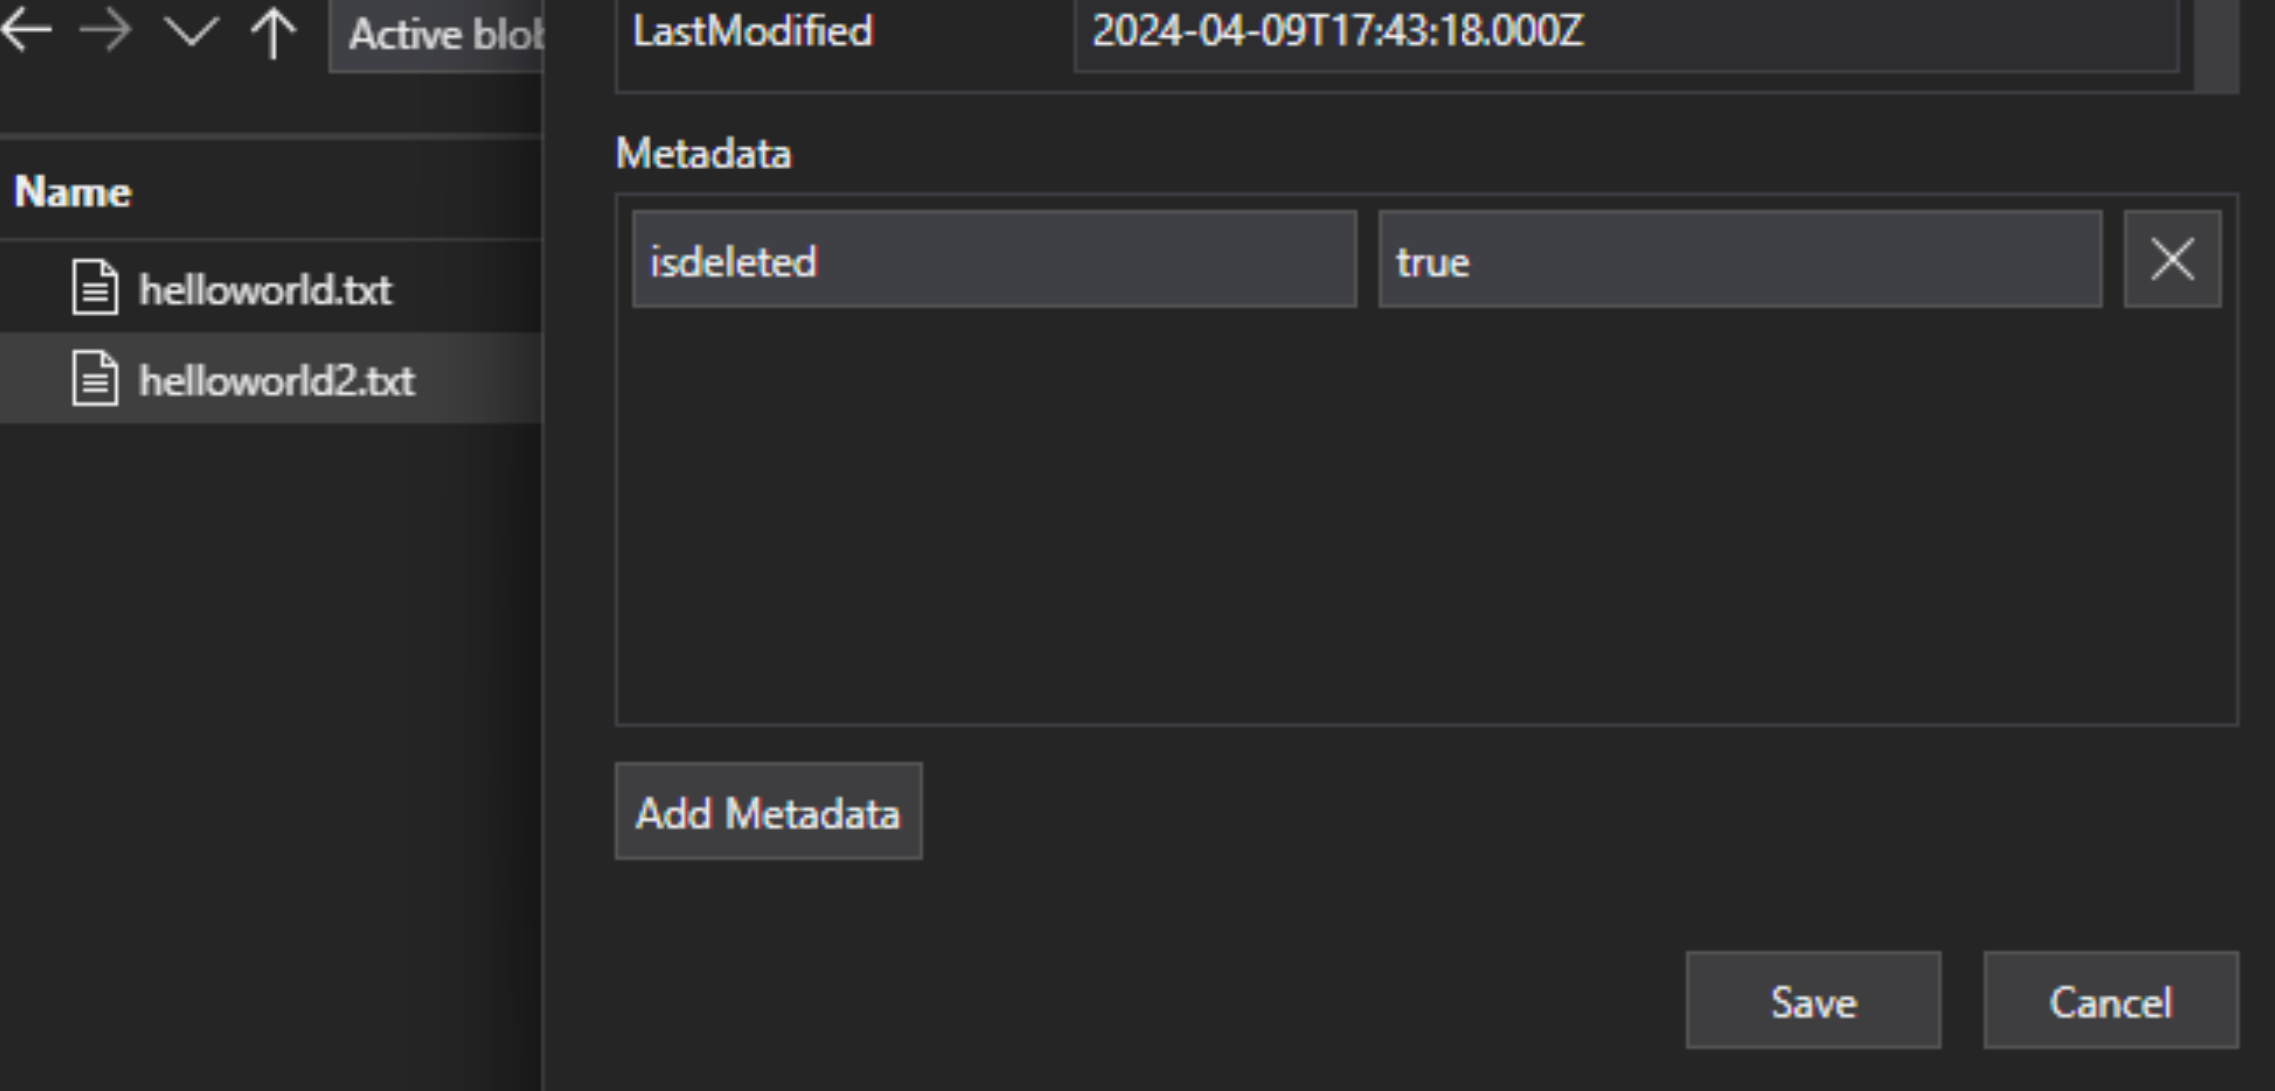
In the lakehouse file, add a custom metadata key-value pair to the file to indicate the file is flagged for deletion. For example, you could name the property "IsDeleted", set to false. When you want to delete the file, change it to true.
In Azure AI Search, edit the data source definition to include a "dataDeletionDetectionPolicy" property. For example, the following policy considers a file to be deleted if it has a metadata property "IsDeleted" with the value true:
PUT https://[service name].search.windows.net/datasources/file-datasource?api-version=2024-05-01-preview
{
    "name" : "onelake-datasource",
    "type" : "onelake",
     "credentials": {
        "connectionString": "ResourceId={FabricWorkspaceGuid}"
    },
    "container": {
        "name": "{lakehouseGuid}",
        "query": "{optionalLakehouseFolderOrShortcut}"
    },
    "dataDeletionDetectionPolicy" : {
        "@odata.type" :"#Microsoft.Azure.Search.SoftDeleteColumnDeletionDetectionPolicy",
        "softDeleteColumnName" : "IsDeleted",
        "softDeleteMarkerValue" : "true"
    }
}
After the indexer runs and deletes the document from the search index, you can then delete the physical file in the data lake.
Some key points include:
Scheduling an indexer run helps automate this process. We recommend schedules for all incremental indexing scenarios.
If the deletion detection policy wasn't set on the first indexer run, you must reset the indexer so that it reads the updated configuration.
Recall that deletion detection isn't supported for Amazon S3 and Google Cloud Storage shortcuts due to the dependency on custom metadata.
Add search fields to an index
In a search index, add fields to accept the content and metadata of your OneLake data lake files.
Create or update an index to define search fields that store file content and metadata:
{
    "name" : "my-search-index",
    "fields": [
        { "name": "ID", "type": "Edm.String", "key": true, "searchable": false },
        { "name": "content", "type": "Edm.String", "searchable": true, "filterable": false },
        { "name": "metadata_storage_name", "type": "Edm.String", "searchable": false, "filterable": true, "sortable": true  },
        { "name": "metadata_storage_size", "type": "Edm.Int64", "searchable": false, "filterable": true, "sortable": true  },
        { "name": "metadata_storage_content_type", "type": "Edm.String", "searchable": false, "filterable": true, "sortable": true }
    ]
}
Create a document key field ("key": true). For file content, the best candidates are metadata properties.
metadata_storage_path(default) full path to the object or file. The key field ("ID" in this example) is populated with values from metadata_storage_path because it's the default.metadata_storage_name, usable only if names are unique. If you want this field as the key, move"key": trueto this field definition.A custom metadata property that you add to your files. This option requires that your file upload process adds that metadata property to all blobs. Since the key is a required property, any files that are missing a value fail to be indexed. If you use a custom metadata property as a key, avoid making changes to that property. Indexers add duplicate documents for the same file if the key property changes.
Metadata properties often include characters, such as
/and-, that are invalid for document keys. Because the indexer has a "base64EncodeKeys" property (true by default), it automatically encodes the metadata property, with no configuration or field mapping required.Add a "content" field to store extracted text from each file through the file's "content" property. You aren't required to use this name, but doing so lets you take advantage of implicit field mappings.
Add fields for standard metadata properties. The indexer can read custom metadata properties, standard metadata properties, and content-specific metadata properties.
Configure and run the OneLake files indexer
Once the index and data source are created, you're ready to create the indexer. Indexer configuration specifies the inputs, parameters, and properties controlling run time behaviors. You can also specify which parts of a blob to index.
Create or update an indexer by giving it a name and referencing the data source and target index:
{
  "name" : "my-onelake-indexer",
  "dataSourceName" : "my-onelake-datasource",
  "targetIndexName" : "my-search-index",
  "parameters": {
      "batchSize": null,
      "maxFailedItems": null,
      "maxFailedItemsPerBatch": null,
      "base64EncodeKeys": null,
      "configuration": {
          "indexedFileNameExtensions" : ".pdf,.docx",
          "excludedFileNameExtensions" : ".png,.jpeg",
          "dataToExtract": "contentAndMetadata",
          "parsingMode": "default"
      }
  },
  "schedule" : { },
  "fieldMappings" : [ ]
}
Set "batchSize" if the default (10 documents) is either under utilizing or overwhelming available resources. Default batch sizes are data source specific. File indexing sets batch size at 10 documents in recognition of the larger average document size.
Under "configuration", control which files are indexed based on file type, or leave unspecified to retrieve all files.
For
"indexedFileNameExtensions", provide a comma-separated list of file extensions (with a leading dot). Do the same for"excludedFileNameExtensions"to indicate which extensions should be skipped. If the same extension is in both lists, it's excluded from indexing.Under "configuration", set "dataToExtract" to control which parts of the files are indexed:
"contentAndMetadata" is the default. It specifies that all metadata and textual content extracted from the file are indexed.
"storageMetadata" specifies that only the standard file properties and user-specified metadata are indexed. Although the properties are documented for Azure blobs, the file properties are the same for OneLkae, except for the SAS related metadata.
"allMetadata" specifies that standard file properties and any metadata for found content types are extracted from the file content and indexed.
Under "configuration", set "parsingMode" if files should be mapped to multiple search documents, or if they consist of plain text, JSON documents, or CSV files.
Specify field mappings if there are differences in field name or type, or if you need multiple versions of a source field in the search index.
In file indexing, you can often omit field mappings because the indexer has built-in support for mapping the "content" and metadata properties to similarly named and typed fields in an index. For metadata properties, the indexer automatically replaces hyphens
-with underscores in the search index.
For more information about other properties, Create an indexer. For the full list of parameter descriptions, see Create Indexer (REST) in the REST API. The parameters are the same for OneLake.
By default, an indexer runs automatically when you create it. You can change this behavior by setting "disabled" to true. To control indexer execution, run an indexer on demand or put it on a schedule.
Check indexer status
Learn multiple approaches to monitor the indexer status and execution history here.
Handle errors
Errors that commonly occur during indexing include unsupported content types, missing content, or oversized files. By default, the OneLake files indexer stops as soon as it encounters a file with an unsupported content type. However, you might want indexing to proceed even if errors occur, and then debug individual documents later.
Transient errors are common for solutions involving multiple platforms and products. However, if you keep the indexer on a schedule (for example every 5 minutes), the indexer should be able to recover from those errors in the following run.
There are five indexer properties that control the indexer's response when errors occur.
{
  "parameters" : {
    "maxFailedItems" : 10,
    "maxFailedItemsPerBatch" : 10,
    "configuration" : {
        "failOnUnsupportedContentType" : false,
        "failOnUnprocessableDocument" : false,
        "indexStorageMetadataOnlyForOversizedDocuments": false
    }
  }
}
| Parameter | Valid values | Description |
|---|---|---|
| "maxFailedItems" | -1, null or 0, positive integer | Continue indexing if errors happen at any point of processing, either while parsing blobs or while adding documents to an index. Set these properties to the number of acceptable failures. A value of -1 allows processing no matter how many errors occur. Otherwise, the value is a positive integer. |
| "maxFailedItemsPerBatch" | -1, null or 0, positive integer | Same as above, but used for batch indexing. |
| "failOnUnsupportedContentType" | true or false | If the indexer is unable to determine the content type, specify whether to continue or fail the job. |
| "failOnUnprocessableDocument" | true or false | If the indexer is unable to process a document of an otherwise supported content type, specify whether to continue or fail the job. |
| "indexStorageMetadataOnlyForOversizedDocuments" | true or false | Oversized blobs are treated as errors by default. If you set this parameter to true, the indexer tries to index its metadata even if the content can't be indexed. For limits on blob size, see service Limits. |
Next steps
Review how the Import and vectorize data wizard works and try it out for this indexer. You can use integrated vectorization to chunk and create embeddings for vector or hybrid search using a default schema.
