Authorization on batch endpoints
Batch endpoints support Microsoft Entra authentication, or aad_token. That means that in order to invoke a batch endpoint, the user must present a valid Microsoft Entra authentication token to the batch endpoint URI. Authorization is enforced at the endpoint level. The following article explains how to correctly interact with batch endpoints and the security requirements for it.
How authorization works
To invoke a batch endpoint, the user must present a valid Microsoft Entra token representing a security principal. This principal can be a user principal or a service principal. In any case, once an endpoint is invoked, a batch deployment job is created under the identity associated with the token. The identity needs the following permissions in order to successfully create a job:
- Read batch endpoints/deployments.
- Create jobs in batch inference endpoints/deployment.
- Create experiments/runs.
- Read and write from/to data stores.
- Lists datastore secrets.
See Configure RBAC for batch endpoint invoke for a detailed list of RBAC permissions.
Important
The identity used for invoking a batch endpoint may not be used to read the underlying data depending on how the data store is configured. Please see Configure compute clusters for data access for more details.
How to run jobs using different types of credentials
The following examples show different ways to start batch deployment jobs using different types of credentials:
Important
When working on a private link-enabled workspaces, batch endpoints can't be invoked from the UI in Azure Machine Learning studio. Please use the Azure Machine Learning CLI v2 instead for job creation.
Prerequisites
- This example assumes that you have a model correctly deployed as a batch endpoint. Particularly, we are using the heart condition classifier created in the tutorial Using MLflow models in batch deployments.
Running jobs using user's credentials
In this case, we want to execute a batch endpoint using the identity of the user currently logged in. Follow these steps:
Use the Azure CLI to log in using either interactive or device code authentication:
az loginOnce authenticated, use the following command to run a batch deployment job:
az ml batch-endpoint invoke --name $ENDPOINT_NAME \
                            --input https://azuremlexampledata.blob.core.windows.net/data/heart-disease-uci
Running jobs using a service principal
In this case, we want to execute a batch endpoint using a service principal already created in Microsoft Entra ID. To complete the authentication, you will have to create a secret to perform the authentication. Follow these steps:
Create a secret to use for authentication as explained at Option 3: Create a new client secret.
To authenticate using a service principal, use the following command. For more details see Sign in with Azure CLI.
az login --service-principal \
         --tenant <tenant> \
         -u <app-id> \
         -p <password-or-cert>
Once authenticated, use the following command to run a batch deployment job:
az ml batch-endpoint invoke --name $ENDPOINT_NAME \
                            --input https://azuremlexampledata.blob.core.windows.net/data/heart-disease-uci/
Running jobs using a managed identity
You can use managed identities to invoke batch endpoint and deployments. Notice that this manage identity doesn't belong to the batch endpoint, but it is the identity used to execute the endpoint and hence create a batch job. Both user assigned and system assigned identities can be use in this scenario.
On resources configured for managed identities for Azure resources, you can sign in using the managed identity. Signing in with the resource's identity is done through the --identity flag. For more details, see Sign in with Azure CLI.
az login --identity
Once authenticated, use the following command to run a batch deployment job:
az ml batch-endpoint invoke --name $ENDPOINT_NAME \
                            --input https://azuremlexampledata.blob.core.windows.net/data/heart-disease-uci
Configure RBAC for Batch Endpoints invoke
Batch Endpoints exposes a durable API consumers can use to generate jobs. The invoker request proper permission to be able to generate those jobs. You can either use one of the built-in security roles or you can create a custom role for the purposes.
To successfully invoke a batch endpoint you need the following explicit actions granted to the identity used to invoke the endpoints. See Steps to assign an Azure role for instructions to assign them.
"actions": [
    "Microsoft.MachineLearningServices/workspaces/read",
    "Microsoft.MachineLearningServices/workspaces/data/versions/write",
    "Microsoft.MachineLearningServices/workspaces/datasets/registered/read",
    "Microsoft.MachineLearningServices/workspaces/datasets/registered/write",
    "Microsoft.MachineLearningServices/workspaces/datasets/unregistered/read",
    "Microsoft.MachineLearningServices/workspaces/datasets/unregistered/write",
    "Microsoft.MachineLearningServices/workspaces/datastores/read",
    "Microsoft.MachineLearningServices/workspaces/datastores/write",
    "Microsoft.MachineLearningServices/workspaces/datastores/listsecrets/action",
    "Microsoft.MachineLearningServices/workspaces/listStorageAccountKeys/action",
    "Microsoft.MachineLearningServices/workspaces/batchEndpoints/read",
    "Microsoft.MachineLearningServices/workspaces/batchEndpoints/write",
    "Microsoft.MachineLearningServices/workspaces/batchEndpoints/deployments/read",
    "Microsoft.MachineLearningServices/workspaces/batchEndpoints/deployments/write",
    "Microsoft.MachineLearningServices/workspaces/batchEndpoints/deployments/jobs/write",
    "Microsoft.MachineLearningServices/workspaces/batchEndpoints/jobs/write",
    "Microsoft.MachineLearningServices/workspaces/computes/read",
    "Microsoft.MachineLearningServices/workspaces/computes/listKeys/action",
    "Microsoft.MachineLearningServices/workspaces/metadata/secrets/read",
    "Microsoft.MachineLearningServices/workspaces/metadata/snapshots/read",
    "Microsoft.MachineLearningServices/workspaces/metadata/artifacts/read",
    "Microsoft.MachineLearningServices/workspaces/metadata/artifacts/write",
    "Microsoft.MachineLearningServices/workspaces/experiments/read",
    "Microsoft.MachineLearningServices/workspaces/experiments/runs/submit/action",
    "Microsoft.MachineLearningServices/workspaces/experiments/runs/read",
    "Microsoft.MachineLearningServices/workspaces/experiments/runs/write",
    "Microsoft.MachineLearningServices/workspaces/metrics/resource/write",
    "Microsoft.MachineLearningServices/workspaces/modules/read",
    "Microsoft.MachineLearningServices/workspaces/models/read",
    "Microsoft.MachineLearningServices/workspaces/endpoints/pipelines/read",
    "Microsoft.MachineLearningServices/workspaces/endpoints/pipelines/write",
    "Microsoft.MachineLearningServices/workspaces/environments/read",
    "Microsoft.MachineLearningServices/workspaces/environments/write",
    "Microsoft.MachineLearningServices/workspaces/environments/build/action",
    "Microsoft.MachineLearningServices/workspaces/environments/readSecrets/action"
]
Configure compute clusters for data access
Batch endpoints ensure that only authorized users are able to invoke batch deployments and generate jobs. However, depending on how the input data is configured, other credentials might be used to read the underlying data. Use the following table to understand which credentials are used:
| Data input type | Credential in store | Credentials used | Access granted by |
|---|---|---|---|
| Data store | Yes | Data store's credentials in the workspace | Access key or SAS |
| Data asset | Yes | Data store's credentials in the workspace | Access Key or SAS |
| Data store | No | Identity of the job + Managed identity of the compute cluster | RBAC |
| Data asset | No | Identity of the job + Managed identity of the compute cluster | RBAC |
| Azure Blob Storage | Not apply | Identity of the job + Managed identity of the compute cluster | RBAC |
| Azure Data Lake Storage Gen1 | Not apply | Identity of the job + Managed identity of the compute cluster | POSIX |
| Azure Data Lake Storage Gen2 | Not apply | Identity of the job + Managed identity of the compute cluster | POSIX and RBAC |
For those items in the table where Identity of the job + Managed identity of the compute cluster is displayed, the managed identity of the compute cluster is used for mounting and configuring storage accounts. However, the identity of the job is still used to read the underlying data allowing you to achieve granular access control. That means that in order to successfully read data from storage, the managed identity of the compute cluster where the deployment is running must have at least Storage Blob Data Reader access to the storage account.
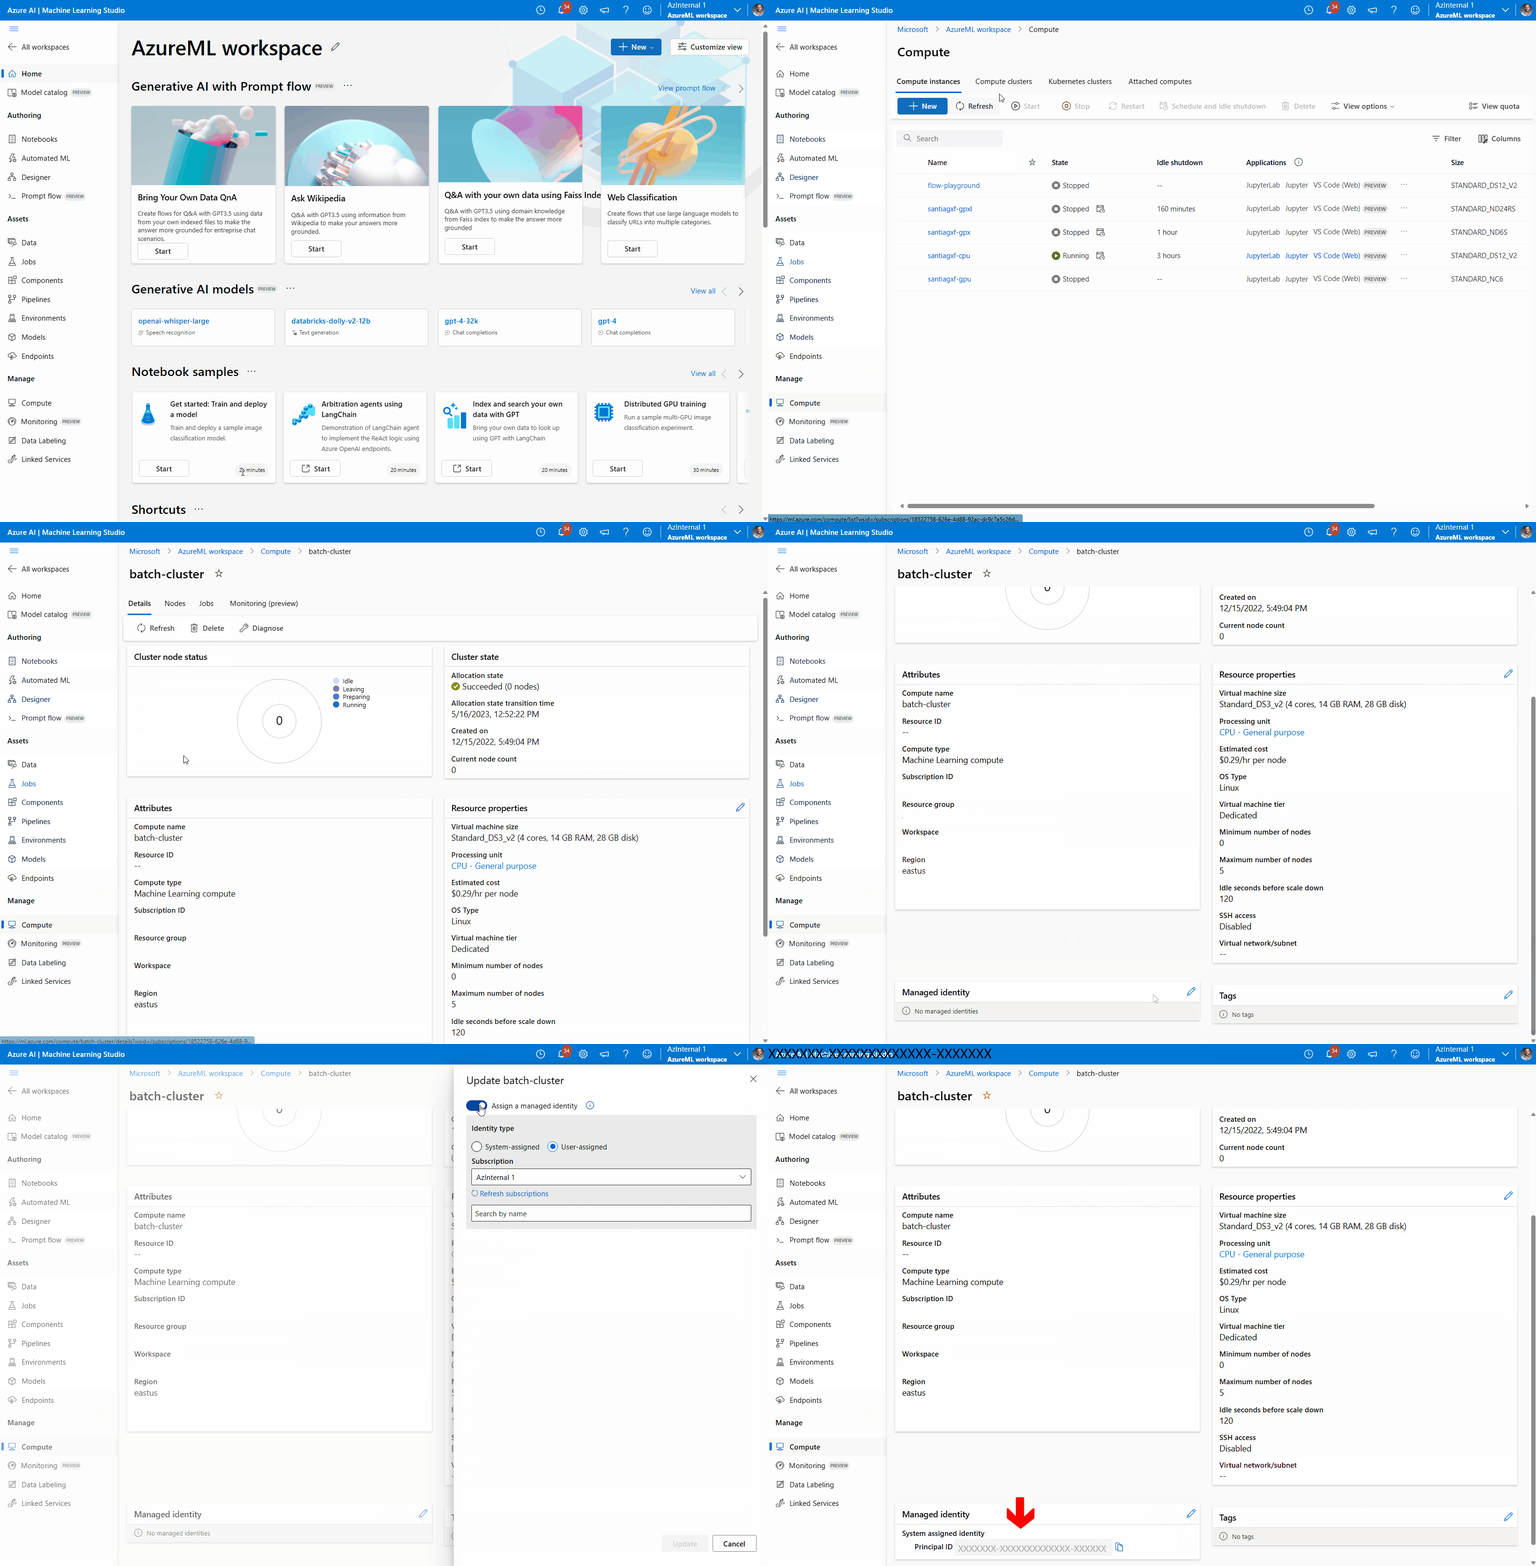
To configure the compute cluster for data access, follow these steps:
Navigate to Compute, then Compute clusters, and select the compute cluster your deployment is using.
Assign a managed identity to the compute cluster:
In the Managed identity section, verify if the compute has a managed identity assigned. If not, select the option Edit.
Select Assign a managed identity and configure it as needed. You can use a System-Assigned Managed Identity or a User-Assigned Managed Identity. If using a System-Assigned Managed Identity, it is named as "[workspace name]/computes/[compute cluster name]".
Save the changes.

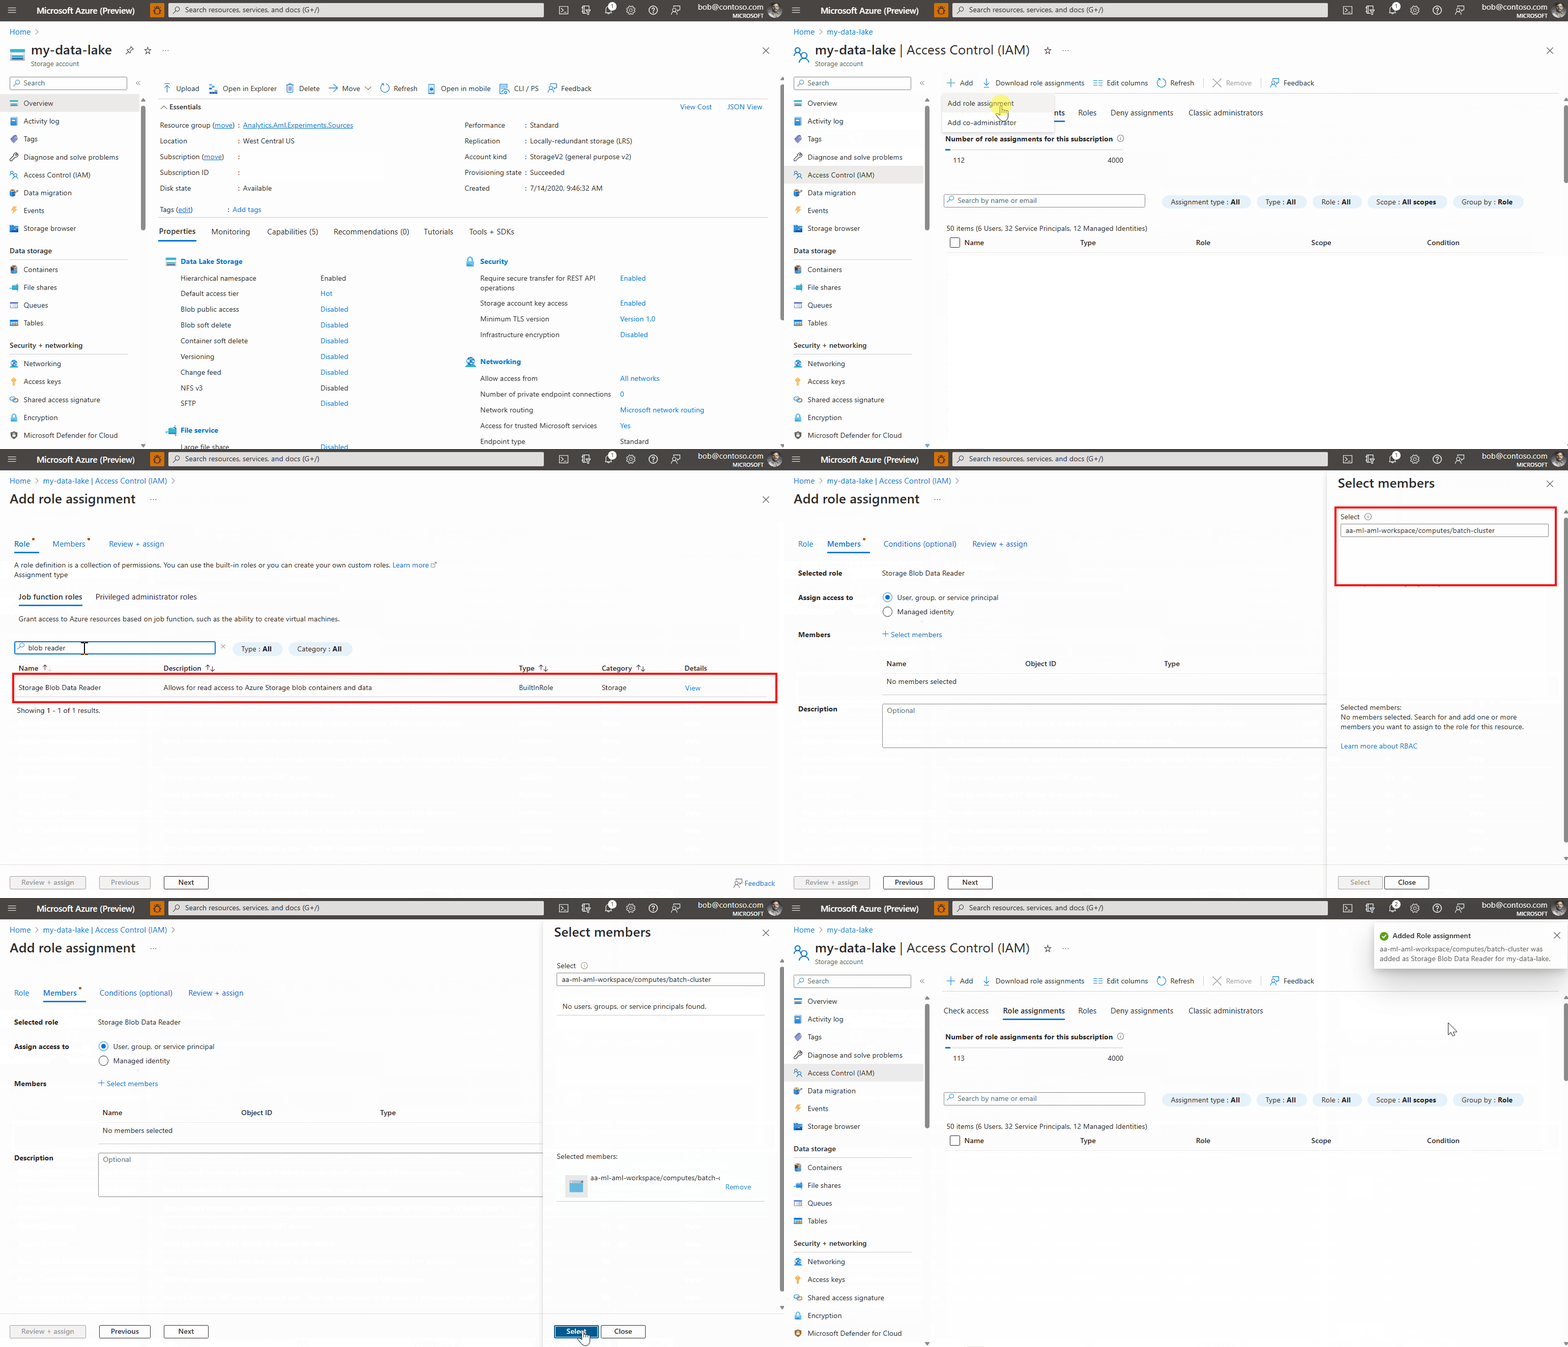
Go to the Azure portal and navigate to the associated storage account where the data is located. If your data input is a Data Asset or a Data Store, look for the storage account where those assets are placed.
Assign Storage Blob Data Reader access level in the storage account:
Go to the section Access control (IAM).
Select the tab Role assignment, and then click on Add > Role assignment.
Look for the role named Storage Blob Data Reader, select it, and click on Next.
Click on Select members.
Look for the managed identity you have created. If using a System-Assigned Managed Identity, it is named as "[workspace name]/computes/[compute cluster name]".
Add the account, and complete the wizard.

Your endpoint is ready to receive jobs and input data from the selected storage account.