Tutorial: Create on-demand Apache Hadoop clusters in HDInsight using Azure Data Factory
In this tutorial, you learn how to create an Apache Hadoop cluster, on demand, in Azure HDInsight using Azure Data Factory. You then use data pipelines in Azure Data Factory to run Hive jobs and delete the cluster. By the end of this tutorial, you learn how to operationalize a big data job run where cluster creation, job run, and cluster deletion are done on a schedule.
This tutorial covers the following tasks:
- Create an Azure storage account
- Understand Azure Data Factory activity
- Create a data factory using Azure portal
- Create linked services
- Create a pipeline
- Trigger a pipeline
- Monitor a pipeline
- Verify the output
If you don't have an Azure subscription, create a free account before you begin.
Prerequisites
The PowerShell Az Module installed.
A Microsoft Entra service principal. Once you've created the service principal, be sure to retrieve the application ID and authentication key using the instructions in the linked article. You need these values later in this tutorial. Also, make sure the service principal is a member of the Contributor role of the subscription or the resource group in which the cluster is created. For instructions to retrieve the required values and assign the right roles, see Create a Microsoft Entra service principal.
Create preliminary Azure objects
In this section, you create various objects that will be used for the HDInsight cluster you create on-demand. The created storage account will contain the sample HiveQL script, partitionweblogs.hql, that you use to simulate a sample Apache Hive job that runs on the cluster.
This section uses an Azure PowerShell script to create the storage account and copy over the required files within the storage account. The Azure PowerShell sample script in this section does the following tasks:
- Signs in to Azure.
- Creates an Azure resource group.
- Creates an Azure Storage account.
- Creates a Blob container in the storage account
- Copies the sample HiveQL script (partitionweblogs.hql) the Blob container. The sample script is already available in another public Blob container. The PowerShell script below makes a copy of these files into the Azure Storage account it creates.
Create storage account and copy files
Important
Specify names for the Azure resource group and the Azure storage account that will be created by the script. Write down resource group name, storage account name, and storage account key outputted by the script. You need them in the next section.
$resourceGroupName = "<Azure Resource Group Name>"
$storageAccountName = "<Azure Storage Account Name>"
$location = "East US"

$sourceStorageAccountName = "hditutorialdata"
$sourceContainerName = "adfv2hiveactivity"

$destStorageAccountName = $storageAccountName
$destContainerName = "adfgetstarted" # don't change this value.

####################################
# Connect to Azure
####################################
#region - Connect to Azure subscription
Write-Host "`nConnecting to your Azure subscription ..." -ForegroundColor Green
$sub = Get-AzSubscription -ErrorAction SilentlyContinue
if(-not($sub))
{
    Connect-AzAccount
}

# If you have multiple subscriptions, set the one to use
# Select-AzSubscription -SubscriptionId "<SUBSCRIPTIONID>"

#endregion

####################################
# Create a resource group, storage, and container
####################################

#region - create Azure resources
Write-Host "`nCreating resource group, storage account and blob container ..." -ForegroundColor Green

New-AzResourceGroup `
    -Name $resourceGroupName `
    -Location $location

New-AzStorageAccount `
    -ResourceGroupName $resourceGroupName `
    -Name $destStorageAccountName `
    -Kind StorageV2 `
    -Location $location `
    -SkuName Standard_LRS `
    -EnableHttpsTrafficOnly 1

$destStorageAccountKey = (Get-AzStorageAccountKey `
    -ResourceGroupName $resourceGroupName `
    -Name $destStorageAccountName)[0].Value

$sourceContext = New-AzStorageContext `
    -StorageAccountName $sourceStorageAccountName `
    -Anonymous

$destContext = New-AzStorageContext `
    -StorageAccountName $destStorageAccountName `
    -StorageAccountKey $destStorageAccountKey

New-AzStorageContainer `
    -Name $destContainerName `
    -Context $destContext
#endregion

####################################
# Copy files
####################################
#region - copy files
Write-Host "`nCopying files ..." -ForegroundColor Green

$blobs = Get-AzStorageBlob `
    -Context $sourceContext `
    -Container $sourceContainerName `
    -Blob "hivescripts\hivescript.hql"

$blobs|Start-AzStorageBlobCopy `
    -DestContext $destContext `
    -DestContainer $destContainerName `
    -DestBlob "hivescripts\partitionweblogs.hql"

Write-Host "`nCopied files ..." -ForegroundColor Green
Get-AzStorageBlob `
    -Context $destContext `
    -Container $destContainerName
#endregion

Write-host "`nYou will use the following values:" -ForegroundColor Green
write-host "`nResource group name: $resourceGroupName"
Write-host "Storage Account Name: $destStorageAccountName"
write-host "Storage Account Key: $destStorageAccountKey"

Write-host "`nScript completed" -ForegroundColor Green
Verify storage account
- Sign on to the Azure portal.
- From the left, navigate to All services > General > Resource groups.
- Select the resource group name you created in your PowerShell script. Use the filter if you have too many resource groups listed.
- From the Overview view, you see one resource listed unless you share the resource group with other projects. That resource is the storage account with the name you specified earlier. Select the storage account name.
- Select the Containers tile.
- Select the adfgetstarted container. You see a folder called
hivescripts. - Open the folder and make sure it contains the sample script file, partitionweblogs.hql.
Understand the Azure Data Factory activity
Azure Data Factory orchestrates and automates the movement and transformation of data. Azure Data Factory can create an HDInsight Hadoop cluster just-in-time to process an input data slice and delete the cluster when the processing is complete.
In Azure Data Factory, a data factory can have one or more data pipelines. A data pipeline has one or more activities. There are two types of activities:
- Data Movement Activities. You use data movement activities to move data from a source data store to a destination data store.
- Data Transformation Activities. You use data transformation activities to transform/process data. HDInsight Hive Activity is one of the transformation activities supported by Data Factory. You use the Hive transformation activity in this tutorial.
In this article, you configure the Hive activity to create an on-demand HDInsight Hadoop cluster. When the activity runs to process data, here is what happens:
An HDInsight Hadoop cluster is automatically created for you just-in-time to process the slice.
The input data is processed by running a HiveQL script on the cluster. In this tutorial, the HiveQL script associated with the hive activity does the following actions:
- Uses the existing table (hivesampletable) to create another table HiveSampleOut.
- Populates the HiveSampleOut table with only specific columns from the original hivesampletable.
The HDInsight Hadoop cluster is deleted after the processing is complete and the cluster is idle for the configured amount of time (timeToLive setting). If the next data slice is available for processing with in this timeToLive idle time, the same cluster is used to process the slice.
Create a data factory
Sign in to the Azure portal.
From the left menu, navigate to
+ Create a resource> Analytics > Data Factory.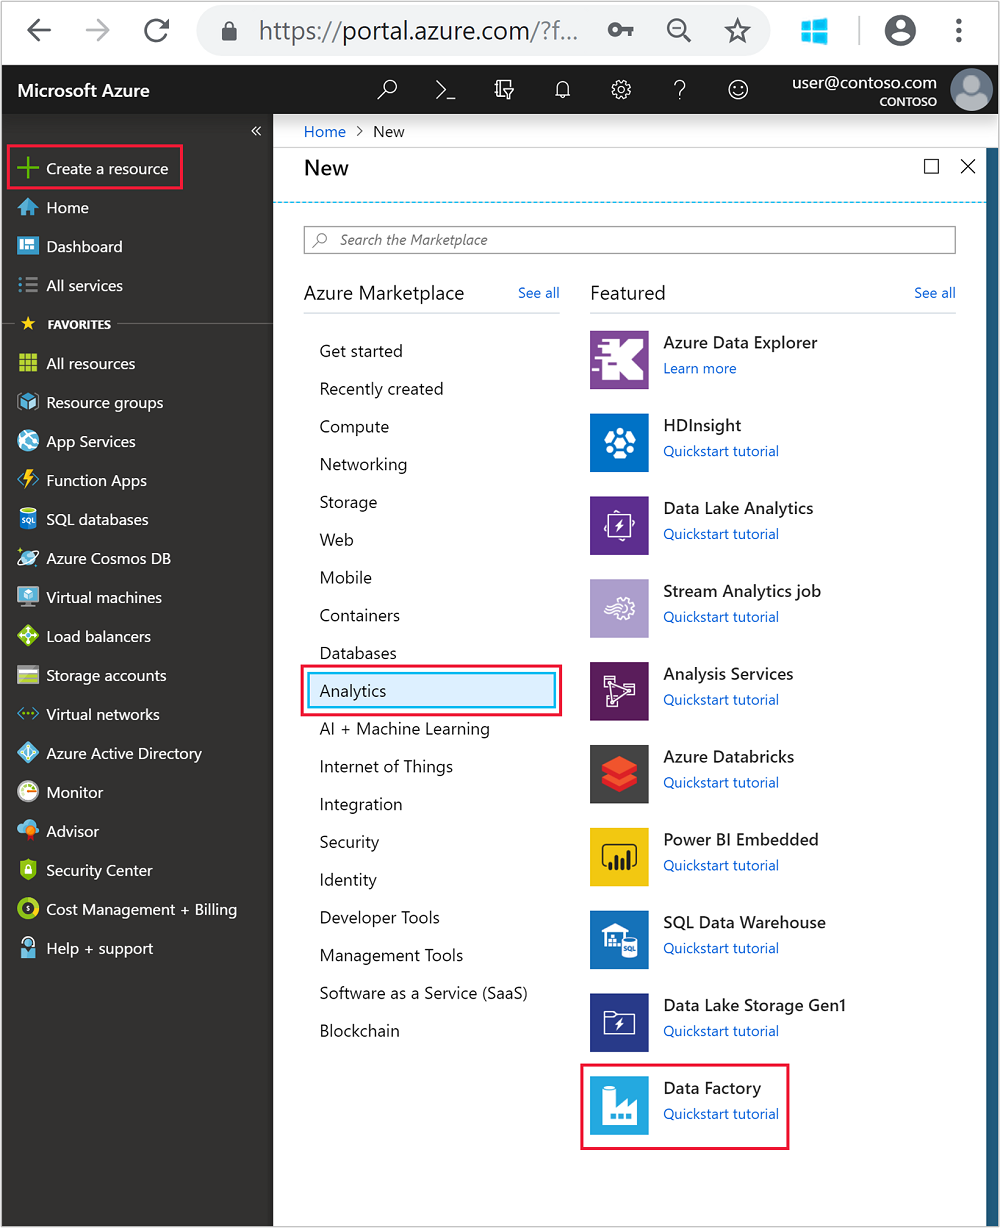
Enter or select the following values for the New data factory tile:
Property Value Name Enter a name for the data factory. This name must be globally unique. Version Leave at V2. Subscription Select your Azure subscription. Resource group Select the resource group you created using the PowerShell script. Location The location is automatically set to the location you specified while creating the resource group earlier. For this tutorial, the location is set to East US. Enable GIT Uncheck this box. 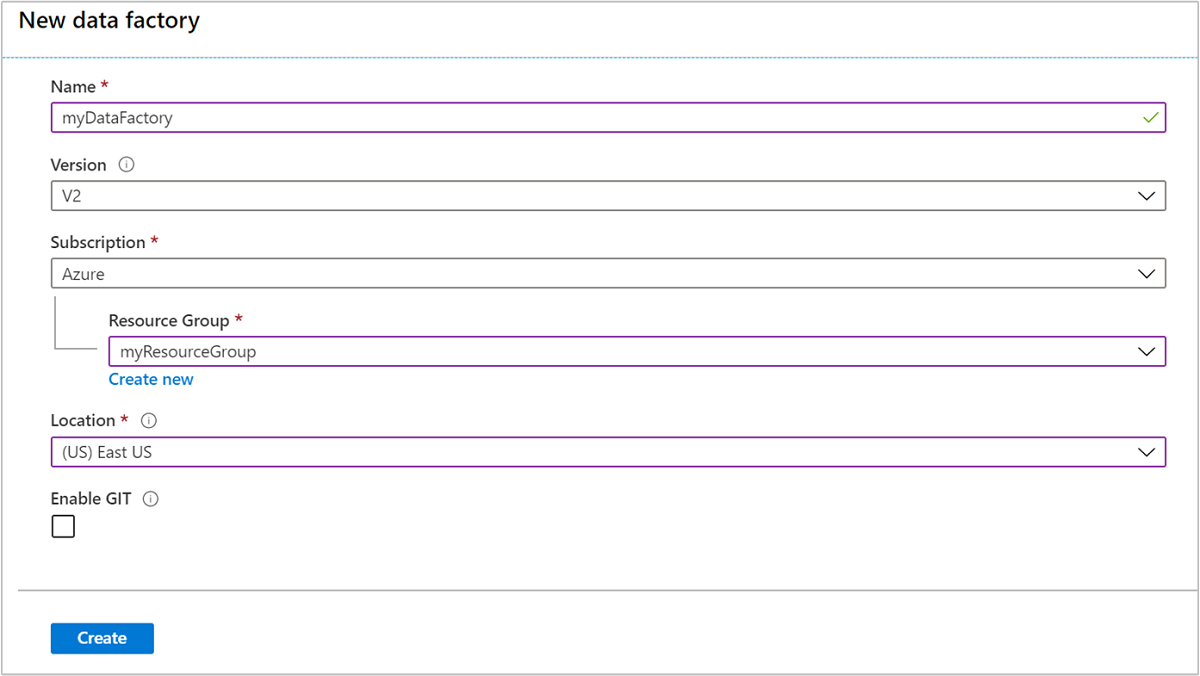
Select Create. Creating a data factory might take anywhere between 2 to 4 minutes.
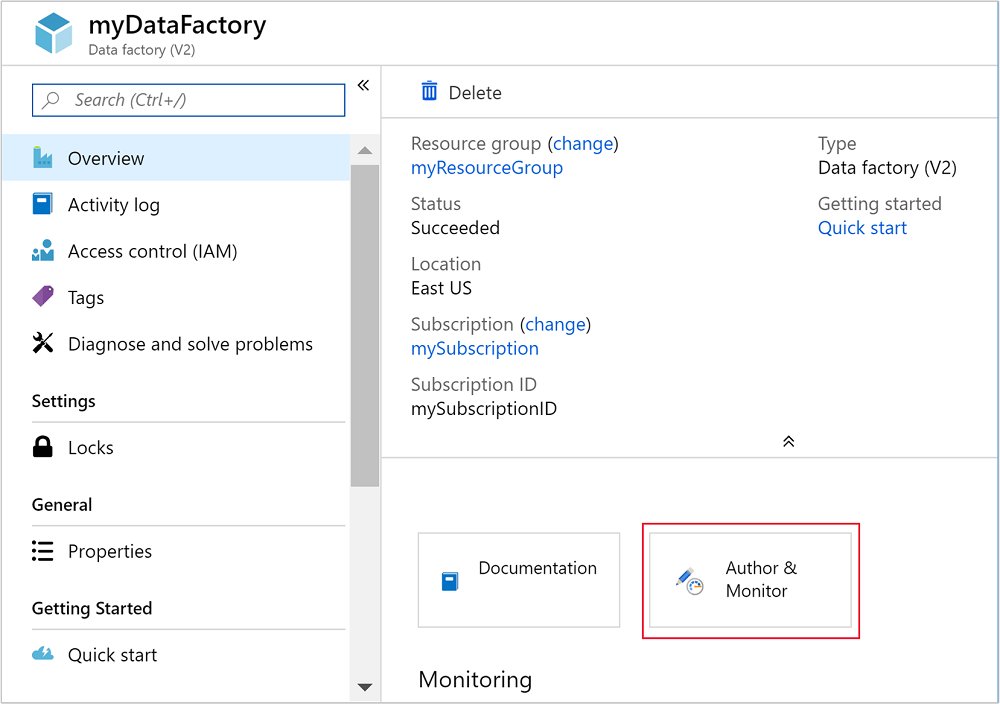
Once the data factory is created, you'll receive a Deployment succeeded notification with a Go to resource button. Select Go to resource to open the Data Factory default view.
Select Author & Monitor to launch the Azure Data Factory authoring and monitoring portal.
Create linked services
In this section, you author two linked services within your data factory.
- An Azure Storage linked service that links an Azure storage account to the data factory. This storage is used by the on-demand HDInsight cluster. It also contains the Hive script that is run on the cluster.
- An on-demand HDInsight linked service. Azure Data Factory automatically creates an HDInsight cluster and runs the Hive script. It then deletes the HDInsight cluster after the cluster is idle for a preconfigured time.
Create an Azure Storage linked service
From the left pane of the Let's get started page, select the Author icon.
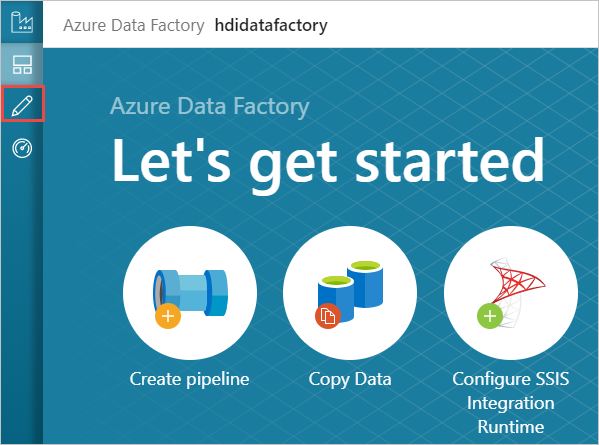
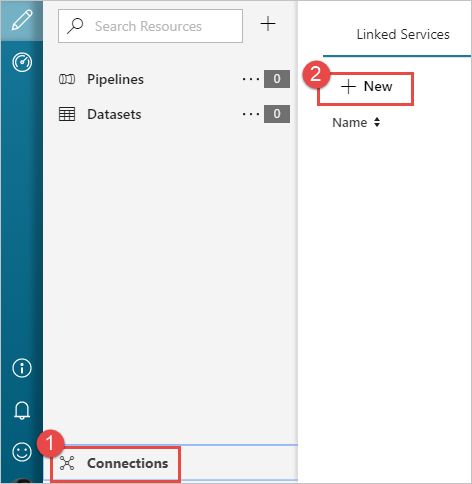
Select Connections from the bottom-left corner of the window and then select +New.
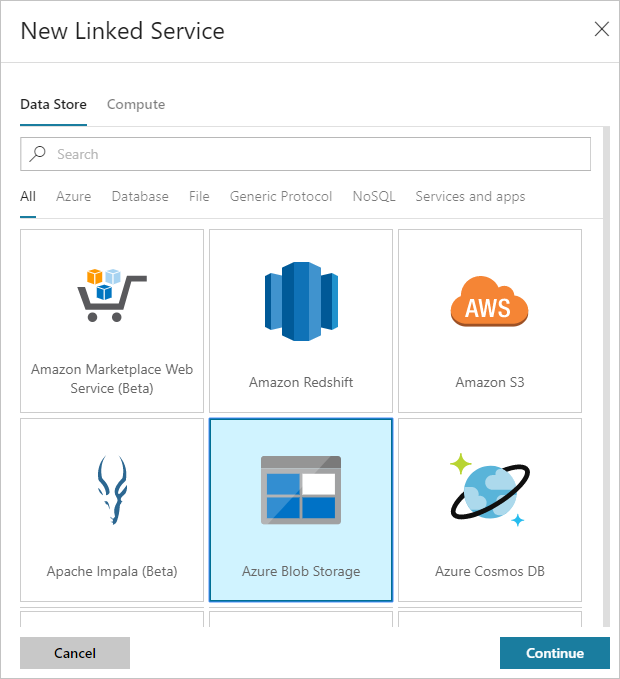
In the New Linked Service dialog box, select Azure Blob Storage and then select Continue.
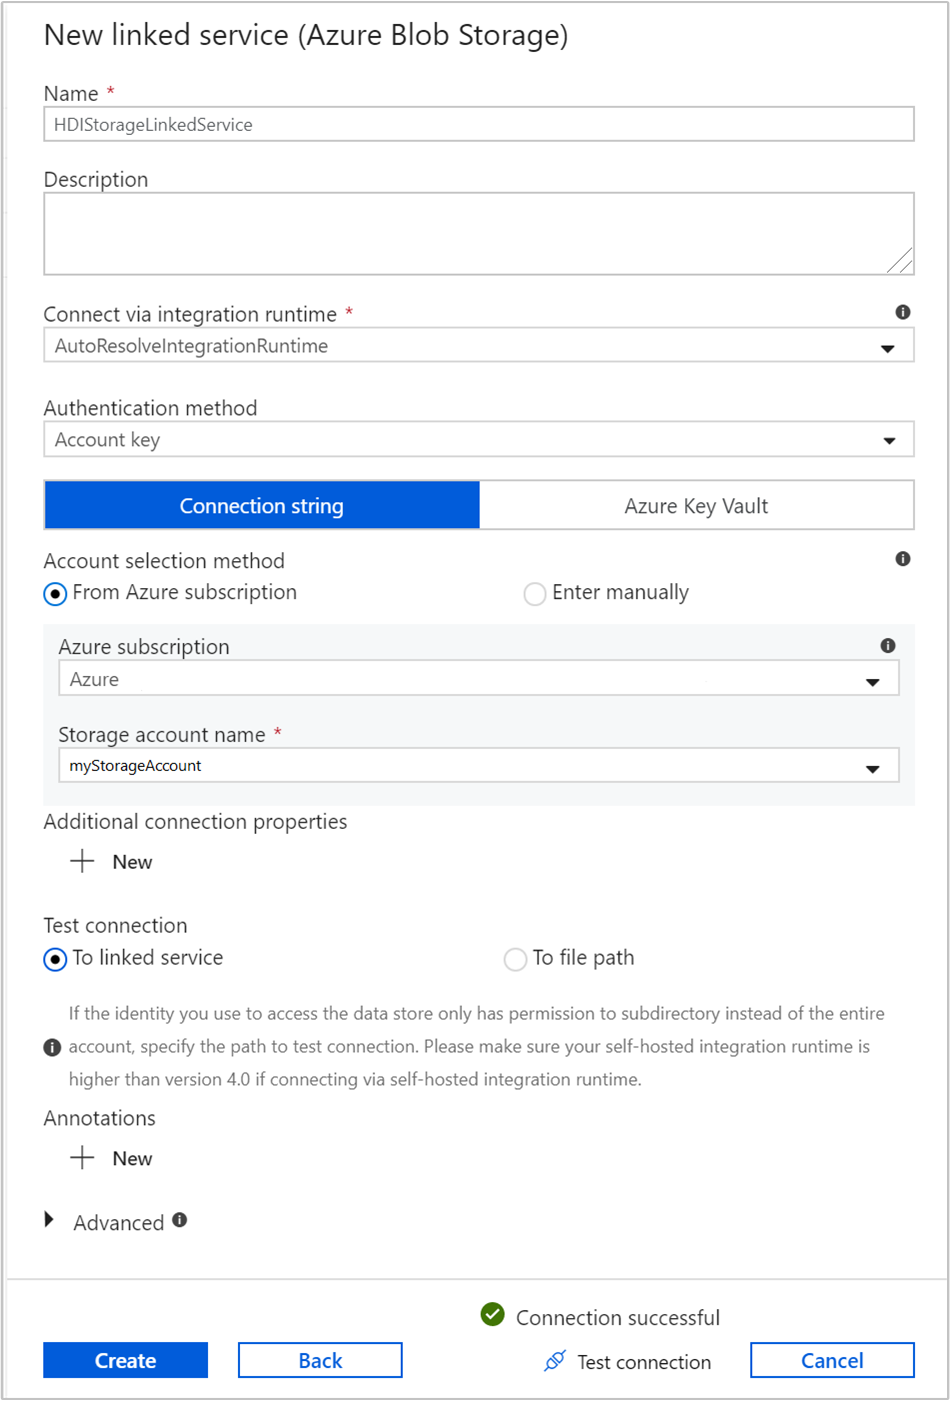
Provide the following values for the storage linked service:
Property Value Name Enter HDIStorageLinkedService.Azure subscription Select your subscription from the drop-down list. Storage account name Select the Azure Storage account you created as part of the PowerShell script. Select Test connection and if successful, then select Create.
Create an on-demand HDInsight linked service
Select the + New button again to create another linked service.
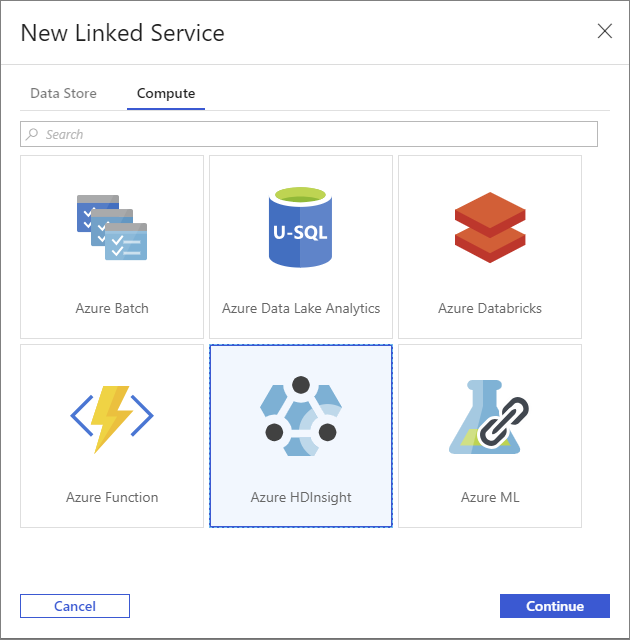
In the New Linked Service window, select the Compute tab.
Select Azure HDInsight, and then select Continue.
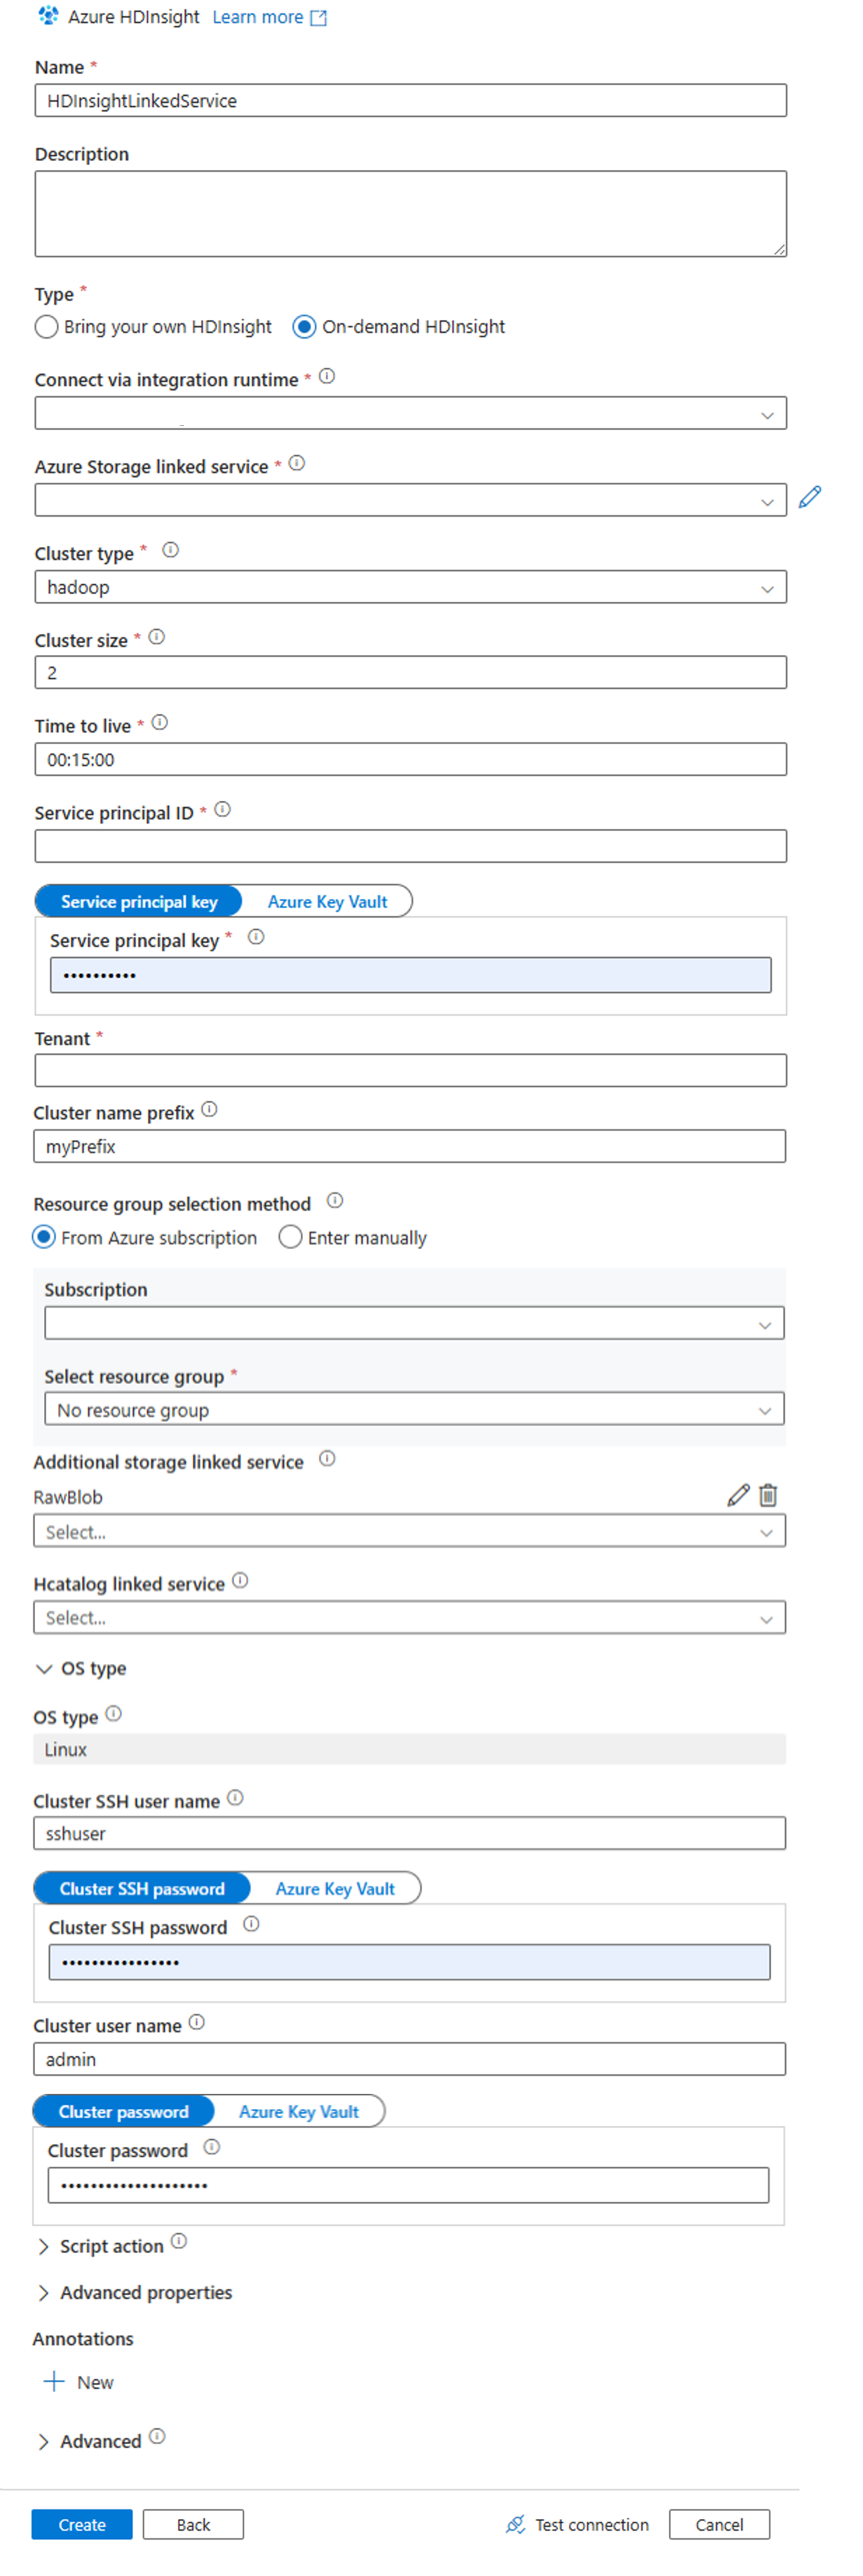
In the New Linked Service window, enter the following values and leave the rest as default:
Property Value Name Enter HDInsightLinkedService.Type Select On-demand HDInsight. Azure Storage Linked Service Select HDIStorageLinkedService.Cluster type Select hadoop Time to live Provide the duration for which you want the HDInsight cluster to be available before being automatically deleted. Service principal ID Provide the application ID of the Microsoft Entra service principal you created as part of the prerequisites. Service principal key Provide the authentication key for the Microsoft Entra service principal. Cluster name prefix Provide a value that will be prefixed to all the cluster types created by the data factory. Subscription Select your subscription from the drop-down list. Select resource group Select the resource group you created as part of the PowerShell script you used earlier. OS type/Cluster SSH user name Enter an SSH user name, commonly sshuser.OS type/Cluster SSH password Provide a password for the SSH user OS type/Cluster user name Enter a cluster user name, commonly admin.OS type/Cluster password Provide a password for the cluster user. Then select Create.
Create a pipeline
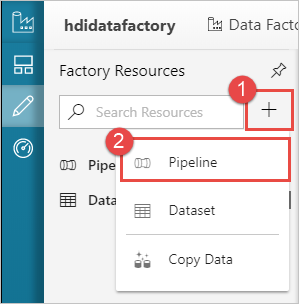
Select the + (plus) button, and then select Pipeline.
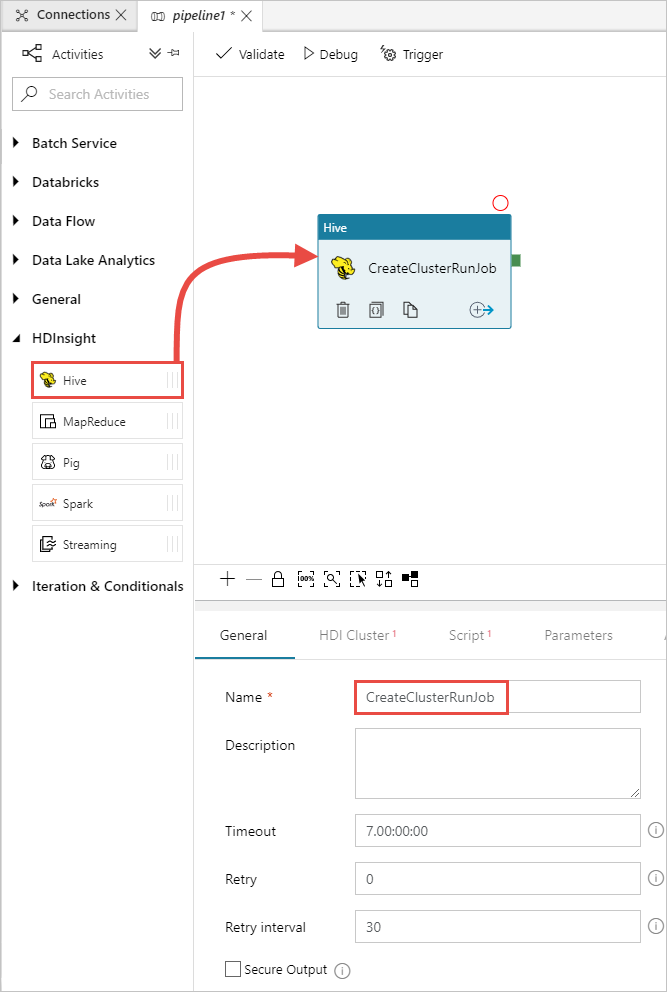
In the Activities toolbox, expand HDInsight, and drag the Hive activity to the pipeline designer surface. In the General tab, provide a name for the activity.
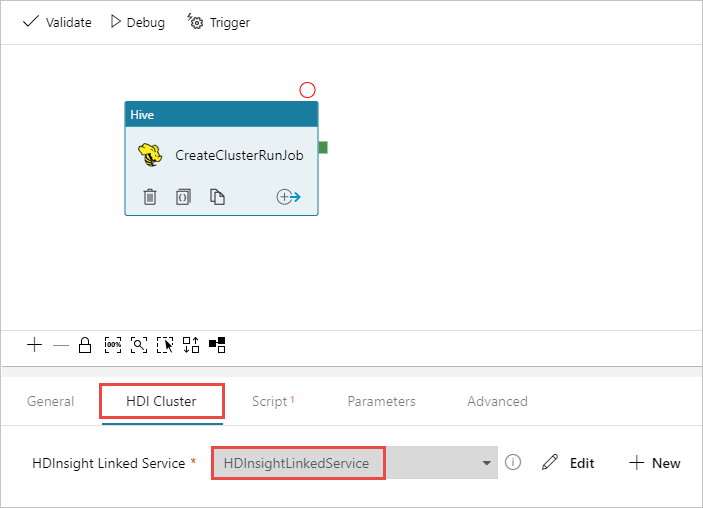
Make sure you have the Hive activity selected, select the HDI Cluster tab. And from the HDInsight Linked Service drop-down list, select the linked service you created earlier, HDInsightLinkedService, for HDInsight.
Select the Script tab and complete the following steps:
For Script Linked Service, select HDIStorageLinkedService from the drop-down list. This value is the storage linked service you created earlier.
For File Path, select Browse Storage and navigate to the location where the sample Hive script is available. If you ran the PowerShell script earlier, this location should be
adfgetstarted/hivescripts/partitionweblogs.hql.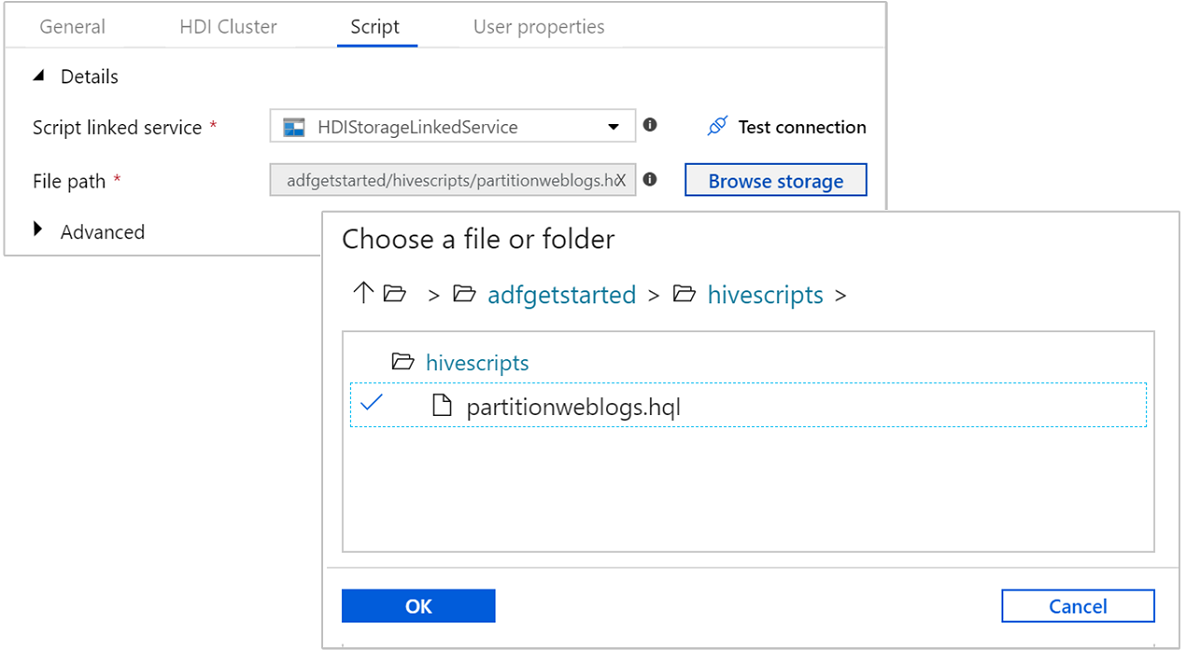
Under Advanced > Parameters, select
Auto-fill from script. This option looks for any parameters in the Hive script that require values at runtime.In the value text box, add the existing folder in the format
wasbs://adfgetstarted@<StorageAccount>.blob.core.windows.net/outputfolder/. The path is case-sensitive. This path is where the output of the script will be stored. Thewasbsschema is necessary because storage accounts now have secure transfer required enabled by default.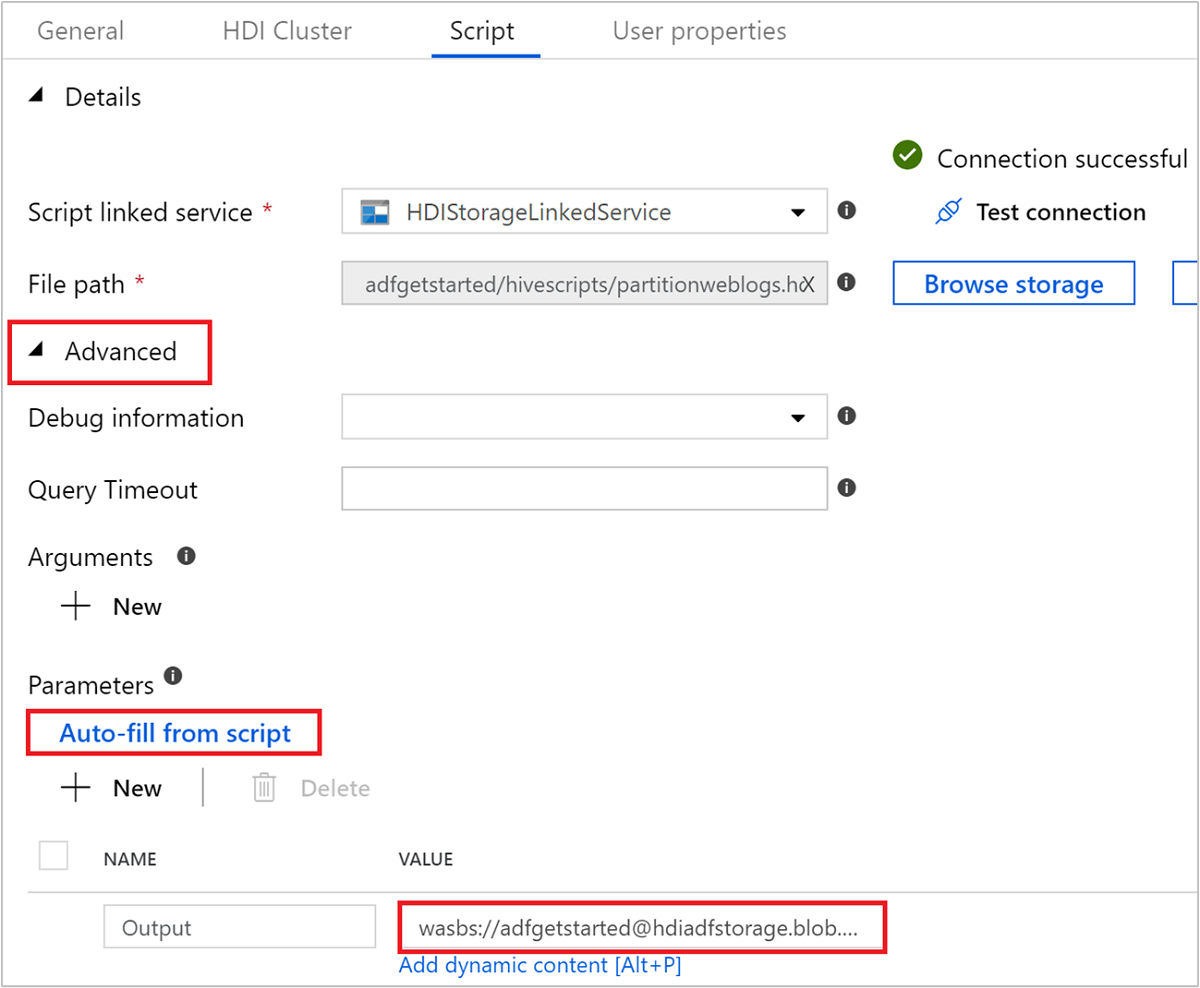
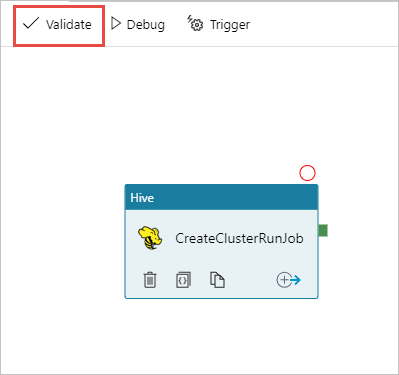
Select Validate to validate the pipeline. Select the >> (right arrow) button to close the validation window.
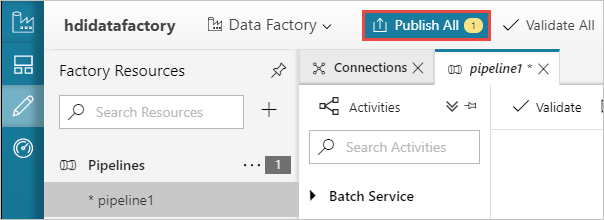
Finally, select Publish All to publish the artifacts to Azure Data Factory.
Trigger a pipeline
From the toolbar on the designer surface, select Add trigger > Trigger Now.
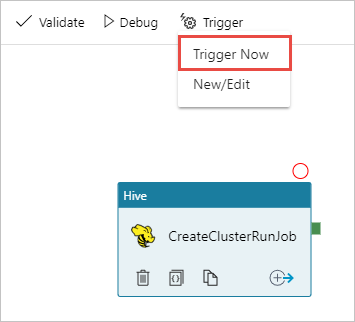
Select OK in the pop-up side bar.
Monitor a pipeline
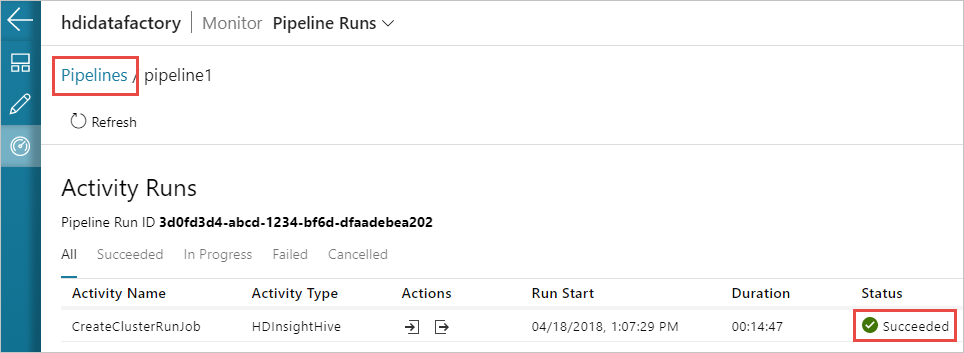
Switch to the Monitor tab on the left. You see a pipeline run in the Pipeline Runs list. Notice the status of the run under the Status column.

Select Refresh to refresh the status.
You can also select the View Activity Runs icon to see the activity run associated with the pipeline. In the screenshot below, you see only one activity run since there's only one activity in the pipeline you created. To switch back to the previous view, select Pipelines towards the top of the page.
Verify the output
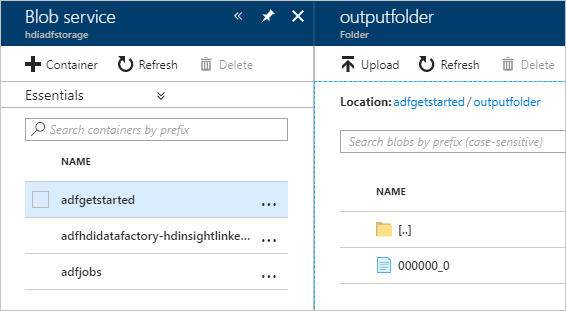
To verify the output, in the Azure portal navigate to the storage account that you used for this tutorial. You should see the following folders or containers:
You see an adfgerstarted/outputfolder that contains the output of the Hive script that was run as part of the pipeline.
You see an adfhdidatafactory-<linked-service-name>-<timestamp> container. This container is the default storage location of the HDInsight cluster that was created as part of the pipeline run.
You see an adfjobs container that has the Azure Data Factory job logs.
Clean up resources
With the on-demand HDInsight cluster creation, you don't need to explicitly delete the HDInsight cluster. The cluster is deleted based on the configuration you provided while creating the pipeline. Even after the cluster is deleted, the storage accounts associated with the cluster continue to exist. This behavior is by design so that you can keep your data intact. However, if you don't want to persist the data, you may delete the storage account you created.
Or, you can delete the entire resource group that you created for this tutorial. This process deletes the storage account and the Azure Data Factory that you created.
Delete the resource group
Sign on to the Azure portal.
Select Resource groups on the left pane.
Select the resource group name you created in your PowerShell script. Use the filter if you have too many resource groups listed. It opens the resource group.
On the Resources tile, you shall have the default storage account and the data factory listed unless you share the resource group with other projects.
Select Delete resource group. Doing so deletes the storage account and the data stored in the storage account.
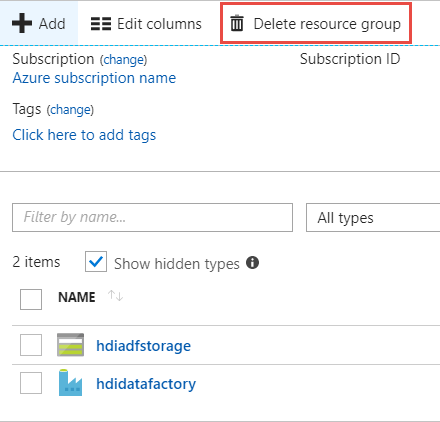
Enter the resource group name to confirm deletion, and then select Delete.
Next steps
In this article, you learned how to use Azure Data Factory to create on-demand HDInsight cluster and run Apache Hive jobs. Advance to the next article to learn how to create HDInsight clusters with custom configuration.