Use a Microsoft Entra service principal to authenticate access to Azure Databricks Git folders
Learn how to configure authenticated access to Azure Databricks Git folders hosted by Azure DevOps (Azure Repos) with a Microsoft Entra service principal.
If you have Databricks Git folders in your Databricks project that are backed by Azure Repos Git repositories and you want to manage them in your automation, you can use the information in this article to configure the authentication using a Microsoft Entra service principal and Azure DevOps. After you’ve completed this task, you will have an authenticated Databricks Git credential that you can use in your automation.
Why use Microsoft Entra and not a PAT?
In the past, Personal Access Tokens (PATs) were the preferred way to authenticate when calling an API that requires specific access and permissions to resources. These bearer tokens represented a username and password, and required regular rotation to minimize the security risk they presented. Microsoft Entra ID access tokens address this concern by automatically managing the rotation of these tokens every hour, and Databricks recommends them as a best practice when working with Azure resources. By creating a Microsoft Entra service principal, you can manage the permissions granted on access to these resources without using a Microsoft Azure user account.
Requirements
You must have:
- Access to an Azure DevOps project with an Azure Repos Git repository connected to a Databricks Git folder.
- Permissions on your Azure account to create an MS Entra service principal.
- The Azure CLI installed.
- The Databricks CLI installed.
Step 1: Create a Microsoft Entra service principal
You can skip this step if you already have a configured Microsoft Entra service principal.
To create a Microsoft Entra service principal, follow the steps in the Microsoft Azure documentation: Register a Microsoft Entra app and create a service principal. In the “Set Up Authentication” section of this article, ignore the first two options and follow the steps in “Option 3: Create a new client secret.”
After you set it up, you will have:
- A client secret. It will present as a long string of random-appearing characters.
-
- A service principal ID. This is the unique name you assigned the MS Entra service principal. As a best practice, the name should also information that indicates how and when it should be used (for example,
Databricks_CICD_SP).
- A service principal ID. This is the unique name you assigned the MS Entra service principal. As a best practice, the name should also information that indicates how and when it should be used (for example,
(You can ignore the optional redirect UI in the MS Entra configuration dialog since it will not be used in this configuration.)
Copy these down somewhere as you will use them in future steps. After you have successfully completed the process in this documentation, secure or delete this information.
Step 2: Configure Azure DevOps permissions for the MS Entra service principal
First, you must grant your MS Entra service principal permission to access your Azure DevOps resources. To do this, you must use the Azure DevOps portal.
Log in to your Azure DevOps account and navigate to your project.
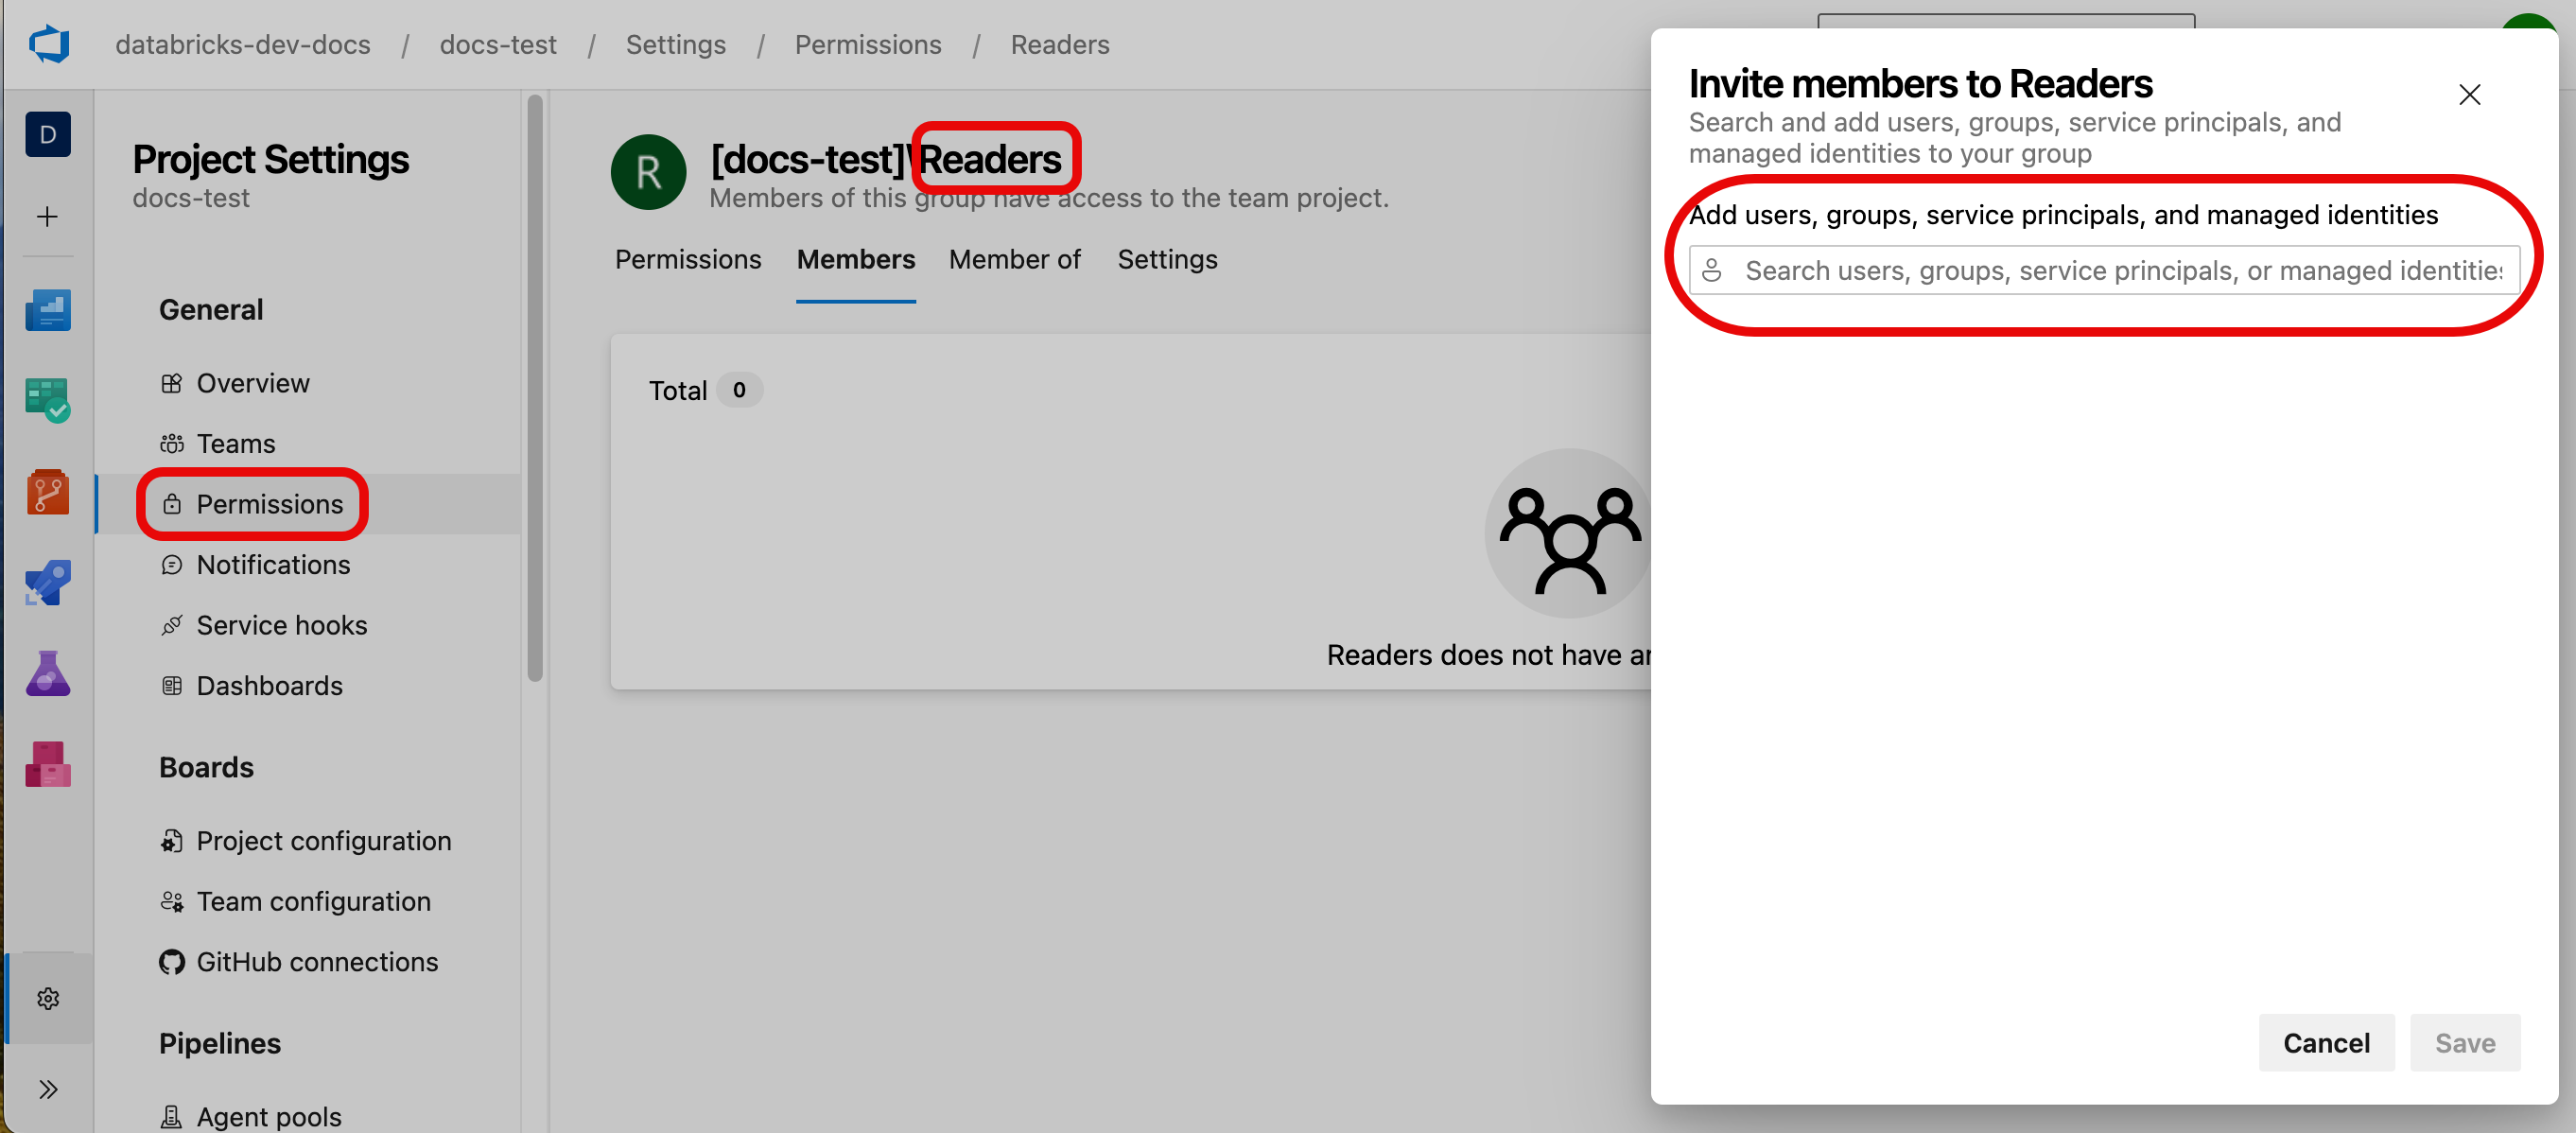
Under Project settings > Permissions, click Readers.

Click the Members tab, click Add, and then add the name of MS Entra service principal you created.
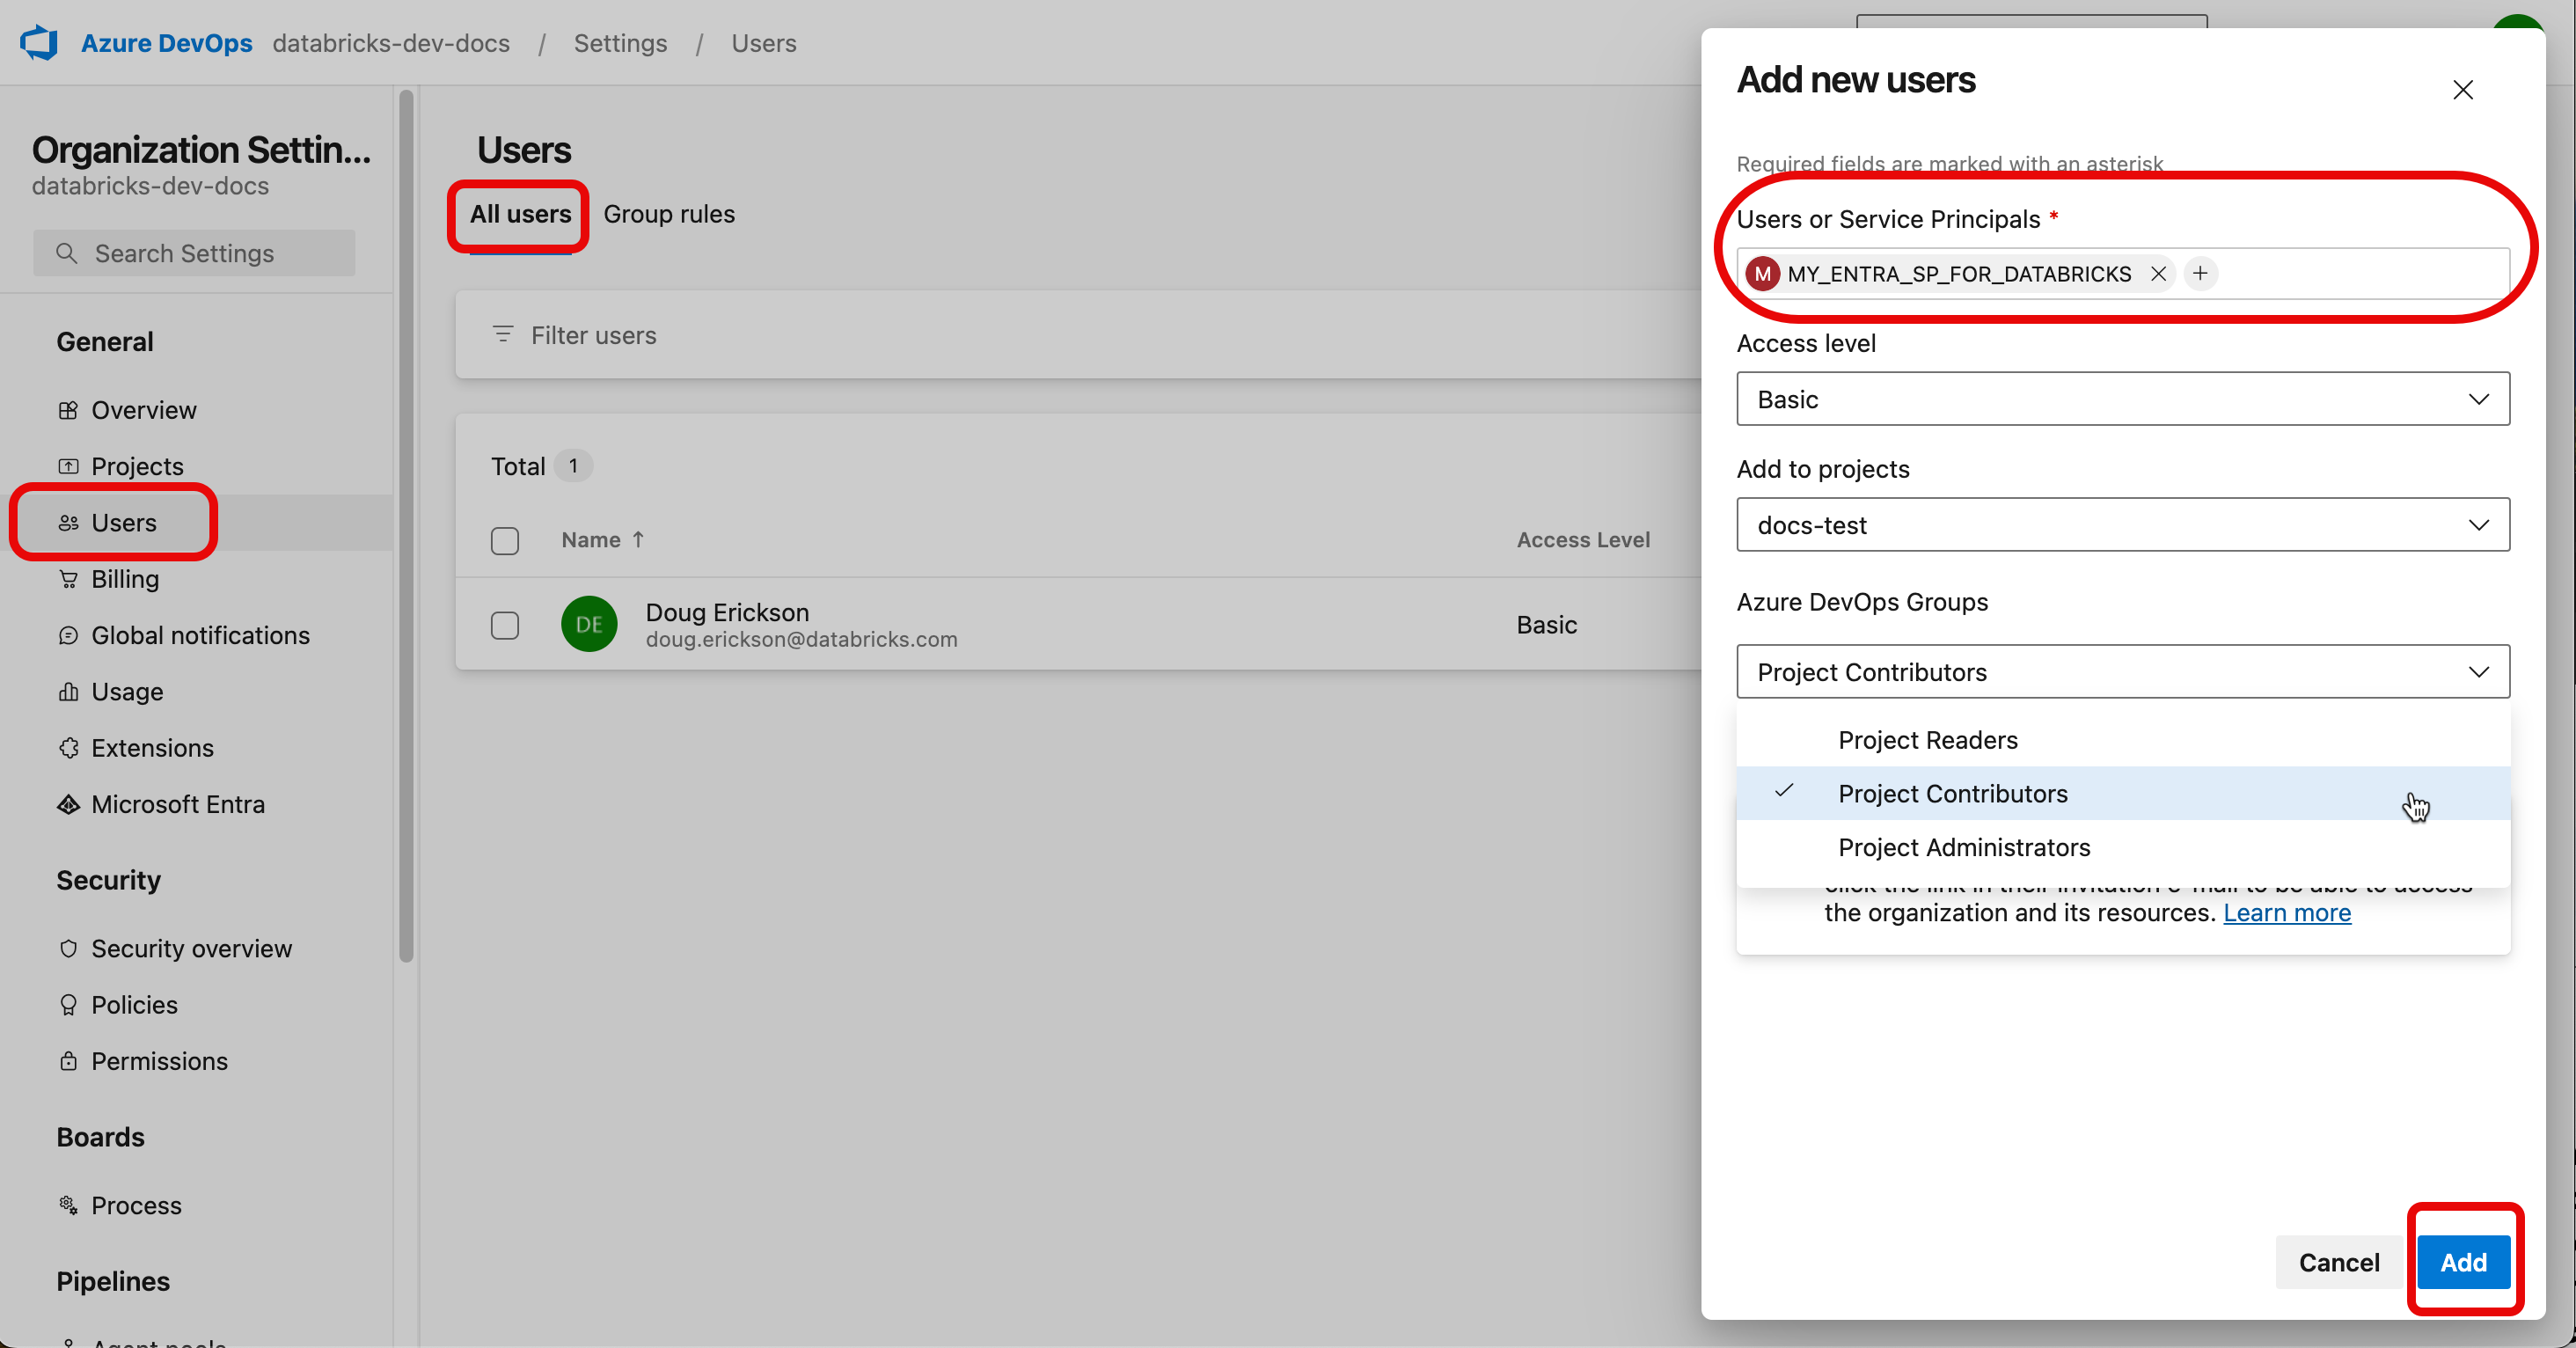
In the console, go back to the organization level of your Azure DevOps organization and click Organization settings at the bottom of the left pane.
Click Users > Add User, and then configure access for your service principal as follows:
- Add your MS Entra service principal using the ID you created previously.
- Configure the access for the service principal to the minimum level it needs to perform operations in Azure Repos. Usually, Basic level permissions are sufficient. If you aren’t sure what level to use, contact your Azure DevOps organization administrator.
- Add the service principal to the your Azure DevOps project.
- Assign the service principal to the Project Contributors group.

Step 3: Assign permissions to the service principal in Azure Databricks
You must also assign permissions within Azure Databricks to your Microsoft Entra service principal.
- Log in to the Azure Databricks account administration console for your account.
- Click Users & groups.
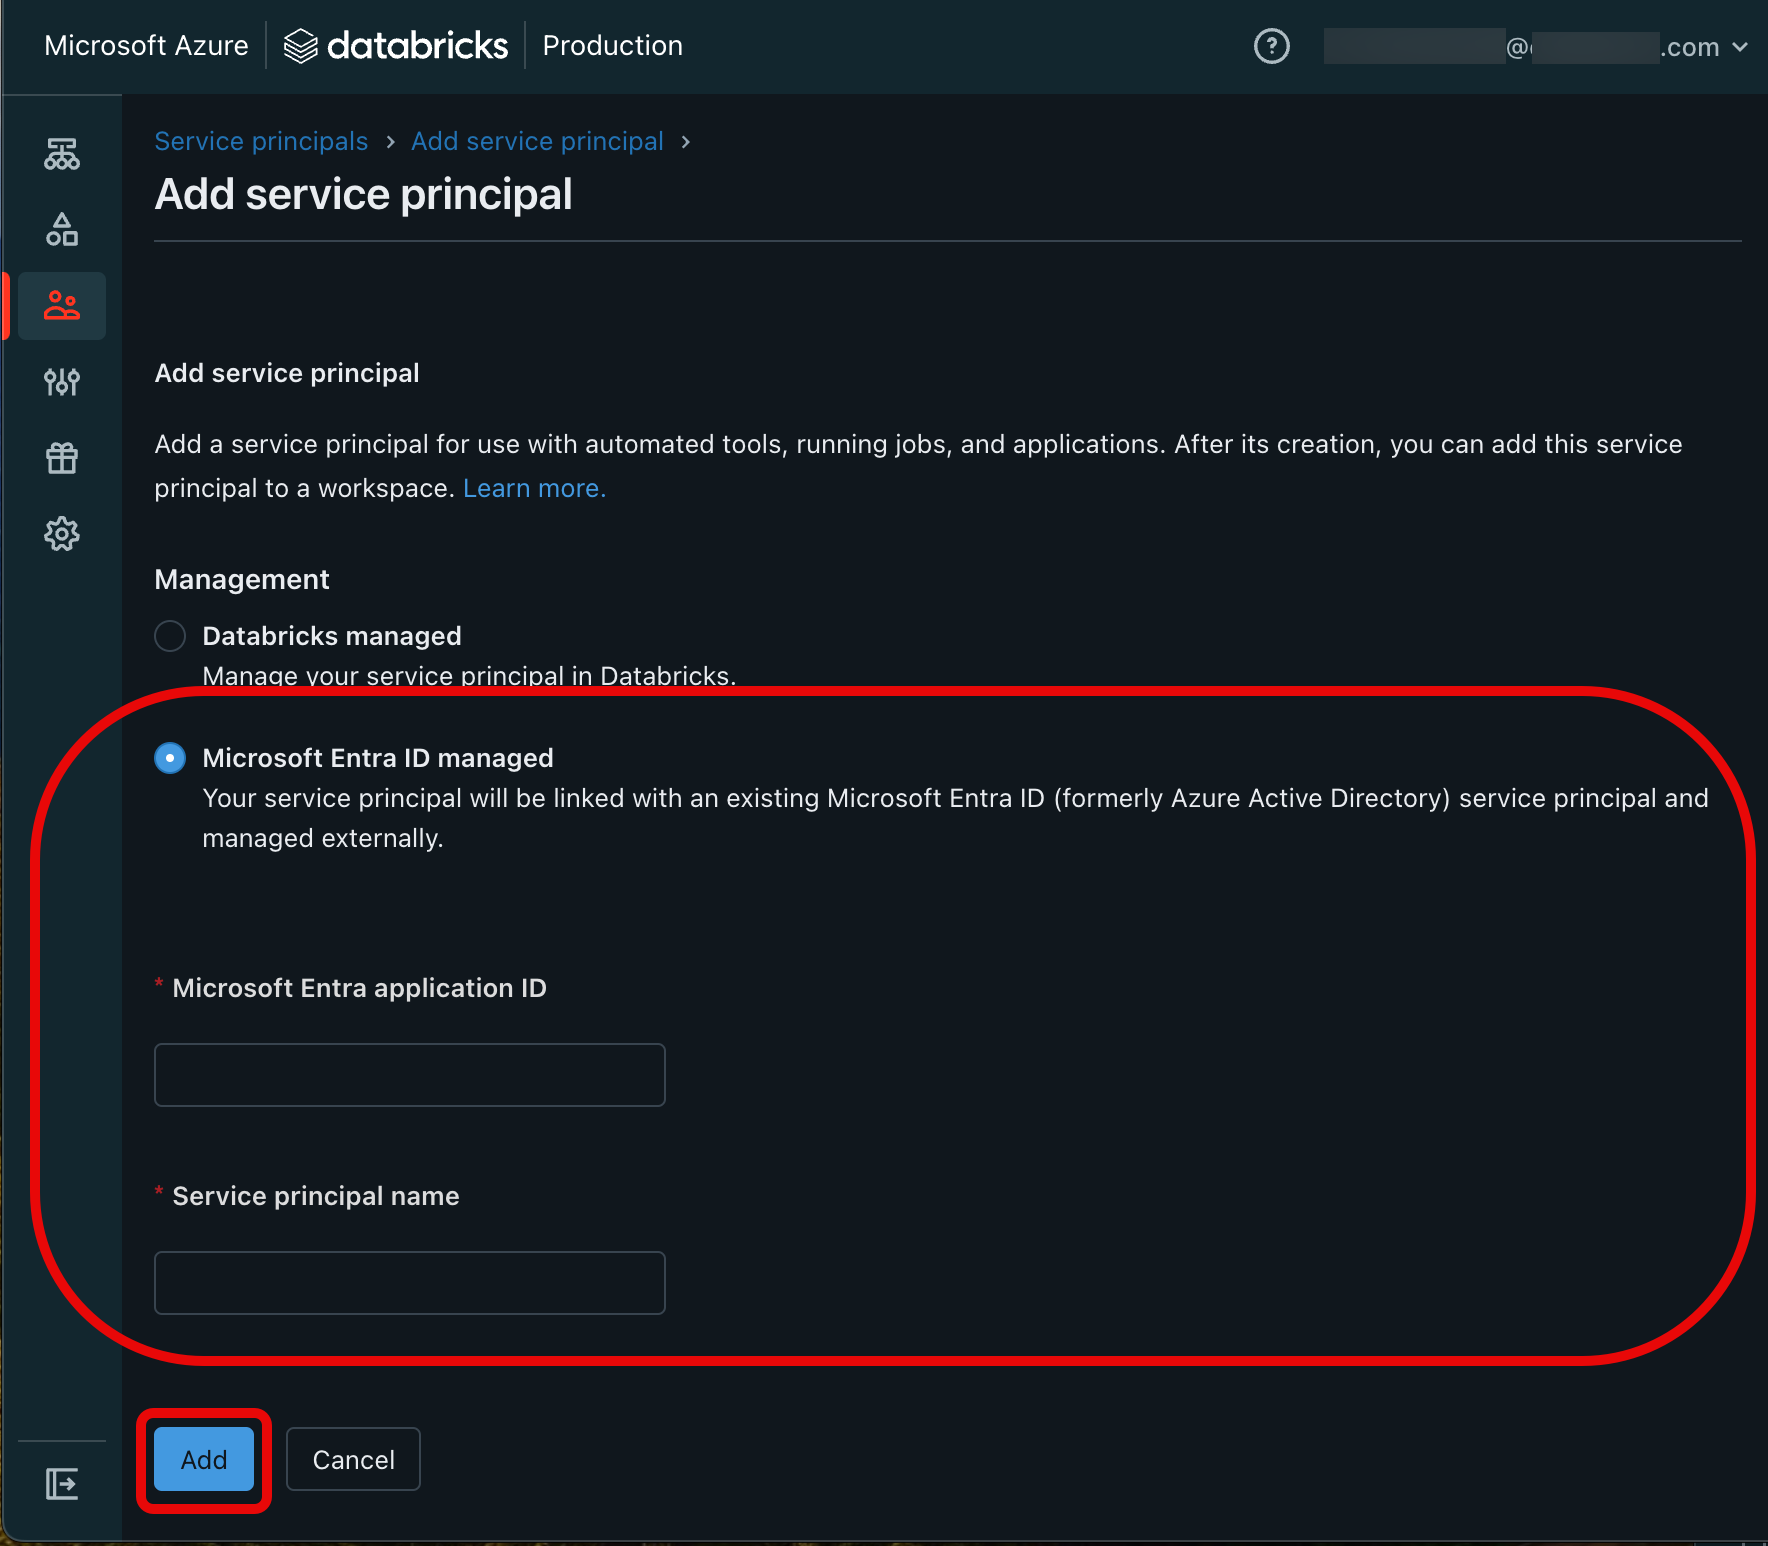
- Click the Service principals tab and then click Add service principal.

- On the Add service principal page, click Microsoft Entra ID managed, and then add your Microsoft Entra application ID and the service principal name from “Step 1: Create a Microsoft Entra service principal.” Click Add when you’re finished.

- Click the added Microsoft Entra service principal to see the Principal information tab.
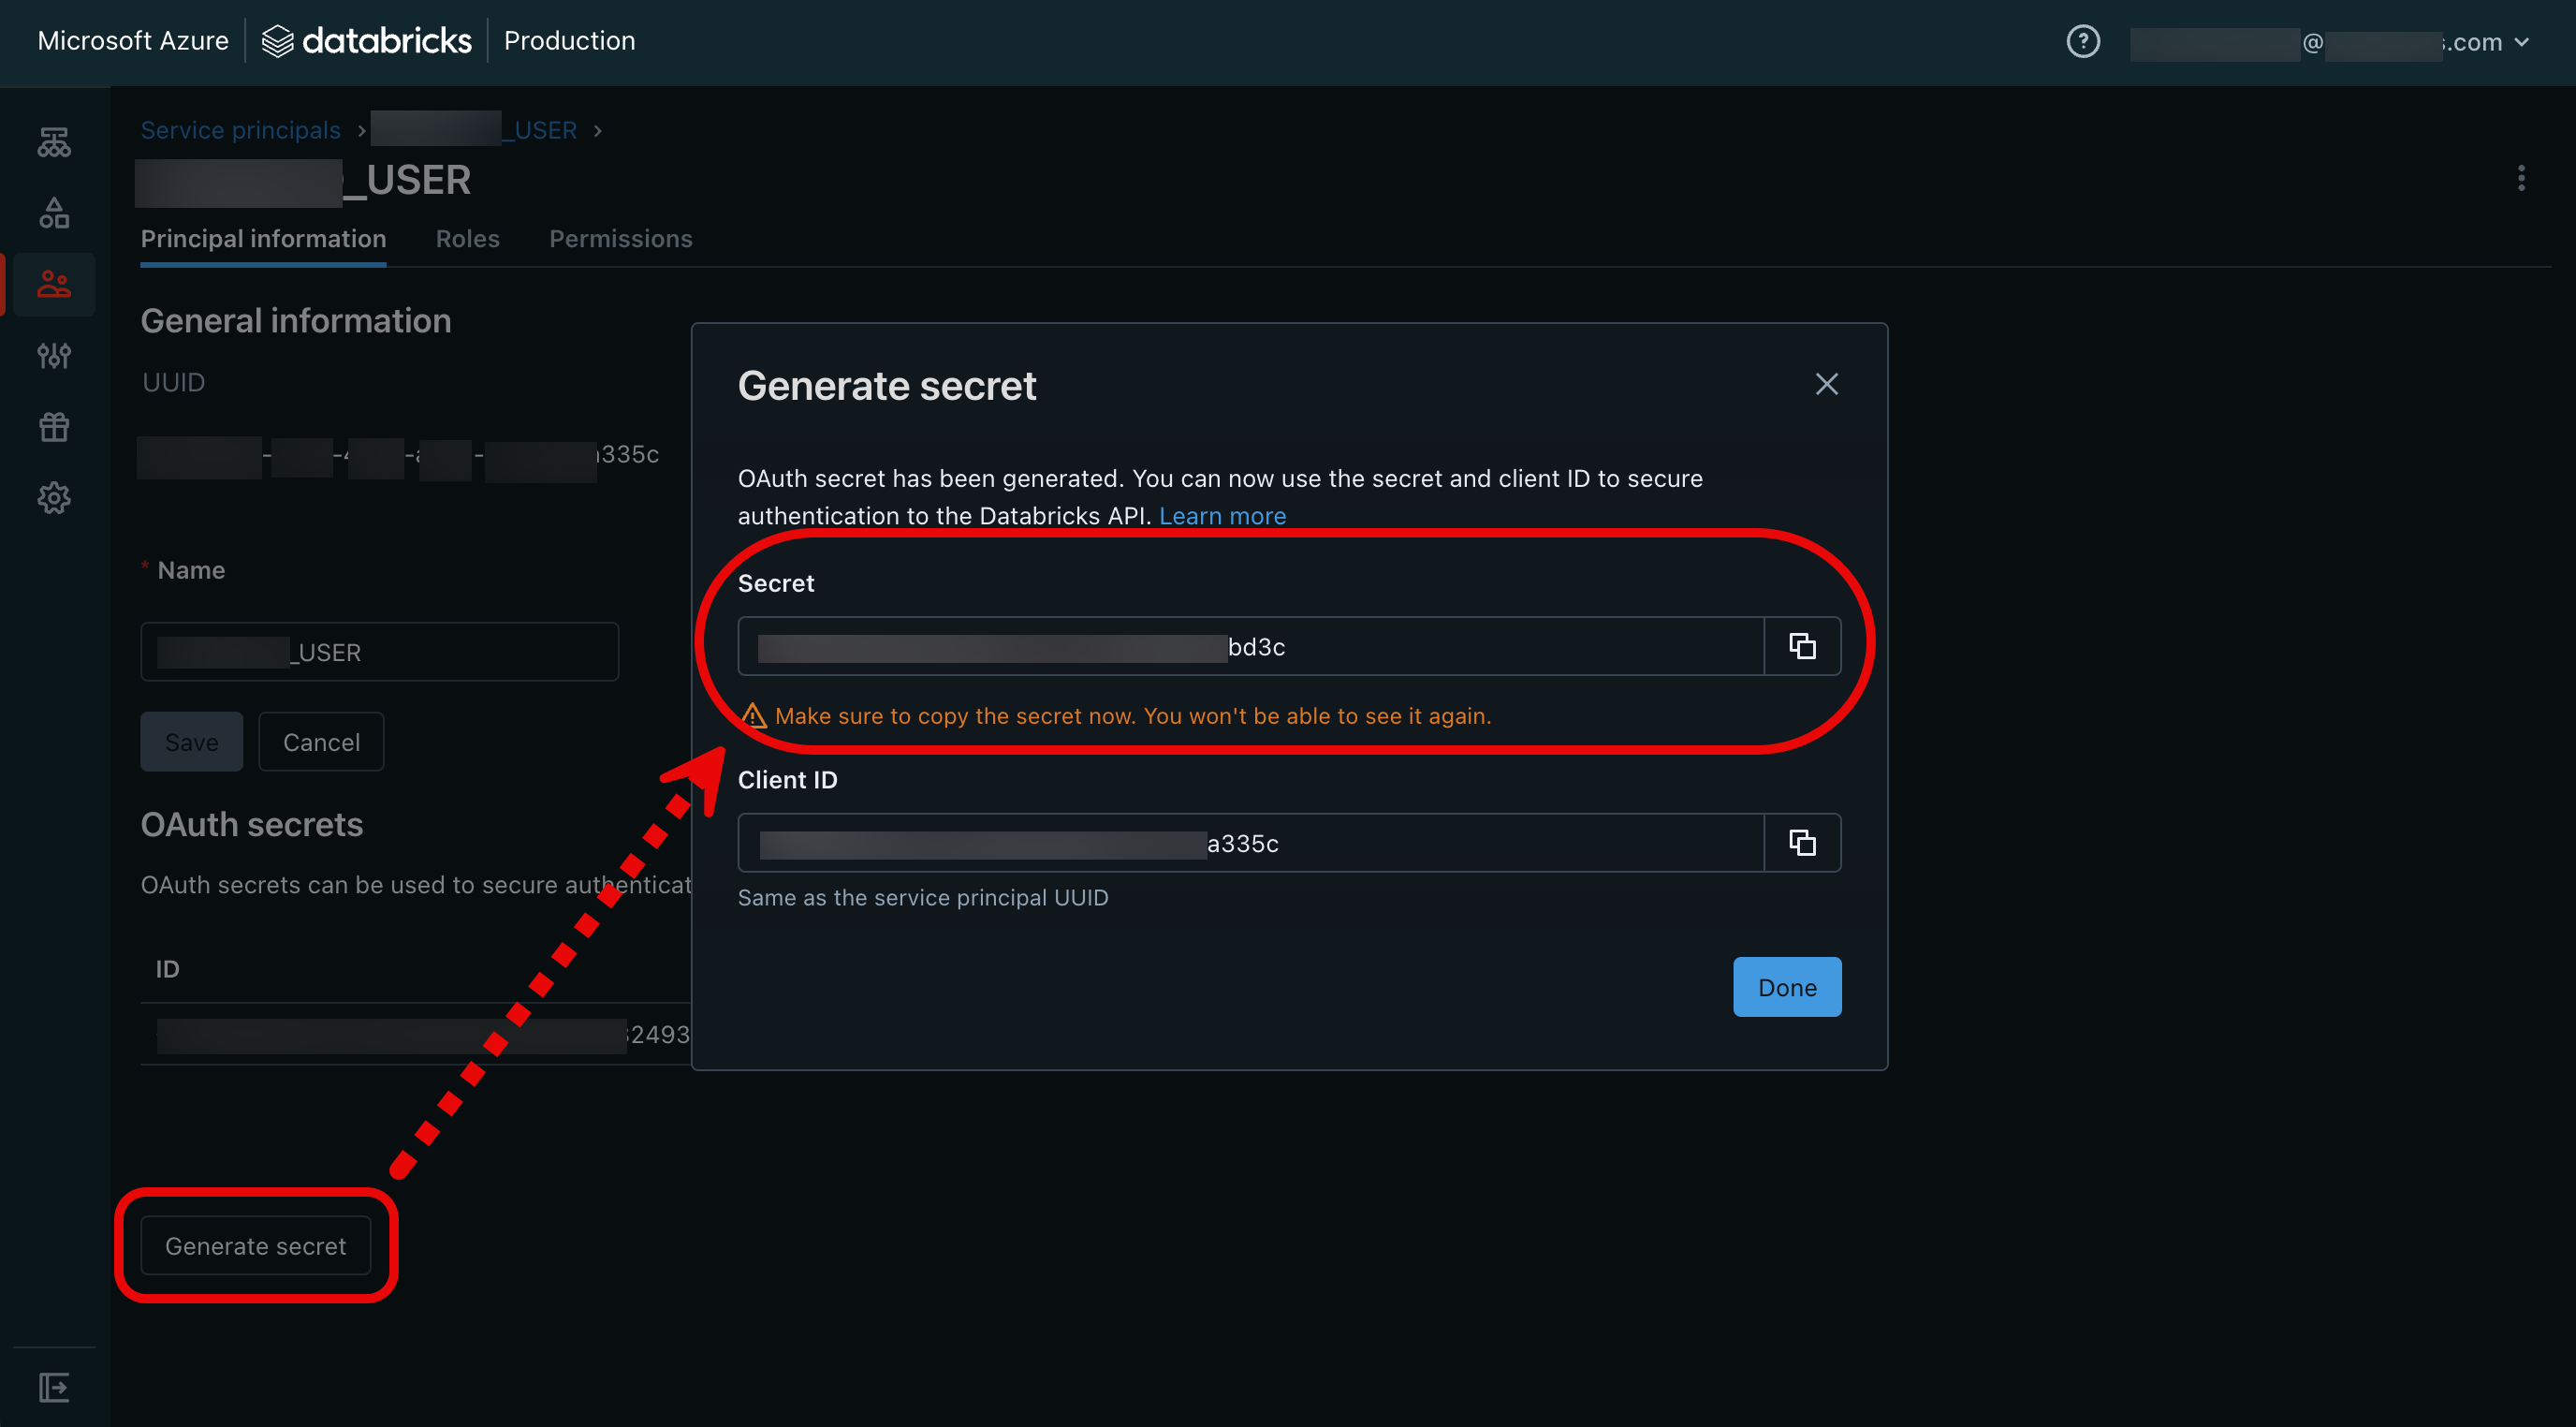
- Click Generate secret at the lower-left side of the page to generate an OAuth secret. This secret allows you to authenticate Azure Databricks API calls using the Databricks CLI.
- Copy the secret string and the client ID, and then click Done. You’ll use both in the next step. Select Done.

- In the left sidebar, click Workspaces, choose your workspace, and then click the Permissions tab.
- Grant your service principal “User” permissions, and then click Add permissions.
Important
If the Permissions tab is greyed out, your Azure Databricks workspace is not assigned to a Unity Catalog metastore. Contact your Databricks administrator.
Next, you create your Azure Databricks Git credential.
Step 4: Create a Microsoft Entra ID access token and store it as a Azure Databricks Git credential.
Note
This step requires the use of both the Azure and Databricks CLIs.
To authenticate to Azure Databricks, you must have a configuration profile (.databrickscfg) configured with the OAuth secret you created in the previous step. To set up this configuration, open the .databrickscfg file in the editor and add the following to the file:
[DEFAULT]
host = https://<workspace-url>.azuredatabricks.net/
client_id = <service principal ID>
client_secret = <Databricks OAuth token value>
Where host is the URL to your Databricks workspace, client_id is the Microsoft Entra service principal ID, and client_secret is the OAuth client secret you created in “Step 3: Assign permissions to the service principal in Azure Databricks.”
You should now have the following values to provide to CLI calls in this process:
- The service principal client ID from Steps 1 or 3 - they should be the same. (
sp_idin the following CLI examples.) - The service principal name from Step 1. (
sp_name) - The service principal client secret string from Step 1. (
sp_secret) - Your Azure DevOps organization name. (
devops_org) - Your Azure DevOps project name. (
devops_project) - Your Azure Repos repository name. (
devops_repo)
In addition, you need the Azure tenant ID (tenant_id in the following examples) for your Azure subscription. Follow these instructions to get it from the Azure portal.
Now, you can create a Git credential from the Azure CLI.
- Open a command line window with access to the Azure and Databricks CLIs.
- Run the following Azure CLI command to log in as the Microsoft Entra service principal:
az login --allow-no-subscriptions --service-principal -u $sp_id -p $sp_secret --tenant $tenant_id - As the Microsoft Entra service principal, request a Microsoft Entra ID access token and assign it to a variable:
ENTRA_ID_TOKEN=$(az account get-access-token --resource "499b84ac-1321-427f-aa17-267ca6975798" --query "accessToken" --output tsv) - Use the access token to create a Git credential for Azure Databricks access, using the permission levels you configured for it:
databricks git-credentials create azureDevOpsServices --personal-access-token $ENTRA_ID_TOKEN --git-username $sp_name - Finally, create a new Git folder using the Microsoft Entra service principal:
databricks repos create \https://$sp_name@dev.azure.com/$devops_org/$devops_project/_git/$devops_repo
The corresponding Git folder for this Azure DevOps repository is now available in your Azure Databricks workspace. You can provide the Git credential to manage it from your code using the Databricks Repos REST APIs or the Databricks CLI.
You’ve now learned how to generate a Microsoft Entra ID access token scoped to Azure DevOps and store it as a Databricks Git credential.
Best practices
The Entra ID access token is short-lived, so your pipeline must update the Databricks Git credential using git-credentials update. You can then trigger a pull request from it using databricks repos update.
Important
Additional security measures are required in a production setting. In a production environment, you should store the service principal client secret and the Databricks OAuth token in a secure secret store such as Azure Key Vault.