Call external HTTP or HTTPS endpoints from workflows in Azure Logic Apps
Applies to: Azure Logic Apps (Consumption + Standard)
Some scenarios might require that you create a logic app workflow that sends outbound requests to endpoints on other services or systems over HTTP or HTTPS. For example, suppose that you want to monitor a service endpoint for your website by checking that endpoint on a specific schedule. When a specific event happens at that endpoint, such as your website going down, that event triggers your workflow and runs the actions in that workflow.
Note
To create a workflow that receives and responds to inbound HTTPS calls instead, see Create workflows that you can call, trigger, or nest using HTTPS endpoints in Azure Logic Apps and the built-in Request trigger and Response action.
This guide shows how to use the HTTP trigger and HTTP action so that your workflow can send outbound calls to other services and systems, for example:
To check or poll an endpoint on a recurring schedule, add the HTTP trigger as the first step in your workflow. Each time that the trigger checks the endpoint, the trigger calls or sends a request to the endpoint. The endpoint's response determines whether your workflow runs. The trigger passes any content from the endpoint's response to the actions in your workflow.
To call an endpoint from anywhere else in your workflow, add the HTTP action. The endpoint's response determines how your workflow's remaining actions run.
Prerequisites
An Azure account and subscription. If you don't have an Azure subscription, sign up for a free Azure account.
The URL for the destination endpoint that you want to call
The logic app workflow from where you want to call the destination endpoint. To start with the HTTP trigger, you need a blank workflow. To use the HTTP action, start your workflow with any trigger that you want. This example uses the HTTP trigger as the first step.
Connector technical reference
For technical information about trigger and action parameters, see the following sections:
Add an HTTP trigger
This built-in trigger makes an HTTP call to the specified URL for an endpoint and returns a response.
In the Azure portal, open your Standard logic app resource and blank workflow in the designer.
Follow these general steps to add the built-in trigger named HTTP to your workflow.
This example renames the trigger to HTTP trigger - Call endpoint URL so that the trigger has a more descriptive name. Also, the example later adds an HTTP action, and operation names in your workflow must be unique.
Provide the values for the HTTP trigger parameters that you want to include in the call to the destination endpoint. Set up the recurrence for how often you want the trigger to check the destination endpoint.
If you select an authentication type other than None, the authentication settings differ based on your selection. For more information about authentication types available for HTTP, see the following topics:
To add other available parameters, open the Advanced parameters list, and select the parameters that you want.
Add any other actions that you want to run when the trigger fires.
When you're done, save your workflow. On the designer toolbar, select Save.
Add an HTTP action
This built-in action makes an HTTP call to the specified URL for an endpoint and returns a response.
In the Azure portal, open your Consumption logic app and workflow in the designer.
This example uses the HTTP trigger added in the previous section as the first step.
Follow these general steps to add the built-in action named HTTP to your workflow.
This example renames the action to HTTP action - Call endpoint URL so that the step has a more descriptive name. Also, operation names in your workflow must be unique.
Provide the values for the HTTP action parameters that you want to include in the call to the destination endpoint.
If you select an authentication type other than None, the authentication settings differ based on your selection. For more information about authentication types available for HTTP, see these topics:
To add other available parameters, open the Advanced parameters list, and select the parameters that you want.
When you're done, save your workflow. On the designer toolbar, select Save.
Trigger and action outputs
Here's more information about the outputs from an HTTP trigger or action, which returns the following information:
| Property | Type | Description |
|---|---|---|
headers |
JSON object | The headers from the request |
body |
JSON object | The object with the body content from the request |
status code |
Integer | The status code from the request |
| Status code | Description |
|---|---|
| 200 | OK |
| 202 | Accepted |
| 400 | Bad request |
| 401 | Unauthorized |
| 403 | Forbidden |
| 404 | Not Found |
| 500 | Internal server error. Unknown error occurred. |
URL security for outbound calls
For information about encryption, security, and authorization for outbound calls from your workflow, such as Transport Layer Security (TLS), previously known as Secure Sockets Layer (SSL), self-signed certificates, or Microsoft Entra ID Open Authentication (Microsoft Entra ID OAuth), see Secure access and data - Access for outbound calls to other services and systems.
Authentication for single-tenant environment
If you have a Standard logic app resource in single-tenant Azure Logic Apps, and you want to use an HTTP operation with any of the following authentication types, make sure to complete the extra setup steps for the corresponding authentication type. Otherwise, the call fails.
TLS/SSL certificate: Add the app setting,
WEBSITE_LOAD_ROOT_CERTIFICATES, and set the value to the thumbprint for your TLS/SSL certificate.Client certificate or Microsoft Entra ID Open Authentication (Microsoft Entra ID OAuth) with the "Certificate" credential type: Add the app setting,
WEBSITE_LOAD_USER_PROFILE, and set the value to1.
TLS/SSL certificate authentication
In your logic app resource's app settings, add or update the app setting,
WEBSITE_LOAD_ROOT_CERTIFICATES.For the setting value, provide the thumbprint for your TLS/SSL certificate as the root certificate to be trusted.
"WEBSITE_LOAD_ROOT_CERTIFICATES": "<thumbprint-for-TLS/SSL-certificate>"
For example, if you're working in Visual Studio Code, follow these steps:
Open your logic app project's local.settings.json file.
In the
ValuesJSON object, add or update theWEBSITE_LOAD_ROOT_CERTIFICATESsetting:{ "IsEncrypted": false, "Values": { <...> "AzureWebJobsStorage": "UseDevelopmentStorage=true", "WEBSITE_LOAD_ROOT_CERTIFICATES": "<thumbprint-for-TLS/SSL-certificate>", <...> } }Note
To find the thumbprint, follow these steps:
On your logic app resource menu, under Settings, select TLS/SSL settings > Private Key Certificates (.pfx) or Public Key Certificates (.cer).
Find the certificate that you want to use, and copy the thumbprint.
For more information, review Find the thumbprint - Azure App Service.
For more information, review the following documentation:
- Edit host and app settings for logic apps in single-tenant Azure Logic Apps
- Private client certificates - Azure App Service
Client certificate or Microsoft Entra ID OAuth with "Certificate" credential type authentication
In your logic app resource's app settings, add or update the app setting,
WEBSITE_LOAD_USER_PROFILE.For the setting value, specify
1."WEBSITE_LOAD_USER_PROFILE": "1"
For example, if you're working in Visual Studio Code, follow these steps:
Open your logic app project's local.settings.json file.
In the
ValuesJSON object, add or update theWEBSITE_LOAD_USER_PROFILEsetting:{ "IsEncrypted": false, "Values": { <...> "AzureWebJobsStorage": "UseDevelopmentStorage=true", "WEBSITE_LOAD_USER_PROFILE": "1", <...> } }
For more information, review the following documentation:
- Edit host and app settings for logic apps in single-tenant Azure Logic Apps
- Private client certificates - Azure App Service
Content with multipart/form-data type
To handle content that has multipart/form-data type in HTTP requests, you can add a JSON object that includes the $content-type and $multipart attributes to the HTTP request's body by using this format.
"body": {
   "$content-type": "multipart/form-data",
   "$multipart": [
      {
         "body": "<output-from-trigger-or-previous-action>",
         "headers": {
            "Content-Disposition": "form-data; name=file; filename=<file-name>"
         }
      }
   ]
}
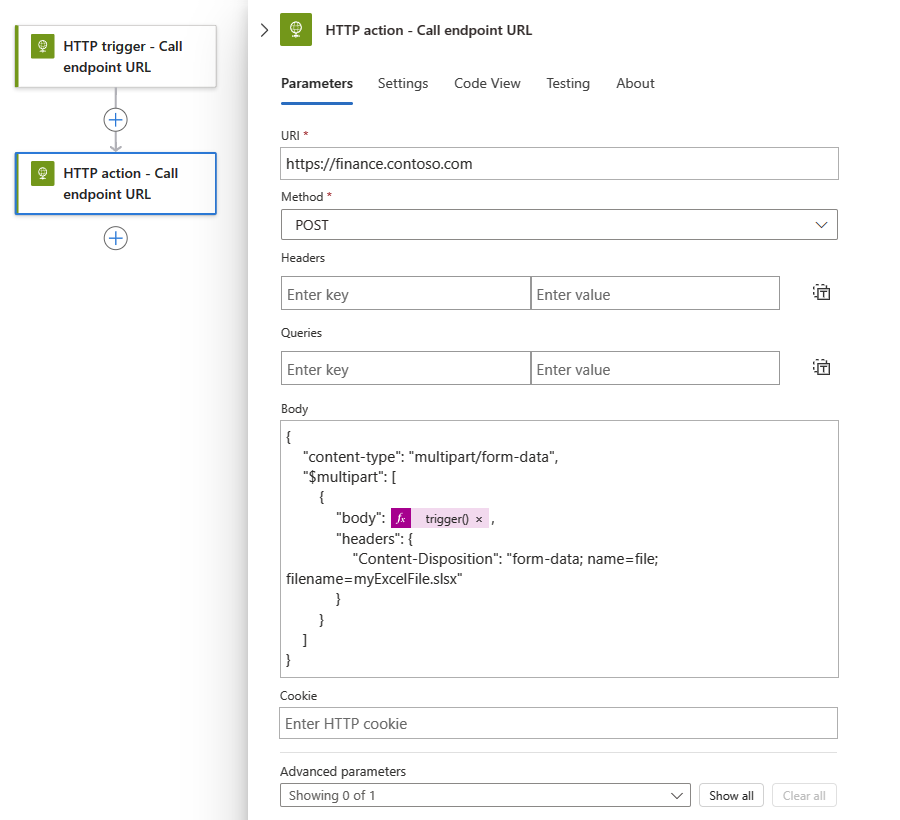
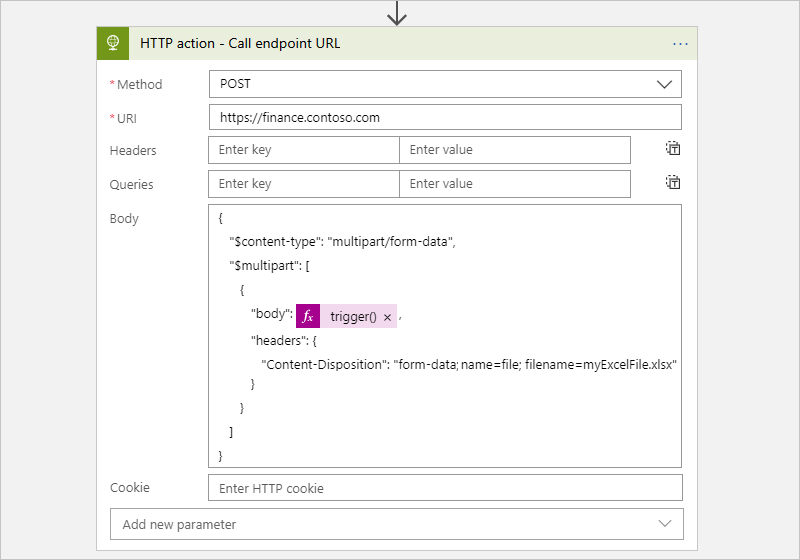
For example, suppose you have a workflow that sends an HTTP POST request for an Excel file to a website by using that site's API, which supports the multipart/form-data type. The following sample shows how this action might appear:
Standard workflow
Consumption workflow
Here's the same example that shows the HTTP action's JSON definition in the underlying workflow definition:
"HTTP_action": {
   "inputs": {
      "body": {
         "$content-type": "multipart/form-data",
         "$multipart": [
            {
               "body": "@trigger()",
               "headers": {
                  "Content-Disposition": "form-data; name=file; filename=myExcelFile.xlsx"
               }
            }
         ]
      },
      "method": "POST",
      "uri": "https://finance.contoso.com"
   },
   "runAfter": {},
   "type": "Http"
}
Content with application/x-www-form-urlencoded type
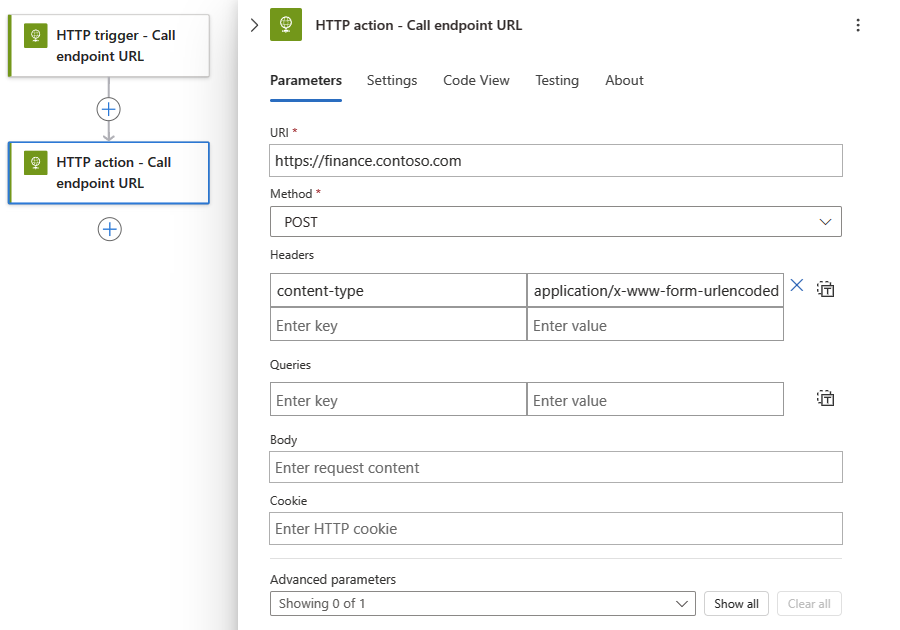
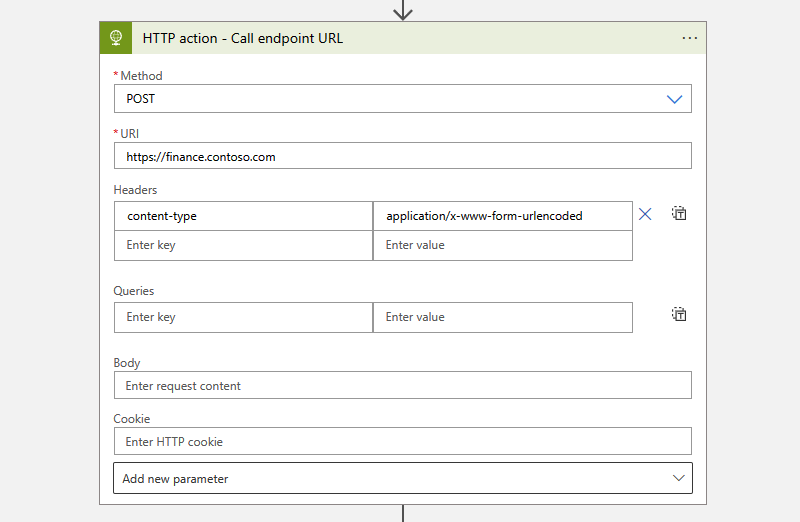
To provide form-urlencoded data in the body for an HTTP request, you have to specify that the data has the application/x-www-form-urlencoded content type. In the HTTP trigger or action, add the content-type header. Set the header value to application/x-www-form-urlencoded.
For example, suppose you have a logic app that sends an HTTP POST request to a website, which supports the application/x-www-form-urlencoded type. Here's how this action might look:
Standard workflow
Consumption workflow
Asynchronous request-response behavior
For stateful workflows in both multitenant and single-tenant Azure Logic Apps, all HTTP-based actions follow the standard asynchronous operation pattern as the default behavior. This pattern specifies that after an HTTP action calls or sends a request to an endpoint, service, system, or API, the receiver immediately returns a "202 ACCEPTED" response. This code confirms that the receiver accepted the request but hasn't finished processing. The response can include a location header that specifies the URI and a refresh ID that the caller can use to poll or check the status for the asynchronous request until the receiver stops processing and returns a "200 OK" success response or other non-202 response. However, the caller doesn't have to wait for the request to finish processing and can continue to run the next action. For more information, see Asynchronous microservice integration enforces microservice autonomy.
For stateless workflows in single-tenant Azure Logic Apps, HTTP-based actions don't use the asynchronous operation pattern. Instead, they only run synchronously, return the "202 ACCEPTED" response as-is, and proceed to the next step in the workflow execution. If the response includes a location header, a stateless workflow won't poll the specified URI to check the status. To follow the standard asynchronous operation pattern, use a stateful workflow instead.
The HTTP action's underlying JavaScript Object Notation (JSON) definition implicitly follows the asynchronous operation pattern.
The HTTP action, but not trigger, has an Asynchronous Pattern setting, which is enabled by default. This setting specifies that the caller doesn't wait for processing to finish and can move on to the next action but continues checking the status until processing stops. If disabled, this setting specifies that the caller waits for processing to finish before moving on to the next action.
To find the Asynchronous Pattern setting, follow these steps, based on whether you have a Standard or Consumption workflow:
Standard workflow*
In the workflow designer, select the HTTP action. On the information pane that opens, select Settings.
Under Networking, find the Asynchronous Pattern setting.
Consumption workflow
In the workflow designer, on the HTTP action's title bar, select the ellipses (...) button, which opens the action's settings.
Find the Asynchronous Pattern setting.
Disable asynchronous operations
Sometimes, you might want to disable the HTTP action's asynchronous behavior in specific scenarios, for example, when you want to:
Turn off Asynchronous Pattern setting
In the workflow designer, select the HTTP action, and on the information pane that opens, select Settings.
Under Networking, find the Asynchronous Pattern setting. Turn the setting to Off if enabled.
Disable asynchronous pattern in action's JSON definition
In the HTTP action's underlying JSON definition, add the "DisableAsyncPattern" operation option to the action's definition so that the action follows the synchronous operation pattern instead. For more information, see also Run actions in a synchronous operation pattern.
Avoid HTTP timeouts for long-running tasks
HTTP requests have a timeout limit. If you have a long-running HTTP action that times out due to this limit, you have these options:
Disable the HTTP action's asynchronous operation pattern so that the action doesn't continually poll or check the request's status. Instead, the action waits for the receiver to respond with the status and results after the request finishes processing.
Replace the HTTP action with the HTTP Webhook action, which waits for the receiver to respond with the status and results after the request finishes processing.
Set up interval between retry attempts with the Retry-After header
To specify the number of seconds between retry attempts, you can add the Retry-After header to the HTTP action response. For example, if the destination endpoint returns the 429 - Too many requests status code, you can specify a longer interval between retries. The Retry-After header also works with the 202 - Accepted status code.
Here's the same example that shows the HTTP action response that contains Retry-After:
{
    "statusCode": 429,
    "headers": {
        "Retry-After": "300"
    }
}
Pagination support
Sometimes, the destination service responds by returning the results one page at a time. If the response specifies the next page with the nextLink or @odata.nextLink property, you can turn on the Pagination setting on the HTTP action. This setting causes the HTTP action to automatically follow these links and get the next page. However, if the response specifies the next page with any other tag, you might have to add a loop to your workflow. Make this loop follow that tag and manually get each page until the tag is null.
Disable checking location headers
Some endpoints, services, systems, or APIs return a 202 ACCEPTED response that doesn't have a location header. To avoid having an HTTP action continually check the request status when the location header doesn't exist, you can have these options:
Disable the HTTP action's asynchronous operation pattern so that the action doesn't continually poll or check the request's status. Instead, the action waits for the receiver to respond with the status and results after the request finishes processing.
Replace the HTTP action with the HTTP Webhook action, which waits for the receiver to respond with the status and results after the request finishes processing.
Known issues
Omitted HTTP headers
If an HTTP trigger or action includes these headers, Azure Logic Apps removes these headers from the generated request message without showing any warning or error:
Accept-*headers except forAccept-versionAllowContent-*headers except forContent-Disposition,Content-Encoding, andContent-Type, which are honored when you use the POST and PUT operations. However, Azure Logic Apps drops these headers when you use the GET operation.Cookieheader, but Azure Logic Apps honors any value that you specify using the Cookie property.ExpiresHostLast-ModifiedOriginSet-CookieTransfer-Encoding
Although Azure Logic Apps won't stop you from saving logic apps that use an HTTP trigger or action with these headers, Azure Logic Apps ignores these headers.
Response content doesn't match the expected content type
The HTTP action throws a BadRequest error if the HTTP action calls the backend API with the Content-Type header set to application/json, but the response from the backend doesn't actually contain content in JSON format, which fails internal JSON format validation.


