Tutorial: Deploy a PHP, MySQL, and Redis app to Azure App Service
This tutorial shows how to create a secure PHP app in Azure App Service connects to a MySQL database (using Azure Database for MySQL Flexible Server). You'll also deploy an Azure Cache for Redis to enable the caching code in your application. Azure App Service is a highly scalable, self-patching, web-hosting service that can easily deploy apps on Windows or Linux. When you're finished, you'll have a Laravel app running on Azure App Service on Linux.

Prerequisites
- An Azure account with an active subscription. If you don't have an Azure account, you can create one for free.
- A GitHub account. you can also get one for free.
- Knowledge of PHP with Laravel development.
- (Optional) To try GitHub Copilot, a GitHub Copilot account. A 30-day free trial is available.
1. Run the sample
First, you set up a sample data-driven app as a starting point. For your convenience, the sample repository, includes a dev container configuration. The dev container has everything you need to develop an application, including the database, cache, and all environment variables needed by the sample application. The dev container can run in a GitHub codespace, which means you can run the sample on any computer with a web browser.
Step 1: In a new browser window:
- Sign in to your GitHub account.
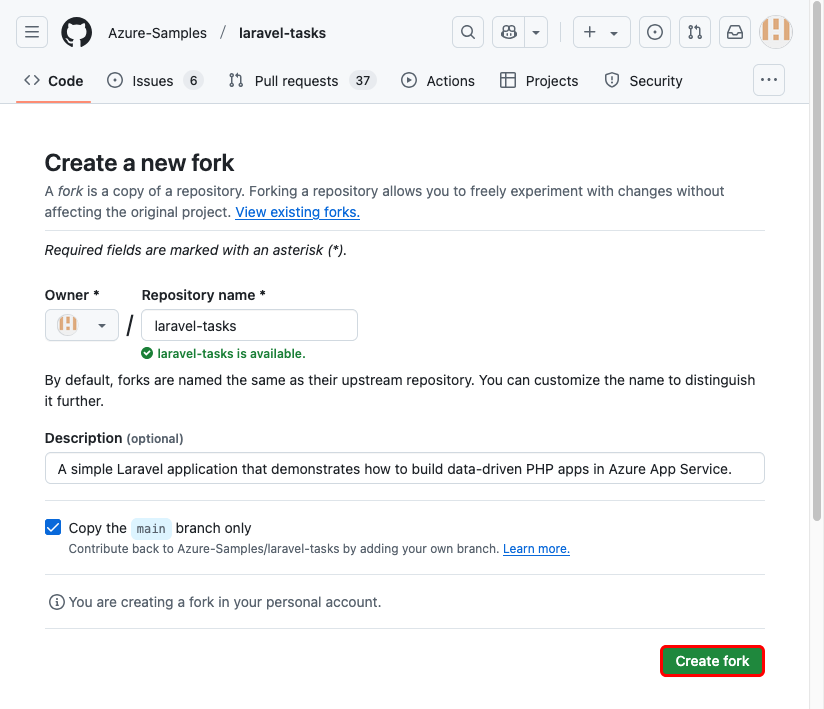
- Navigate to https://github.com/Azure-Samples/laravel-tasks/fork.
- Select Create fork.
Step 2: In the GitHub fork:
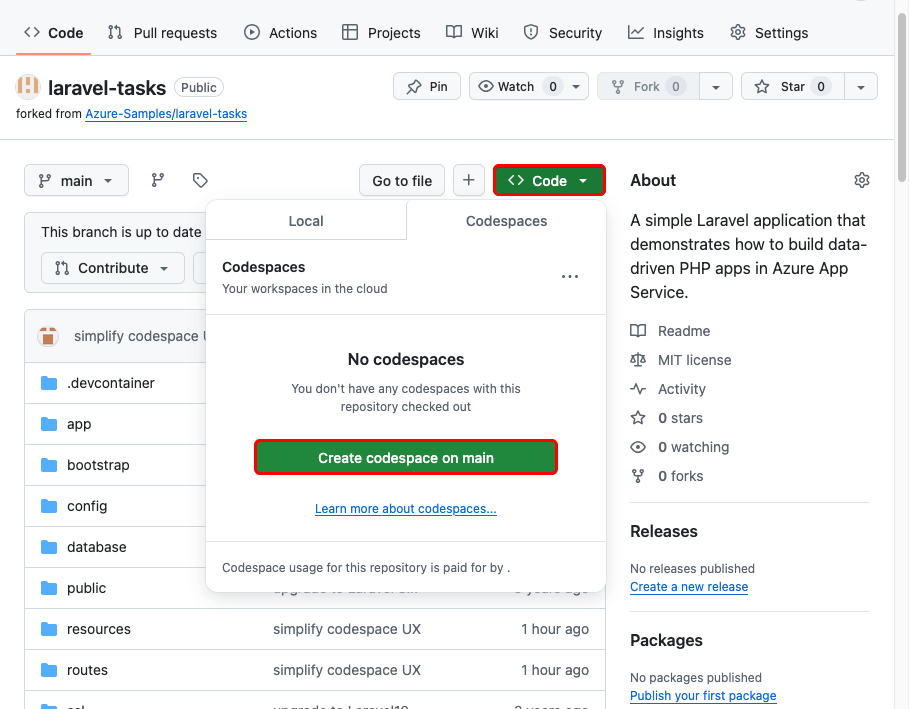
- Select Code > Create codespace on main.
The codespace takes a few minutes to set up. Also, the provided .env file already contains a dummy
APP_KEYvariable that Laravel needs to run locally.
Step 3: In the codespace terminal:
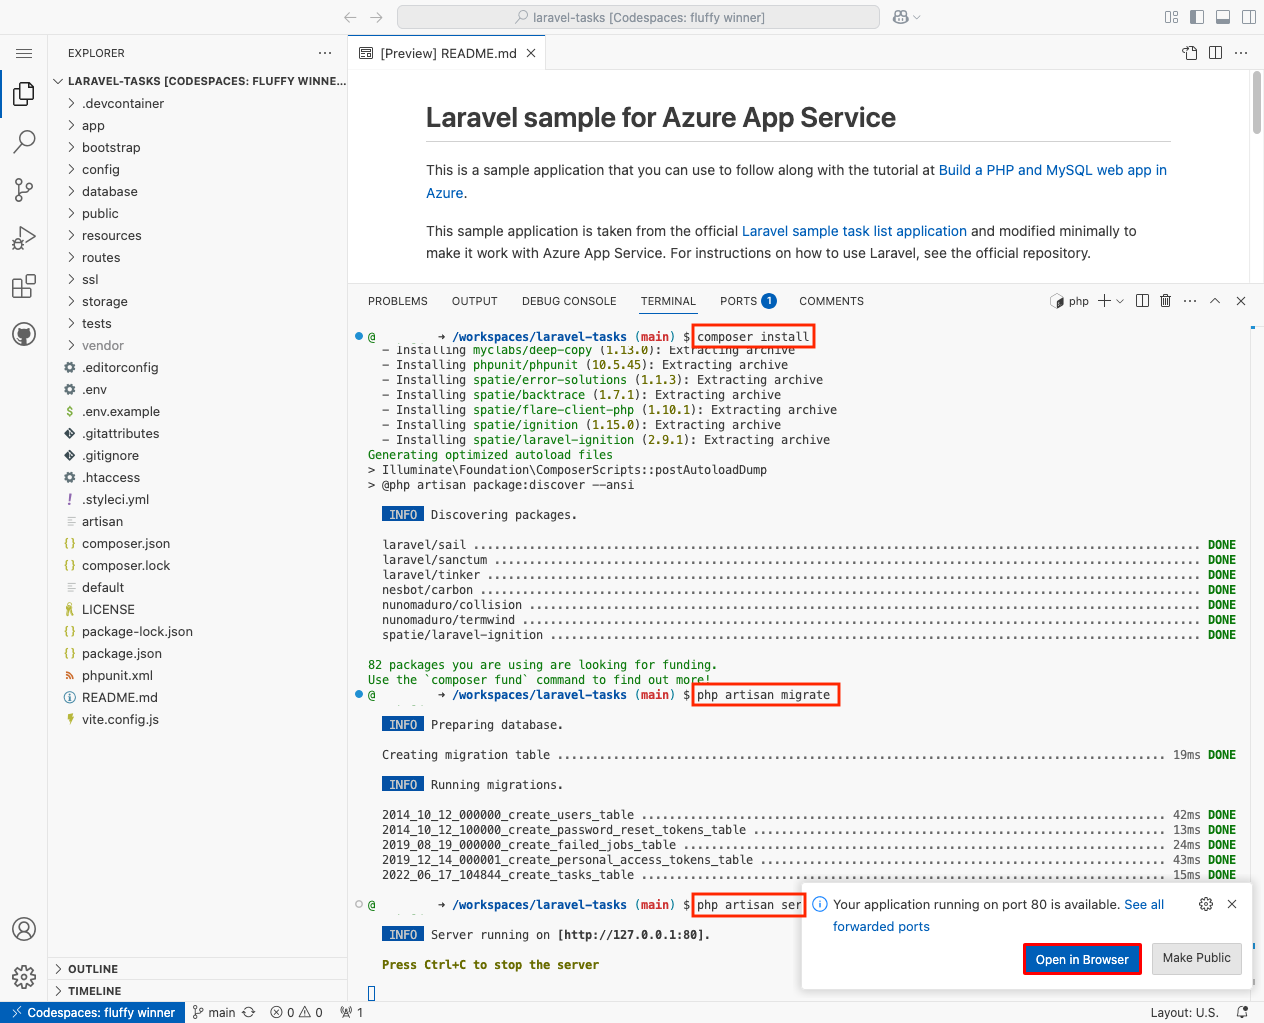
- Run
composer install. - Run database migrations with
php artisan migrate. - Run the app with
php artisan serve. - When you see the notification
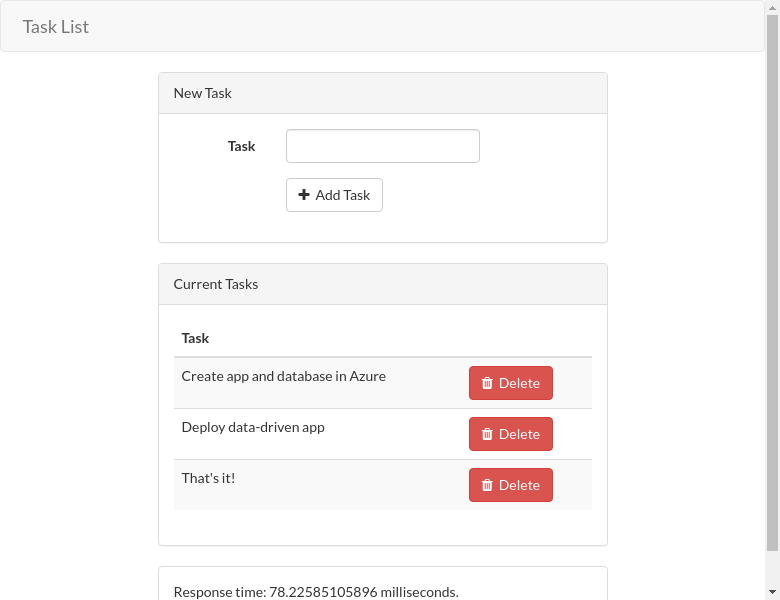
Your application running on port 80 is available., select Open in Browser. You should see the sample application in a new browser tab. To stop the application, typeCtrl+C.
Having issues? Check the Troubleshooting section.
2. Create Azure resources and deploy a sample app
In this step, you create the Azure resources and deploy a sample app to App Service on Linux. The steps used in this tutorial create a set of secure-by-default resources that include App Service and Azure Database for MySQL.
The GitHub codespace already has the Azure Developer CLI (AZD).
Generate a Laravel encryption key with
php artisan key:generate --show:php artisan key:generate --showSign into Azure by running the
azd auth logincommand and following the prompt:azd auth loginCreate the necessary Azure resources and deploy the app code with the
azd upcommand. Follow the prompt to select the desired subscription and location for the Azure resources.azd upWhen prompted, give the following answers:
Question Answer Enter a new environment name Type a unique name. The AZD template uses this name as part of the DNS name of your web app in Azure ( <app-name>-<hash>.azurewebsites.net). Alphanumeric characters and hyphens are allowed.Select an Azure Subscription to use Select your subscription. Select an Azure location to use Select a location. Enter a value for the 'appKey' infrastructure secured parameter Use the output of php artisan key:generate --showhere. The AZD template creates a Key Vault secret for it that you can use in your app.Enter a value for the 'databasePassword' infrastructure secured parameter Database password for MySQL. It must be at least 8 characters long and contain uppercase letters, lowercase letters, numbers, and special characters. The
azd upcommand takes about 15 minutes to complete (the Redis cache takes the most time). It also compiles and deploys your application code, but you modify your code later to work with App Service. While it's running, the command provides messages about the provisioning and deployment process, including a link to the deployment in Azure. When it finishes, the command also displays a link to the deploy application.This AZD template contains files (azure.yaml and the infra directory) that generate a secure-by-default architecture with the following Azure resources:
- Resource group: The container for all the created resources.
- App Service plan: Defines the compute resources for App Service. A Linux plan in the B1 tier is created.
- App Service: Represents your app and runs in the App Service plan.
- Virtual network: Integrated with the App Service app and isolates back-end network traffic.
- Azure Database for MySQL Flexible Server: Accessible only from the virtual network through the DNS zone integration. A database is created for you on the server.
- Azure Cache for Redis: Accessible only from within the virtual network.
- Private endpoints: Access endpoints for the key vault and the Redis cache in the virtual network.
- Private DNS zones: Enable DNS resolution of the key vault, the database server, and the Redis cache in the virtual network.
- Log Analytics workspace: Acts as the target container for your app to ship its logs, where you can also query the logs.
- Key vault: Used to keep your database password the same when you redeploy with AZD.
Having issues? Check the Troubleshooting section.
3. Use Azure connection strings in application code
The AZD template you use generated the connectivity variables for you already as app settings and outputs the them to the terminal for your convenience. App settings are one way to keep connection secrets out of your code repository.
In the AZD output, find the app settings that begin with
AZURE_MYSQL_andAZURE_REDIS_. Only the setting names are displayed. They look like this in the AZD output:App Service app has the following app settings: - AZURE_KEYVAULT_RESOURCEENDPOINT - AZURE_KEYVAULT_SCOPE - AZURE_MYSQL_DBNAME - AZURE_MYSQL_FLAG - AZURE_MYSQL_HOST - AZURE_MYSQL_PASSWORD - AZURE_MYSQL_PORT - AZURE_MYSQL_USERNAME - AZURE_REDIS_DATABASE - AZURE_REDIS_HOST - AZURE_REDIS_PASSWORD - AZURE_REDIS_PORT - AZURE_REDIS_SSLSettings beginning with
AZURE_MYSQL_are connection variables for the MySQL database, and settings beginning withAZURE_REDIS_are for the Redis cache. You need to use them in your code later. For your convenience, the AZD template shows you the direct link to the app's app settings page in the Azure portal.From the explorer, open config/database.php. This is the configuration file for database and Redis cache connections.
Find the part that defines the
mysqlconnection (lines 46-64) and replaceDB_HOST,DB_PORT,DB_DATABASE,DB_USERNAME, andDB_PASSWORDwith theAZURE_MYSQL_app settings from the AZD output. Yourmysqlconnection should look like the following code.'mysql' => [ 'driver' => 'mysql', 'url' => env('DATABASE_URL'), 'host' => env('AZURE_MYSQL_HOST', '127.0.0.1'), 'port' => env('AZURE_MYSQL_PORT', '3306'), 'database' => env('AZURE_MYSQL_DBNAME', 'forge'), 'username' => env('AZURE_MYSQL_USERNAME', 'forge'), 'password' => env('AZURE_MYSQL_PASSWORD', ''), 'unix_socket' => env('DB_SOCKET', ''), 'charset' => 'utf8mb4', 'collation' => 'utf8mb4_unicode_ci', 'prefix' => '', 'prefix_indexes' => true, 'strict' => true, 'engine' => null, 'options' => extension_loaded('pdo_mysql') ? array_filter([ PDO::MYSQL_ATTR_SSL_CA => env('MYSQL_ATTR_SSL_CA'), ]) : [], ],For more information on database configuration in Laravel, see Laravel documentation.
Find the part that defines the Redis cache connection (lines 140-147) and replace
REDIS_HOST,REDIS_PASSWORD,REDIS_PORT, andREDIS_CACHE_DBwith theAzure_REDIS_app settings from the AZD output. Also, add'scheme' => 'tls',to the connection. Your cache connection should look like the following code:'cache' => [ 'scheme' => 'tls', 'url' => env('REDIS_URL'), 'host' => env('AZURE_REDIS_HOST', '127.0.0.1'), 'username' => env('REDIS_USERNAME'), 'password' => env('AZURE_REDIS_PASSWORD'), 'port' => env('AZURE_REDIS_PORT', '6379'), 'database' => env('AZURE_REDIS_DATABASE', '1'), ],For more information on Redis cache configuration in Laravel, see Laravel documentation.
Note
Remember that your changes aren't deployed yet. You'll deploy them at the end of the next step.
4. Configure Laravel settings in web app
From the explorer, open infra/resources.bicep. This is the Bicep template file that defines the created Azure resources.
Find the part that defines the app settings (lines 510-514) and uncomment them. These app settings are:
Setting Description CACHE_DRIVERTells Laravel to use Redis as its cache (see Laravel documentation). MYSQL_ATTR_SSL_CANeeded to open a TLS connection to MySQL in Azure. The certificate file is included in the sample repository for convenience. This variable is used by the mysql connection in config/database.php LOG_CHANNELTells Laravel to pipe logs to stderr, which makes it available to the App Service logs (see Laravel documentation).APP_DEBUGEnable debug mode pages in Laravel (see Laravel documentation). APP_KEYLaravel encryption variable. The AZD template already created a Key Vault secret (lines 212-217), so you access it with a Key Vault reference. In infra/resources.bicep, find the resource definition for the App Service app and uncomment line 315:
appCommandLine: 'cp /home/site/wwwroot/default /etc/nginx/sites-available/default && service nginx reload'Laravel application lifecycle begins in the /public directory instead of the application root. The default PHP container for App Service uses Nginx, which starts in the application root. To change the site root, you need to change the Nginx configuration file in the PHP container (/etc/nginx/sites-available/default). For your convenience, the sample repository contains a replacement configuration file called default, which tells Nginx to look in the /public directory. This custom command in
appCommandLineruns every time the app starts to apply the file replacement each time the Linux container is reloaded from a clean state.Back in the codespace terminal, run
azd upagain.azd up
Tip
azd up runs azd package, azd provision, and azd deploy together, and it makes sense because you're making both infrastructure and application changes. To make infrastructure changes only, run azd provision. To just deploy changes to application code, run azd deploy.
Having issues? Check the Troubleshooting section.
5. Generate database schema
With the MySQL database protected by the virtual network, the easiest way to run Laravel database migrations is in an SSH session with the Linux container in App Service.
In the AZD output, find the URL for the SSH session and navigate to it in the browser. It looks like this in the output:
Open SSH session to App Service container at: https://<app-name>-<hash>.scm.azurewebsites.net/webssh/host
In the SSH session, run database migrations from the /home/site/wwwroot directory:
cd /home/site/wwwroot
php artisan migrate --force
If it succeeds, App Service is connecting successfully to the database.
Note
Only changes to files in /home can persist beyond app restarts.
Having issues? Check the Troubleshooting section.
6. Browse to the app
In the AZD output, find the URL of your app and navigate to it in the browser. The URL looks like this in the AZD output:
 Deploying services (azd deploy)

   (✓) Done: Deploying service web
   - Endpoint: https://<app-name>-<hash>.azurewebsites.net/
Add a few tasks to the list.

Congratulations, you're running a web app in Azure App Service, with secure connectivity to Azure Database for MySQL.
Having issues? Check the Troubleshooting section.
7. Stream diagnostic logs
Azure App Service captures all messages logged to the console to assist you in diagnosing issues with your application. For convenience, the AZD template already enabled logging to the local file system and is shipping the logs to a Log Analytics workspace.
The sample app outputs console log messages in each of its endpoints to demonstrate this capability. By default, Laravel's logging functionality (for example, Log::info()) outputs to a local file. Your LOG_CHANNEL app setting from earlier makes log entries accessible from the App Service log stream.
Route::get('/', function () {
    Log::info("Get /");
    $startTime = microtime(true);
    // Simple cache-aside logic
    if (Cache::has('tasks')) {
        $data = Cache::get('tasks');
    } else {
        $data = Task::orderBy('created_at', 'asc')->get();
        Cache::add('tasks', $data);
    }
    return view('tasks', ['tasks' => $data, 'elapsed' => microtime(true) - $startTime]);
});
In the AZD output, find the link to stream App Service logs and navigate to it in the browser. The link looks like this in the AZD output:
Stream App Service logs at: https://portal.azure.com/#@/resource/subscriptions/<subscription-guid>/resourceGroups/<group-name>/providers/Microsoft.Web/sites/<app-name>/logStream
Having issues? Check the Troubleshooting section.
8. Clean up resources
To delete all Azure resources in the current deployment environment, run azd down and follow the prompts.
azd down
Troubleshooting
I get the error during database migrations php_network_getaddresses: getaddrinfo for mysqldb failed: No address associated with hostname...
It indicates that MySQL connection variables aren't properly configured. Verify that the AZURE_MYSQL_ app settings are properly configured in 3. Use Azure connection strings in application code.
I get a blank page in the browser.
It indicates that App Service can't find the PHP start files in /public. Follow the steps in 4. Configure Laravel settings in web app.
I get a debug page in the browser saying Unsupported cipher or incorrect key length.
It indicates that the APP_KEY setting is set to an invalid key. When you run azd up, make sure you set appKey to the output of php artisan key:generate --show.
I get a debug page in the browser saying Uncaught Error: Class "Illuminate\..." not found.
This error and similar errors indicate that you didn't run composer install before azd up, or that the packages in the /vendor directory are stale. Run composer install and azd deploy again.
I get a debug page in the browser saying php_network_getaddresses: getaddrinfo for redishost failed: Name or service not known.
It indicates that Redis connection variables aren't properly configured. Verify that the AZURE_REDIS_ app settings are properly configured in 3. Use Azure connection strings in application code.
I get a debug page in the browser saying SQLSTATE[42S02]: Base table or view not found: 1146 Table 'XXXX-XXXXXXXXX-mysql-database.tasks' doesn't exist
It means you haven't run database migrations, or database migrations weren't successful. Follow the steps at 5. Generate database schema.
Frequently asked questions
- How much does this setup cost?
- How do I connect to the MySQL database that's secured behind the virtual network with other tools?
- How does local app development work with GitHub Actions?
- Why is the GitHub Actions deployment so slow?
How much does this setup cost?
Pricing for the create resources is as follows:
- The App Service plan is created in Basic tier and can be scaled up or down. See App Service pricing.
- The MySQL flexible server is created in B1ms tier and can be scaled up or down. With an Azure free account, B1ms tier is free for 12 months, up to the monthly limits. See Azure Database for MySQL pricing.
- The Azure Cache for Redis is created in Basic tier with the minimum cache size. There's a small cost associated with this tier. You can scale it up to higher performance tiers for higher availability, clustering, and other features. See Azure Cache for Redis pricing.
- The virtual network doesn't incur a charge unless you configure extra functionality, such as peering. See Azure Virtual Network pricing.
- The private DNS zone incurs a small charge. See Azure DNS pricing.
How do I connect to the MySQL database that's secured behind the virtual network with other tools?
- For basic access from a command-line tool, you can run
mysqlfrom the app's SSH terminal. - To connect from a desktop tool like MySQL Workbench, your machine must be within the virtual network. For example, it could be an Azure VM that's connected to one of the subnets, or a machine in an on-premises network that has a site-to-site VPN connection with the Azure virtual network.
- You can also integrate Azure Cloud Shell with the virtual network.
How does local app development work with GitHub Actions?
Take the autogenerated workflow file from App Service as an example, each git push kicks off a new build and deployment run. From a local clone of the GitHub repository, you make the desired updates push it to GitHub. For example:
git add .
git commit -m "<some-message>"
git push origin main
Why is the GitHub Actions deployment so slow?
The autogenerated workflow file from App Service defines build-then-deploy, two-job run. Because each job runs in its own clean environment, the workflow file ensures that the deploy job has access to the files from the build job:
- At the end of the
buildjob, upload files as artifacts. - At the beginning of the
deployjob, download the artifacts.
Most of the time taken by the two-job process is spent uploading and download artifacts. If you want, you can simplify the workflow file by combining the two jobs into one, which eliminates the need for the upload and download steps.
Next steps
Advance to the next tutorial to learn how to secure your app with a custom domain and certificate.
Or, check out other resources:


