How to authorize developer accounts by using Azure Active Directory B2C in Azure API Management
APPLIES TO: Developer | Basic v2 | Standard | Standard v2 | Premium | Premium v2
Azure Active Directory B2C is a cloud identity management solution for consumer-facing web and mobile applications. You can use it to manage access to your API Management developer portal.
In this tutorial, you'll learn the configuration required in your API Management service to integrate with Azure Active Directory B2C.
For an overview of options to secure the developer portal, see Secure access to the API Management developer portal.
Important
- This article has been updated with steps to configure an Azure AD B2C app using the Microsoft Authentication Library (MSAL).
- If you previously configured an Azure AD B2C app for user sign-in using the Azure AD Authentication Library (ADAL), we recommend that you migrate to MSAL.
Prerequisites
- An Azure Active Directory B2C tenant in which to create an application. For more information, see Azure Active Directory B2C overview.
- An API Management instance. If you don't already have one, create an Azure API Management instance.
- If you created your instance in a v2 tier, enable the developer portal. For more information, see Tutorial: Access and customize the developer portal.
Configure sign up and sign in user flow
In this section, you'll configure a user flow in your Azure Active Directory B2C tenant that enables users to sign up or sign in to the developer portal. Users are led down the right path depending on the context. For detailed steps, see Create user flows and custom policies in Azure Active Directory B2C.
- In the Azure portal, access your Azure Active Directory B2C tenant.
- Under Policies, select User flows > + New user flow.
- On the Create a user flow page, select the Sign up and sign in user flow. Select the Recommended version and then select Create.
- On the Create page, provide the following information:
- Enter a unique name for the user flow.
- In Identity providers, select Email signup.
- Optionally enable a Multifactor authentication method or Conditional access policies.
- In User attributes and token claims, select the following attributes and claims that you want to collect and send from the user during sign-up. Select Show more to view all attributes and claims.
Collect attributes: Given Name, Surname
Return claims: Given Name, Surname, Email Addresses, User’s ObjectID
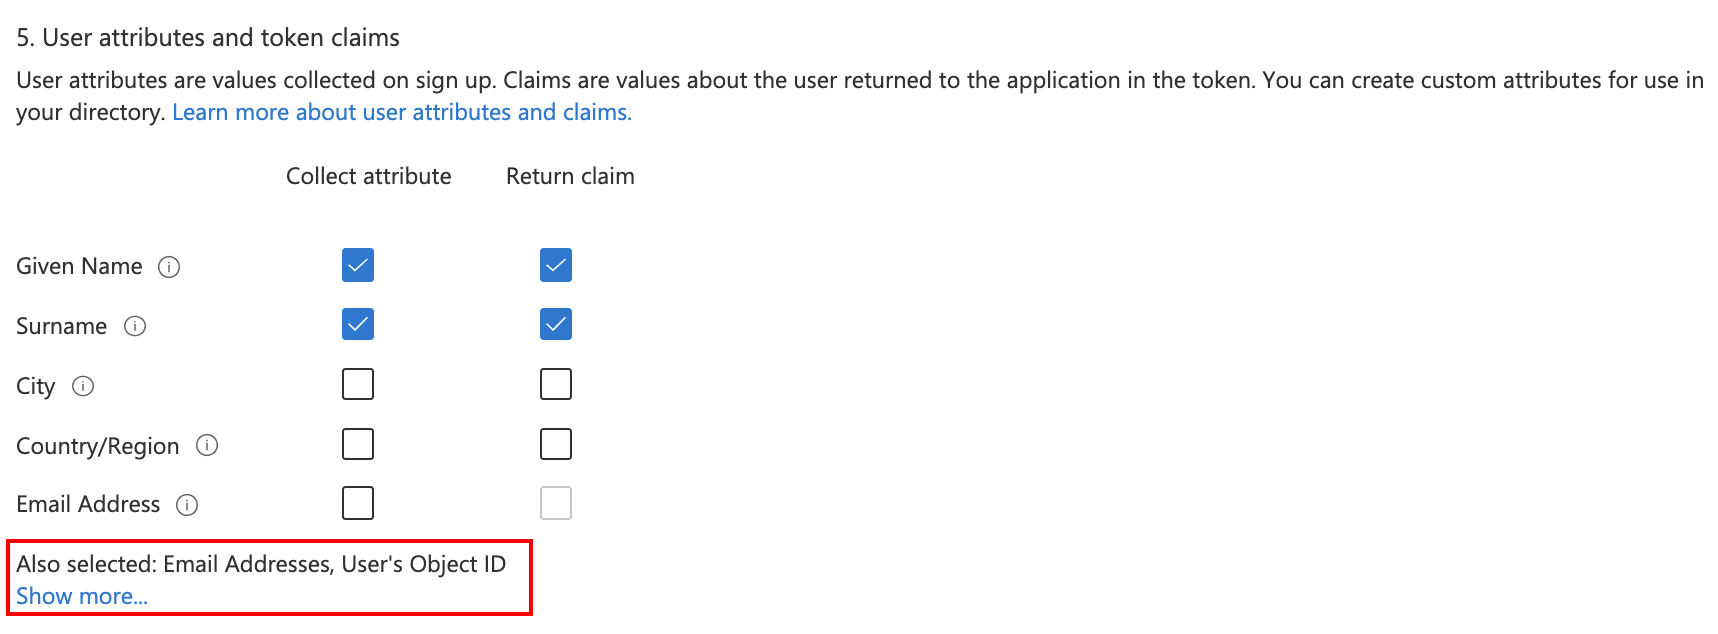
- Select Create.
Configure identity provider for developer portal
In a separate Azure portal tab, navigate to your API Management instance.
Under Developer portal, select Identities > + Add.
In the Add identity provider page, select Azure Active Directory B2C. Once selected, you'll be able to enter other necessary information.
- In the Client library dropdown, select MSAL.
- To add other settings, see steps later in the article.
In the Add identity provider window, copy the Redirect URL.
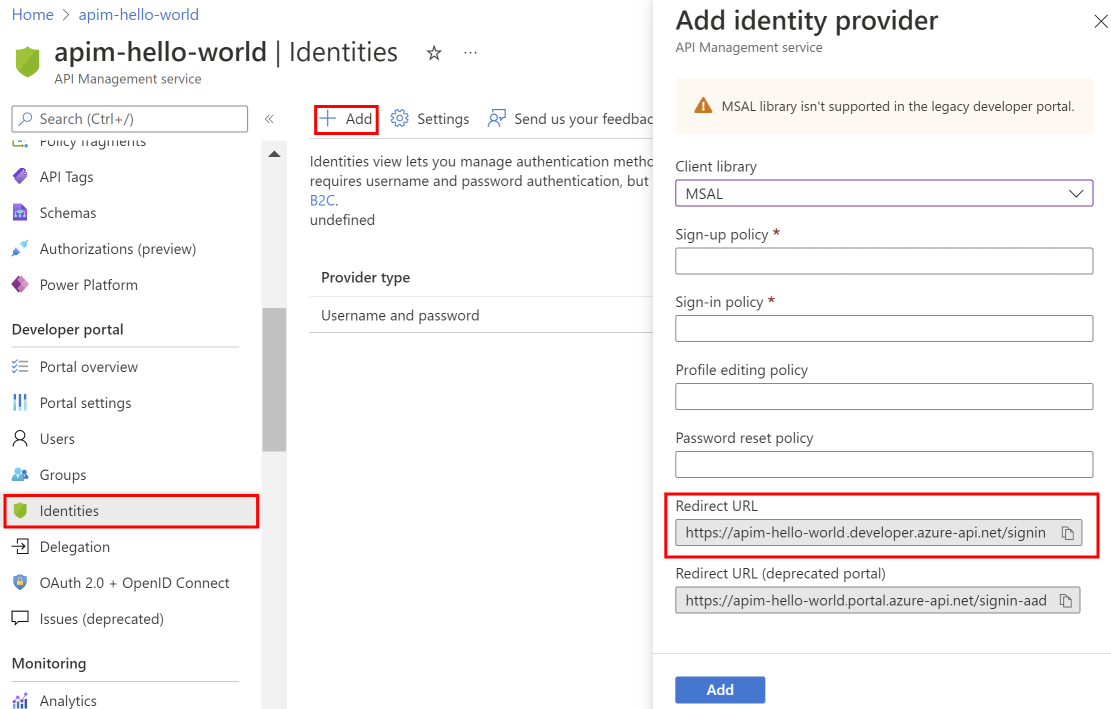
Return to the browser tab for your Azure Active Directory B2C tenant in the Azure portal. Select App registrations > + New registration.
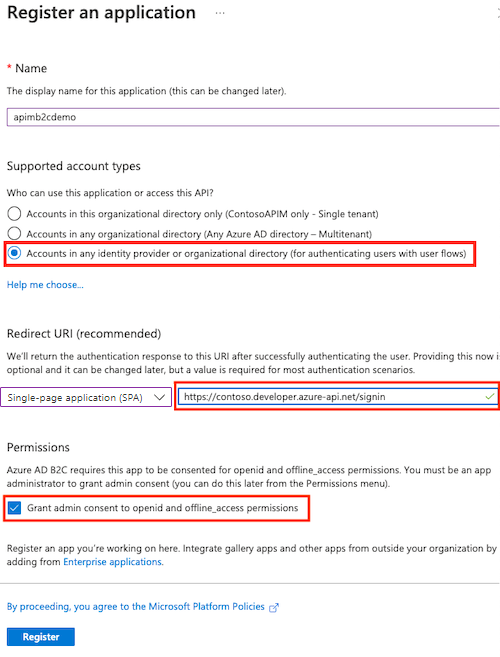
In the Register an application page, enter your application's registration information.
- In the Name section, enter an application name of your choosing.
- In the Supported account types section, select Accounts in any organizational directory (for authenticating users with user flows). For more information, see Register an application.
- In Redirect URI, select Single-page application (SPA) and paste the redirect URL you saved from a previous step.
- In Permissions, select Grant admin consent to openid and offline_access permissions.
- Select Register to create the application.
On the app Overview page, find the Application (client) ID and copy the value to the clipboard.
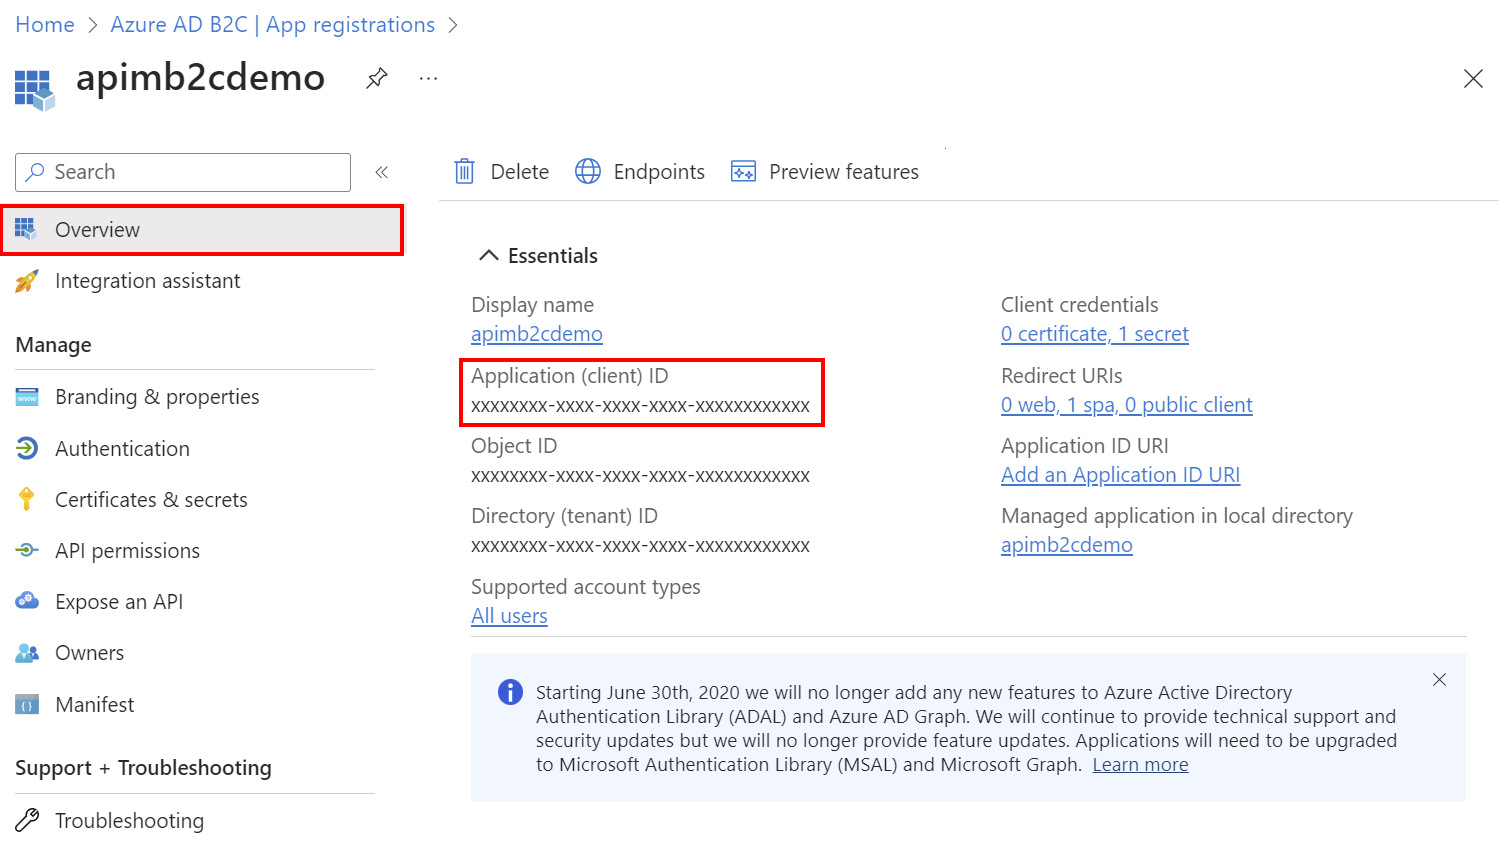
Switch back to the API Management Add identity provider page and paste the ID into the Client Id text box.
Switch back to the B2C app registration. Select Certificates & secrets > + New client secret.
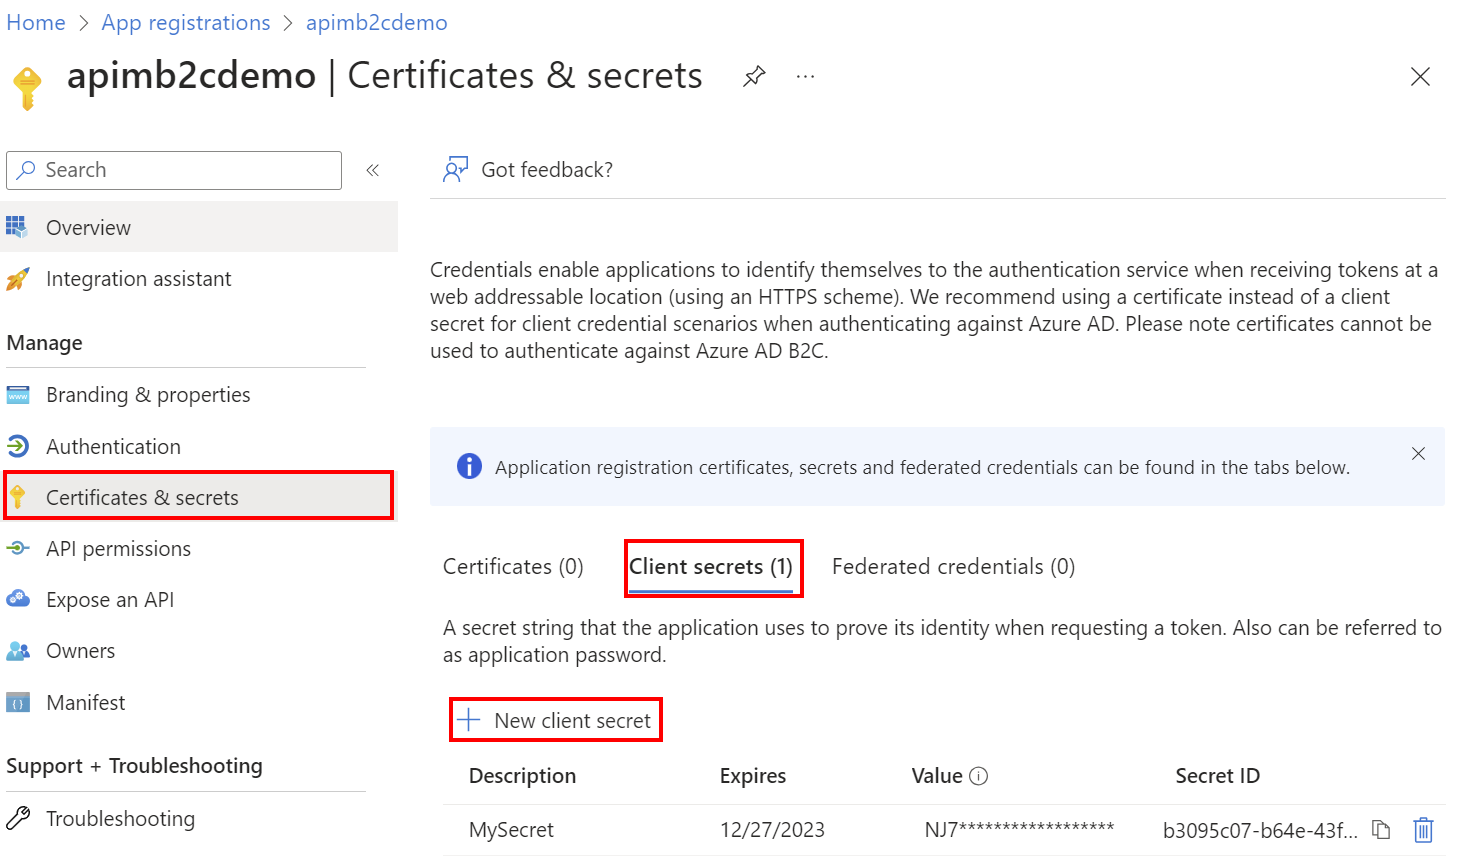
- In the Add a client secret page, enter a Description and select Add.
- Record the Value in a safe location. This secret value is never displayed again after you leave this page.
Switch back to the API Management Add identity provider page, and paste the key into the Client secret text box.
Continuing on the Add identity provider page:
In Signin tenant, specify the domain name of the Azure Active Directory B2C tenant.
The Authority field lets you control the Azure Active Directory B2C login URL to use. Set the value to <your_b2c_tenant_name>.b2clogin.com.
Specify the Sign-up Policy and Sign-in Policy using the name of the user flow you created in a previous step.
Optionally provide the Profile Editing Policy and Password Reset Policy.
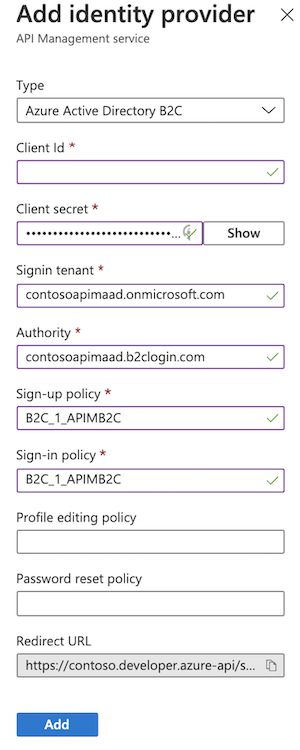
After you've specified the desired configuration, select Add.
Republish the developer portal for the Azure AD B2C configuration to take effect. In the left menu, under Developer portal, select Portal overview > Publish.
After the changes are saved, developers will be able to sign up for new accounts and sign in to the developer portal by using Azure Active Directory B2C.
Migrate to MSAL
If you previously configured an Azure AD B2C app for user sign-in using the ADAL, you can use the portal to migrate the app to MSAL and update the identity provider in API Management.
Update Azure AD B2C app for MSAL compatibility
For steps to update the Azure AD B2C app, see Switch redirect URIs to the single-page application type.
Update identity provider configuration
- In the left menu of your API Management instance, under Developer portal, select Identities.
- Select Azure Active Directory B2C from the list.
- In the Client library dropdown, select MSAL.
- Select Update.
- Republish your developer portal.
Developer portal - add Azure Active Directory B2C account authentication
Important
You need to republish the developer portal when you create or update Azure Active Directory B2C configuration settings for the changes to take effect.
In the developer portal, sign-in with Azure Active Directory B2C is possible with the Sign-in button: OAuth widget. The widget is already included on the sign-in page of the default developer portal content.
To sign in by using Azure Active Directory B2C, open a new browser window and go to the developer portal. Select Sign in.
On the Sign in page, select Azure Active Directory B2C.
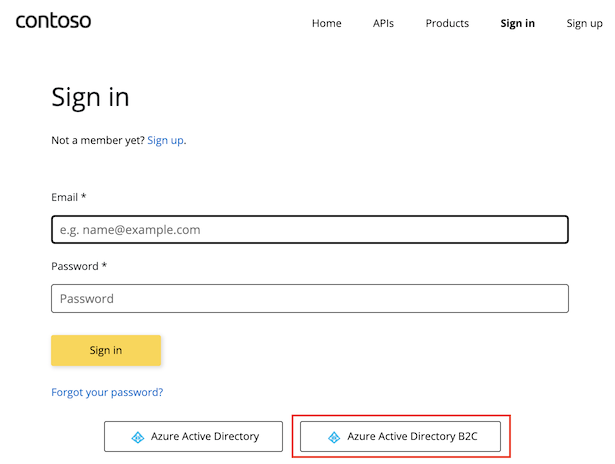
You're redirected to the signup policy that you configured in the previous section. Choose to sign up by using your email address in the Active Directory B2C tenant.
When the signup is complete, you're redirected back to the developer portal. You're now signed in to the developer portal for your API Management service instance.
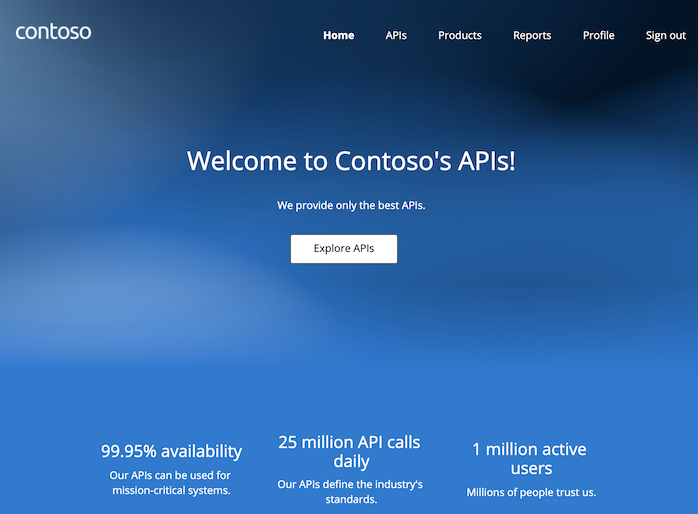
Although a new account is automatically created whenever a new user signs in with Azure Active Directory B2C, you may consider adding the same widget to the signup page.
The Sign-up form: OAuth widget represents a form used for signing up with OAuth.
Related content
- Azure Active Directory B2C overview
- Azure Active Directory B2C: Extensible policy framework
- Learn more about MSAL and migrating to MSAL v2
- Use a Microsoft account as an identity provider in Azure Active Directory B2C
- Use a Google account as an identity provider in Azure Active Directory B2C
- Use a LinkedIn account as an identity provider in Azure Active Directory B2C
- Use a Facebook account as an identity provider in Azure Active Directory B2C