Verify your Xamarin environment
Note
This article applies to Visual Studio 2015. If you're looking for the latest Visual Studio documentation, see Visual Studio documentation. We recommend upgrading to the latest version of Visual Studio. Download it here
Once the installers have completed (see Setup and install), spend a few minutes to verify that everything is ready to experience Xamarin development.
Once you have completed these verifications, you can do either or both of the following walkthroughs:
All platforms
First, select Tools > Options, expand Xamarin > Other, and click the Check now link for updates. You need to be using Xamarin 4.0.3.214 or later to avoid previous licensing issues.
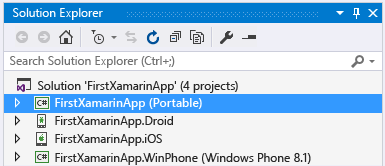
Then create a new Xamarin solution in Visual Studio using File > New Project, then in the dialog expand Templates > Other Languages > Visual C# > Cross-Platform, select Blank App (Native Portable), and click OK. This creates a solution with a shared portable class library project and individual projects for Android, iOS, and Windows:
Note
If the templates are not there, see Are the Xamarin project templates missing? Try this at the bottom of this page.
Android
Check that you have the latest Android SDK tools installed by going to Tools > Android > Android SDK Manager and installing the newest version of the Android SDK Tools, Android SDK Platform-tools, and Android SDK Build-tools components. Note that it is not necessary to always install the latest Android API level; the API you need depends on the platform level you want to target. In general, installing Xamarin will install the platform level it requires.
Validate the Android designer: in the Android project in Solution Explorer, open the Resources > Layout > Main.axml file. (If you aren't seeing this file directly, try searching for it in Solution Explorer; it exists in the Android project only and not in the iOS project.)
- If you receive an error saying "The installed Android SDK is too old", click Open Android SDK in that message to select and install the newest SDK version tools available as in step 1 above.
Validate building and debugging in the emulator (or device):
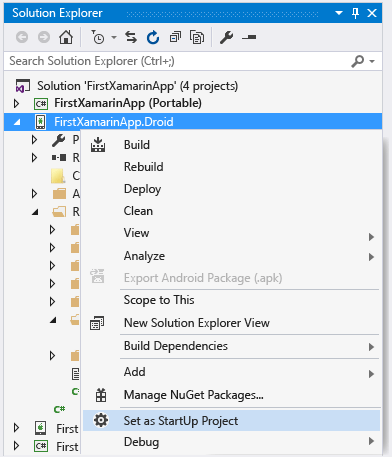
Right-click the Android project in Solution Explorer and select Set as Startup Project.
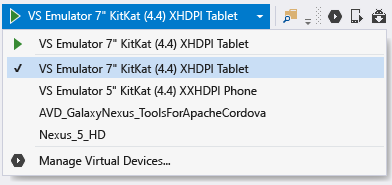
Select an appropriate emulator based on your target Android version; if you have an Android development device attached to your computer, you will also see it listed here alongside the emulators:
Windows 8+: select a VS Emulator target in Visual Studio’s debug drop-down as shown below and start the debugger by pressing F5. For more details, see Introducing Visual Studio’s Emulator for Android (Visual Studio ALM blog). If you encounter problems getting the emulator to work, see Troubleshooting the Visual Studio Emulator for Android. You can also create new device profiles for the emulator by selecting Tools > Visual Studio Emulator for Android....
Note: if you do not see the Tools > Visual Studio Emulator for Android... menu option, you may not have the emulator itself installed. Go to Control Panel > Programs and Features, select Microsoft Visual Studio, and click Change to rerun the installer. Click Modify in the installer, check the box for Cross Platform Mobile Development > Microsoft Visual Studio Emulator for Android, and click Update.
For Windows 7 and earlier: select the Xamarin Player for Android in the drop-down instead and press F5 to run. For details on the Xamarin Player, its device manager, and troubleshooting tips, read Xamarin Android Player (xamarin.com).
Note
In Visual Studio, you may notice the presence of the Android Emulator Manager (AVD) button in the toolbar (show below), which opens the device manager that is specifically used for configuring the Google Android emulator. This has no impact on either the Visual Studio Emulator for Android or the Xamarin Player, each of which has their own device manager for configuring profiles. See Introducing Visual Studio’s Emulator for Android (Visual Studio ALM blog) and Xamarin Android Player (xamarin.com) for details.

Windows Phone
Validate the Windows Phone designer: in the Windows Phone project in Solution Explorer, open the MainPage.xaml file.
Validate building and debugging in the emulator or on a device (note: you will need to have the Windows Phone emulator installed through Visual Studio setup for this step, or a tethered device):
Right-click the Windows Phone project in Solution Explorer and select Set as Startup Project.
Select an Emulator 8.1 target or an attached device in Visual Studio’s debug drop-down as shown below and start the debugger by pressing F5.
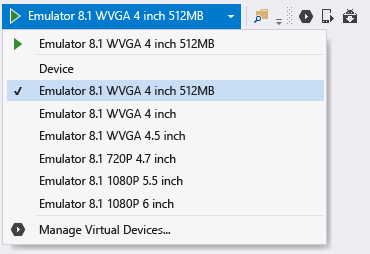
If you encounter problems getting the emulator to work, read Troubleshooting the Windows Phone 8 Emulator.
iOS
Make sure your Mac is available on the network and paired with Visual Studio as described on Connecting to the Mac (xamarin.com).
Validate the storyboard designer: in the iOS project in Solution Explorer, open the Main.storyboard file. Here, Visual Studio is hosting the designer that’s running remotely on the Mac.
Validate building and debugging:
Right-click the iOS project in Solution Explorer and select Set as Startup Project.
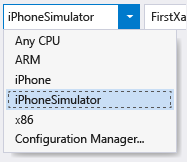
Select the iPhoneSimulator target from Visual Studio’s build drop-down as shown below, or the iPhone target if you have a tethered device. If no simulators are listed, launch Xcode on your Mac, select Xcode->Preferences, and click Download. Under Components you should see the simulator versions that are available to download. Additional instructions for debugging can be found on the Xamarin’s Debugging page (xamarin.com).
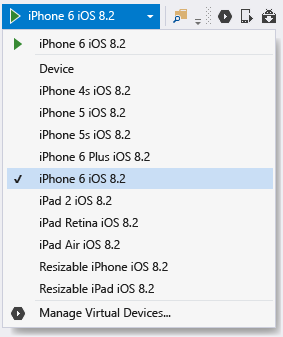
Select an iPhone target from Visual Studio’s debug drop-down as shown below and start the debugger by pressing F5. This launches the simulator on the Mac where you’ll interact with the app, while debugging happens in Visual Studio. If you have a physical iPhone or iPad connected to the Mac, it will appear here and you can select it instead. If you do not see any devices or simulators listed, check the connection to the Mac by reviewing the topic linked in step 1 above, or by going to Tools >iOS >Xamarin Mac Agent
If you encounter problems connecting to the Mac, read Connection Troubleshooting (xamarin.com).
If you see an error saying "No installed provisioning profiles match the installed iOS signing keys, do the following:
Check that your Apple Id account is added in Xcode on your Mac as described on Adding Your Account to Xcode (apple.com). After adding your account, be sure to restart both Visual Studio and Xcode.
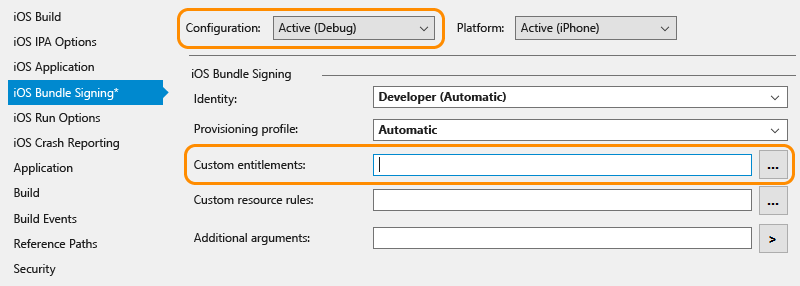
Verify that in your iOS project properties in the iOS bundle signing tab, that the Custom entitlement field is empty for the active debug configuration. Note: you should only try removing this setting if you’ve encountered the above error message.
Are the Xamarin project templates missing? Try this
Templates might be missing if you install Xamarin directly from the Xamarin website and you have Visual Studio 2013 and Visual Studio 2015 installed side-by-side. It’s easy to fix, though: just enable the Xamarin for Visual Studio 2015 feature in the Xamarin setup program.
In Control Panel, open Programs and Features, choose the Xamarin item, and click Change.
In the setup wizard for Xamarin that appears, click Next and then Change.
In the list of optional features to install, expand Xamarin for Visual Studio 2015, choose will be installed on local drive, and click Next to proceed with adding the feature.