Build apps with native UI using Xamarin in Visual Studio
Note
This article applies to Visual Studio 2015. If you're looking for the latest Visual Studio documentation, see Visual Studio documentation. We recommend upgrading to the latest version of Visual Studio. Download it here
Once you've done the steps in Setup and install and Verify your Xamarin environment, this walkthrough shows you how to build a basic Xamarin app (shown below) with native UI layers. With native UI, shared code resides in a portable class library (PCL) and the individual platform projects contain the UI definitions.
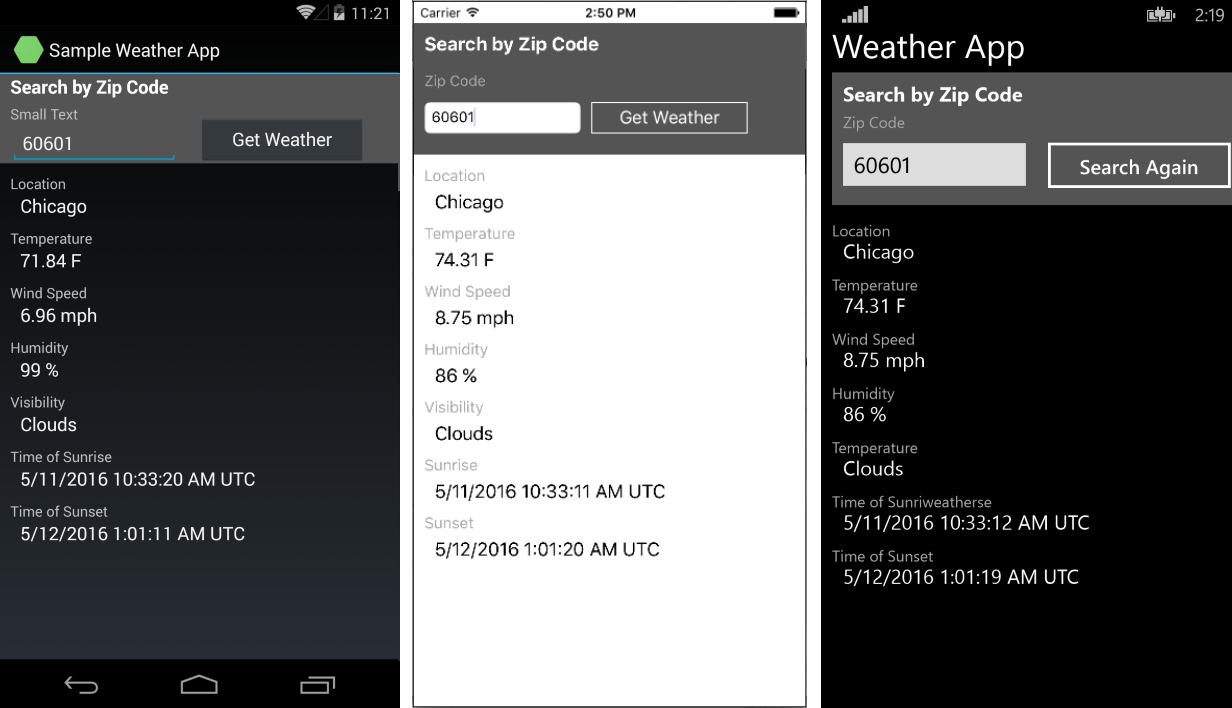
You'll do these things to build it:
Tip
You can find the complete source code for this project in the mobile-samples repository on GitHub.
If you have difficulties or run into errors, please post questions on forums.xamarin.com. Many errors can be resolved by updating to the latest SDKs required by Xamarin, which are described in the Xamarin Release Notes for each platform.
Note
Xamarin's developer documentation also offers several walkthroughs with both Quickstart and Deep Dive sections as listed below. On all these pages, be sure that "Visual Studio" is selected in the upper right of the page to see Visual Studio-specific walkthroughs.
Xamarin apps with native UI:
Hello, Android (simple app with one screen)
Hello, Android multiscreen (app with navigation between screens)
Android Fragments Walkthrough (used for master/detail screens, among other things)
Xamarin apps with Xamarin.Forms (shared UI)
Set up your solution
These steps create a Xamarin solution with native UI that contains a PCL for shared code and two added NuGet packages.
In Visual Studio, create a new Blank App (Native Portable) solution and name it WeatherApp. You can find this template most easily by entering Native Portable into the search field.
If it’s not there, you might have to install Xamarin or enable the Visual Studio 2015 feature, see Setup and install.
After clicking OK to create the solution, you’ll have a number of individual projects:
WeatherApp (Portable): the PCL where you’ll write code that is shared across platforms, including common business logic and UI code using with Xamarin.Forms.
WeatherApp.Droid: the project that contains the native Android code. This is set as the default startup project.
WeatherApp.iOS: the project that contains the native iOS code.
WeatherApp.WinPhone (Windows Phone 8.1): the project that contains the native Windows Phone code.
Within each native project you have access to the native designer for the corresponding platform and can implement platform specific screens.
Add the Newtonsoft.Json and NuGet package to the PCL project, which you’ll use to process information retrieved from a weather data service:
Right-click Solution 'WeatherApp' in Solution explorer and select Manage NuGet Packages for Solution....
In the NuGet window, select the Browse tab and search for Newtonsoft.
Select Newtonsoft.Json.
On the right side of the window, check the WeatherApp project (this is the only project in which you need to install the package).
Ensure the Version field is set to the Latest stable version.
Click Install.
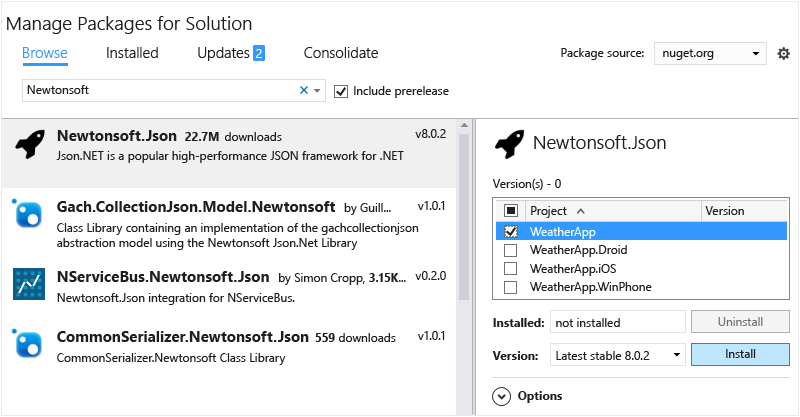
Repeat step 3 to find and install the Microsoft.Net.Http package.
Build your solution and verify that there are no build errors.
Write shared data service code
The WeatherApp (Portable) project is where you’ll write code for the portable class library (PCL) that’s shared across all platforms. The PCL is automatically included in the app packages built by the iOS, Android, and Windows Phone projects.
The following steps then add code to the PCL to access and store data from that weather service:
To run this sample you must first sign up for a free API key at http://openweathermap.org/appid.
Right-click the WeatherApp project and select Add > Class…. In the Add New Item dialog, name the file Weather.cs. You’ll use this class to store data from the weather data service.
Replace the entire contents of Weather.cs with the following:
namespace WeatherApp
{
    public class Weather
    {
        public string Title { get; set; }
        public string Temperature { get; set; }
        public string Wind { get; set; }
        public string Humidity { get; set; }
        public string Visibility { get; set; }
        public string Sunrise { get; set; }
        public string Sunset { get; set; }

        public Weather()
        {
            //Because labels bind to these values, set them to an empty string to
            //ensure that the label appears on all platforms by default.
            this.Title = " ";
            this.Temperature = " ";
            this.Wind = " ";
            this.Humidity = " ";
            this.Visibility = " ";
            this.Sunrise = " ";
            this.Sunset = " ";
        }
    }
}
Add another class to the PCL project named DataService.cs in which you’ll use to process JSON data from the weather data service.
Replace the entire contents of DataService.cs with the following code:
using System.Threading.Tasks;
using Newtonsoft.Json;
using System.Net.Http;

namespace WeatherApp
{
    public class DataService
    {
        public static async Task<dynamic> getDataFromService(string queryString)
        {
            HttpClient client = new HttpClient();
            var response = await client.GetAsync(queryString);

            dynamic data = null;
            if (response != null)
            {
                string json = response.Content.ReadAsStringAsync().Result;
                data = JsonConvert.DeserializeObject(json);
            }

            return data;
        }
    }
}
Add a third class to the PCL named Core where you’ll put shared business logic, such as logic that forms a query string with a zip code, calls the weather data service, and populates an instance of the Weather class.
Replace the contents of Core.cs with the following:
using System;
using System.Threading.Tasks;

namespace WeatherApp
{
    public class Core
    {
        public static async Task<Weather> GetWeather(string zipCode)
        {
            //Sign up for a free API key at http://openweathermap.org/appid
            string key = "YOUR KEY HERE";
            string queryString = "http://api.openweathermap.org/data/2.5/weather?zip="
                + zipCode + ",us&appid=" + key + "&units=imperial";

            //Make sure developers running this sample replaced the API key
            if (key == "YOUR API KEY HERE")
            {
                throw new ArgumentException("You must obtain an API key from openweathermap.org/appid and save it in the 'key' variable.");
            }

            dynamic results = await DataService.getDataFromService(queryString).ConfigureAwait(false);

            if (results["weather"] != null)
            {
                Weather weather = new Weather();
                weather.Title = (string)results["name"];
                weather.Temperature = (string)results["main"]["temp"] + " F";
                weather.Wind = (string)results["wind"]["speed"] + " mph";
                weather.Humidity = (string)results["main"]["humidity"] + " %";
                weather.Visibility = (string)results["weather"][0]["main"];

                DateTime time = new System.DateTime(1970, 1, 1, 0, 0, 0, 0);
                DateTime sunrise = time.AddSeconds((double)results["sys"]["sunrise"]);
                DateTime sunset = time.AddSeconds((double)results["sys"]["sunset"]);
                weather.Sunrise = sunrise.ToString() + " UTC";
                weather.Sunset = sunset.ToString() + " UTC";
                return weather;
            }
            else
            {
                return null;
            }
        }
    }
}
Replace YOUR KEY HERE in the code with the API key you obtained in step 1 (it still needs quotes around it).
Delete MyClass.cs in the PCL because we won't be using it.
Build the WeatherApp PCL project to make sure the code is correct.
Design UI for Android
Now, we’ll design the user interface, connect it to your shared code, and then run the app.
Design the look and feel of your app
In Solution Explorer, expand the WeatherApp.Droid>Resources>layout folder and open Main.axml. This opens the file in the visual designer. (If a Java-related error appears, see this blog post.)
Tip
There are many other files in the project. Exploring them is beyond the scope of this topic, but if you want to dive into the structure of an Android project a bit more, see Part 2 Deep Dive of the Hello Android topic on xamarin.com.
Select and delete the default button that appears in the designer.
Open the Toolbox with View > Other Windows > Toolbox.
From the Toolbox, drag a RelativeLayout control onto the designer. You'll use this control as a parent container for other controls.
Tip
If at any time the layout doesn't seem to display correctly, save the file and switching between the Design and Source tabs to refresh.
In the Properties window, set the background property (in the Style group) to
#545454.From the Toolbox, drag a TextView control onto the RelativeLayout control.
In the Properties window, set these properties (note: it can help to sort the list alphabetically using the sort button in the Properties window toolbar):
Property Value text Search by Zip Code id @+id/ZipCodeSearchLabellayout_marginLeft 10dptextColor @android:color/whitetextStyle boldTip
Notice that many properties don’t contain a drop-down list of values that you can select. It can be difficult to guess what string value to use for any given property. For suggestions, try searching for the name of a property in the R.attr class page.
Also, a quick web search often leads to a page on http://stackoverflow.com/ where others have used the same property.
For reference, if you switch to Source view, you should see the following code for this element:
<TextView
    android:text="Search by Zip Code"
    android:layout_width="wrap_content"
    android:layout_height="wrap_content"
    android:id="@+id/ZipCodeSearchLabel"
    android:layout_centerVertical="true"
    android:layout_marginLeft="10dp"
    android:textColor="@android:color/white"
    android:textStyle="bold" />
From the Toolbox, drag a TextView control onto the RelativeLayout control and position it below the ZipCodeSearchLabel control. You do this by dropping the new control on the appropriate edge of the existing control; it helps to zoom the designer in somewhat for this.
In the Properties window, set these properties:
Property Value text Zip Code id @+id/ZipCodeLabellayout_marginLeft 10dplayout_marginTop 5dpThe code in Source view should look like this:
<TextView
    android:text="Zip Code"
    android:layout_width="wrap_content"
    android:layout_height="wrap_content"
    android:layout_below="@id/ZipCodeSearchLabel"
    android:id="@+id/ZipCodeLabel"
    android:layout_marginTop="5dp"
    android:layout_marginLeft="10dp" />
From the Toolbox, drag a Number control onto the RelativeLayout, position it below the Zip Code label. Then set the following properties:
Property Value id @+id/zipCodeEntrylayout_marginLeft 10dplayout_marginBottom 10dpwidth 165dpAgain, the code:
<EditText
    android:inputType="number"
    android:layout_width="wrap_content"
    android:layout_height="wrap_content"
    android:layout_below="@id/ZipCodeLabel"
    android:id="@+id/zipCodeEntry"
    android:layout_marginLeft="10dp"
    android:layout_marginBottom="10dp"
    android:width="165dp" />
From the Toolbox, drag a Button onto the RelativeLayout control and position it to the right of the zipCodeEntry control. Then set these properties:
Property Value id @+id/weatherBtntext Get Weather layout_marginLeft 20dplayout_alignBottom @id/zipCodeEntrywidth 165dp<Button android:text="Get Weather" android:layout_width="wrap_content" android:layout_height="wrap_content" android:layout_toRightOf="@id/zipCodeEntry" android:id="@+id/weatherBtn" android:layout_marginLeft="20dp" android:layout_alignBottom="@id/zipCodeEntry" android:width="165dp" />You now have enough experience to build a basic UI by using the Android designer. You can also build a UI by adding markup directly to the .asxml file of the page. To build the rest of the UI that way, switch to Source view in the designer, then past the following markup beneath the
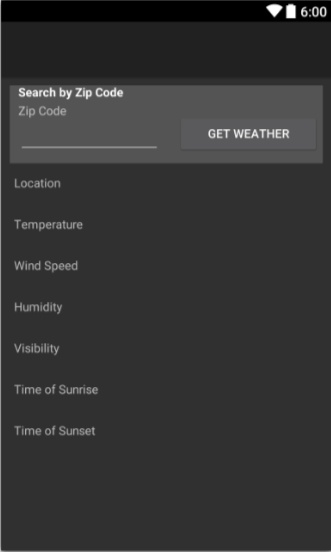
</RelativeLayout>tag (yes, that's beneath the tag...these elements are not contained in the ReleativeLayout).<TextView android:text="Location" android:textAppearance="?android:attr/textAppearanceSmall" android:layout_width="match_parent" android:layout_height="wrap_content" android:id="@+id/locationLabel" android:layout_marginLeft="10dp" android:layout_marginTop="10dp" /> <TextView android:textAppearance="?android:attr/textAppearanceMedium" android:layout_width="match_parent" android:layout_height="wrap_content" android:id="@+id/locationText" android:layout_marginLeft="20dp" android:layout_marginBottom="10dp" /> <TextView android:text="Temperature" android:textAppearance="?android:attr/textAppearanceSmall" android:layout_width="match_parent" android:layout_height="wrap_content" android:id="@+id/tempLabel" android:layout_marginLeft="10dp" /> <TextView android:textAppearance="?android:attr/textAppearanceMedium" android:layout_width="match_parent" android:layout_height="wrap_content" android:id="@+id/tempText" android:layout_marginBottom="10dp" android:layout_marginLeft="20dp" /> <TextView android:text="Wind Speed" android:textAppearance="?android:attr/textAppearanceSmall" android:layout_width="match_parent" android:layout_height="wrap_content" android:id="@+id/windLabel" android:layout_marginLeft="10dp" /> <TextView android:textAppearance="?android:attr/textAppearanceMedium" android:layout_width="match_parent" android:layout_height="wrap_content" android:id="@+id/windText" android:layout_marginBottom="10dp" android:layout_marginLeft="20dp" /> <TextView android:text="Humidity" android:textAppearance="?android:attr/textAppearanceSmall" android:layout_width="match_parent" android:layout_height="wrap_content" android:id="@+id/humidtyLabel" android:layout_marginLeft="10dp" /> <TextView android:textAppearance="?android:attr/textAppearanceMedium" android:layout_width="match_parent" android:layout_height="wrap_content" android:id="@+id/humidityText" android:layout_marginBottom="10dp" android:layout_marginLeft="20dp" /> <TextView android:text="Visibility" android:textAppearance="?android:attr/textAppearanceSmall" android:layout_width="match_parent" android:layout_height="wrap_content" android:id="@+id/visibilityLabel" android:layout_marginLeft="10dp" /> <TextView android:textAppearance="?android:attr/textAppearanceMedium" android:layout_width="match_parent" android:layout_height="wrap_content" android:id="@+id/visibilityText" android:layout_marginBottom="10dp" android:layout_marginLeft="20dp" /> <TextView android:text="Time of Sunrise" android:textAppearance="?android:attr/textAppearanceSmall" android:layout_width="match_parent" android:layout_height="wrap_content" android:id="@+id/sunriseLabel" android:layout_marginLeft="10dp" /> <TextView android:textAppearance="?android:attr/textAppearanceMedium" android:layout_width="match_parent" android:layout_height="wrap_content" android:id="@+id/sunriseText" android:layout_marginBottom="10dp" android:layout_marginLeft="20dp" /> <TextView android:text="Time of Sunset" android:textAppearance="?android:attr/textAppearanceSmall" android:layout_width="match_parent" android:layout_height="wrap_content" android:id="@+id/sunsetLabel" android:layout_marginLeft="10dp" /> <TextView android:textAppearance="?android:attr/textAppearanceMedium" android:layout_width="match_parent" android:layout_height="wrap_content" android:id="@+id/sunsetText" android:layout_marginBottom="10dp" android:layout_marginLeft="20dp" />Save the file and switch to Design view. Your UI should appear as follows:
Open MainActivity.cs and delete the lines in the OnCreate method that refer to the default button that was removed earlier. The code should look like this when you're done:
protected override void OnCreate (Bundle bundle)
{
    base.OnCreate (bundle);

    // Set our view from the "main" layout resource
    SetContentView (Resource.Layout.Main);
}
Build the Android project to check your work. Note that building adds control IDs to the Resource.Designer.cs file so that you can refer to controls by name in code.
Consume your shared code
Open the MainActivity.cs file of the WeatherApp project in the code editor and replace its contents with the code below. This code calls the
GetWeathermethod that you defined in your shared code. Then, in the UI of the app, it shows the data that is retrieved from that method.using System; using Android.App; using Android.Widget; using Android.OS; namespace WeatherApp.Droid { [Activity(Label = "Sample Weather App", MainLauncher = true, Icon = "@drawable/icon")] public class MainActivity : Activity { protected override void OnCreate(Bundle bundle) { base.OnCreate(bundle); SetContentView(Resource.Layout.Main); Button button = FindViewById<Button>(Resource.Id.weatherBtn); button.Click += Button_Click; } private async void Button_Click(object sender, EventArgs e) { EditText zipCodeEntry = FindViewById<EditText>(Resource.Id.zipCodeEntry); if (!String.IsNullOrEmpty(zipCodeEntry.Text)) { Weather weather = await Core.GetWeather(zipCodeEntry.Text); FindViewById<TextView>(Resource.Id.locationText).Text = weather.Title; FindViewById<TextView>(Resource.Id.tempText).Text = weather.Temperature; FindViewById<TextView>(Resource.Id.windText).Text = weather.Wind; FindViewById<TextView>(Resource.Id.visibilityText).Text = weather.Visibility; FindViewById<TextView>(Resource.Id.humidityText).Text = weather.Humidity; FindViewById<TextView>(Resource.Id.sunriseText).Text = weather.Sunrise; FindViewById<TextView>(Resource.Id.sunsetText).Text = weather.Sunset; } } } }
Run the app and see how it looks
In Solution Explorer, make sure the WeatherApp.Droid project is set as the startup project.
Select an appropriate device or emulator target, then start the app by pressing the F5 key.
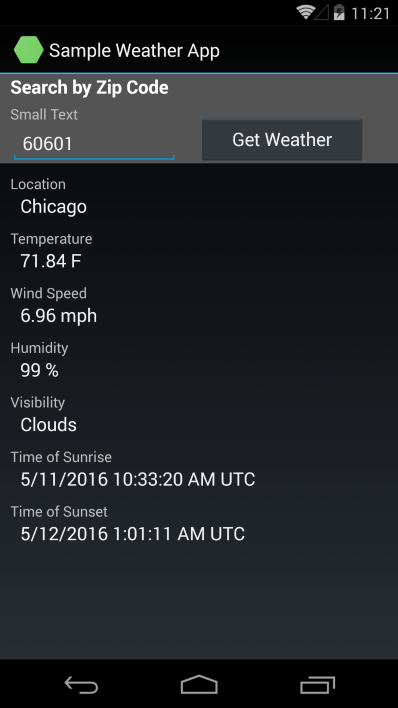
On the device or in the emulator, type a valid United States zip code into the edit box (for example: 60601), and press Get Weather. Weather data for that region then appears in the controls.
Tip
The complete source code for this project is in the mobile-samples repository on GitHub.
Design UI for Windows Phone
Now we’ll design the user interface for Windows Phone, connect it to your shared code, and then run the app.
Design the look and feel of your app
The process of designing native Windows Phone UI in a Xamarin app is no different from any other native Windows Phone app. For this reason, we won't go into the details here of how to use the designer. For that, refer to Creating a UI by using XAML Designer.
Instead, simply open MainPage.xaml and replace all the XAML code with the following:
<Page
    x:Class="WeatherApp.WinPhone.MainPage"
    xmlns="https://schemas.microsoft.com/winfx/2006/xaml/presentation"
    xmlns:x="https://schemas.microsoft.com/winfx/2006/xaml"
    xmlns:local="using:WeatherApp.WinPhone"
    xmlns:d="https://schemas.microsoft.com/expression/blend/2008"
    xmlns:mc="https://schemas.openxmlformats.org/markup-compatibility/2006"
    mc:Ignorable="d"
    Background="{ThemeResource ApplicationPageBackgroundThemeBrush}">

    <Grid>
        <StackPanel HorizontalAlignment="Left" Height="40" Margin="10,0,0,0" VerticalAlignment="Top" Width="400">
            <TextBlock x:Name="pageTitle" Text="Weather App" FontSize="30" />
        </StackPanel>
        <StackPanel HorizontalAlignment="Left" Height="120" Margin="10,40,0,0" VerticalAlignment="Top" Width="400" Background="#FF545454">

            <TextBlock x:Name="zipCodeSearchLabel" TextWrapping="Wrap" Text="Search by Zip Code" FontSize="18" FontWeight="Bold" HorizontalAlignment="Left" Margin="10,10,0,0"/>
            <TextBlock x:Name="zipCodeLabel" TextWrapping="Wrap" Text="Zip Code" Margin="10,5,0,0" FontSize="14" Foreground="#FFA8A8A8"/>
            <StackPanel Orientation="Horizontal">
                <TextBox x:Name="zipCodeEntry" Margin="10,10,0,0" Text="" VerticalAlignment="Top" InputScope="Number" Width="165" />
                <Button x:Name="weatherBtn" Content="Get Weather" Width="165" Margin="20,0,0,0" Height="60" Click="GetWeatherButton_Click"/>
            </StackPanel>
        </StackPanel>
        <StackPanel Margin="10,175,0,0">
            <TextBlock x:Name="locationLabel" HorizontalAlignment="Left" FontSize="14" Foreground="#FFA8A8A8" TextWrapping="Wrap" Text="Location" VerticalAlignment="Top"/>
            <TextBlock x:Name="locationText" Margin="10,0,0,10" HorizontalAlignment="Left" FontSize="18" TextWrapping="Wrap" VerticalAlignment="Top"/>
            <TextBlock x:Name="tempLabel" HorizontalAlignment="Left" FontSize="14" Foreground="#FFA8A8A8" TextWrapping="Wrap" Text="Temperature" VerticalAlignment="Top"/>
            <TextBlock x:Name="tempText" Margin="10,0,0,10" HorizontalAlignment="Left" FontSize="18" TextWrapping="Wrap" VerticalAlignment="Top"/>
            <TextBlock x:Name="windLabel" HorizontalAlignment="Left" FontSize="14" Foreground="#FFA8A8A8" TextWrapping="Wrap" Text="Wind Speed" VerticalAlignment="Top"/>
            <TextBlock x:Name="windText" Margin="10,0,0,10" HorizontalAlignment="Left" FontSize="18" TextWrapping="Wrap" VerticalAlignment="Top"/>
            <TextBlock x:Name="humidityLabel" HorizontalAlignment="Left" FontSize="14" Foreground="#FFA8A8A8" TextWrapping="Wrap" Text="Humidity" VerticalAlignment="Top"/>
            <TextBlock x:Name="humidityText" Margin="10,0,0,10" HorizontalAlignment="Left" FontSize="18" TextWrapping="Wrap" VerticalAlignment="Top"/>
            <TextBlock x:Name="visibilityLabel" HorizontalAlignment="Left" FontSize="14" Foreground="#FFA8A8A8" TextWrapping="Wrap" Text="Temperature" VerticalAlignment="Top"/>
            <TextBlock x:Name="visibilityText" Margin="10,0,0,10" HorizontalAlignment="Left" FontSize="18" TextWrapping="Wrap" VerticalAlignment="Top"/>
            <TextBlock x:Name="sunriseLabel" HorizontalAlignment="Left" FontSize="14" Foreground="#FFA8A8A8" TextWrapping="Wrap" Text="Time of Sunriweatherse" VerticalAlignment="Top"/>
            <TextBlock x:Name="sunriseText" Margin="10,0,0,10" HorizontalAlignment="Left" FontSize="18" TextWrapping="Wrap" VerticalAlignment="Top"/>
            <TextBlock x:Name="sunsetLabel" HorizontalAlignment="Left" FontSize="14" Foreground="#FFA8A8A8" TextWrapping="Wrap" Text="Time of Sunset" VerticalAlignment="Top"/>
            <TextBlock x:Name="sunsetText" Margin="10,0,0,10" HorizontalAlignment="Left" FontSize="18" TextWrapping="Wrap" VerticalAlignment="Top"/>
        </StackPanel>
    </Grid>
</Page>
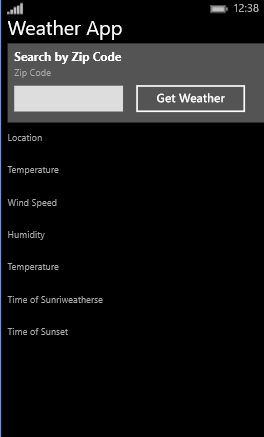
In the design view, your UI should appear as follows:
Consume your shared code
In the designer, select the Get Weather button.
In the Properties window, choose the event handler button (
 ).
).This icon appears in the top corner of the Properties window.
Next to the Click event, type GetWeatherButton_Click, and then press the ENTER key.
This generates an event handler named
GetWeatherButton_Click. The code editor opens and places your cursor inside of the event handler code block. Note: if the editor doesn't open when pressing ENTER, just double-click the event name.Replace that event handler with the following code.
private async void GetWeatherButton_Click(object sender, RoutedEventArgs e)
{
    if (!String.IsNullOrEmpty(zipCodeEntry.Text))
    {
        Weather weather = await Core.GetWeather(zipCodeEntry.Text);
        locationText.Text = weather.Title;
        tempText.Text = weather.Temperature;
        windText.Text = weather.Wind;
        visibilityText.Text = weather.Visibility;
        humidityText.Text = weather.Humidity;
        sunriseText.Text = weather.Sunrise;
        sunsetText.Text = weather.Sunset;

        weatherBtn.Content = "Search Again";
    }
}
This code calls the
GetWeathermethod that you defined in your shared code. This is the same method that you called in your Android app. This code also shows data retrieved from that method in the UI controls of your app.In MainPage.xaml.cs, which is open, delete all the code inside the OnNavigatedTo method. This code simply handled the default button that was removed when we replaced the contents of MainPage.xaml.
Run the app and see how it looks
In Solution Explorer, set the WeatherApp.WinPhone project as the startup project.
Start the app by pressing the F5 key.
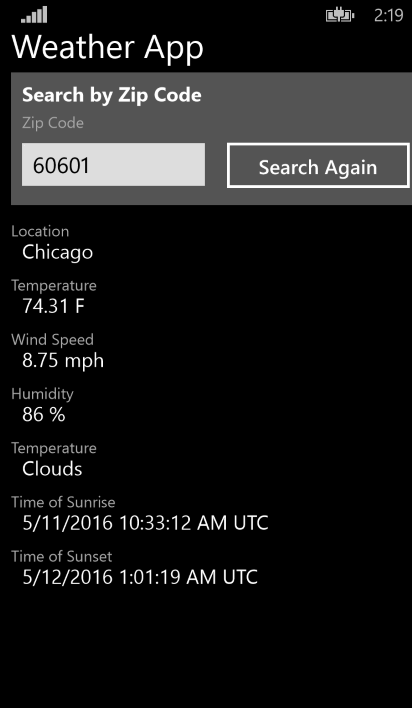
In the Windows Phone emulator, type a valid United States zip code into the edit box (for example: 60601), and press Get Weather. Weather data for that region then appears in the controls.
Tip
The complete source code for this project is in the mobile-samples repository on GitHub.
Next steps
Add UI for iOS to the solution
Extend this sample by adding native UI for iOS. For this you’ll need to connect to a Mac on your local network that has Xcode and Xamarin installed. Once you do, you can use the iOS designer directly in Visual Studio. See the mobile-samples repository on GitHub for a completed app.
Also refer to the Hello, iOS (xamarin.com) walkthrough. Note that on this page, be sure that "Visual Studio" is selected in the upper right corner of pages on xamarin.com so that the correct set of instructions appear.
Add platform-specific code in a shared project
Shared code in a PCL is platform-neutral, because the PCL is compiled once and included in each platform-specific app package. If you want to write shared code that uses conditional compilation to isolate platform-specific code, you can use a shared project. For more details, see ode Sharing Options (xamarin.com).
See Also
Xamarin Developer site Windows Dev Center Swift and C# Quick Reference Poster