Create multiple work streams for entity records routing in Omnichannel Administration
Omnichannel for Customer Service offers a suite of capabilities that extend the power of Dynamics 365 Customer Service Enterprise to enable organizations to instantly connect and engage with their customers across digital messaging channels. An additional license is required to access Omnichannel for Customer Service. For more information, see the Dynamics 365 Customer Service pricing overview and Dynamics 365 Customer Service pricing plan pages.
Important
- Support for the Omnichannel Administration app ended on April 30, 2022, and the app was removed in July 2023. We recommend that you use the Customer Service admin center app to configure the latest features, such as unified routing and the voice channel. More information: Omnichannel Administration app is deprecated and will be removed in July 2023.
- We recommend that you upgrade to the latest version of Omnichannel for Customer Service and use unified routing. For more information, see Overview of unified routing. With the upgrade, you can also use the Customer Service admin center app. For more information, see Customer Service admin center.
Overview
You can setup multiple work streams for same entity records if you want to distribute the entity records using different work streams based on certain conditions.
For example, you want high priority cases to be pushed to agents and demand more capacity than low priority cases, which can be picked by agents. You can achieve it by configuring multiple work streams.
This walkthrough demonstrates how to set up two work streams, one each for high priority cases and low priority cases and to distribute the cases appropriately.
In this section
Step 2: Update Entity Record Distribution Flow
Step 1: Create work stream
Create entity records work stream to define how the records will be distributed. In this walkthrough, we will create two work streams - High Priority Cases and Low Priority Cases.
High priority cases work stream is set up to distribute the cases using automatic push, and the capacity required in 60 units.
Low priority cases work stream is set up to distribute the cases for manual pick up, and capacity required is 30 units.
To learn more, see Create workstream for entity record routing.
Step 2: Update entity records distribution flow
If you create or edit an entity record work stream, you must update Entity records Distribution Flow. The Omnichannel Administration app automatically creates this flow out-of-the-box for distributing entity records.
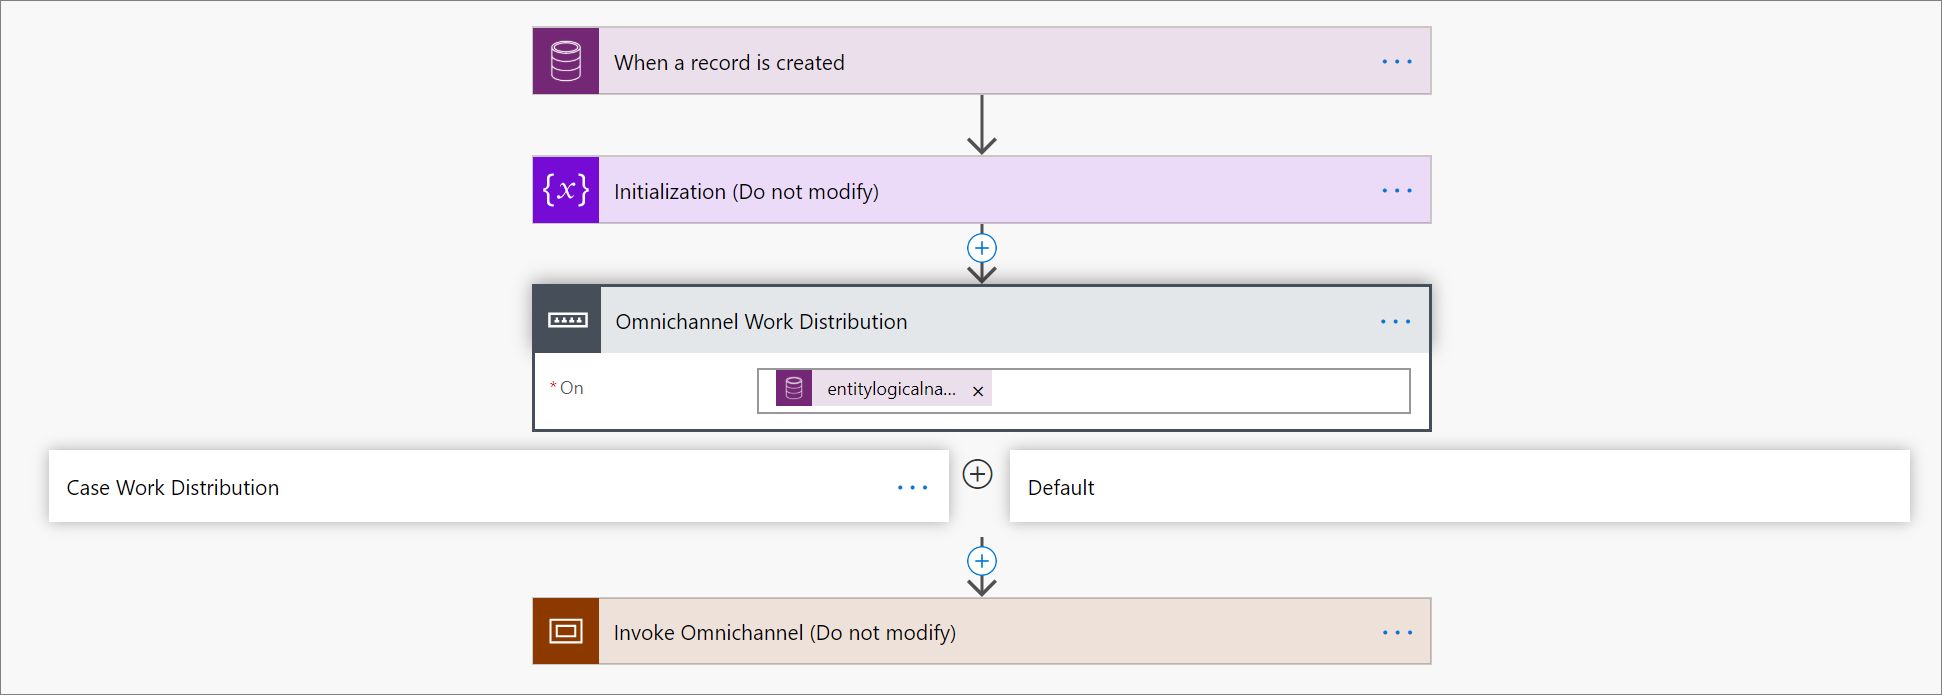
Entity records Distribution Flow contains the following components.
| Component | Modification recommendation |
|---|---|
| When the record is created | Do not modify. |
| Initialization | Do not modify. |
| Omnichannel Work Distribution | You can see the list of entity records for which work streams were created in the Omnichannel Administration app. |
| <Entity Record> | Select to view the components under the Entity record. |
| Work Stream Initialization - <Entity Record> | Do not modify. |
| Entity record - <Entity Record> | Do not modify. |
| Work Stream Selection for Routing (<Entity Record> ) | Update the condition and work stream ID. |
| Invoke Omnichannel | Do not modify. |
Warning
We recommend you update only the Work Stream Selection for Routing component in Entity Records Distribution Flow. If you update any other component step in the flow, the entity routing might fail.
Update entity records work distribution flow
Navigate to the flow
Sign in to the Omnichannel Administration app.
Select Work Streams under Work Distribution Management.
Select the work stream for which you want to update the flow.
Select Flow menu in the command bar, and then select See your flows. Power Automate opens in a new browser window.
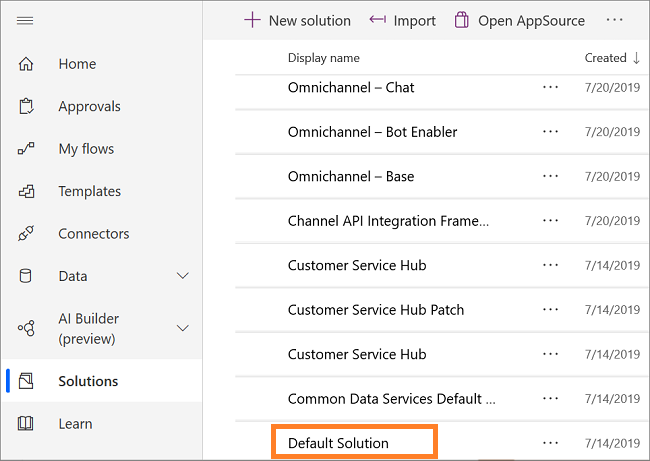
Select Solutions in the sitemap, and then select Default Solution from the list.
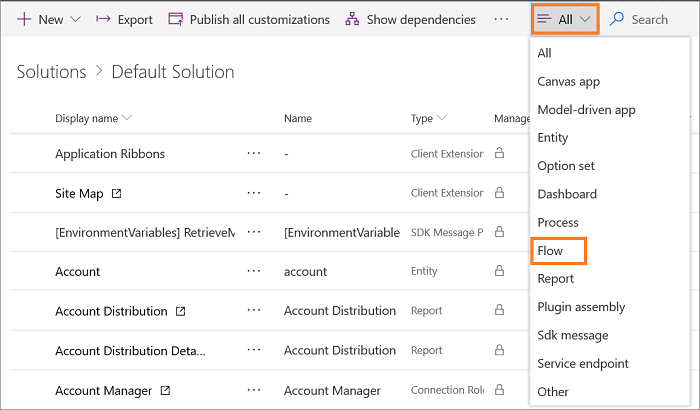
Select the All button in the menu and select Flow to filter the flows.
Select Entity Record Distribution Flow from the list.

Select the Edit button from the command bar at the top. The flow appears in a new tab.
Authenticate
Select the flow component that shows the warning icon. Select an existing connection to resolve the warning. The flow component uses the current user credentials and resolves the warning.

Update the work stream ID
Select the Omnichannel Work Distribution section.
Select <Entity Record> Distribution. For example, Case Work Distribution.
Select the Work Stream Selection for Routing section.
Remove the Select Default Work Stream - <Entity Record> section by selecting the ellipses, and then by selecting Delete.
For example, Select Default Work Stream - Case
Remove the default work stream so you can update the work stream with the one you created earlier.
Select Add an action in the Work Stream Selection for routing entity- (<Entity Record>) section.
Select Conditions under the Actions tab.
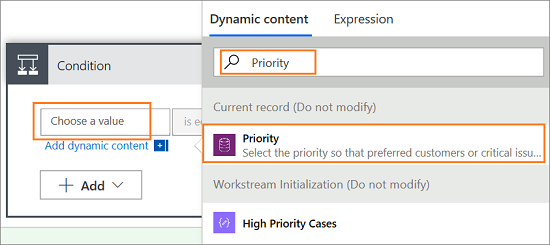
Select the Choose a value box to add a rule. A flyout control appears. Type in the search box to look up the attributes of the Case record that is being routed. For example, Priority. The rule appears in the list, and when you select the rule, it is added to the field.
Select a condition from the list. For example, is equal to.
Type the rule value in the field. For example, 1.

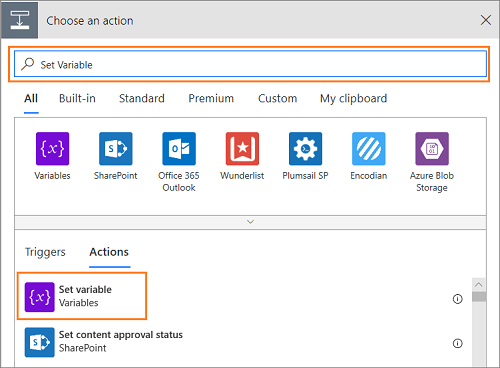
Select Add an action button under the If yes section. The Choose an action component appears. Now, type Set Variable in the Search connectors and actions box and the action appears in the list. Select it and the Set Variable action appears.
Select the LiveWorkStreamId from the Name drop-down list.
Select the Value field search box to add a variable. A flyout control appears. Type the name of the work stream that you created in the search box. For example, High Priority Cases is one of the case work stream that you created to route high priority cases. The value appears in the list, and when you select the value, it is added to the field.
Note
If you update the name of the work stream in Omnichannel Administration app, then you must perform step 21. Otherwise, the cases won't be automatically distributed to the agents.
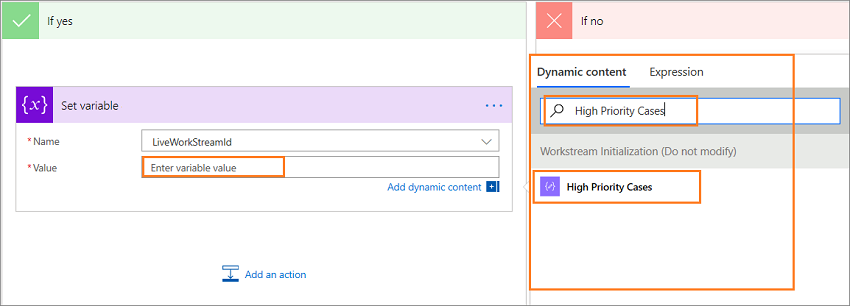
Select Add an action button under the If no section. The Choose an action component appears. Now, type Set Variable in the Search connectors and actions box and the action appears in the list. Select it and the Set Variable action appears.
Select the LiveWorkStreamId from the Name drop-down list.
Select the Value field search box to add a variable. A flyout control appears. Type the name of the work stream you created in the search box. For example, Low Priority Cases is one of the case work stream that you created to route low priority cases. The value appears in the list, and when you select the value, it is added to the field.
Note
If you update the name of the work stream in Omnichannel Administration app, then you must perform step 24. Otherwise, the cases won't be automatically distributed to the agents.
Adding multiple work streams in the conditions are optional. If your business process requires multiple work stream conditions, you can create it.

Select Save to save Entity Record Distribution Flow.
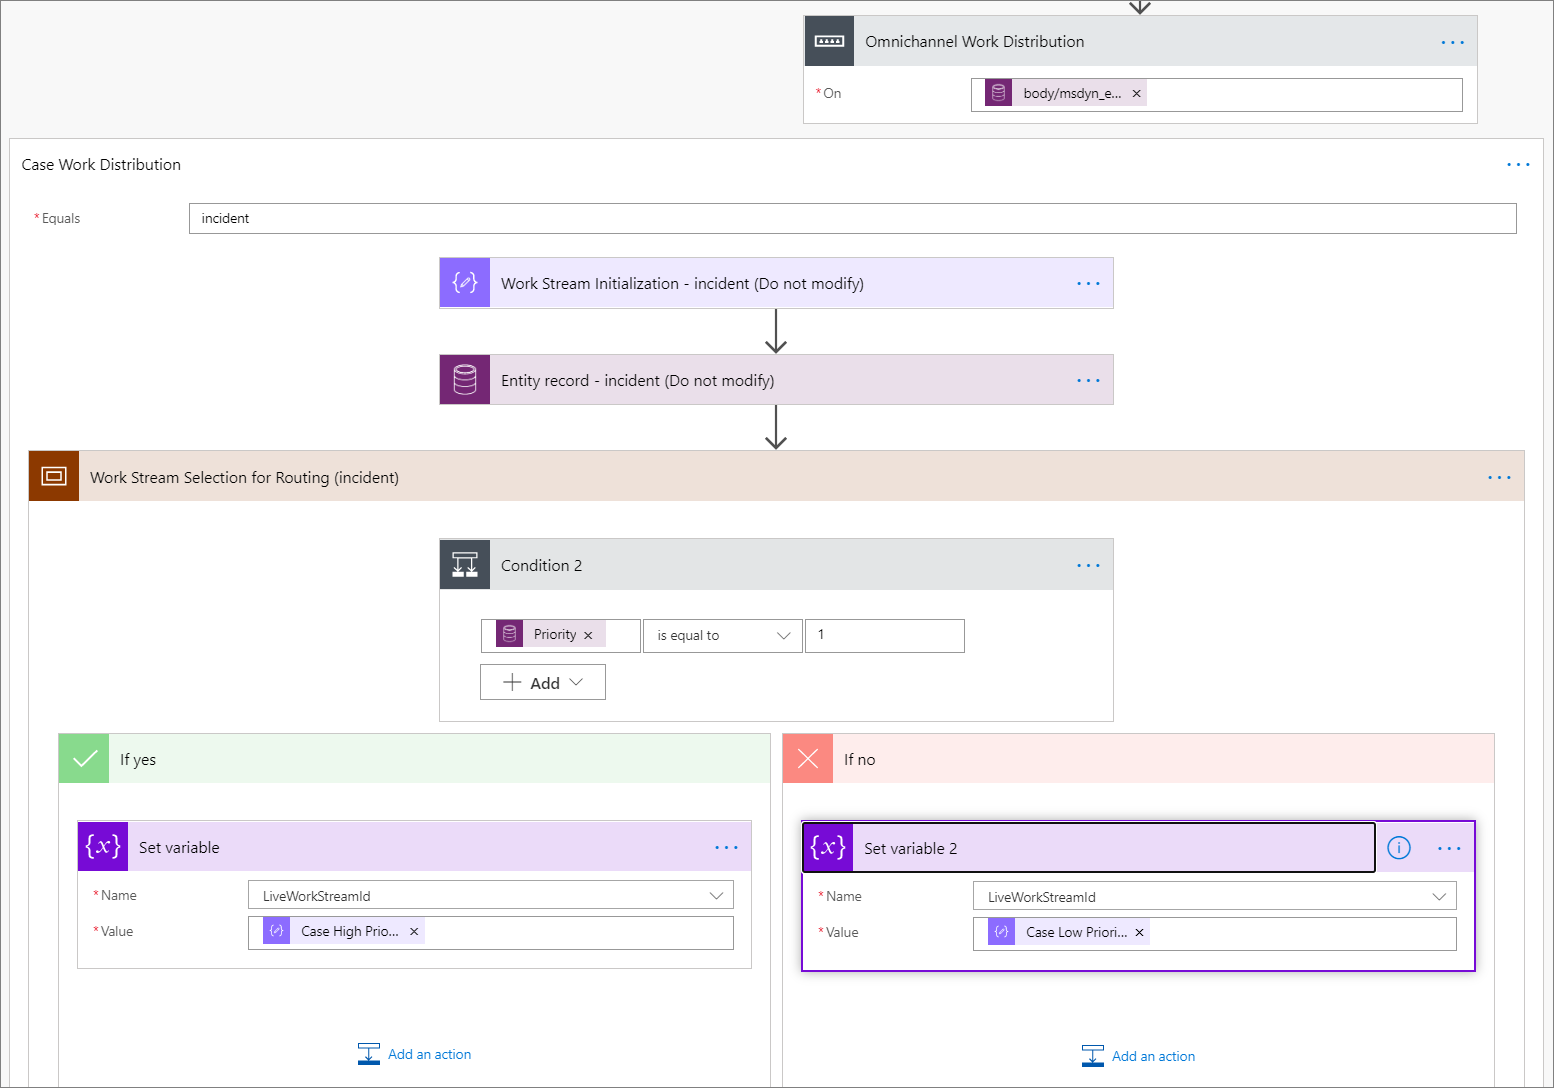
Now, you've defined Entity Record Distribution Flow such that any case whose priority is 1 (high) is distributed using high priority work stream, and other cases will be distributed using low priority work stream. Similarly, you can extend the conditions such that the Flow supports your business scenario requirements.
Important
Whenever you want to update the entity record work stream ensure that Entity Records Distribution Flow is closed. Assume, you've made certain updates to the Flow. Now, while the Flow is still in the open in the browser, you go to Omnichannel Administration app and update the work stream. In this case, after you save the work stream, the Flow will be reset to its earlier state and you will loose the changes you did to the Flow.
See also
Entity records routing
Understand and create workstreams
Create workstreams for entity record routing