Build and Publish a ClickOnce App using Team Build/VSO.
<Update: We have added another blog Building ClickOnce apps using build vNext>
I needed to use TFS version control use it to build and publish a ClickOnce application. To achieve this I ended up editing the XAML build definition to do the same and sign it.
I couldn’t find a lot of articles on this, so decided to blog the entire experience, as it can benefit others. I have done this with minimal changes to the build definition and also have explained things in detailed here, so that this can be further customized depending on needs.
Disclaimer!: This is one way of doing this and may not even be the smartest too ![]() Suggestions and betterments are welcome in the comments.
Suggestions and betterments are welcome in the comments.
Pre-requisites – before you begin, have these ready..
Set the publish path in the properties of the project.
This would correspond to the destination (either the website or the UNC) – can be different from the drop location (usually is so).
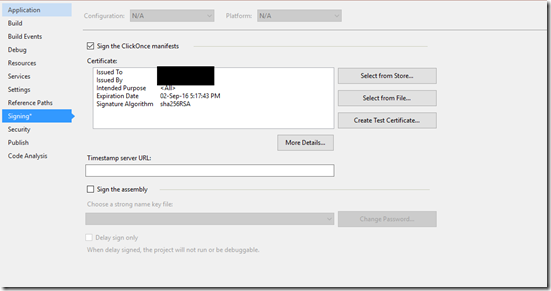
Set the signing details
· If you have the certificate go ahead and use it, by importing the pfx file
· If you want to create a temporary certificate, go ahead and do it
If you select one of the two – there are no additional steps needed. MsBuild would take of signing and you will have the signed application and manifest on the build drop location/destination location.
If you want to use a certificate from store (and the store is on the build server, under the build service account) – there are a few additional steps you would have to take. This is addressed in the last section of the blog. This would give you additional security – as it doesn’t expose your certificate and also doesn’t need a user name password sent in plain text. If you decide to go with this one you needn’t select any singing setting here, but would have to write a two line post build script. This is only if the certificate is put directly on the store, you don’t have a copy and is under the build service account credentials.
Don’t forget to check the project files into your source control store. With this you are ready to use TeamBuild to automate deploy and signing.
On to VSO/TFS
I have used the TFVCTemplate.12.xaml as my base (picked this instead of the default as this uses MSBuild, but DefaultTemplate uses CSC.exe to build C# code). Any template that uses MSBuild (irrespective GIT or TFVC) can be modified the following way to support the deployment.
We would be using the MSBuild argument “/target:publish” to make MSBuild create the ClickOnce publish folder.
I have created a copy of the template called ClickOnceBuild (which is what I have shared with you as an attachment) and done the following edits.
Edit 0
This edit is to make the build process get a few environment data. We would be using these down the lane.
· Create two environment variables – DropLocation and WorkingDirectory
· Add two events of type GetEnvironmentVariable<String> from the tool box. Add them any place you prefer within the flow.
· Use the first to set the variable DropLocation with data “Microsoft.TeamFoundation.Build.Activities.Extensions.WellKnownEnvironmentVariables.DropLocation”
· Use the second variable to set the variable WorkingDirectory with data “Microsoft.TeamFoundation.Build.Activities.Extensions.WellKnownEnvironmentVariables.BuildDirectory”
· Create new argument of type DestinationLocation and set to In with type String. This would be used to hold the location (file location) where your end data is going to go.
Edit 1 (May be long, but is an one time edit)
The reason we are editing the XAML build definition is the way ClickOnce publishing is done by MsBuild. MSBuild publish doesn’t do the copy of files to the destination – like copying to UNC or the IIS website. Rather it creates a folder within bin and puts the files there (against the Visual Studio publish that actually copies the files too).
For example
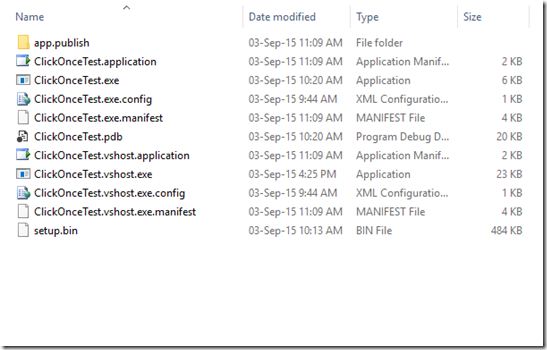
My solution is in this location –“C:\Users\venkatn\Desktop\TeamAdmin\ClickOnceTest\ClickOnceTest”. When I build and publish it using “msbuild /target:publish” a folder is created under it -bin\Debug\app.publish\Application Files\ClickOnceTest_1_0_0_1 and the ClickOnce output goes there.
Bin folder
App.Publish folder
The desired output is actually in the App.Publish folder and not under bin.
When we use TeamBuild to run the build, the solution is copied to the local workspace of the build service account. MsBuild is run on the solution from here. So the publish folder is created under the same local workspace folder. By default VSO/TFS copies the bin folder to the output drop location. This is not the desired output in our case, and we need the app.publish folder. The first edit is to address this. Our end goal should be to find a way to take the published files from the publish folder. To get this done, we need to find where TFS build is going to put the source code, locally to run the build. How to find it may be a bit tricky.
One quick way to find is using TFS sidekicks. Connect to your build server and check the workspaces used by your build service account.
From this example, I can see my solution would be copied to "C:\builds\51574\ClickOnce\src\Desktop\TeamAdmin\ClickOnceTest\ClickOnceTest”
This file location is governed by your build definition again (if you feel this is too long, feel free to edit here)
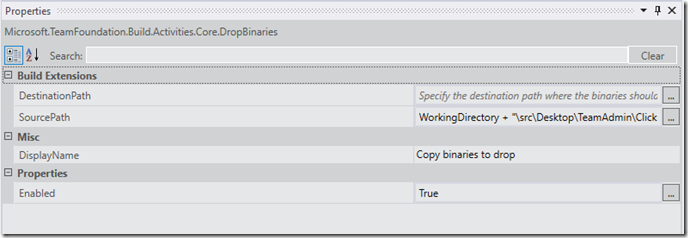
· Search for “Copy binaries to drop” activity within the template
· In the properties over write the existing source location(which would be the bin folder) to something like this – WorkingDirectory + "\src\Desktop\TeamAdmin\ClickOnceTest\ClickOnceTest\bin\Debug\app.publish"
Explanation –
The code is stored here for the build to run (as a part of the get latest) “C:\Builds\51574\ClickOnce\ClickOnceTest\src\Desktop\TeamAdmin\ClickOnceTest\ClickOnceTest” and when we ClickOnce output goes under the bin directory as we discussed before.
So the publish folder location in my build server the location “C:\Builds\51574\ClickOnce\ClickOnceTest\src\Desktop\TeamAdmin\ClickOnceTest\ClickOnceTest\bin\Debug\app.publish”
This is a temporary folder and may not be there once the build completes.
The variable WorkingDirectory would translate to “C:\Builds\51574\ClickOnce\ClickOnceTest”. Using this variable would ensure we can run this on any agent. Only the first half is agent specific. The rest of the path is going to stay the same.
Hence we used the expression as before.
Note - This is the tweak that you will have to do – with your work directory settings. WorkingDirectory variable will give you the current agent build working directory location. Within this is where you will find the bin folder and the app.publish folder.
You will have to find this once and hard code this into the template. As of now there is no other work around (will do some more digging on this).
This edit would ensure the build drop location gets the ClickOnce publish folder instead of the bin output.
Edit 2
· Optional
Add an event DeleteDirectory, to clean up the folder where we want the ClickOnce output should go – the IIS website folder or the UNC folder
Add an event CreateDirectory, to create the directory again. We can use the destination location variable we created before.
· Copy the files from the drop location to the desired location
Now we can create a new build definition with this XAML and then make the following
Enter the value for the DestinationLocation and the MSBuildArguments.
This should get you going and your build definition is ready for use.
Additional steps for singing (using a certificate in window certificate store, under build service account)
· Connect to the certificate manager and make a copy of the HashValue. This is how we will reference the certificate when we sign. Make now of the one below, without spaces like this 918198cc93ccdea62e81e928d5da9bb5b1fd7e3c.
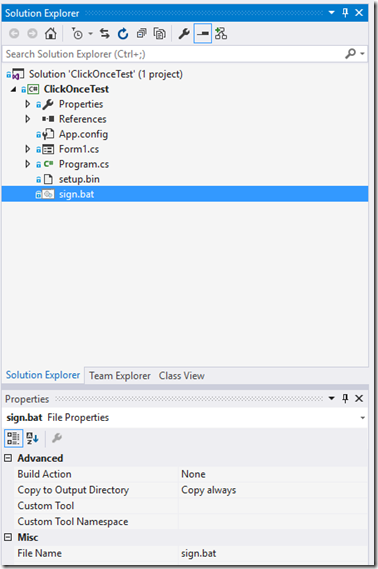
· Create a new batch file and add the following commands to sing the manifest using the mage utility, located here "C:\Program Files (x86)\Microsoft SDKs\Windows\v10.0A\bin\NETFX 4.6 Tools\mage.exe". We will be using the following arguments.
MageExe – "C:\Program Files (x86)\Microsoft SDKs\Windows\v10.0A\bin\NETFX 4.6 Tools\mage.exe"
This is the location of the Mage executable on the build machine.
You can copy the executable along with your code, if you don’t see this on your build box.
Manifest – the location of the manifest relative to the working directory of build
This is the location where MsBuild would put the Manifest file. This is the location under working directory we discussed in edit 1.
<path we used as the source location (under Edit 1)\ Application Files\<version_folder>\manifest>
For example ".\Desktop\TeamAdmin\ClickOnceTest\ClickOnceTest\bin\Debug\app.publish\Application Files\ClickOnceTest_1_0_0_1\ClickOnceTest.exe.manifest"
(I am ignoring the src folder, as the path is relative to where your batch file is going to be existing on the build server working directory. Since I have added the batch file (sign.bat) along with rest of the code, it would be already under the src folder already. And the arguments should give the path of the Manifest and Application relative to the location of our batch file).
Application – the location of the application file relative to the working directory of build.
This is the location where MsBuild would put the Application file. This is the location under working directory we discussed in edit 1.
<path we used as the source location (under Edit 1)\application>
For example
“.\Desktop\TeamAdmin\ClickOnceTest\ClickOnceTest\bin\Debug\app.publish\ClickOnceTest.application”
Hash - <hash value copied>
· Command 1
<MageExe> update <manifest> -CertHash <hash> -Version <version of the app>
"C:\Program Files (x86)\Microsoft SDKs\Windows\v10.0A\bin\NETFX 4.6 Tools\mage.exe" -update ".\Desktop\TeamAdmin\ClickOnceTest\ClickOnceTest\bin\Debug\app.publish\Application Files\ClickOnceTest_1_0_0_1\ClickOnceTest.exe.manifest" -CertHash 918198cc93ccdea62e81e928d5da9bb5b1fd7e3c -Version 2.0.0.0
· Command 2
<MageExe> update <Application> -AppManifest <Application> -CertHash <hash> -Version <version>
"C:\Program Files (x86)\Microsoft SDKs\Windows\v10.0A\bin\NETFX 4.6 Tools\mage.exe" -update ".\Desktop\TeamAdmin\ClickOnceTest\ClickOnceTest\bin\Debug\app.publish\ClickOnceTest.application" -AppManifest ".\Desktop\TeamAdmin\ClickOnceTest\ClickOnceTest\bin\Debug\app.publish\Application Files\ClickOnceTest_1_0_0_1\ClickOnceTest.exe.manifest" -CertHash 918198cc93ccdea62e81e928d5da9bb5b1fd7e3c -Version 2.0.0.0
You can also set the working directory to a more suitable one, to shorten the command.
You will have to update this command, to reflect change in version or change in the certificate used.
· Check it into source control and also set copy to build to true
· Add this file as a post build script, so that the batch file is used to sign the ClickOnce manifest, before it is copied.
· You should be able to queue a new build that would sign it using this certificated, before copying.
Hope this helps!
Content created by – Venkata Narasimhan
Content Reviewed by – Romit Gulati
Comments
Anonymous
September 23, 2015
do you have the same description for publishing ClickOnce application using TFS Build vNext ?Anonymous
October 09, 2015
It would be really helpful to have a description for TFS 2015 Build vNextAnonymous
October 15, 2015
Daniel/Colin, Apologies for the delay, We have added another blog Building ClickOnce apps using build vNext here, blogs.msdn.com/.../building-clickonce-apps-using-build-vnext.aspxAnonymous
January 14, 2016
Been working with this Click Once deployment for months. Such a pain. This helped solve the problem for us. Many thanks!!Anonymous
February 08, 2016
Do you have any suggestions to add support for using config transforms?Anonymous
April 23, 2017
This is great! The only thing I think is important to ADD is what VERSION of TFS this works with. I read a LOT of TFS articles on the www that go on for pages without mentioning "oh, by the way, this is for TFS 2012" or whatever. TFS has seen a LOT of change over the past 7 years... what version your article works for is important to note right at the top of the article. It's not safe to assume the article timestamp indicates the version. That's a great hint, but you really should indicate hte version explicitly in the article.


